Wsappx is a runtime environment in the Windows OS that manages the setup, upgrades, and uninstallation of Universal Windows Platform (UWP) programs from the Microsoft Store.
While this procedure is typically smooth and error-free, several users may encounter excessive CPU usage for Wsappx.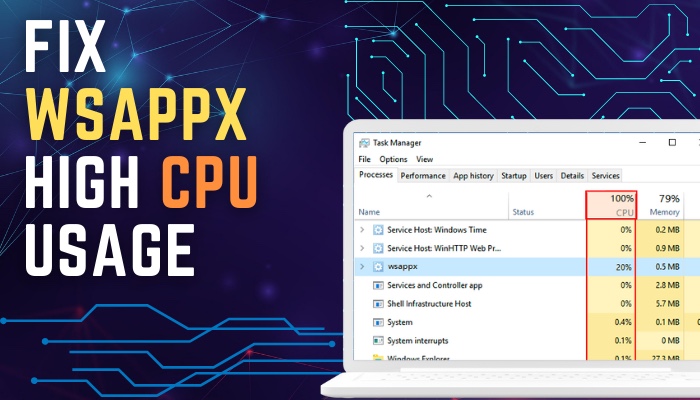
Here, I’ll explain some causes of this problem and a few solutions for wsappx’s high CPU utilization.
Let’s get started.
What are the Reasons for Wsappx’s High CPU Utilization?
The simultaneous installation or updating of numerous applications, the Windows store cache, and antivirus software are the primary causes of Wsappx using a lot of CPU. App-related processes and outdated system files also contributed to wsappx’s high CPU utilization.
There are other causes for wsappx’s high CPU usage. You can discover more by reading the section below.
Here are some of the causes of wsappx’s excessive CPU utilization:
When wsappx executes app-related tasks, this is one of the primary causes of its high CPU utilization.
This process involves checking for upgrades, locating and installing application packages, and confirming app permissions. These procedures can be resource-intensive and increase CPU utilization.
Windows Store Cache
To enhance the speed of the Microsoft Store, a group of temporary files known as the Windows Store cache is kept on your computer.
These files may enlarge or turn defective over time which may interfere with wsappx and result in high CPU and disk utilization.
Antivirus Software
Antivirus programs can occasionally meddle with the Wsappx function, leading it to utilize more Computational power than it should.
This extra CPU use happens because some security software may identify app-related activities as possibly harmful, causing the virus protection to perform additional searches or inspections.
App Installations or Updates
Another factor for excessive CPU and disk utilization produced by Wsappx occurs when downloading or upgrading UWP applications.
When this occurs, the procedure can take a massive portion of Computational power, slowing down your overall PC performance.
Outdated or Corrupted System Files
Last but not least, out-of-date or corrupted system files may occasionally be to blame for the high CPU and disk utilization brought on by Wsappx.
This process may occur if you recently updated your operating system or new software, which could have unintentionally damaged your system files.
Can viruses cause high CPU usage in your computer? We explore the answer on a separate article and give you the necessary actions to take when you detect a virus.
How to Fix Wsappx High CPU Usage
Users can resolve wsappx high CPU utilization by disabling Windows Store, increasing virtual memory capacity, and checking for disk internal errors. Altering the value of AppXSVC in the registry and running a virus check can help to fix the wsappx high CPU utilization error.
To address high CPU usage, additional fixes users can attempt. Simply use the techniques listed below to find out.
The following are some solutions for wsappx excessive CPU usage:
1. Extend Virtual Memory
Extending the virtual memory is one of the effective fixes for the wsappx issue of excessive CPU utilization. Increasing virtual memory allows the wsappx to temporarily keep updated and installed files, giving the CPU more headroom.
The procedure is basic and straightforward. Simply follow the steps outlined below.
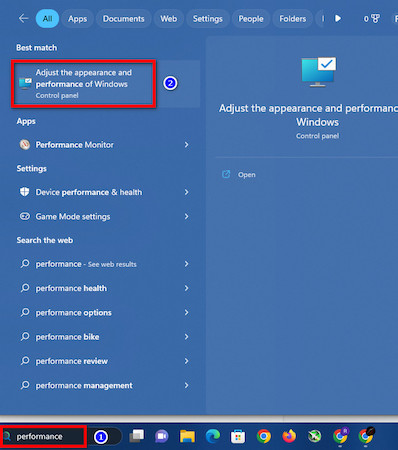
Here’s how to increase virtual memory:
- Type Performance in the Start Menu and hit Enter.
- Select Adjust Appearance vs. Performance on Windows.
- Navigate to the Advanced tab and click Change.

- Deselect Automatically manage paging file size for all drives.
- Choose the Operating System drive and click Custom size.
- Click Ok after entering your preferred number.
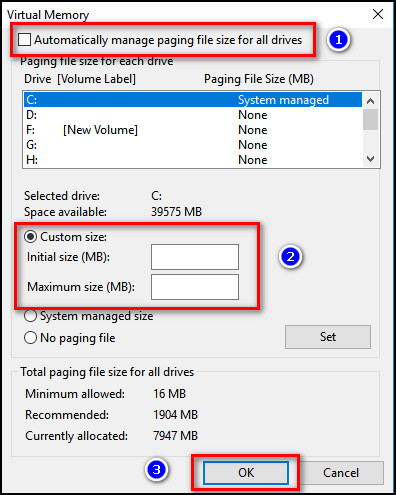
Assign the initial variable to the amount of your RAM in Megabytes and the Highest Size to twice the Initial Size. After that, restart your pc. You can see if this assists with the CPU Usage problem.
If svchost is constantly using the CPU resources on your computer, go and check our dedicated troubleshooting article for this. We have listed all the ways you can reduce this high usage.
2. Modify the Value of AppXSVC in the Registry
According to my testing, changing the setting of AppxSvs in the Directory may also assist in resolving the wsappx excessive CPU utilization error.
Simply follow the instructions below to find out how to complete the procedure.
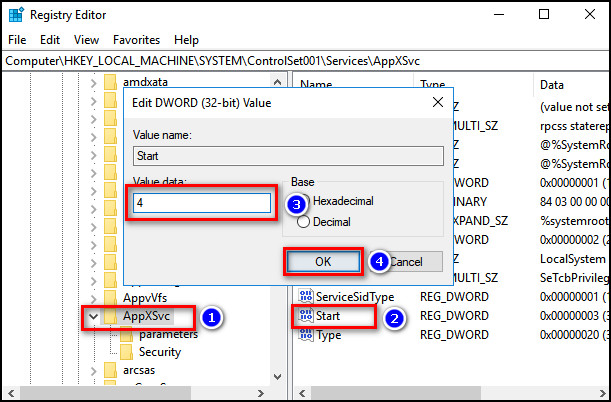
The procedure to change the value of AppXSVC in the register is as follows:
- Type Registry Editor in the Search menu and hit Enter.
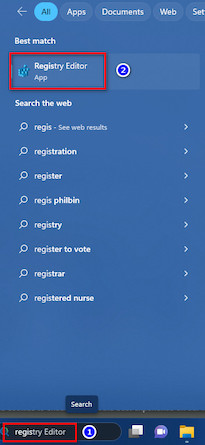
- Follow the path: HKEY_LOCAL_MACHINE\SYSTEM\ControlSet001\Services\AppXSvc.
- Find the key and set the Start number to 4 in the right panel.
- Hit Ok to save the modifications and exit Registry.
3. Turn off Windows Store
One of the primary culprits of the wsappx excessive CPU problem is Windows Store. You can also deactivate Windows Store by using the Registry Editor.
It is very straightforward to remove the Windows Store from your operating system. Simply follow the steps below to find out.
Here’s how to disable Windows Store:
- Type regedit in Search and hit Ok to open it.
- Go to: HKEY_LOCAL_MACHINE\SOFTWARE\Policies\Microsoft\Windows Store.
- Make a new DWORD number within the Widows Store values.
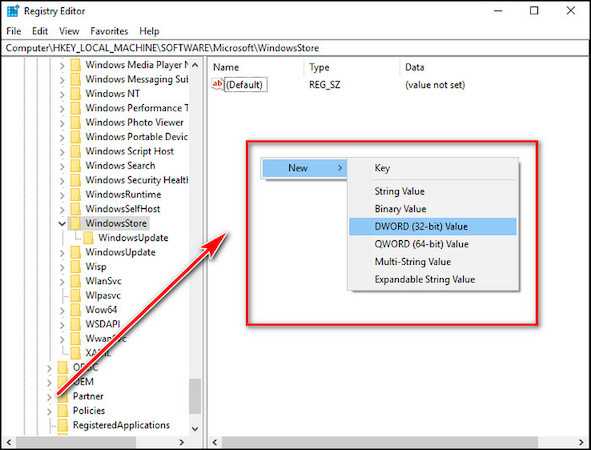
- Set the number to 1 and name it RemoveWindowsStore.
Your Windows store will stop after following this procedure. Check to see if your Processor usage has decreased. If not, proceed to the following approach.
Getting high CPU usage in every application? Check our guide to troubleshoot and fix this issue.
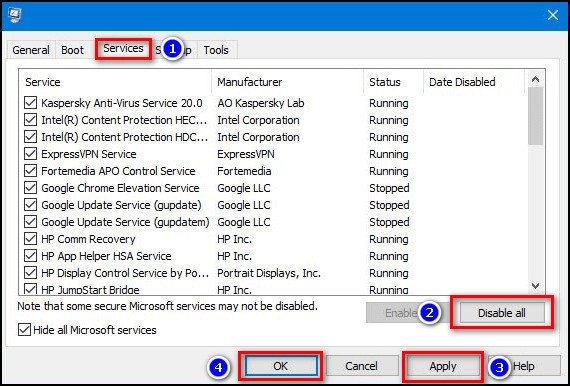
4. Perform a Clean Boot
Another option for resolving the wsappx high CPU utilization problem is to conduct a Clean Boot. It will restrict Windows to only necessary components for preferences and startup applications.
The clean boot procedure is very straightforward. Simply follow the steps outlined below.
The following is the process for performing a clean boot procedure:
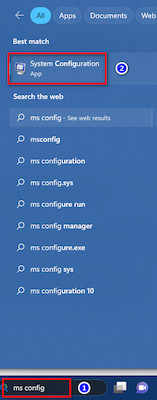
- Enter MS Config in the Search box to launch the System Configuration Tool.
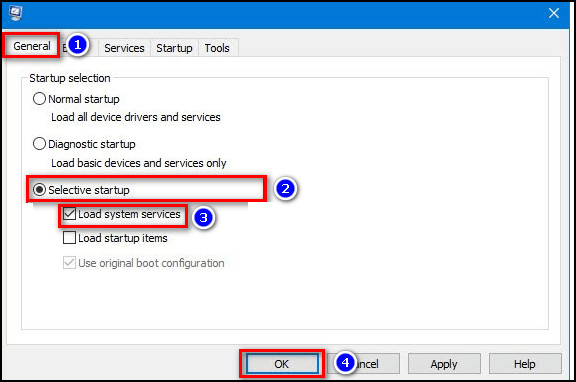
- Navigate to the General option and choose Selective Startup.
- Check the box Load system services under the original boot configuration and Click OK to continue.
- Navigate to the Services tab and choose to Hide All Microsoft Services.
- Click Disable all.
- Hit the Apply button and select Ok.
5. Scan Your PC for Viruses
Spyware or viruses can sometimes cause excessive CPU utilization. A complete system scan can assist in identifying and removing any computer viruses that are generating high CPU utilization.
Scanning your computer with antivirus software is a simple job. Simply follow the instructions outlined below.
Here’s how to perform a virus check on your computer:
- Launch your antivirus program.
- Run a complete system scan.
- Follow the on-screen instructions to delete any detected malware or viruses.
Resetting the Microsoft Store cache is another way to resolve Wsappx’s excessive CPU utilization. This process can aid in any problems with the Microsoft Store and may decrease CPU utilization.
Cleaning the MS store cache is a straightforward process. Simply follow the steps below to find out.
The following is the process for clearing the Microsoft store cookies:
- Launch the Run dialog box by pressing Windows key + R.
- Enter wsreset.exe in the Run dialog window and press Ok.

Wait for the instruction to finish before restarting your computer. Your Computer will have its MS Store cache cleared after restarting your computer.
Windows modules worker process can give you spikes of high CPU usage. Solving this problem is quite easy. Just follow our troubleshooting article and you will be good to go.
What is Wsappx?
Wsappx is an application that runs in system on your operating system 11/10/8 pc as an element of Microsoft’s Windows Store and Unified app platform On Windows 11/10. Wsappx includes two distinct background facilities: AppX Deployment Service and Client License Service.
Wsappx collaborates with Windows programs such as the AppX Deployment Service (AppXSVC) and the Client License Service (ClipSVC).
When you install a program from the Windows Store, WSAPPX gets the app and saves it to a folder on your desktop. It also examines application updates frequently.
When an upgrade is ready, WSAPPX obtains and runs the new package on your PC. During the setup process, WSAPPX collaborates with the AppXSVC to distribute the application to the correct area on your device.
Conclusion
Wsappx’s excessive CPU utilization can be a frustration for Windows users. While there are numerous possible causes, knowing the root causes can help you find and deal with the problem.
By adhering to the instructions described above, you can enhance the efficiency of your computer and ensure that the Wsappx process works smoothly and without error.