It’s definitely off-putting seeing all the intricate settings in BIOS like LLC, AVX Offset, Speed Step, etc while trying out CPU overclocking for the first time or even with minimal experience.
But does that mean you can’t savor the sweet taste of OC? Definitely not!
Overclocking without getting bogged down in the BIOS is real. And I’m about to guide you through the journey step by step.
Let’s begin, shall we?
Can You Overclock CPU Without BIOS?
Yes, absolutely. You can overclock your CPU without getting into the nitty-gritty of BIOS. It is possible on both Intel and AMD systems, thanks to their proprietary software— Intel Extreme Tuning Utility (XTU) and Ryzen Master. Though, you must ensure proper cooling of the processor to avoid damage.
You see, BIOS is the first word that comes to mind when anyone speaks of overclocking. And it intimidates a great deal of users.
Besides, tweaking different settings without sound knowledge might end up damaging the CPU altogether. For example, incorrect core voltage (Vcore) or VID can fry up the processor.
So, CPU tuning straight from the OS is an endearing and safe approach for a novice.
With that being said, overclocking from the BIOS is always stable and reliable. Because bugs and glitches can plague the preset you choose and discard the performance benefit.
What Is CPU Overclocking?
The art of enforcing electronic components to perform at their maximum potential, despite the manufacturer’s intention, is known as overclocking.
You know, core Architecture and the number of cycles per second dictate the performance of a CPU. Which is also known as Frequency or Clock Speed. So, increasing the cycles per second allows the CPU to do more work. This is where the term Overclocking was born.
A bit too technical? Ok, let’s understand this with an analogy.
Imagine, you have a horse, that can pull 2 buggies at a time. Now, with additional feeding, it is able to drag 4 buggies easily. Ergo double the work with the additional cost of food.
With reference to this scenario, the 2 extra buggies are the increased frequency measured in Hz and the food is the additional-required voltage when it comes to CPU OC. Makes a lot of sense, right? Bet it does.
In the upcoming section, I’ll walk you through the process of intuitive CPU overclocking.
How to Overclock CPU Without BIOS
Traditional way of hardcore overclocking will always involve BIOS. But most of you, reading this article, will be more than comfortable with overclocking from your desktop.
Prerequisites
Before you jump ahead, there are multiple requirements you need to fulfill to push your processor to the limit. Inspect and make sure your CPU meet them.
Here are the prerequisites for CPU overclocking without BIOS:
Processor Compatibility
See, not all CPUs are eligible for overclocking, especially, Intel ones. Only some specific chips have an unlocked multiplier. Hence, they are called Unlocked and denoted with the Letter K, HK.
For example, core i9 13900K is unlocked and OCable, whereas its non-K sibling core i9 13900 can’t break the rated clock speed barrier.
On the other side of the spectrum, all AMD desktop CPUs are unlocked from the get-go and easily overclockable. Though, AMD typically has less OC headroom than Intel. I’ll get back to this later.
Now, to tidy up things a little bit, let me give you a comprehensive look at the CPU category as per overclocking capability.
| CPU Family | Overclocking Capability |
|---|---|
| Intel K Series e.g., 13900K, 12900K, 12980HK | Yes |
| Intel X Series (HEDT) e.g., 10980XE, 10900X | Yes |
| Intel Non-K series e.g., 13900, 13700 | No |
| Intel HK and HX Mobile processor e.g., 13980HX, 12900HK | Yes |
| AMD RyzenTM e.g., 7950X, 7700 | Yes |
| AMD Threadripper (HEDT) e.g., 5995WX | Yes |
| AMD Athlon Series e.g., 3000G, 3150GE | Yes |
| AMD Ryzen Mobile U series e.g. 5500U,5800U, 6800U | No |
To check if your CPU is in line with OC compatibility list, press Ctrl+Shift+ESC to open the Task Manager > Switch to the Performance tab and check your processor model.
Motherboard Chipset Compatibility
You need a motherboard chipset that supports OC, otherwise, a compatible CPU is just a waste. Intel and AMD both offer different tiers of chipsets with diverse sets of features.
Unfortunately, Intel motherboards do not support overclocking across the board like AMD. For example, all AMD chipsets such as A320, A520, B450, B650, X670, B650E, etc. support full OC.
But for team blue, only Z series chipsets such as Z590, Z690, Z370, Z790, etc., have complete OC support.
Interestingly, 12th gen non-K chips are overclockable on some B660 boards with specific BIOS versions. It is, however, not a norm as on the 13th gen CPU, Intel completely locked out any BCLK overclocking. Not to mention, it includes BIOS tuning.
So make sure you have a compatible motherboard to carry out OC.
Sufficient Cooling
You know, hardware compatibility is only half of the story, the rest is the cooling capability of your system. It doesn’t matter how good your motherboard or CPU is unless you can keep the temperature in check.
So, make sure your cooler has enough headroom to handle the extra thermal output of the CPU.
Check the rated TDP of your processor and the cooler. Validate that your cooler has a higher TDP rating than the CPU. Which is also known as heat dissipation power, whether it be an AIO or Air Cooler.
Apart from that, heat sink material, radiator length, pump quality, fan RPM, air pressure, and airflow play a big part.
In contrast to PC, laptop cooling is a bit tricky. When you attempt OC, make sure it has enough cooling capacity, else it will be a portable toaster. Thin and light laptops are a no-go due to their extremely slim build profile.
Tuning & Testing Programs
Once you meet all the hardware requirements, you need some monitoring and testing programs to ensure a stable and perfectly working system.
The first kind of app is for the actual overclocking process, such as XTU (Intel), Ryzen Master, and AMD APU Tuning Utility. For monitoring and stressing, CPU-Z, Cinebench R23, AIDA64, Prime95, FPS Monitor, and MSI Afterburner will suffice.
Settings to Tweak for Overclocking
For starters, three basic settings you need to modify—Base Clock, Multiplier, and Core Voltage. Your goal is to find the sweet spot where the CPU can yield maximum frequency with reasonable voltage and heat output. So that, you can squeeze out the last bit of performance.
Base Clock (BCLK)
Every processor has a mean value to determine the final clock speed. You can consider it as a unit frequency. In the PC industry, it is known as Base Clock, A.K.A BCLK. When you multiply it with some decimal numbers, such as 30 or 40, that is the effective clock speed.
For example, Intel and AMD both have a base clock of 100MHz. So, when you attempt OC, this will play a crucial part. Don’t worry if it sounds complicated now. It’ll all come to sense later on.
Clock Multiplier (Core Ratio)
Already told you about multiplying numbers, remember? These numbers are called Clock Multipliers or Core Ratio. Fast-forward to the conclusive clock speed, you need to multiply the base clock with the multipliers.
Clock Speed = Base Clock x Clock Multipliers.
For example, 5.2GHz = 100Mhz x 52. So, if you increase the core ratio, a clock speed bump is apparent.
There’s one important piece of information you must remember, base clock tampering makes the system unstable. This is why I recommend you stick with the core ratio tweaking.
Voltage
As you go ahead with OC, you’ll be doing extensive modification with CPU voltage. It’s the actual power that the CPU use to retain its maximum performance thresh hold.
If the voltage is lower than the processor’s need, you’ll see a dip in clock speed and overall performance. So, a higher voltage is better, right?
Wrong!
As per basic physics, too much voltage will exert more heat and eventually end up burning the CPU.
Usually, processors come with a dynamic optimal voltage out of the box. You should not go too high above that unless you have superior cooling.
Execution
Now, that I covered all the necessary settings and factors that will directly affect the overclocking, let’s dive into the execution.
As you’re overclocking without getting into the BIOS, there’ll be a slight difference in the tweaking part, especially the tuning application.
Intel Extreme Tuning Utility (XTU)
This piece of software is specific to overclocking only unlocked Intel processors.
Here are the steps to overclock Intel CPUs with XTU:
Step 1: Download & Launch XTU
First and foremost, download Intel Extreme Tuning Utility. Launch it, and you’ll see a window with all the hardware information of your computer.
In my case, I have a 13600KF paired with an ASUS Prime Z690-P DDR4 motherboard. 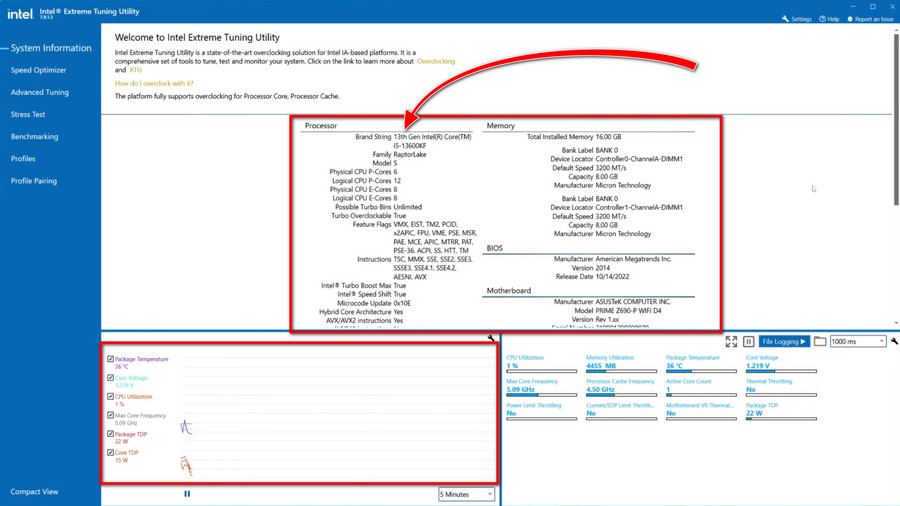
Step 2: Tune Frequency & Voltage
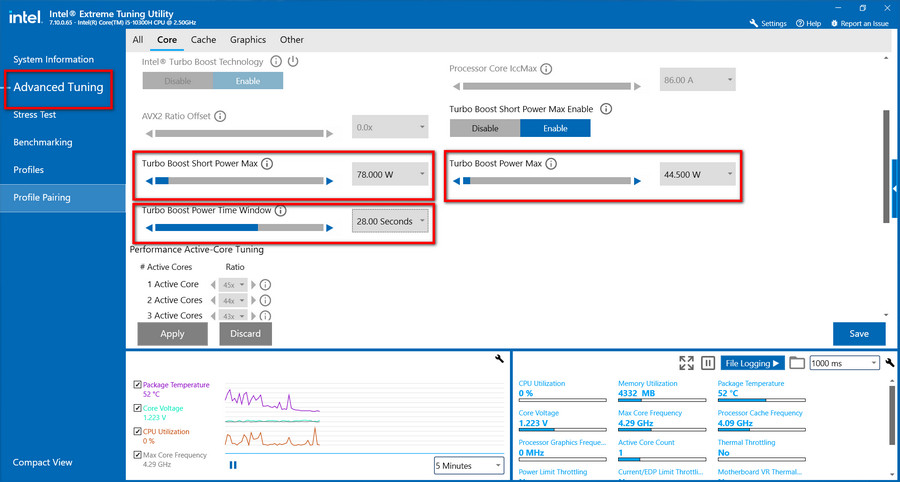
Switch to the Advanced Tuning tab from the left pane. But don’t get carried away, seeing all the different options. Focus only on the Core Voltage and Active-Core Tuning. Make sure Processor Core IccMax is set to Unlimited. By this, you’re, basically, lifting any power limit imposed on the CPU. 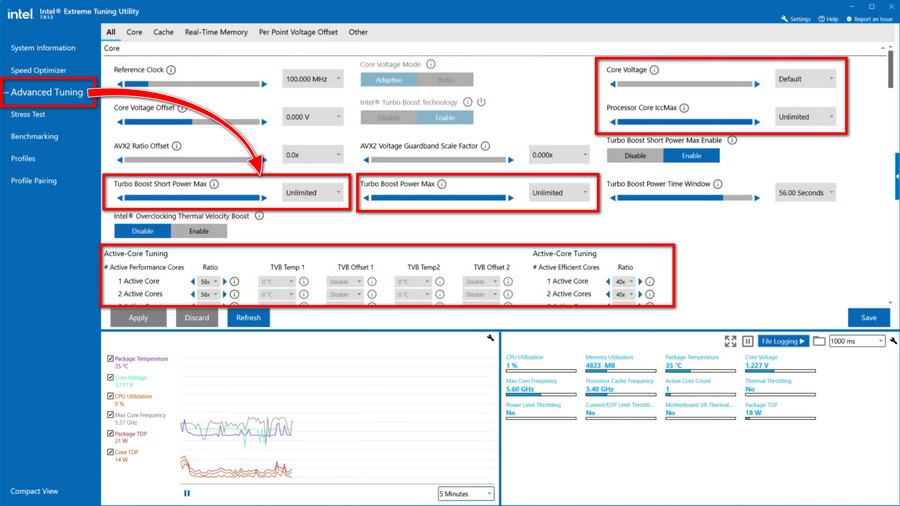
For overclocking, click on the button right next to the Active Core and set your multiplier value. Do the same thing for Core Voltage.
My recommendation is to increase the core ratio by 0.25, 0.5, or 1, and the voltage to 25 or 50 millivolts for each attempt. Sometimes fraction numbers are unsupported by the application; increment the values by 1 in such cases. 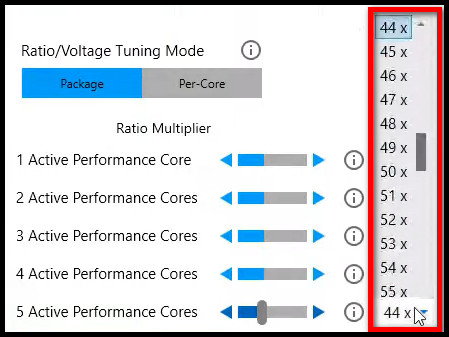
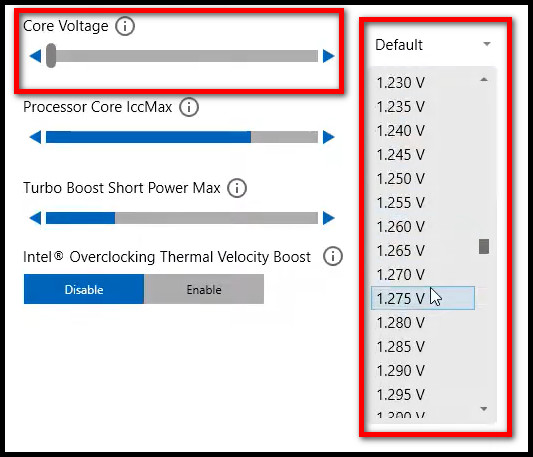
For example, if your default multiplier is set to x49, raise it to x50 and voltage from default to 1.25V. But from where should you start raising the voltage?
To determine the opening voltage, run Cinebench R23 or Prime 95 stress test and monitor the voltage on HWinfo or any other tools you like. Then note it down. And this is your starting point.
Remember, you must run a stress test after every increment or decrement of the values. Run the tests for at least 10mins to ensure stability. If you see any crash or error, go back to XTU and decrease the multiplier.
With the new multiplier value, if your CPU passes the test, turn up the voltage and clock speed a bit more.
One important thing, you have to monitor temperature constantly. I’d say anything under 85 degrees is feasible.
Usually, high voltage is behind strong thermal output. So checking the temp is a great sign for you to know when to stop.
Finally, save the settings as a preset. Apply it whenever you need to push your CPU to the limit.
Now, for my CPU, I started off with 5.2 GHz and 3.8 GHz on P and E core frequencies at stock voltage. Ran a 10mins Cinebench R23 loop and it passed the test. Then I increased the voltage by 50 millivolts for a 100mhz increase in the clock speed.
I went ahead, repeated the process several times, and found out x55 and x40 for P and E cores on multiplier and 1.33V on Vcore deliver the best performance with reasonable temperature. It also passed the extreme Prime 95 stability test.
Here’s the summary of my 13600KF tests and overclocking progress:
| Frequency (Core i5 13600KF) | Voltage | Temperature (Celcius) | Cinebench R23 (30min) | Prime95 (30min) |
|---|---|---|---|---|
| 5.1Ghz P, 3.7Ghz E | 1.25 | 78 | Passed | Passed |
| 5.2Ghz P, 3.8Ghz E | 1.25 | 80 | Passed | Failed |
| 5.2Ghz P, 3.8Ghz E | 1.275 | 80 | Passed | Passed |
| 5.3Ghz P, 3.8Ghz E | 1.28 | 83 | Passed | Passed |
| 5.4Ghz P, 3.9Ghz E | 1.30 | 85 | Passed | Passed |
| 5.5Ghz P, 4.0Ghz E | 1.30 | 85 | Failed | Failed |
| 5.5Ghz P, 4.0Ghz E | 1.33 | 86 | Passed | Passed |
Note: Your OC mileage will definitely vary due to silicon lottery. All tests I ran on an open-air test bench with a 280mm AIO.
Ryzen Master
This amazing overclocking utility is one of AMD’s brilliance. It makes OC highly intuitive and easy to execute for anyone.
Here are the steps to Overclock AMD processors with Ryzen Master:
Step 1: Download Ryzen Master
To begin with, download and install Ryzen Master on your computer. Though, installation may fail due to .Net framework 3.5. Just install it and then everything should work like a charm.
Step 2: Tweak Voltage & Frequency
Launch Ryzen Master and go to the Creator Mode from the left pane. On, the top you’ll see some options such as Default, Precision Boost Overdrive (PBO), Auto Overclocking, and Manual. 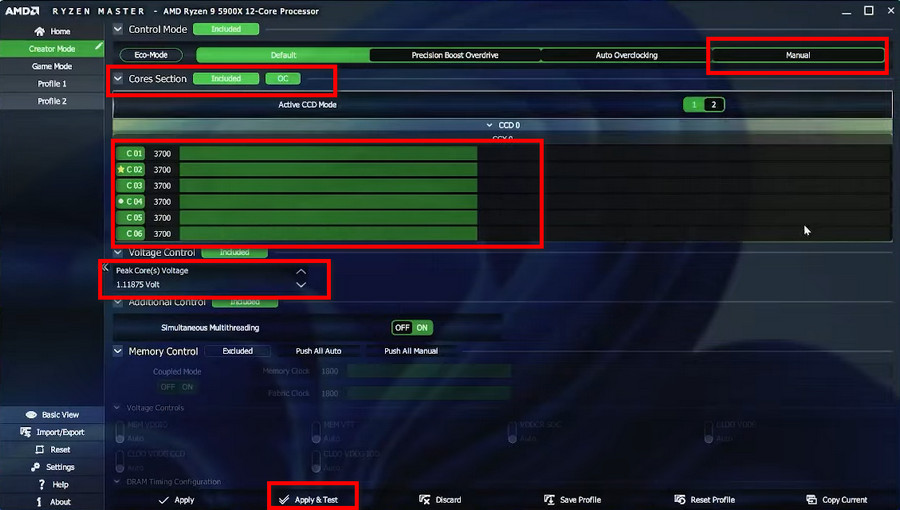
Except for Default, other modes apply overclock on the CPU. PBO and Auto mode do all the tuning automatically based on your silicon quality and cooling headroom. To keep things simple, you can choose between PBO or Auto OC.
See, the manual OC process is exactly the same as doing it on Intel processors. The only difference is the utility and UI.
Now, look at the Cores Section and expand it. You’ll see the list of CCDs and cores within them.
Just so you know, the Star mark on a core means it is the best core on that CCD. A Dot mark is an indicator of the second-best core. So, these cores will boost higher than the other cores with proper voltage. 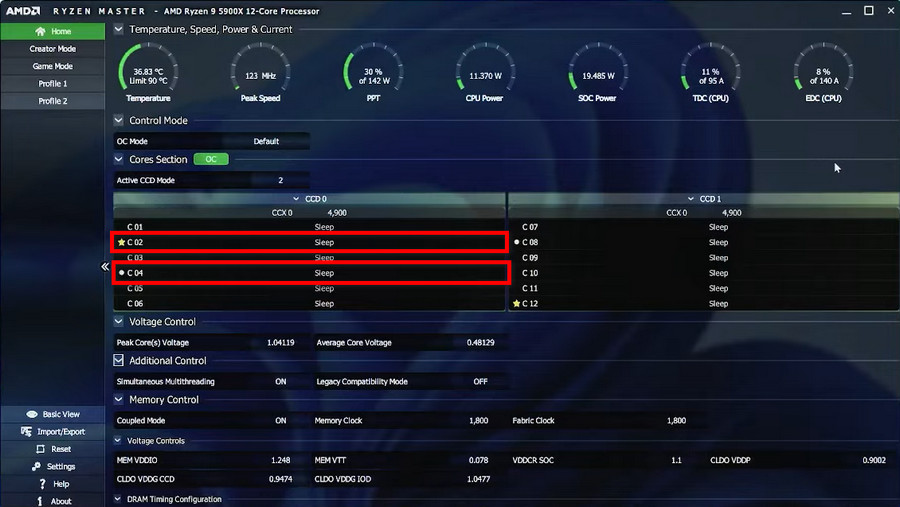
As for the manual overclocking process, double-click on the cores and input a value such as 4000 to set your target clock speed for that core. You can even set a common frequency value for all cores. 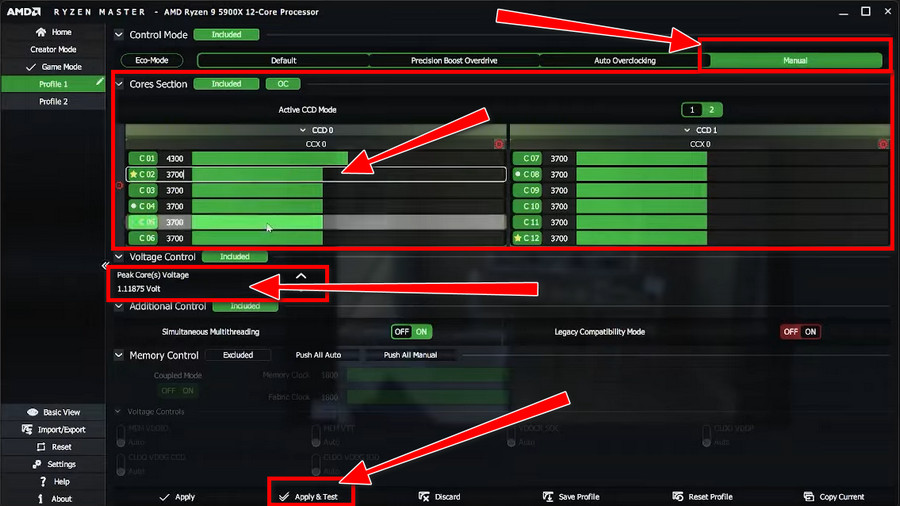
Just below the core section, you’ll find Peak Core(s) Voltage. Tweak it as per your stress test results. Find the sweet spot for your processor that wield the balance between core clock, voltage, and temperature. Save the preset.
Remember, you must test the stability of the OC after each time you change any value. Because this is the only way to validate whether the overclock is effective and ready to roll. Also, check out our extended CPU temperature guide to ensure the CPU’s longevity.
To confidently go with your preset, I recommend running the Prime 95 torture test for 2 or 3 hours.
Overclocking Locked CPU
One of the most common queries while overclocking is about the locked processors. Yes, I’m talking about Intel non-K desktop and low-powered laptop CPUs.
Sadly enough, you have no freedom over frequency and core voltage, as I’ve shown you above. You can, however, gouge more performance out of them, raising the power limit and maximum boost duration.
Here’s how to maximize the performance on locked CPU:
- Launch XTU.
- Switch to Advance Tuning tab from the left pane.
- Enable Turbo Boost Short Power Max.
- Choose Unlimited for Turbo Boost Short Power Max.
- Max out the value of Turbo Boost Power Max and Turbo Boost Power Time Window.
Don’t panic seeing all the values cranked up, you are just letting your CPU use the maximum power within the safe limit for maximum duration. This ensures the processor is delivering all it has and boost to the absolute max clocks.
But there’s one caveat— heat.
If your machine, especially Laptop has insufficient cooling, the CPU will thermal throttle as it hits the maximum temperature limit. Eventually, you end up with no benefit.
In such cases, find the balance between cooling availability and power. Run some tests and repeat the process until you are there.
AMD APU Tuning Utility (AATU)
As I’ve shown, maximizing the power limit on locked Intel CPUs boosts performance, the same can be done on AMD laptop APUs with this software.
Because of their design and form factor, AMD locked any clock and voltage modification.
Here’s how you can tune AMD APUs to inherit more performance:
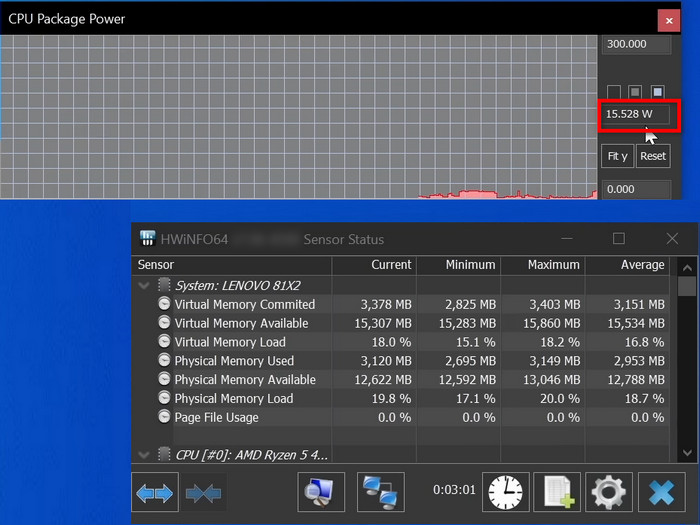
- Run a stress test with any app such as AIDA 64, Prime 95 etc., and note down the CPU package power reading. It should be 15W on a U model.
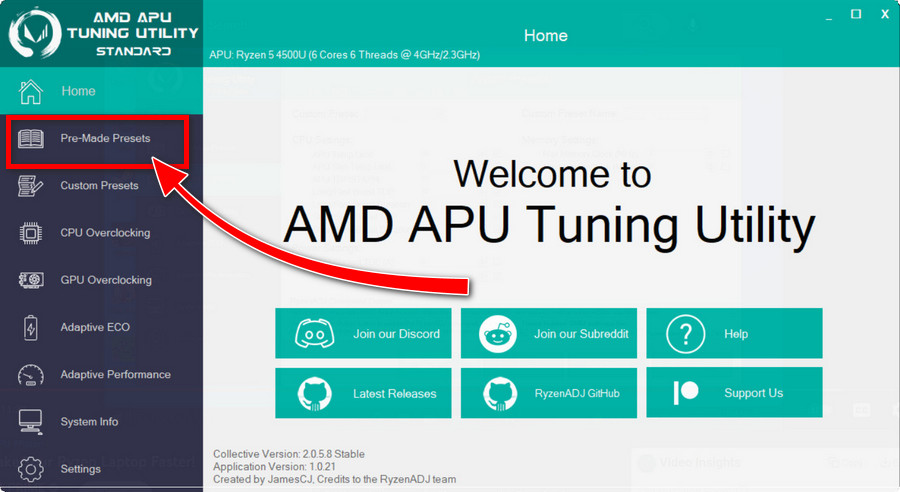
- Download and install AMD APU Tuning Utility version 2 or later.
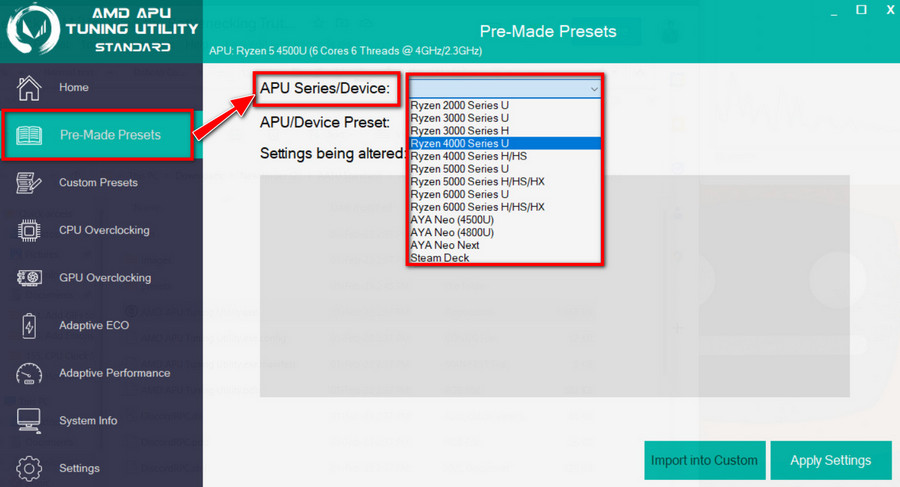
- Select Pre-Mode Preset tab.
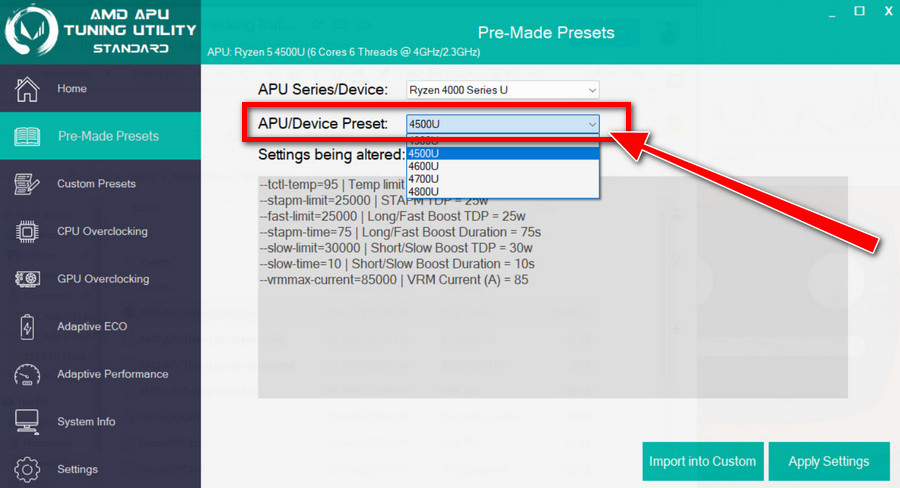
- Choose APU Series/Device and APU Device Preset from the drop-down. I tested with Ryzen 5 4500U, so I picked Ryzen 4000 series. By default, the app will crank the maximum TDP from 15W to 25W.
- Switch to Custom Presets from the left bar.
- Tweak the following options:
| Settings Name | Value |
|---|---|
| APU Temp Limit | 95 |
| APU TDP/STAMP | 30 |
| Long/Fast Boost TDP | 30 |
| Long/Fast Boost Duration | 3600 |
| Short/Slow Boost TDP | 30 |
| Short/Slow Boost Duration | 10 |
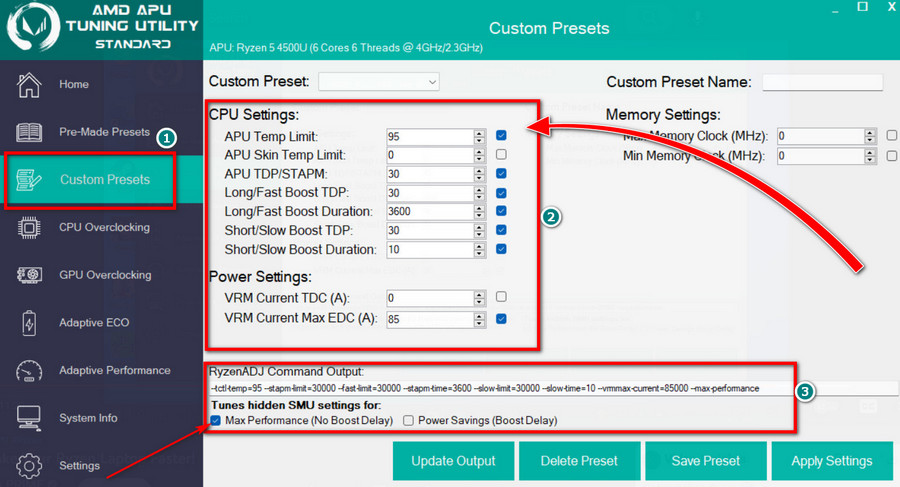
- Make sure you check the boxes of each menu along with Max Performance (No Boost Delay).
- Give a name to your preset.
- Save and Apply the settings.
Run the stress test again and check processor package power consumption. You’ll see it’s hovering somewhere around 30W.
Voilà! It’s a success.
Play games or other applications to see the difference. I’ve provided my results across different programs down below. And let me tell you I’m impressed.
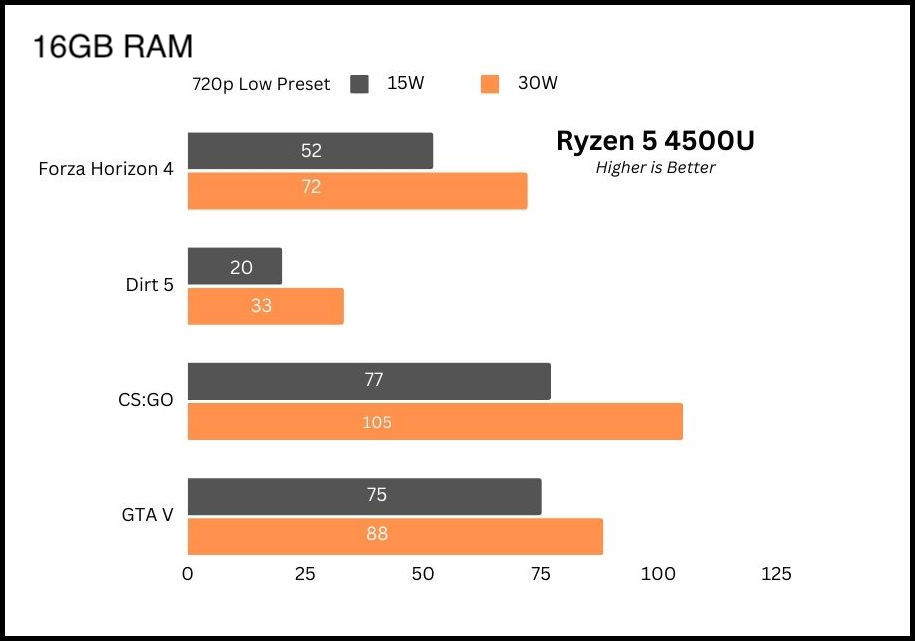
Warning: If you see a high-temperature reading, such as 90 degrees+, try to lower the TDP values. Set it in places where I put 30. Also, try to use a laptop cooler to get the best results.
Should You Overclock Your CPU?
Pushing your processor to the limit helps to improve the overall performance of the system, especially an aging CPU like i7 7700K, R7 2700X, etc.
See, with the release of modern graphics cards such as the Nvidia RTX 4000 & AMD RX 7000 series and games, older CPUs bottleneck them big time.
It’s very unlikely you want to upgrade the processor every couple of years, isn’t it?
Let’s say you own a relatively updated CPU like Ryzen 5 5600X or Core i5 11600K, OCing them can be hugely beneficial in terms of daily usage whether it’s gaming or productive work.
But is it worth all the hassle?
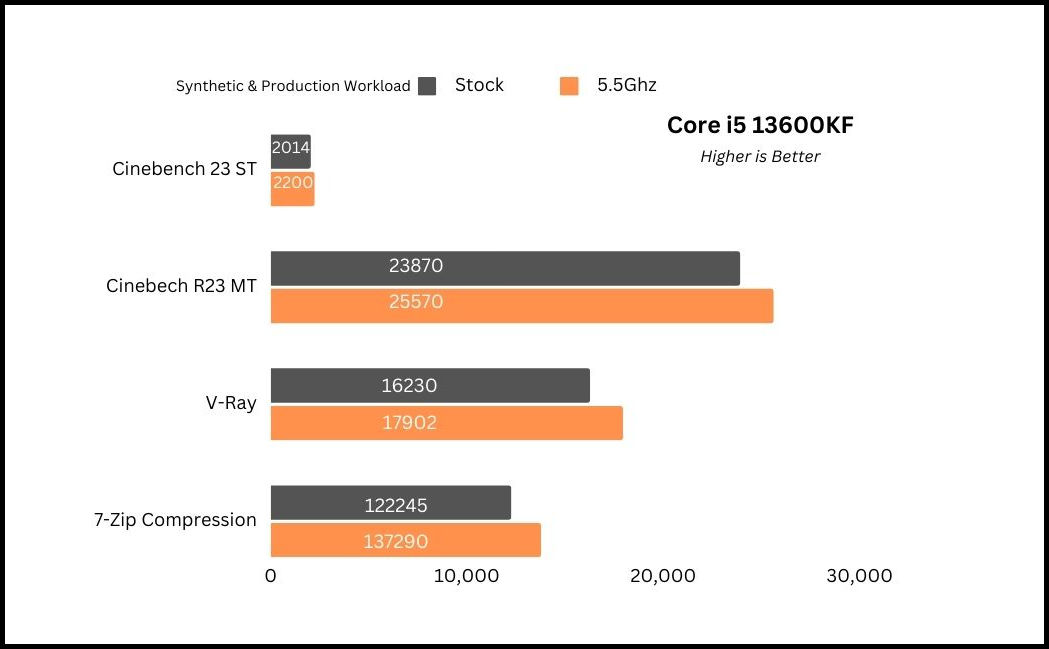
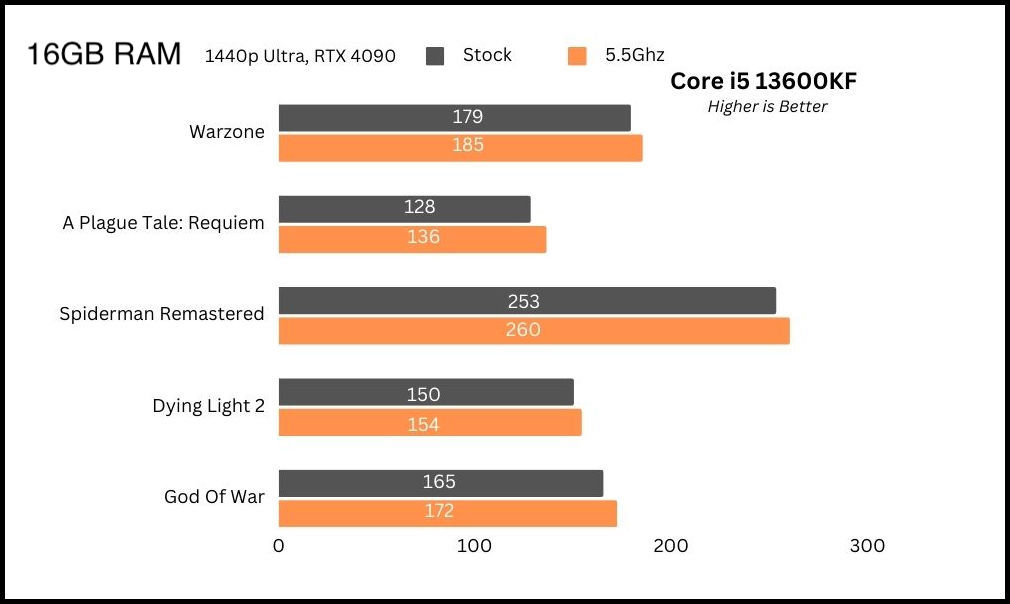
Well, with proper cooling, overclocking ensures you leave no performance off the table. For example, I pushed my 13600KF and got a substantial increase in performance, especially in multicore over stock frequency.
 On the flip side, it does not always work out with flying colors. Tinkering with the wrong settings, you may present yourself with a dead CPU.
Not only that, an aggressive OC profile will increase in higher operating temperatures, which degrades the silicon quality and longevity.
On top of that, some chips require a ridiculous amount of power to push a bit further. Sometimes it is so bad that a marginal uplift in clock speed requires anywhere between 30-40% more power.
Ryzen 7000 series non-X chips are great examples of this. X chips such as R7 7700X need 60% more power for a mere 5-7% boost in overall performance compared to R7 7700.
On the team blue side, things are even more terrifying. As Intel is still on 10nm, and traditionally they go all out on power to deliver the absolute best clock speed, they consume way more power.
At stock, their latest and greatest i9 13900K pulls roughly 300W for all core workloads. No, that’s not the total system power, only the CPU! 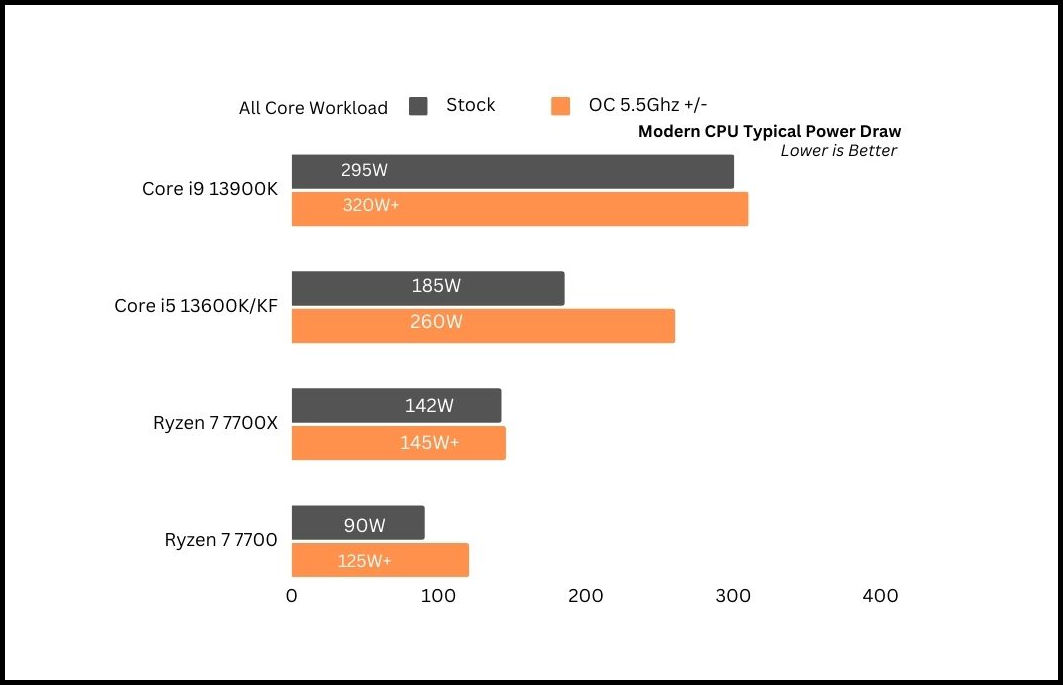
So, any moderate PC must have a great PSU, otherwise an unstable system will be the only outcome of overclocking. Not to mention, you lose the product warranty.
But the good news is appropriate settings can reduce power consumption quite a bit, although manufacturers allot way higher power budgets.
Considering all the pros and cons, if you want to extract the last bit of performance, or expect a little bit more out of your CPU than usual, you should opt for OC.
Is Overclocking Safe?
Overclocking is mostly safe as long as you are within the safe limits. By this, I mean, voltage and temperature should be within a risk-free threshold.
For CPU, anything under 85C and 1.4V is considered a risk-free zone. Also, synchronized clock speed is a crucial factor. Else your system might crash abruptly.
But the good news, however, is when you hit the TJ max, for safety your system will completely shut down to prevent any thermal damage.
Look, if you go overboard and pump higher voltage to the processor due to achieving higher clocks, the power draw will increase drastically; resulting in astronomical heat output. This will degrade the silicon, shortening its lifespan.
For example, I fried my Ryzen 5 3600X back in the day due to high Voltage Identification Definition (VID) and Core Voltage (Vcore). It failed within a month. So, tweak everything appropriately, and your system should be snug by a long shot.
Ending Remarks
So, that’s a wrap on this complete overclocking write-up without BIOS. If you have read it through, you should feel confident to enter the world of OC.
Go ahead and play around with your own settings. Remember, you can unlock much more power than you can imagine.
Got more questions? Leave a comment down below.