The Windows 11 installation Assistant is an essential tool that must be used to install Windows 11 on your pc. It can also be used to upgrade from Windows 10 to 11 directly.
So, if you need to install Windows 11 on your pc, it is necessary for you you to download the Installation Assistant from the official Microsoft website, then run it and install Windows 11 on your system.
Now, you might ask, why does the Installation Assistant not work?
It is clearly understandable if you just want to install Windows 11 on your pc, but the installation assistant is not even running. I agree with you that this is a very annoying situation to be in.
The great thing is that if you are one of the people searching for a fix to this problem, I have conducted thorough research and have written the best methods that you can follow to fix this issue.
Read the full post for more details.
Check out our separate post: Install Active Directory Users and Computers on Windows 11
Fix Windows 11 Installation Assistant Closing Automatically
I have made sure to write only the latest and best fixes to this problem in the most straightforward manner I could. The steps have been written in a concise manner so that you can understand and implement them easily.
If you are like me and want to fix problems effectively, I give you a virtual high five. All the methods mentioned in this post are very simple.
So, keep calm and go through the procedures mentioned below in this post. You got this!
Here are the methods to fix the Installation Assistant for Windows 11:
1. Run The Installation Assistant Tool in compatibility mode
Many users have found a quick fix for the Installation Assistant Tool for Windows 11. All you have to do in this procedure is locate the Installation Assistant file you downloaded and change some of its properties.
It is very easy to change the properties of most files on Windows 11. All you need to do is follow the simple steps below and you will be good to go.
Follow our guide to Fix cFosSpeed Driver Preventing Windows 11 Installation
Here are the steps to run the Installation Assistant in compatibility mode:
- Locate the downloaded Installation Assistant File.
- Right-click on the file.
- Select Show more options.
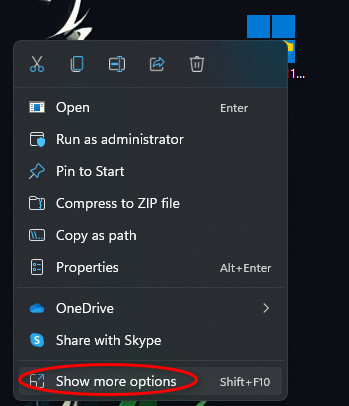
- Click on Properties.
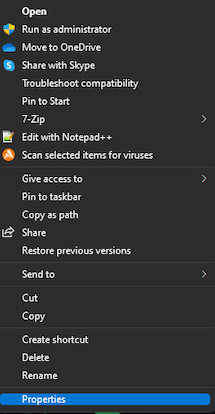
- Go to the Compatibility
- Turn on the Run this program in compatibility mode for
- Select Windows 7.
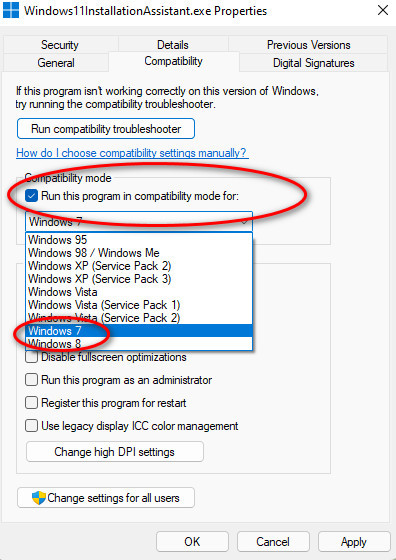
- Click on Apply, then OK.
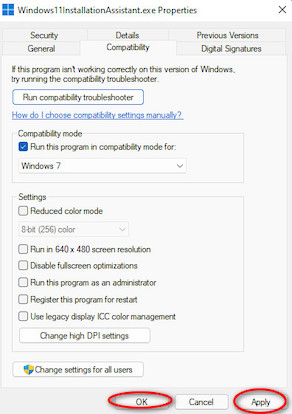
- Reopen the file and see whether it is working or not.
If this method did not work, do not worry. I have explained some alternative methods in this post.
You may also like to read: Install Amazon Appstore on Windows 11
2. Disable Third-Party Antivirus
Many people use a third-party antivirus on their systems. An antivirus is a great app to have as it will keep your system safe more than Windows Defender, the default antivirus app on Windows 11.
There are many third-party antiviruses available to us; they have different ways to get deactivated. That is no reason to worry as all third party antiviruses have a similar way of getting disabled.
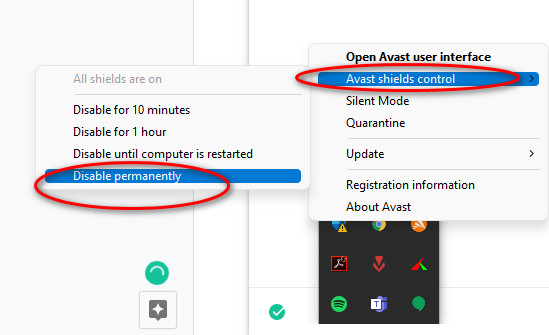
As Avast is a very popular Thrid party antiviruses used by a lot of people, including me, The steps below contain images of Avast and they can be followed to disable other antiviruses as well.
Here are the steps to disable a third-party antivirus:
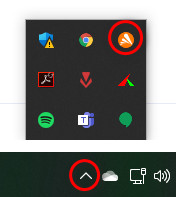
- Click on the arrow at the bottom right. You will be displayed some options.
- Right-click on the Avast icon.
- Navigate to Avast shields control and select Disable permanently.
- Rerun the Installation Assistant file that you downloaded.
- Check whether the file opens or not.
If this method did not work, do not worry, as other methods are given below in this post.
Check out the easiest way to Fix When Windows 11 Won’t Install
3. Re-Download and Re-run the Installation Assistant
The file that you downloaded might have gotten corrupted, resulting in it crashing right after you run it. So, it would be wise to download the file again and run it.
As you have already downloaded the file once, you might remember how to do it, but I have mentioned the steps below just in case.
Here are the steps to download the installation Assistant file on Windows 11:
- Go to your browser and search for the Installation assistant.
- Enter the official website.
- Download the installation assistant file.
- Run the file after it is downloaded to your system.
- Check whether it is running properly or not.
If this method did not work, do not worry, as other methods are given below in this post.
Here’s a complete guide on how to Fix Windows 11 Install Error 0x800f0922
4. Use the Media Creation Tool
If the previously mentioned procedures did not work, you could also install Windows 11 on your pc using the media creation tool available on the official Microsoft website.
You need an external storage device like a USB drive or an external HDD to implement this method to install Windows 11 on your system.
The steps to this process are very simple, so keep your cool and go through them.
Here are the steps to use the media creation tool to install Windows 11:
- Open your browser and go to the official Microsoft page.
- Download the file,
- Open the file and enter the necessary information.
- Install Windows 11.
Read more on how to Install & Uninstall Fonts on Windows 11
How to install Windows 11
Windows 11 is the latest version of Windows that was released in 2021. It came with new features and a more sleek and modern look. It also boasts about better gaming performance.
If you need to know how to install Windows 11 on your system, please follow the methods given below.
1. Run Installation Assistant
To install Windows 11 easily on your system, all you have to do is download and run the Windows 11 Installation Assistant and run it.
You can get the Installation Assistant on the official Microsoft website. The simple steps to this process are below, so please follow them.
Here are the steps to download the installation Assistant file on Windows 11:
- Go to your browser and search for the Windows 11 Installation assistant.
- Enter the official website.
- Download the installation assistant file.
- Run the file after it is downloaded to your system.
- Check whether it is running correctly or not.
If this method did not work, do not worry, as other methods are given below in this post.
Also read, Can You Still Install Zune Software on Windows 11
2. Download and Run the Media Creation Tool
Just like the previous method, this one is very easy to follow. You need to go to the official Microsoft website and download the file within the Media CreationTool section.
You need to have an external storage device like a USB drive, external HDD, or SSD. The steps to this process are very simple, so keep your cool and go through them.
Here are the steps to use the media creation tool to install Windows 11:
- Open your browser and go to the official Microsoft page.
- Download the file,
- Open the file and enter the necessary information.
- Install Windows 11.
Follow our guide on Windows 11:Download & Install ADB Driver
Conclusion
Hopefully, you could fix the Installation Assistant closing automatically issue after following the procedures that I have written in this post.
I have tested and made sure all the methods given in this post are legit and working as of now. I hope you never face an issue like this again.
It is clearly annoying to have the desire to install Windows 11 on one’s system but the assistant does not run properly.
As I have been in a similar situation and I can understand your frustration, I have written this post after thorough research and testing.
I wish you luck in whatever you do in the future.
Take care and stay safe!