A grave confusing matter comes to pass when building a new computer or upgrading the cooling solution with additional fans is to figure out where to connect them.
After seeing all the ports and connectors, it deems enigmatic to even begin with PC fans on your PC. But worry not; this article will provide you with everything you ever need to know to put the pieces together regarding plugging in PC fans correctly.
So, let’s take the tour, shall we?
Where to Connect PC Fans?
Plug in your PC fans to the correct ports on the motherboard. For example, connect the CPU cooler fan to the CPU_FAN header on the main board. Likewise, PC case fans should go into the CHA_FAN or SYS_FAN headers. You can, however, plug-in case fans into the PSU’s Molex connectors.
Speaking of fan connectors, dedicated connectors for Liquid AIO cooler is included on modern motherboards labeled as AIO_PUMP or SYS_FAN_PUMP. Naming discrepancies come up based on different manufacturers.
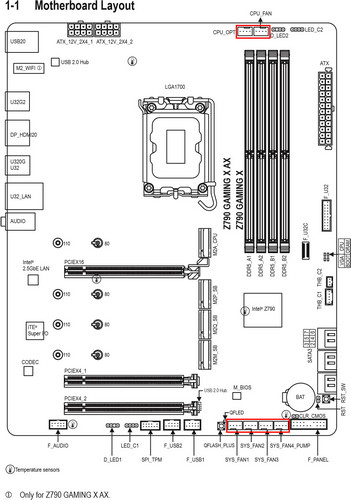
On that note, let’s check out where exactly you should connect your PC fans in vivid detail. But before that, take a closer look at the Gigabyte AORUS Z790 AX motherboard diagram below as an example.
Plug in CPU Cooler Fans on the Motherboard
When it comes to PC fans, the CPU cooler’s fan is inevitable unless you’re using a passive cooler. Every CPU heat sink in the market comes with at least one fan, whether it’s an air or a liquid cooler. Bulky liquid AIOs such as 240mm or 360mm coolers ship with more than 1 fan. And they sport a 4-pin PWM connector.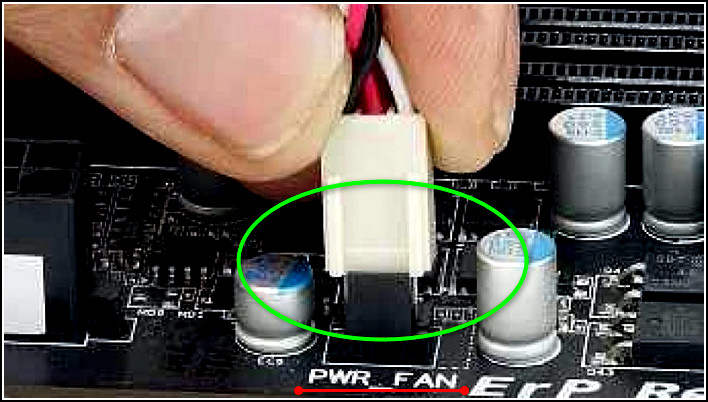
In reply to the question, “Where to plug in CPU cooler fans?” — it’s the CPU_FAN or CPU_OPT PWM header at the top of the main board.
For multiple CPU fans, connect them to the dedicated CPU fan header on the motherboard utilizing the provided Y-splitter cable. Easy eh!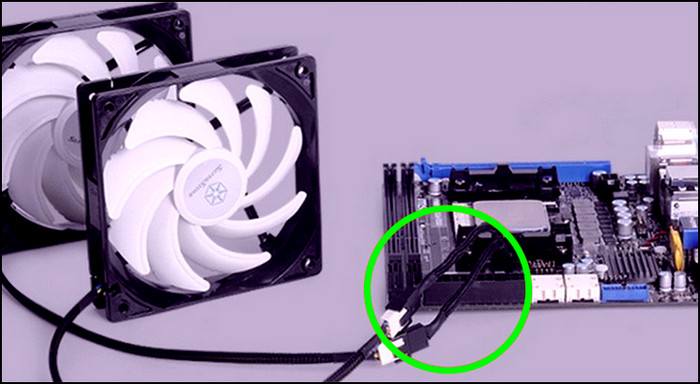
Connect PC Case Fans to Motherboard
Just like the CPU cooler fan, every motherboard houses dedicated headers for case fans or system fans for a PC. When I say headers, I refer to multiple connection points for additional PWM fans.
You see, with a close inspection, 3 to 4 PWM fan headers will appear under your radar marked as SYS_FAN1, SYS_FAN2, etc., on the main board. So whenever you wish to add a new fan to the system, plug the fan cable into one of these headers, and bazinga!
Not to mention, system fan headers let you connect dedicated fan hubs to facilitate more than one case fan to each header. Inspect the bottom half of the main board to locate these headers.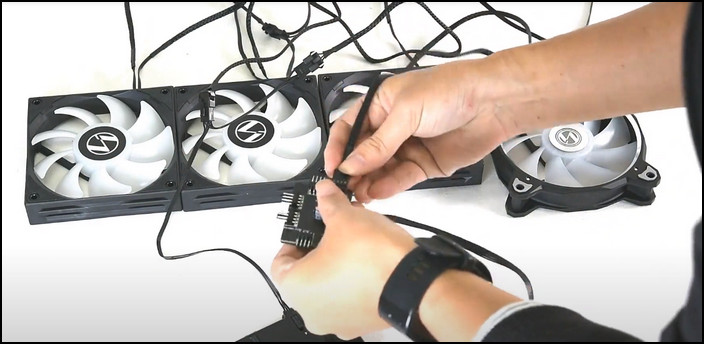
Plug in Case Fans to the Power Supply MOLEX Connector
In the event you run out of 4-pin PWM to append more fans to your computer, MOLEX connectors on the power supply come to the rescue. But it’s not flawless.
See, unlike the PWM, it’s impossible to control the fan speed through a MOLEX connection. It basically lets the fan run at a constant speed. No tweaking from the BIOS, such as setting up a fan curve.
Important to note before plugging in a case fan, you should check what PSU model you have.
GPU Fans
As bizarre as it sounds, GPUs might have fans that you’re struggling to figure out where they should go on the motherboard. Wait what?
Yep, you heard me correctly.
You see, conventional graphics cards are air-cooled and have fans connected to the GPU’s PCB. Liquid-cooled GPU’s, however, requires the radiator fans connected to the main board of your computer.
Take MSI RTX 4090 SUPRIM Liquid, for example. It ships with a 240mm stock radiator with two 120mm fans mounted on it. Simply connect the radiator fans to the closest SYS_FAN header on the motherboard.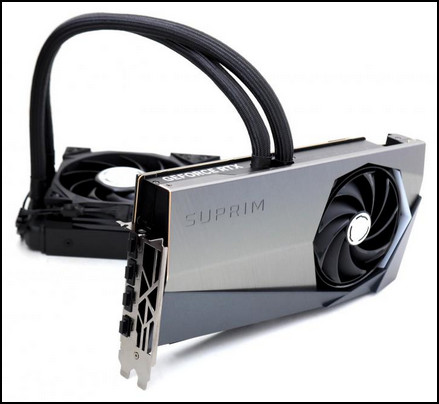
Connect Power Supply Fan on the Motherboard
The Power Supply Unit A.K.A PSU has a fan connected internally to the unit. Typically, that’s how computer PSUs are made forever. However, a high-end PSU lets you monitor the PSU fan status by connecting it to the motherboard.
So, where should you connect this fan?
Well, it’s the PWR_FAN header on the main board. It’s also known as the power fan header. Take the PSU fan cable and simply tuck it into the fan header.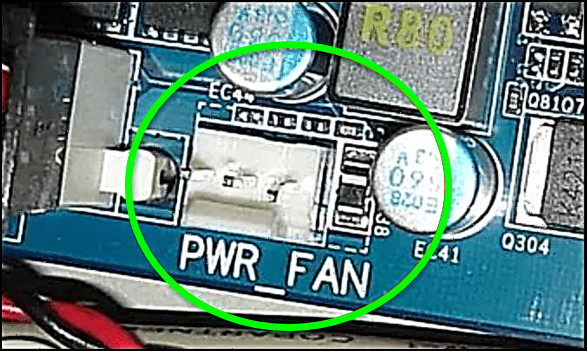
How to Install Fans In PC
To install extra PC fans, mount fans on the case with the correct screws and directly plug in a fan’s PWM connector to the SYS_FAN header on the motherboard. Use a Y-splitter cable to chain two fans together. However, use a fan hub to install more than two extra PC fans in a single header.
The fan header on the motherboard can supply 1A current in general. To confirm, check the manual first.
Now, due to such power limitations, you can either use 2x 0.5A or 4x 0.25A fans, but a 3x 0.5A fan configuration is a no-go. Or any other arrangement that exceeds the 1A limit, for that matter.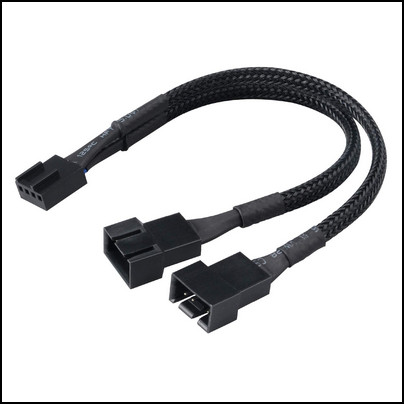
To resolve this issue, exploit dedicated fan hubs. This device essentially allows multiple fans to be connected to a single PWM header on the motherboard. How? You may ask.
Well, the fan hub takes in enough juice from the PSU and delivers it to the fans. Also, it acts as a central terminal to manage RGB or ARGB effects on all the fans.
On a different note, PC fans with no PWM connector use the MOLEX or DC connector (if it’s included). DC and PWM fans are different, although they seem to be similar types. This depends on which type of connection is available on a PC fan.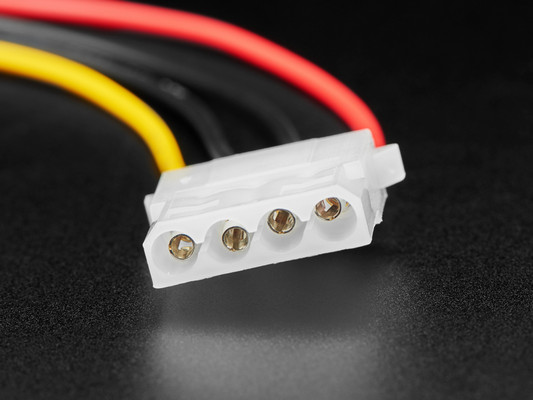
Insert the MOLEX male on the fan into the MOLEX female of the power supply, and just like that, the fan is installed.
Once you figure out the connections, install the fans on the case according to your preference. Use the correct screws and mounting holes for a smooth installation process.
Factors to Consider Before Installing PC Case Fans
Installing PC case fans is not like grabbing a plank and nailing it right away. There’s science involved. You need to give thought to why you need extra fans in the first place. The answer is quite apparent — better airflow inside the PC.
So, before you jump in with both feet to add fans, carefully consider the factors below:
Pick the Right Fan
Choosing the right case fan is the first step before upgrading or adding them to your computer. Imagine the disaster if you pick a stand fan for your computer!
Jokes apart, PC fans are available in different sizes, such as 120mm, 140mm, 200mm, and so on. Also, they come in with different profiles, such as static and airflow fans.
Now, here’s the kicker: select PC case fans according to your chassis dimension and clearance. Consider low noise profile and superior airflow. If you don’t know how to look for this information, simply read the product description carefully.
Consider Maintaining Positive Air Pressure
The general rule of thumb for installing PC case fans is that positive air pressure is better than negative air pressure. It’s more efficient in dissipating heat from the case. As neutral pressure is almost impossible to achieve, positive is our best bet.
But how do you count the air pressure?
It goes like this: Positive Air Pressure = Intake fans total CFM – Exhaust Fans total CFM= Positive Value.
Just as the equation, calculate the total CFM of the intake and exhaust fans. Subtract the exhaust CFM value from the intake. And when you find a positive value, that’s the fan arrangement you need to maintain inside your PC.
Direction Of Case Fans
You need to set up your case fans in the correct orientation. If you don’t, the fans will do more harm than good.
Luckily, new intake fans have body markings indicating which way they should face.
But what if there is no clear sign on the fan?
In that case, pay attention to the blades of the fan. Usually, the convex side of the blade indicates the front. Air gets sucked from this side.
The concave facet, however, draws air out. It’s considered the back of a PC case fan. And another indication for the rear is that there’s an X-pattern frame that holds the fan.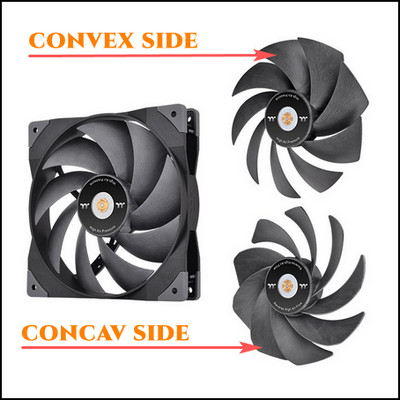
Appropriate Place to Mount Your Case Fans
Typically, the intake fans should be placed on the front side of the case to intake the cool air from outside, and the exhaust fans would be at the backside to let out the hot air.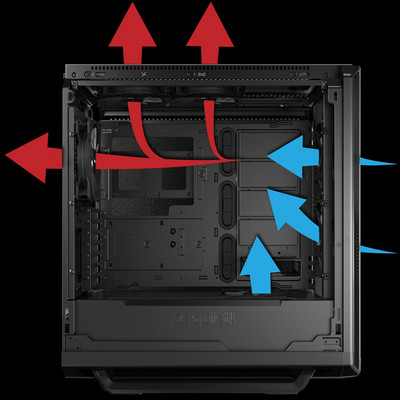
Some new cases will have a vent on top of it. But don’t make a mistake and install an intake fan over there. That vent should be used for exhaust fans; that way, the hot air will have more ways to get out.
To mount the fan, by the way, you need to find the correct place for it. So that when you install the Fan, you can reach the motherboard or PSU without any hassle. This facilitates great cable management.
When you are done finding the perfect spot, align the fan with the four holes in the case and screw them up.
How Many Fans Can You Plug Into Your PC?
Corresponding to motherboard vendors, the number of dedicated fan headers varies. Though, in general, you can plug into 3-4 fans directly via motherboard 4-pin PWM ports. Increase this number With Y-splitter cables and fan hubs. You can plug in 8,10,12, or even more fans simultaneously.
See, you don’t have to agitate yourself with the case fan amount. Accessories like the fan hub will allow you to add more fans to the PC than you ever need.
I mean, think about it; If you buy 4 fan hubs, each with 10 fan ports, you’ll end up having room for 40 freaking fans! Who would ever need such an amount of fans on a single computer?
On top of that, by chaining the MOLEX connectors, you can accommodate even more fans in your PC. So, I would say you can plug in more than enough fans on a PC. Some low-end motherboards, on the other hand, offer fewer slots to install additional fans.
Do Additional PC Case Fans Matter?
Yes, additional PC case fans do matter, but to a certain degree. It’s not like you slap more fans on your PC, and dramatically every component is icy cool. More fans = Better thermal performance; it doesn’t always apply. A Higher number of fans instead produce more noise altogether.
See, you need to figure out the sweet spot number for the fans that yields the best thermal performance. Don’t forget to consider a low noise profile, by the way.
To bust myths, we conducted several tests and observed the results firsthand. Shockingly enough, a read exhaust fan can make a world of difference.
We mounted different fans in a variety of orientations on the Lian Li LanCool 216 housing the Core i7 13700 and RX590.
CPU Temperature
When we stressed the CPU with AIDA 64 with no fans running on the case, we got the highest maximum temp reading for the Core i7 13700 — a toasty 89 degrees Celsius!
We added 1 exhaust fan at the rear to improve the situation, and the maximum temperature dropped by 6.5 degrees to 82.5 degrees Celsius. Even with adding more intake fans at the front and removing the side glass panel entirely, our result didn’t change much.
Below are the results of CPU temperature with multiple fan configurations: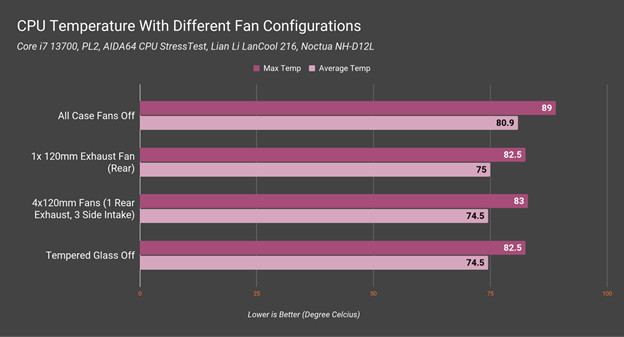
GPU Temperature
Moving on to the GPU temperature, it also depends on the airflow inside the case. Just like the CPU, we tested the maximum and average graphics temperature at diverse fan arrangements.
Furmark torture test pushed our XFX RX590 FAT BOY to its thermal limits and hit a maximum of 85 degrees Celcius. Installing an exhaust fan at the back of our Lian Li LanCool 216 again did wonders. With other fan configurations, the results remained unchanged.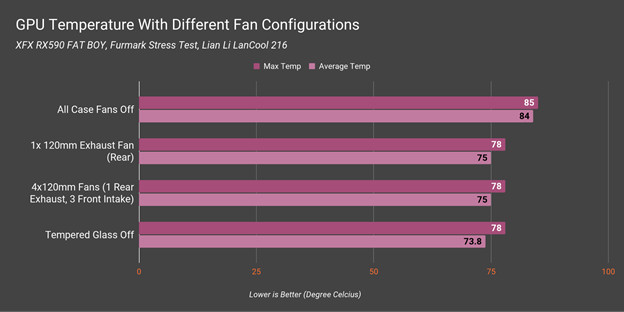
Note: Results for each component will vary on a different PC case.
FAQs
Should you Connect Case Fans to Motherboard or Power Supply?
You should connect fans to the motherboard. It can be a direct 4-pin PWM plug-in or through a fan hub. However, if your fan has no PWM connector, plug it into the PSU’s MOLEX point.
Can a 3-pin Case Fan Be Used on a 4-pin PWM Port?
Yes, a 3-pin case fan can be used on a 4-pin PWM port. Skip the first pin on the PWM header and connect the 3-pin connector of the fan as usual. This will work just fine but with limited fan control capability.
What is the Chassis Fan (“CHA_FAN”) Connector?
The chassis fan connector CHA_FAN and the SYS_FAN indicate the same thing. They both are meant for the case fans to begin with. Different motherboard vendors name these PC case fan headers according to their scheme.
Can You Use the CPU and Power Fan Header for Case Fans?
Yes, you can use the CPU and power fan header for case fans. When you run out of ports, exploiting an alternative CPU fan header or the PWR_FAN header is feasible.
Final Words
In summary, plug in CPU cooler and case fans to the CPU_FAN and SYS_FAN header respectively. Thus achieve control over these fans to your preference.
For more questions and queries comment down below.
Happy PC building!