To maintain a good relationship with customers and co-workers, you should always reply to their messages. But it is difficult when you are on sick leave or vacation.
However, in Outlook, use the Out of Office/Automatic Replies feature to message the people trying to reach you.
Rather than being rude, you can let people know you are unavailable, when you will reach them, and whom to contact in case of an emergency.
 Here, I’ve described how to use Automatic Replies in Outlook for Windows, Mac & web browsers and explained how to create an auto-reply rule. Let’s begin!
How to Send Automatic Out of Office Replies from Outlook App
Outlook has a dedicated Automatic Replies option for auto-responding to emails. Access the option from the File of the Outlook app. But if you are using a Gmail, Yahoo, or other POP or IMAP account, you must create an auto-reply rule in Outlook.
Follow the instructions below to utilize the Automatic Replies option and create a new rule that automatically sends replies to your emails.
Here are the steps to send automatic out-of-office from the Outlook app:
1. Use the Automatic Replies Feature
This feature lets you send auto-replies to people both inside and outside your organization.
Here’s how to use the Automatic Replies feature:
- Launch Outlook on your computer.
- Select File from the top-left corner.
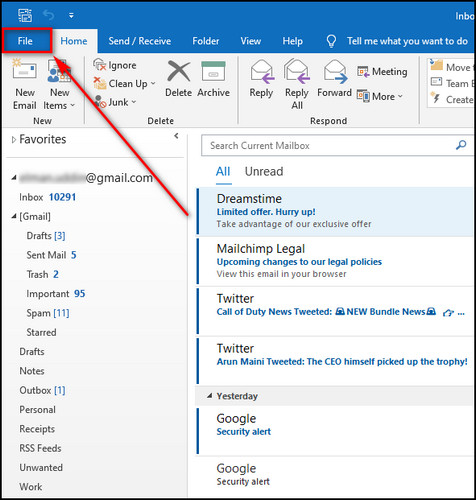
- Click on the Automatic Replies button.

- Turn on Send automatic replies.
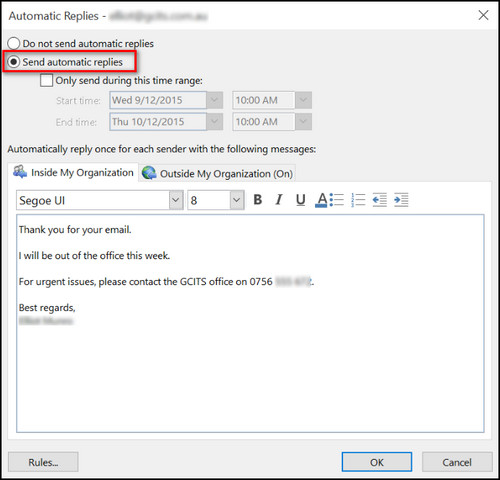
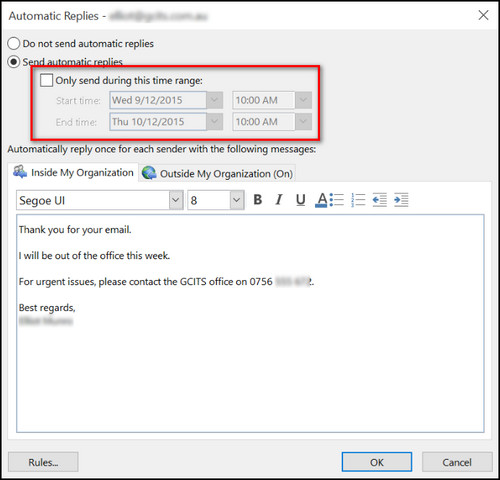
- Check Only send during this time range and set the time range for this auto-reply if you want, in case you forget to turn it off.
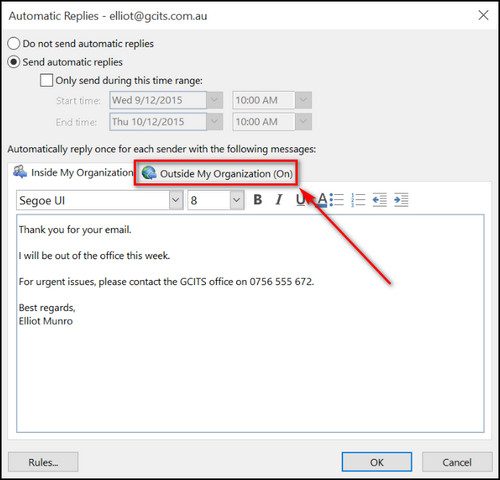
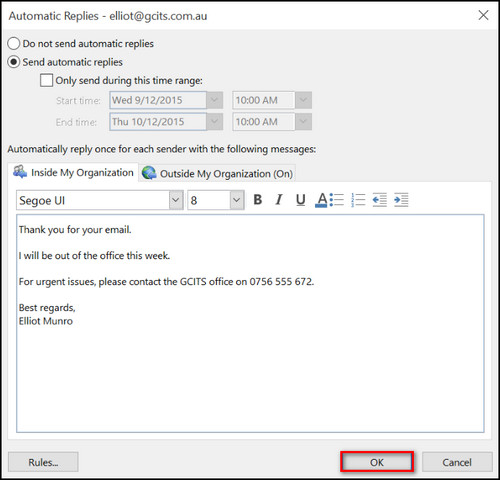
- Go to the Inside My Organization tab and write your auto-reply message for your co-workers.

- Proceed to the Outside My Organization tab and customize your automatic reply accordingly.
- Choose whether to auto-reply to your contacts only or everyone.
- Click on OK, and your automatic replies are turned on.
If you want to disable auto-reply, go to File and click on the Turn off button.
Assuming you are using a different POP or IMAP account other than Microsoft, you won’t see the Automatic Replies option. In that case, create an auto-reply rule which I’ve explained in the following section.
Follow our guide on how to automatically forward emails in Outlook.
2. Create an Automatic Replies Rule
In Outlook 2007, 2010, 2016, 2019 and newer versions, you can create a rule that automatically sends out replies to your contacts.
Here’s the process for creating an automatic replies rule:
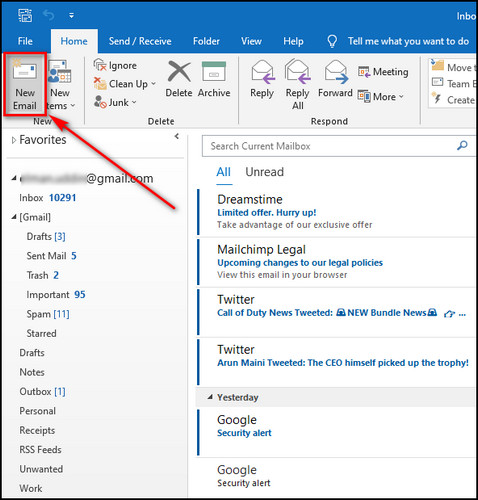
- Open Outlook on your device.
- Select New Email or press Ctrl + N key.
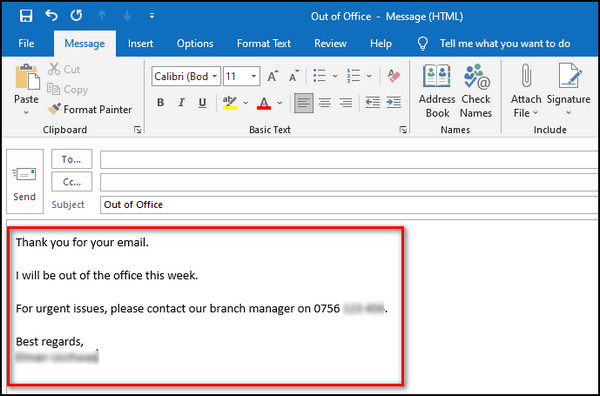
- Type Out of Office in the Subject field.
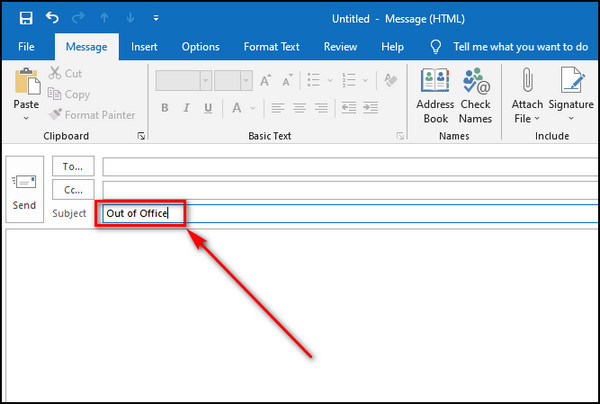
- Write your auto-reply message.
- Click on File and select Save As.
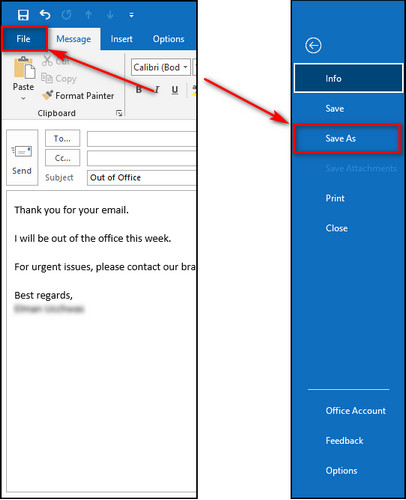
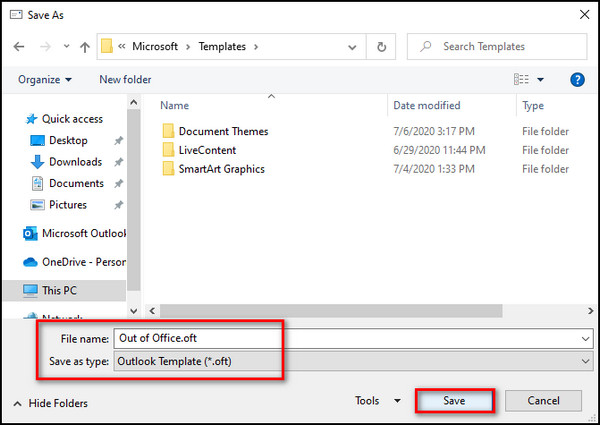
- Save the recently created message as an Outlook Template.
- Close the New Email window.
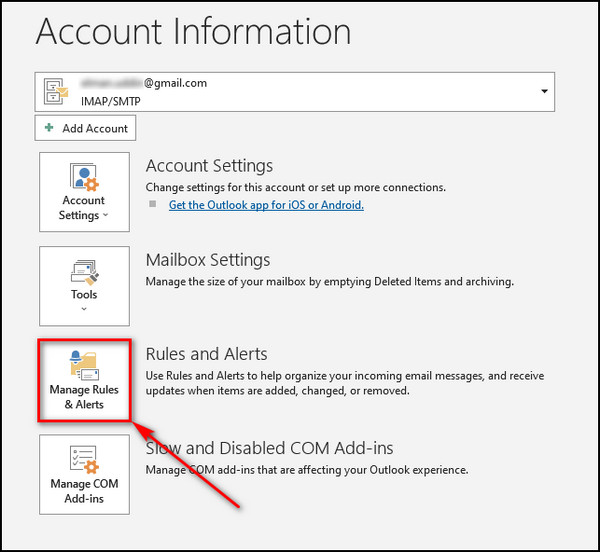
- Select File from the top-left.
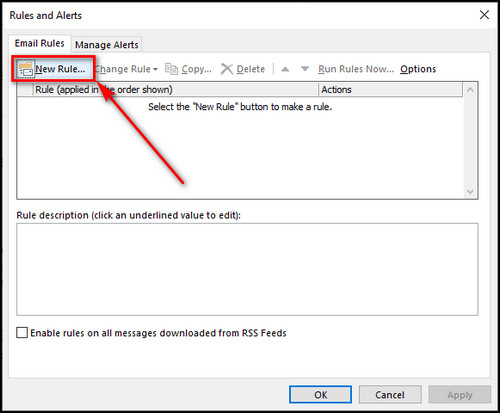
- Choose to Manage Rules & Alerts.
- Click on New Rule.
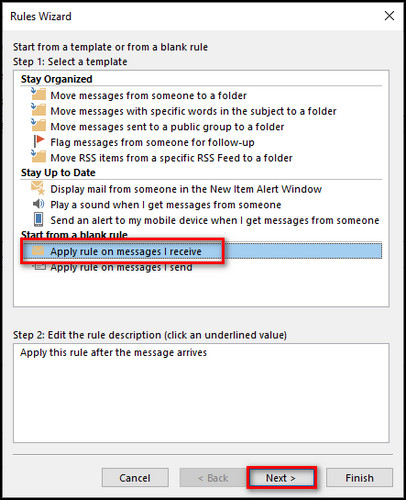
- Press Apply rule on messages I receive and click on Next.
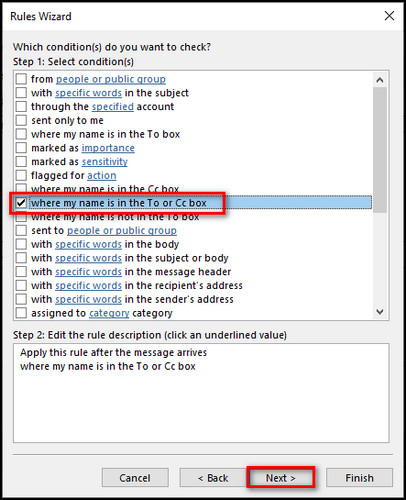
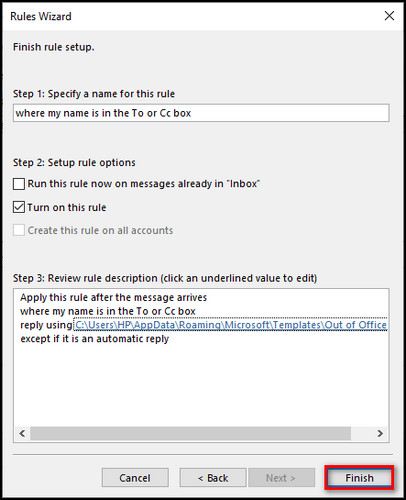
- Put a checkmark on where my name is in the To or Cc box and click Next.
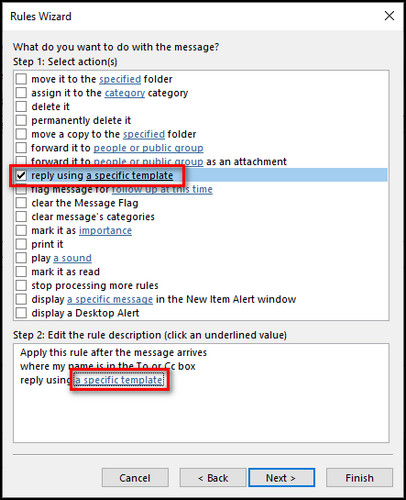
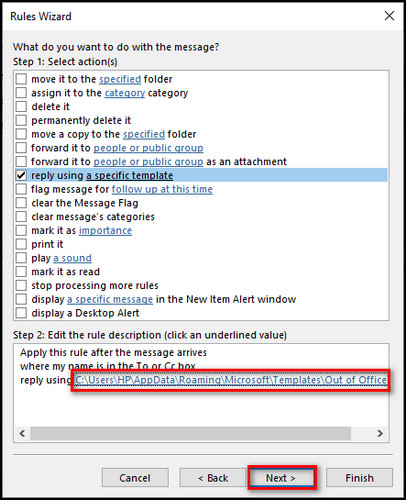
- Check reply using a specific template and click on a specific template at the bottom.
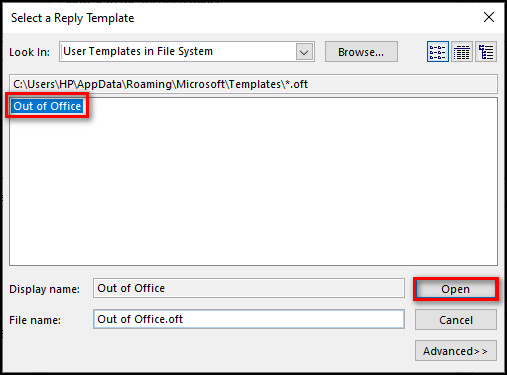
- Use the dropdown in the Look in field and choose User Templates in File System.
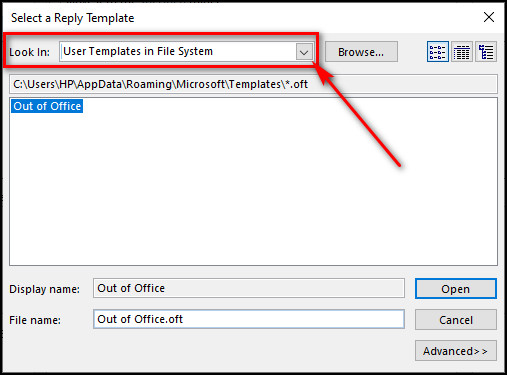
- Select the template you’ve created and click on Open.
- Press on Next.
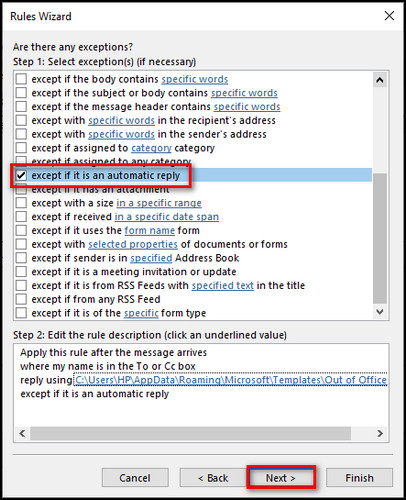
- Choose except if it is an automatic reply and click Next.
- Click the Finish button, and you’ve successfully created an auto-reply rule.
- Select Apply and OK on the Rules and Alerts window to enforce the rule.
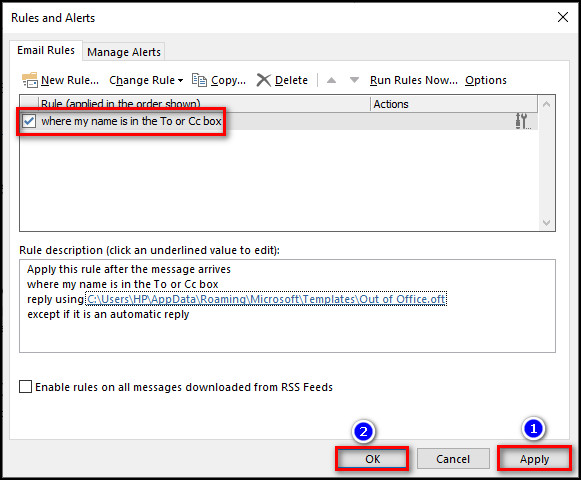
After these steps, the message template you’ve made will be automatically sent back to every email address that you receive a message from.
When you want to remove the auto-reply, simply uncheck the rule you’ve created from the Rules and Alerts dialog box.
Here’s a complete guide on how to add email signature in Outlook.
How to Set Up an Automatic Reply in Outlook for Mac
To set an Out of Office reply in Outlook for Mac, open Automatic Replies from Tools and enable the feature. Along with composing the reply, you can set when to auto-reply and specify other options. You can also write a different reply for people outside your organization.
Below I’ve provided the steps to send auto-replies using the Outlook app for macOS.
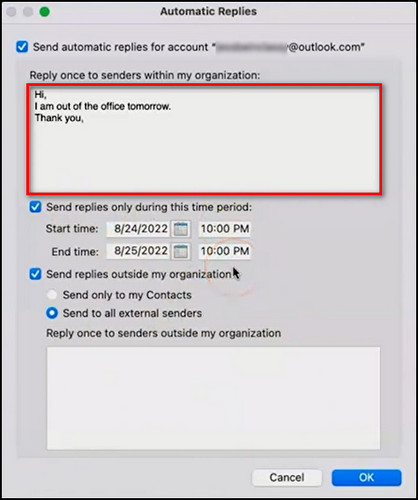
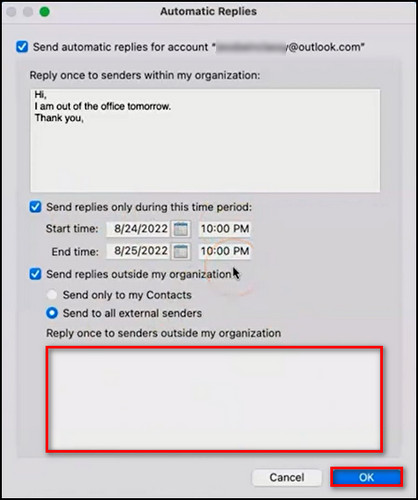
Here are the steps to set up an automatic reply in Outlook for Mac:
- Open the Outlook app on your macOS computer.
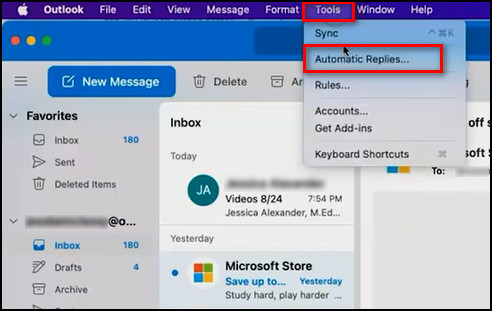
- Select Tools from the top bar.
- Click on Automatic Replies if you are using the latest Outlook version, or choose Out of Office in case you are on older versions.
- Check the option at the top to send automatic replies.
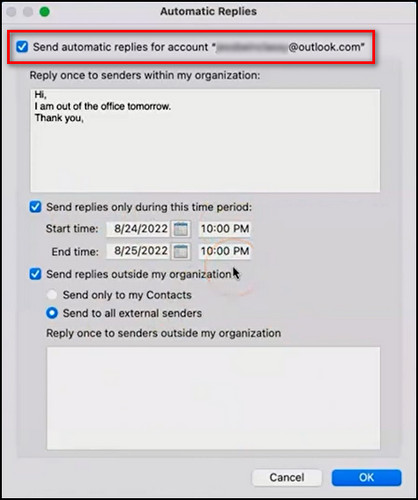
- Compose your auto-reply message for the co-workers in your organization.
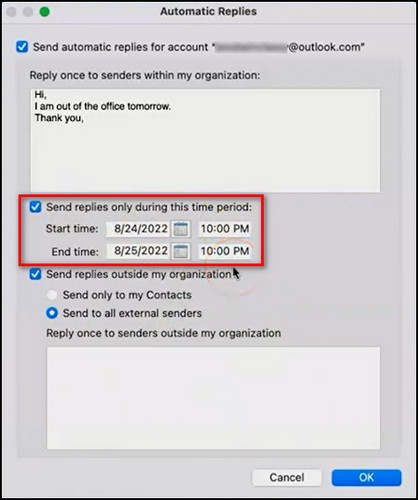
- Check the Send replies only during this time period box and set the Start time & End time to send out auto-replies during a specified time range.
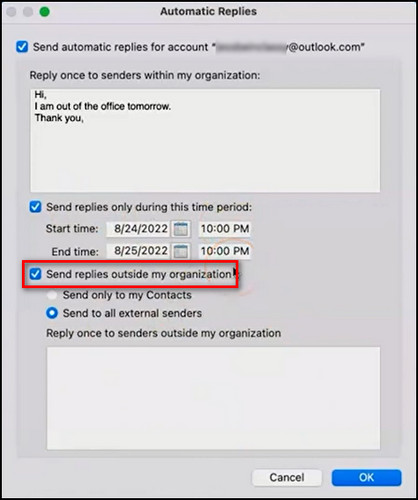
- Put a checkmark on Send replies outside my organization to send a different message automatically to those who aren’t in your organization.
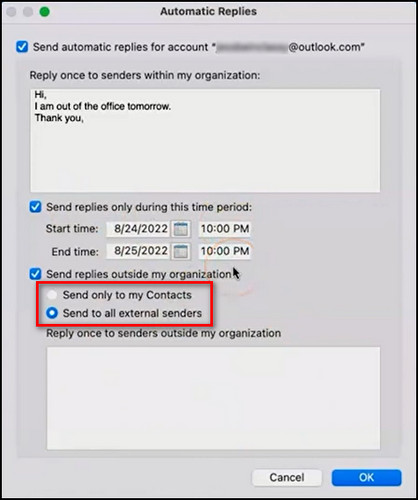
- Choose whether to auto-reply to your contacts only or everyone you receive an email from.
- Compose your message for the users outside your organization and click on OK.
To disable auto-reply, simply go to Tools > Out of Office, choose Do not send Out of Office messages or go to Tools > Automatic Replies, remove the checkmark from send automatic replies and click OK.
Check out the easiest way to enable read receipts in Outlook.
How to Set Up Out of Office in Outlook Web Access
In order to send auto-replies from Outlook Web Access, you have to enable the option available in the Automatic Replies tab of Settings. Once enabled, you can compose the auto-reply message and set the time frame to send the message automatically.
Follow the steps below to send automatic replies from OWA.
Here’s how to set up Out of Office in Outlook Web Access:
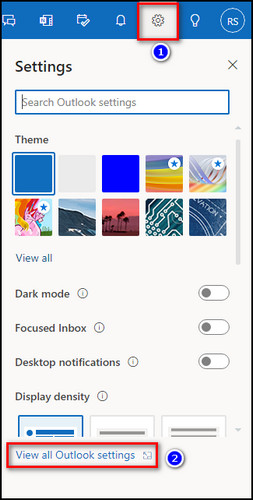
- Open your web browser and go to outlook.live.com.
- Sign in to your Microsoft account.
- Click the Gear icon at the top-right corner and select View all Outlook settings.
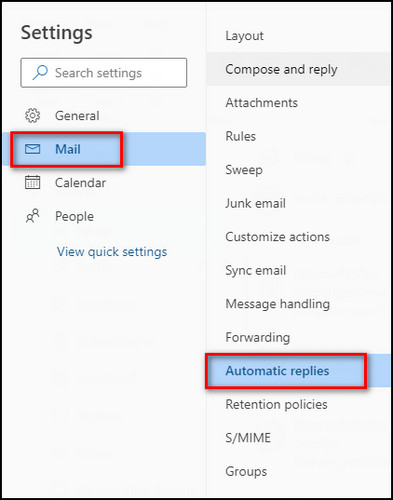
- Choose Mail from the left menu and go to the Automatic Replies tab.
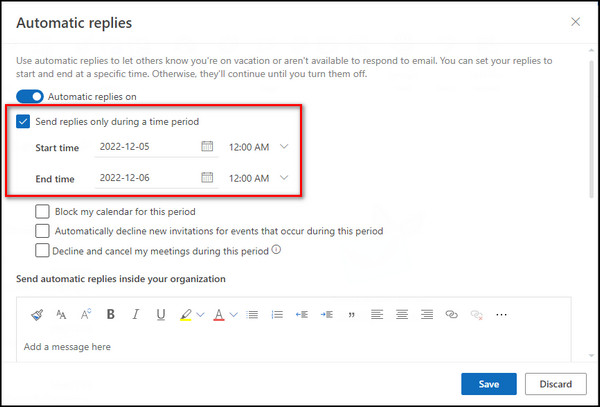
- Toggle on the Automatic replies on option.
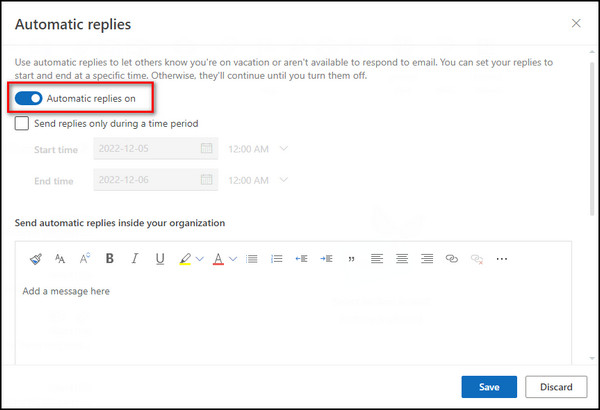
- Put a checkmark on Send replies only during a time period to send out emails automatically during a set time frame and specify the Start time and the End time.
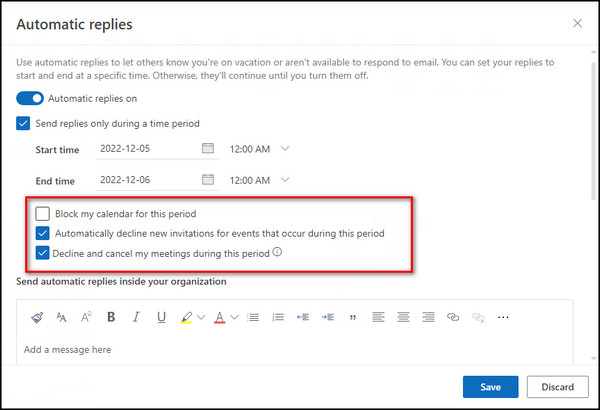
- Use the tags below to block your calendar, enable or disable auto decline for event invitations and choose whether to decline and cancel meetings in the time range you’ve set for auto-reply.
- Write the auto-reply message.
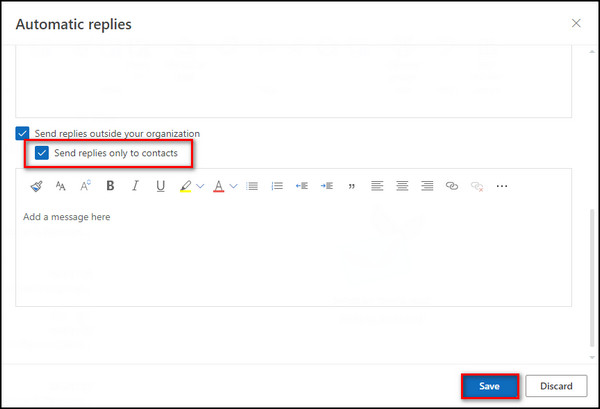
- Check the box for Send replies only to contacts to send the auto-reply email to the people in your contact list, or keep the option unchecked, and everyone will get the auto-reply message when they send an email.
- Click on the Save button.
Follow our guide on how to view message headers in Outlook.
FAQs
Why can’t I set up an automatic reply in Outlook?
You can’t set up an automatic reply while using a Gmail, Yahoo, or other POP or IMAP account. In that case, you need to create an auto-reply rule in Outlook.
How do I get Outlook to automatically reply to pop-out emails?
Follow the steps below to automatically reply to pop-out emails in Outlook:
- Open Outlook.
- Select File > Options.
- Choose Mail from the left menu.
- Go to the Replies and forwards section.
- Check Open replies and forwards in a new window.
- Click Ok.
How do I turn on Out of Office in Outlook 365?
Follow the instructions below to turn on Out of Office in Outlook 365:
- Go to outlook.live.com.
- Click the Gear icon.
- Select View all Outlook settings.
- Choose Mail from the left menu.
- Go to the Automatic Replies tab.
- Toggle on the Automatic replies on option.
- Check Send replies only during a time period and specify the time frame.
- Compose the auto-reply message.
- Click Save.
Final Thoughts
Outlook offers the Automatic Replies feature, so you can respond to others trying to reach you, even if you are not in the office. You just specify the auto-reply message, and Outlook takes care of the rest.
Simply follow all the steps in this article to successfully set up an auto-reply for different versions of Outlook.
Leave a comment below if you face any problems in Outlook, and I’ll help you with the solution.