A CPU cooler is a device that absorbs heat from the Processor and distributes it far from the components, allowing the system to operate at an optimal temperature.
However, its operation is a little tricky, which is why most users have no idea whether their CPU cooler is working properly.
So, in this article, I’ll show you a few tried-and-true ways for determining whether your CPU cooler is operating adequately and how to fix it.
Let’s get started.
How to Tell if CPU Cooler is Working
If you have a liquid cooler, the quickest method to tell if it is working is to sense the movement and fluid flow. If it is buzzing, the cooler is working. However, if you have an air cooler, check to see if the cooling fan is spinning. If it is, your cooler is fine.
Also, make sure the CPU cooler is compatible with the processor and motherboard.
There are various other criteria, such as temperature, pump, and water level, to consider when determining whether your CPU cooling is operational.
When using a liquid cooler, you should inspect the water pump, pipe connection, water level, and coolant type. If you have an air cooler, all you need to do is double-check your fan is installed correctly, thermal paste, and electrical connection between the cooler and the motherboard.
So, after verifying these aspects, if you find that all the components operate correctly, your CPU cooler is fine. If you see any irregularities in these criteria, your water cooler is not working correctly.
The liquid cooling CPU cooler is more sensitive than the air cooler since it requires more monitoring and maintenance.
As a result, in the section below, we will go through how to test your liquid cooler to see if it is working adequately.
How to Determine if the Pump is Functioning on Your Liquid Cooler
The only technique to precisely tell if the water cooler pump is working is to verify the pump’s rotational speed or RPM (Round Per Minute). This process can only be allowed if the motor connection is attached to a fan port on the motherboard.
There are additional methods for determining whether the liquid cooler water pump is operational. Let’s look at those ways in the part below.
Here are several ways to tell if your liquid cooler’s pump is working:
Verify Fan RPM
The CPU fan RPM is one way to tell if your cooler pump is running adequately. If the fan maintains a steady RPM while testing, it signifies your water pump is performing correctly; otherwise, it has an issue that has to be fixed.
For our testing, we will utilize HWMonitor, which allows us to verify the fan speed of the water cooler we are using. Let’s look at the instructions in more detail below.
The method to check fan RPM is as follows:
- Download HWMonitor and install it on your computer.
- Open the application and go to the Fan section.
- Check the RPM of the CPU Fan.
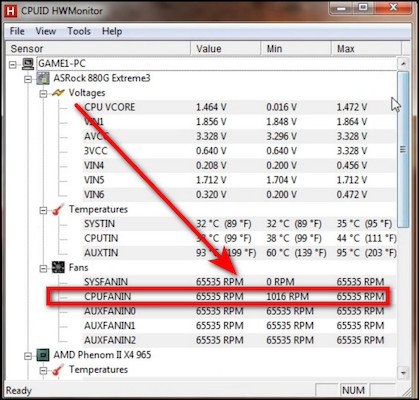
If your CPU’s RPM matches what the manufacturer claimed after checking it, your water pump is in good shape.
Test the Pump Physically
You can also manually inspect your liquid cooler pump to ensure it is working sufficiently. The procedure is pretty simple; just look at the verification method in the part below.
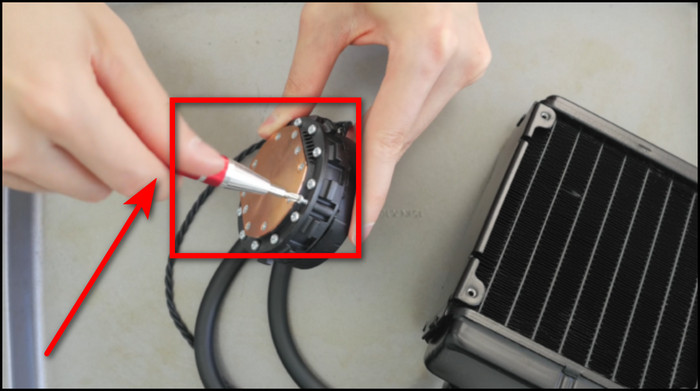
Here is how to physically inspect the pump:
- Locate the pump by cautiously opening the casing.
- Switch on your computer and put your finger over the pump.
If you feel any vibration, it tells your CPU cooler is functioning correctly. Unless you don’t feel any vibration, your pump is most likely damaged and needs to be repaired.
Test the Pump Externally
You can alternatively disassemble your liquid cooler and test the pump while an external source powers it. Simply follow the instructions in the section below.
Follow the below process to check the pump externally:
- Take apart every component of the liquid cooler, including the pump, heatsink, and radiator.
- Disconnect the tubes from the heatsink and dispose of the water completely.
- Connect the pump to a power source with a 12-volt adaptor.
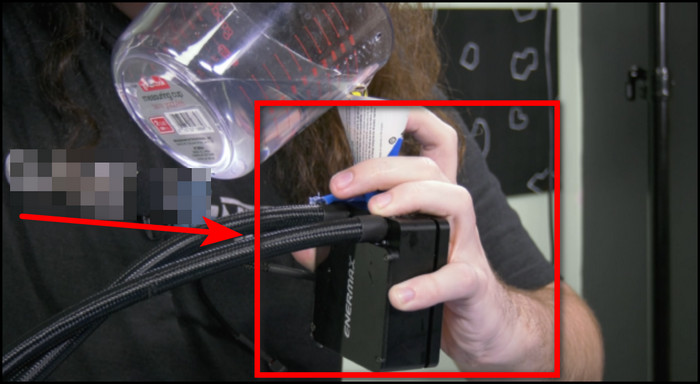
- Fill a pot with water and immerse both ends of the pump’s pipe.
- Turn on the pump.
If you notice water pouring through the pump at desired speed after switching it on, it implies your pump is functioning well, and you don’t need to be concerned.
How Do I Know If My CPU Water Cooler Is Working
Check the rumbling and liquid flow to ensure your Processor water cooler is functioning
adequately. If it’s vibrating, it means your cooler pump is working. You can also examine the pump temperature, leaks, and water level to establish whether the cooler is working.
There are other ways to determine the functionality of your CPU water cooler. Simply follow the procedures outlined below.
Here are several ways to tell if your CPU water cooler is functioning or not:
Verify the Temperature
You can also check your CPU temperature to see how well your cooler works. If you notice your CPU temperature rising beyond normal, this indicates an issue with your water cooler. As a result, it is unable to remove heat from the processor.
We will utilize Core Temp software for our testing, which displays the processor’s single-core and multicore temperatures in a single location.
Here’s how to check the temperature:
- Download Core Temp and install it on your computer.
- Open Core Temp.
- Check the Processor section.
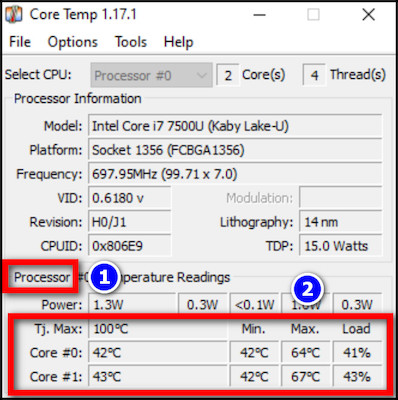
The Processor section displays the temperature of your processor’s cores. If the temperature is ordinary and there is no sign of overheating, your water cooler is functioning rightly.
Verify the Coolant Level
The coolant level in a liquid cooler is critical because fluid absorbs heat from the processor and dissipates it via radiator fans. So, if your cooler’s coolant level is lower than typical, it suggests it can only carry a small amount of heat.
So, checking your liquid cooler’s coolant level will tell you about the status of your CPU cooling. Simply follow the steps below to determine your coolant level.
The procedure for checking the coolant level is as follows:
- Turn off your computer and disconnect it from the power source.
- Remove your casing side panel.
- Open the radiator carefully.
- Check the coolant level of your cooler inside the reservoir.
If the coolant level inside the reservoir is lower than usual, it implies you should change the coolant of your PC; otherwise, your CPU cooler may not function properly.
Inspect for Leaks
In general, open-loop liquid CPU coolers have a variety of pipes. If one of the pipes leaks, the CPU cooler may stop operating, causing damage to the other hardware around it.
So inspecting the pipes for leaks will reveal the state of your CPU cooler. Simply follow the steps outlined below.
Follow the steps below to inspect an AIO cooler for leaks:
- Remove the side panel of your casing.
- Keep a paper towel or tissue on your hand.
- Look for a water-dripping mark on the pipe.
If you discover any leaks in the pipe, you must replace them immediately; otherwise, your CPU cooler may fail and damage the other components surrounding the cooler.
How to Fix the CPU Cooler if it is Not Working
If the CPU cooler is not functioning properly, users should inspect the power cord that connects the fan to the motherboard. Users can also try re-connecting the fan heatsink cable and brushing off any dust that has gathered on all components.
Also, check and make sure the CPU cooler is seated properly.
You will need some tools before you can repair the CPU cooler. These tools include a screwdriver, an empty tray, a 12-volt battery, and a cleaning brush. Simply follow the steps below to begin the repair process.
Here are the steps to fix the CPU cooler if it is not working:
- Turn off your computer.
- Disconnect it from all the power sources.
- Disassemble the cooler and remove the pump from the radiator.
- Drain the coolant from the pump and clean it.
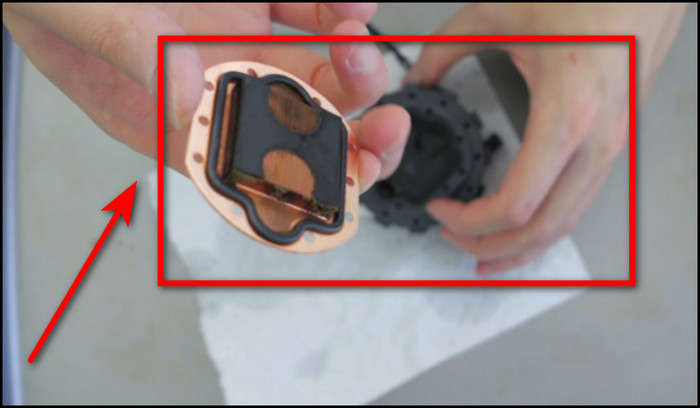
- Open the backplate of the pump using a screwdriver.
- Clean the inside of the pump and reattach them.
- Examine the pipes and look for leakage.
- Replace the leaking pipe.
- Reassemble the cooler.
- Reinstall the pump on your computer.
- Turn on your system.
Now that your system is on, check the temperature of the CPU. If the temperature of your CPU is the same as what the manufacturer stated, the CPU cooler is functioning suitably.
On the other hand, if you notice that your CPU temperature is higher than usual, this indicates your cooler is faulty, and you need to change it.
How to Reset My CPU Cooler
To reset your air cooler, remove the fan connector from the fan header, draw up the push pins, and spin the push pins clockwise 90 degrees to reset them. Users of liquid coolers must take apart, and clean all the parts. After that, they have to reassemble their cooler.
The method of installing a CPU cooler is simple; just follow the instructions below to learn more.
The procedure for resetting the CPU cooler is explained below:
- Remove the CPU cooler fan connector from the fan header.
- Turn the push pins counterclockwise at 90 degrees to release them.
- Clean all the parts with rubbing alcohol and a brush.
- Reset the push pins by rotating them 90 degrees clockwise.
Note: Do these processes if you have an air CPU cooler.
- Disassemble your liquid cooler and remove the pump from the radiator.
- Clean all the inner parts using a cleaning brush and cloth.
- Check for leaks in pipes and replace the leaky pipes.
- Reassemble the cooler.
- Fill the pump with coolant and carefully install it into the motherboard.
Note: These steps are for the liquid cooler.
After you’ve reset the CPU cooler, check to see if it’s still operating properly. If it is not operating sufficiently, repeat the preceding steps or replace the CPU cooler with a new one.
How to increase the Lifespan of Your CPU Cooler
To improve the lifespan of a CPU cooler, utilize crystal pipes instead of standard pipes, dye color liquid as a coolant, and a filter to avoid dust and grime. Users can also keep a cleaning routine to clean their CPU cooler on a regular basis to extend its longevity.
There are certain things a user may do to extend the life of a CPU cooler. These procedures are simple; simply follow the instructions in the part below.
Here’s how to extend the life of your CPU cooler:
Use Filter
Users can use filters in CPU coolers to filter dust and grime from the air, keeping the CPU cooler dust-free. The main issue is dust and filth, which can clog the fan and other cooling components.
Therefore, CPU coolers must work harder to remove heat from the processor. Their longevity can reduce as a result of these additional tasks. To extend the life of the CPU cooler, users should use a filter.
Utilize Crystal Pipes
Users can also utilize crystal pipes instead of standard tubes since crystal pipes allow the user to see into the coolant level and condition. The user can easily recognize any debris or filth passing through the pipes.
Users can maintain coolant quality early on for clear visibility, which helps the cooler last longer.
Use Dye Instead of Food Color
Instead of food coloring, users can rather use dye to change the color of their coolant. Because food coloring is created from edible components that produce bacteria and other organisms. These bacteria have the potential to cause damage to the cooling system.
Why You Shouldn’t Water Cool Your PC
Water cooling your PC is not recommended because there is always a possibility of leakage, especially if you’re using a custom loop. Custom loop components include a pump, radiator, pipes, and coolant. If the parts are not correctly linked, there is always a risk of a leak.
Another reason not to use a water cooler for your PC is energy consumption. A liquid CPU cooler requires more energy than a traditional air cooler.
As a result, if the user uses a low-power supply, the liquid cooler may bottleneck the system due to a lack of power.
Furthermore, liquid coolers produce more sound than air coolers due to the presence of a heavy radiator, a pump, and numerous fans. These components generate a lot of noise. So if it feels irritating, fix the CPU cooler noise to make it normal while operating.
How to Check Pump RPM PC
Go to your computer’s BIOS to verify the pump RPM. After that, navigate to your BIOS’s monitor option and select the Fan Info option. This section contains information about your pump’s RPM (Round Per Minute). Now check to verify if they match the company’s assertion.
Checking the RPM of the pump is a simple procedure. Simply follow the steps outlined below.
The following are the steps for checking pump RPM:
- Press F2 or DEL to enter into the BIOS.
- Go to the Monitor option in your BIOS.
Note: These options differ according to the motherboard type.
- Select the Fan Info option.
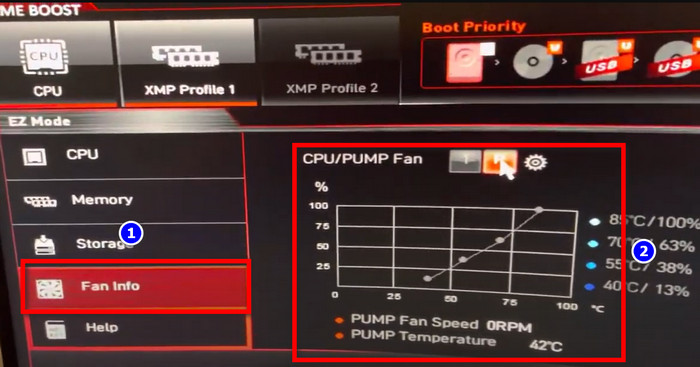
- Check your pump RPM from the Fan Info.
If your pump’s RPM is lower than typical, it signifies the pump isn’t performing sufficiently and needs fixing.
Conclusion
A properly functioning CPU cooler is crucial for the efficiency and durability of the computer, as well as for allowing the user to get the most performance out of it.
So, in this article, I’ve demonstrated how to determine whether your CPU cooler is operational and along with how to repair it.
If you have anything in mind about this topic, feel free to drop your comment in the section below.