CPU coolers transport heat away from the processor by absorbing heat, allowing it to run more efficiently.
However, it might cause many issues for the system if it is not installed properly on the CPU socket.
So, in this article, I will demonstrate some tried and true ways to determine whether your CPU cooler is fitted correctly.
Let’s get started.
How To Know If Your CPU Cooler Is Mounted Properly
To determine if you have correctly installed the CPU cooler, simply touch it and check for any movement. If it moves, it indicates insufficient mounting pressure. In that case, screw in the cooler tighter or ensure you’ve fastened the pushpins correctly.
Suppose your CPU temps range between 149°F (65°C) and 167°F (75°C) while under the workload and 50°F (10°C) and 59°F (15°C) while inactive, your CPU cooler is appropriately installed. But unless your temperature exceeds that, you might want to double-check your mounting again.
And make sure your CPU cooler is not loose.
Before determining whether your CPU cooler is adequately mounted, remove the motherboard from your chassis better see the CPU cooler. If you cannot do it, you can even install the CPU cooler without removing the motherboard.
Simply follow the methods listed below to complete the checking process.
Here are a few ways to know whether your CPU cooler is correctly mounted:
1. Examine the CPU Cooler Setup
You must examine a few factors to determine whether your AIO or liquid cooler is properly installed over the processor. As soon as you discover these factors, you can tell whether it is correctly mounted on your CPU.
Make Sure the CPU Cooler is Properly Touching the CPU
First, check to see if there is any room between the cooler and the processor, as air may be passing through that space. Air is a poor thermal carrier. It lowers thermal efficiency and has an adverse influence on cooling.
So, make sure there’s absolutely no space between the CPU and the cooler.
Otherwise, you might suffer like me. I bought a heat sink that was not actually touching my CPU. Despite the package claiming compatibility with LGA1151 sockets, implying a perfect fit, there was a noticeable gap of approximately 1-2mm between the heat sink and the CPU.
Consequently, my CPU temperature soared to 90°C while in the BIOS.
The solution was simple. The cooler was set in the wrong direction. So, if you use the correct kit with the proper amount of thermal interface material in the right direction, there won’t be any gap between the heatsink and CPU.
Verify the Screws are Tight Enough
Proper mounting pressure between your CPU and cooler is vital for optimal performance and to prevent damage. Excessive pressure can harm the motherboard, leading to issues like random shutdowns or boot errors.
To avoid this problem, modern motherboards include a protective metal plate that ensures proper connection without bending.
Don’t over tighten the screws, but make sure they are adequately tightened. Because not enough pressure causes poor contact, reducing heat dissipation and the cooler’s effectiveness.
Coolers with built-in screws prevent screws from loosening over time, maintaining a secure fit without too much pressure.
Another factor to look for is if the processor bracket wobbles a lot. If you see wiggles, the link is weak, and the assembly will be less efficient than it ought to be. In that case, tighten the cooler screws. But be careful not to overtighten them as it’ll do more harm than good.
To know how to fix the CPU cooler vibrating issue and how tight the screws should be, check out our steps on what to do if your CPU cooler is loose.
Ensure that the Pushpins are Securely Attached
Securely attaching your CPU cooler heatsink has become too easy with this ingenious mechanism — the pushpins. 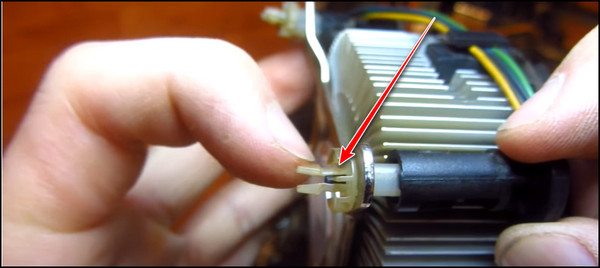
Gently push the pushpin onto the heatsink, then rotate it to ensure a tight fit. But beware! Improper installation can lead to disastrous consequences.
Loose pushpins or improper locking can result in poor contact between the CPU cooler and the CPU, causing inefficient heat dissipation and potential CPU damage.
Avoid this by maintaining the correct pressure and fixing any issues with the thermal paste application. Carefully place the heatsink, and push and twist each pin securely.
Don’t underestimate mounting the pushpins correctly, especially for Intel stock coolers. I myself am a victim of this unfortunate situation. My CPU temperatures rose as high as 90°C under moderate load just because of a loose connection. But properly tightening the connection, temperatures immediately dropped to 51°C, even during intense stress tests.
Here’s the secret, the markers on the pushpins indicate the direction to unlock and remove the cooler, not to lock them.
So, pay attention and turn them in the correct direction while gently pushing down to mount your stock cooler.
Check that the Screws are Tightened Evenly
Furthermore, some CPU coolers use screws rather than push pins. As a result, maintaining proper continued stress between the heatsink and the processor is critical. If you apply excessive force, you risk damaging the motherboard.
As a result, you must tighten the screw without being too tight or too loose. Uneven tightness when installing the cooling system might result in numerous issues.
Sometimes, users get problems screwing in a CPU cooler because the backplate blocks the screws or the screws are not compatible. Don’t worry, though; you can easily fix the CPU cooler not screwing in by getting the correct screws and checking the backplate.
Verify that You have Correctly Applied Thermal Paste
Finally, you should inspect the thermal paste between the heatsinks because the thermal paste is a good conductor of heat. It occupies these tiny areas, allowing for maximum heat exchange.
But don’t use too much thermal paste. It’ll increase the distance between the heatsink and the processor, reducing the paste efficiency. Also, it can spill on the motherboard and short-circuit. So you see how crucial it is to know how much thermal paste on the CPU is needed.
If you find these indicators in your CPU cooler, it signifies your CPU cooler is not correctly fitted into the motherboard and has to be installed appropriately.
2. Check the Functioning of Your PC After the Installation
If your CPU cooler is not correctly mounted on your computer, your system will behave weirdly and do unexpected things.
These problems include system stopping while gameplay, frequent PC starting problems, unpredictable restarting or shutdowns, and a single processor core warmer than the remaining cores.
These incidents usually occur when the processor becomes overheated, and you must know the signs of CPU overheating.
In most cases, the processor overheated because the CPU cooler was not functioning correctly, and it also indicates that there is a malfunction in the CPU cooler or that the cooler is not properly mounted on the motherboard.
You should know how to tell if the CPU cooler is working, as it’ll determine if your processor is getting hot due to a faulty cooler or if it’s not mounted correctly.
3. Monitor the CPU Temperature
Temperature is another indicator that your CPU cooler is not functioning properly. So you also need to monitor your CPU temperature and find if there is any difference between the minimum and maximum temperature.
If your highest processor temperature is greater than 90°C while working and greater than 50°C when idle, your CPU cooler is not correctly placed. Simply follow the instructions below to perform a temperature check.
For our demonstration, utilize Open Hardware Monitor, a free temperature testing program.
The following section describes the temperature testing procedure:
- Download Open Hardware Monitor and install it.
- Open the application.
- Check the Temperature section under the processor model.
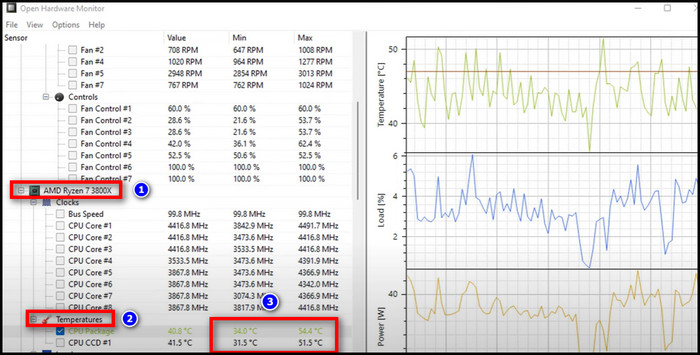
The processor’s lowest and maximum temperatures are listed in the Temperature section. If you notice a higher temperature than usual, make sure your CPU cooler is correctly placed.
4. Run a Stress Test
A less stressed CPU may not be able to generate heat. For that reason, the CPU cooler does not have to do as much work. Therefore, if the cooler is not correctly installed on the processor, the user is unaware of it.
As a result of the stress test, the processor will be used 100% of the time, and the user will be able to monitor the maximum temperature of the CPU and determine whether their cooler is appropriately mounted.
I will use CoreTemp for the demonstration. Simply follow the instructions in the section below to begin testing.
Here’s how to perform a stress test:
- Download CoreTemp and install it.
- Open CoreTemp and go to the Bench option.
- Click on the Stress CPU button.
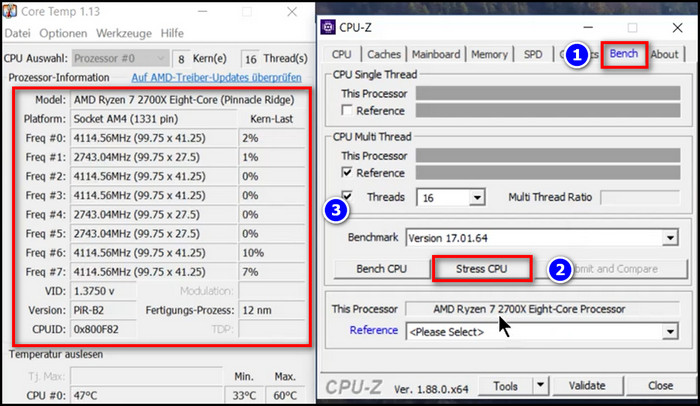
When you press the Stress CPU button, the app will overload your processor. Everything, including CPU frequency and frequency usage, is displayed on the left side of the CoreTemp menu.
In the meantime, you must monitor your CPU temperature during the stress test. If it is higher than usual, you may not have positioned your CPU cooler correctly on the processor.
How to Know if the CPU Cooler is Working
Notice the movement and liquid flow if you’re using a liquid cooler. As long as it’s buzzing, your cooler motor is functioning, and the cooler is ok. For an air cooler, simply observe whether your fan is spinning. If it’s spinning correctly, it’s working.
You can also inspect the water level in your liquid cooler. If the water level is lower than usual, it indicates that your cooler isn’t working properly and must be filled before it causes damage to the cooler.
You may also check the temperature of your CPU. If your CPU temperature is higher than average, your CPU cooler is not functioning the right way.
Finally, if you experience lag or freezing during regular stress on your computer, your CPU is overheating and hurting computer performance.
So there must be a problem with the CPU cooler because it cannot extract heat from the processor effectively.
How to Tell if Your CPU Cooler is Bad
If your system crashes while gaming or heavy workload, and your system restarts or shuts down unexpectedly, you have a bad CPU cooler. Also, if you see that a single CPU is hotter than the rest cores, this indicates a faulty CPU cooler.
You need to understand whether your CPU cooler is working properly.
When your CPU cooling fails to function properly, the CPU overheats under severe workloads or games.
The CPU cannot operate at its full frequency due to overheating. As a result, the system may stutter or freeze without notice.
Another indicator of a malfunctioning cooler is when one CPU core is hotter than the other.
If you notice varied temperatures for different cores, this indicates an issue with your cooling system, and it cannot disperse heat from the processor.
FAQs
How do I know if my CPU cooler is tight enough?
As long as there’s sufficient pressure to keep the cooler flat against the CPU, it’ll be securely fastened and function correctly. You don’t necessarily need to fully tighten it if the screws are equipped with springs.
Is mounting pressure important for CPU thermals?
No, CPU thermals are unaffected by mounting pressure. You shouldn’t be too worried about how much you should tighten the CPU cooler down. Have a look at the cooler manual to see if there’s a maximum amount of threading, which is the amount you should screw down. If the manual doesn’t have that info, screw in the cooler until it feels relatively sturdy.
What direction should airflow be for the CPU cooler?
When using a conventional tower air cooler, position the fan on the cooler’s heatsink to efficiently direct the airflow toward the rear exhaust of the computer case. By adopting this configuration, the system can effectively manage heat dissipation and maintain an ideal operating temperature for the CPU.
Conclusion
You will not receive the best performance from your computer if you haven’t installed the CPU cooler correctly over the processor.
So, in this article, I demonstrated how to determine if you have fitted your CPU cooler the proper way.
If you have any questions or comments, leave them in the space below.