After a lot of research and thinking, you finally bought a new cooler for your PC. The trouble is you can’t find any way to screw in the CPU cooler.

Why is my CPU cooler not screwing in?
This is nothing to worry about as you are not the only one who is facing this issue. I also faced this issue when I was a beginner at building PCs. I’m an expert now and I will share exactly how to resolve this problem in this article.
I don’t want to keep you waiting any longer so let’s just dive right in. I just need you to be wide awake and relaxed so grab a cup of coffee and read every part carefully and see how all your issues vanish into thin air.
How Do You Put A Screw In The Cooler
The process of installing a screw in the cooler and attaching it to the motherboard is not as complicated as you might think. The problem arises because of some other component and not just because of either the screw or the cooler.
In addition to that, literally, every CPU cooler out there comes with the screws provided nowadays. However, some manufacturers make rare mistakes like providing the wrong or incompatible screws.
There is a standard size for screws that you can follow if your cooler is pretty standard. The diameter of the screw holes is typically around 5 mm on a standard cooler.
On the other hand, if you are using a unique cooler that’s not widely available, then you will probably have to check the manufacturer’s website for the sizes.
If that doesn’t work, you can also try contacting their support team.
Also, make sure your CPU cooler is compatible with the motherboard and processor. And before you start screwing, verify the CPU cooler is seated correctly.
Let’s see how we can troubleshoot this issue now.
Here are the methods to fix the CPU cooler not screwing in:
1. Check If The Screws Are Compatible
The first thing you need to do when this kind of issue arises is to make yourself absolutely confident that the screws are not the source of the problem before moving forward.
You could do the measurements of the diameter and the screws by using the required tools that you get from any typical hardware store.
However, for your own convenience, you can also use an app called Wonderbolt with your smartphone which is much easier and free.
So, how do you take the necessary measurements? Well, in order to measure the diameter of screws and bolts, you need to measure the distance from the outer thread on one side to the outer thread on the other side.
This is typically called the major diameter and will usually be the accurate size of the bolt.
2. Check The CPU Backplate
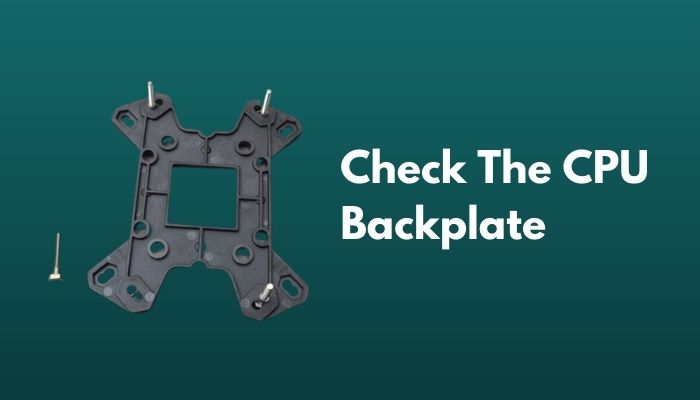
If you couldn’t find anything wrong with the screws you are using, then it’s time to check and make sure that the backplate isn’t improperly placed. You can always remove the backplate and place it correctly before installing the CPU cooler.
The CPU coolers need backplates, so they can keep the processors as much cool as possible.
Most of the users realized that their backplate had fallen off while screwing in the cooler or that it wasn’t properly placed.
I had a similar issue once and I fixed it by locating the plate that needed to be fixed under the motherboard. It was tucked away inside the case for the motherboard, and I only found it after taking the panel off.
Moreover, the screws are usually far away from the PCB because the backplate is required to thread the screws.
Another point to keep in mind is that you will need to press down harder when you are screwing in the cooler if you notice that your backplate is not placed the right way.
It might feel a little risky but trust me, it will work.
How Do You Put Spring Screws On A CPU Cooler
In order to put spring screws on a CPU cooler, you will need to manually position the cooler so that all four spring screws on the heatsink align perfectly with the four screw holes of the backplate.
After you are done with all that, you will need to carefully place the heatsink onto the CPU.
For the next step, you need to grab your screwdriver and very slowly turn every spring screw a half-turn clockwise.
This step is very important, even if it doesn’t seem like it, because this will help you understand whether the spring screw has made a connection with the backplate.
In order to do the opposite, like removing the spring screws, you need to first gently press down on top of the heatsink. This is mainly to counteract the pressure of the captive spring-loaded screws which are used to secure the heatsink to the motherboard.
Next, just use a number two Phillips screwdriver to loosen both the spring-loaded mounting screws.
If you need a comprehensive guide on how to install a CPU cooler, do not forget to check out our separate article. There we have included all the different types so that it can be easier for you.
FAQ
Question: Does the CPU cooler come with screws?
Answer: Yes, absolutely. Every CPU cooler comes with everything that is necessary to install it. If you didn’t get any screws, contact the store you bought it from immediately.
Question: How hard should I screw the CPU cooler?
Answer: Well, if I’m going, to be honest, you only need to use your judgment. There’s no reason to go overboard and keep turning even if it’s tight. The best thing is to just tighten it until a slight twist doesn’t turn the whole screw.
Question: Do you need standoffs for the CPU cooler?
Answer: Some CPU coolers have requirements for extra installation hardware, like standoffs. However, not all coolers need standoffs. The kind of motherboard you are using also determines whether you need any standoffs.
Question: What should I do if I put thermal paste on my CPU?
Answer: You need to clean the thermal paste off your CPU pins. You can do this very easily by pouring a bit of isopropyl alcohol into a small container. Dip a soft unused toothbrush and start brushing the CPU pins very gently.
Question: Can too much thermal paste cause overheat?
Answer: A lot of thermal paste has the potential to behave like an insulator. The best-case scenario is that your thermal paste will just be ineffective but in a worst-case scenario, you might end up damaging your components by overheating.
Question: How long does thermal paste last?
Answer: Almost all manufacturers list a shelf life on their thermal paste bottles. The most common life is about three years if the bottle has never been opened.
Final Thoughts
It can be super frustrating when you face an issue with doing something as simple as just screwing a CPU cooler in.
Thankfully, the fix is not frustrating at all. Now that you are done installing that new CPU cooler perfectly, you can go ahead and start your next gaming session.
If you do face any other issue regarding this topic, there are many more guides like this on our website so make sure to go take a look.