A multi-monitor setup can enhance the gamers’ playing experience — making it more convenient to stream games online, allowing you to play and interact with the audiences in real-time.
Thus, multitasking while gaming has grown more efficient through a multi-monitor system, replacing the need to buy expensive curved and wider monitors.
However, there are many situations where your multi-monitor setup may not work properly, and you can not run games on your desired monitor.
If you are facing similar problems and searching for the best solutions, then you are at the right place.
I have researched the possible causes of this issue and stacked up all the working methods to solve the error, testing them all by myself.
So, let’s dive in.
Also, check out our separate post on can you run two Monitors on two GPUs.
Why are my Games Launching on Wrong Monitor?
While setting up a multi-monitor arrangement for gaming and multitasking, many users have complained about their games and softwares not being able to start on their required monitor.
This mostly occurs in Windows 10. But many Mac OS and Linux users have also reported facing the similar issue.
You may fail to open your games and apps on your required monitor for various reasons.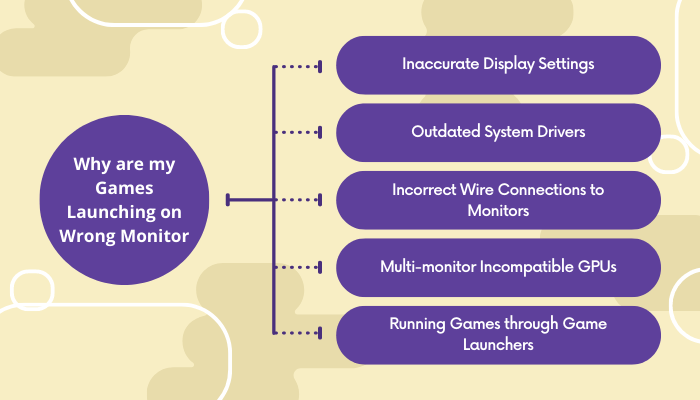
Here are some common causes for games to start on the wrong monitor:
Inaccurate Display Settings
While running a multi-monitor arrangement for gaming, improper display configuration like primary monitor setup, refresh rate mismatch, and unsupported resolution settings can create the discussing error.
Outdated System Drivers
Bugs and glitches from outdated OS sometimes open games on unwanted monitors. Even old display drivers can add to the bothering issue.
Incorrect Wire Connections to Monitors
Loose cable connections in the monitor’s display port or damaged wires can block a multi-monitor setup from operating accurately.
Multi-monitor Incompatible GPUs
Though most of the latest GPUs from NVIDIA and AMD support multi-monitor setup, many older GPU models are not made compatible to run multiple monitors at once.
Running Games through Game Launchers
Game launchers like Steam, Epic, and Origin are designed to open games on the same screen as the launcher runs by default.
Check out our separate post on move taskbar to another Monitor on Windows 11.
How to Fix Games Launching on Wrong Monitor
Though reasons for facing the bothering issue in your multi-monitor setup may seem complicated, the fixes are pretty simple.
Taking actions like configuring the monitors properly, running games on Window Mode, and updating drivers can quickly solve this problem. Additionally, monitor management tools like Nvidia View and Multi-Motion Tools can promptly fix any issue related to programs opening on the wrong monitor of your setup.
Moreover, it’s better to check whether extending the display fixes the error. Just as importantly, ensure that none of the monitors go to Sleep Mode before you turn off the PC.
Here are the methods to solve Games Launching on Wrong Monitor:
1. Check the Dual Monitor Systems Wired Connections
You can sometimes see your games opening on the wrong display simply due to faulty cable connections to your monitors. Therefore, the first thing is to manually check whether your multi-monitor system is arranged correctly.
Make sure all the cables are firmly attached to the display ports of the monitor and graphics card, as even a slightly slack connection can restrain games from running on the right monitor.
Bear in mind that your graphics card should have the power to run dual monitors on their native resolutions.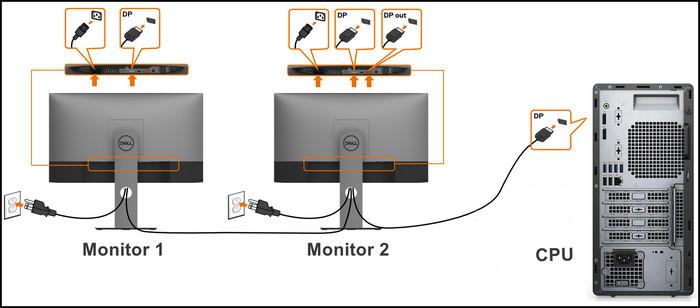
Follow our guide to fix Monitor randomly loses signal.
2. Set the Desired Monitor as Primary
Upon physically checking the connection, it’s time to configure the dual monitor setup inside the OS. This configuration can be done from both the Display settings and the GPU’s Control Panel, depending on whether you have a dedicated GPU or not.
Here’s the way to configure your display settings (For internal GPU Users):
- Right-click on any blank space of your display and open Display Settings.
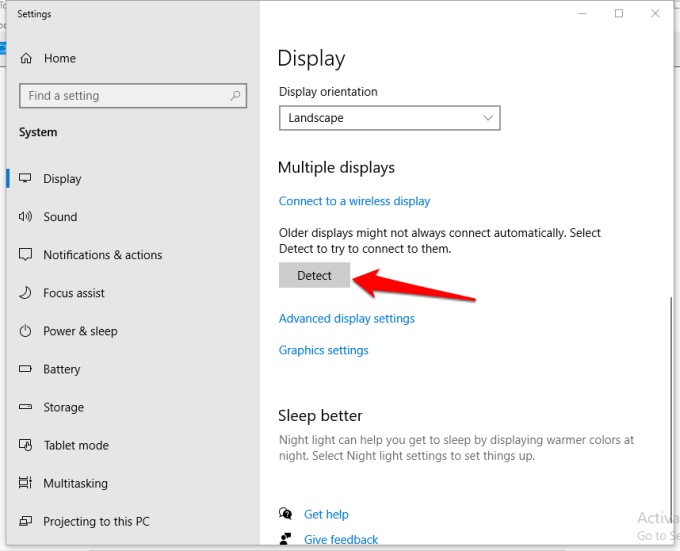
- Scroll and select the Detect button under the Multiple Display option.
- Select your required monitor and enable the option Make This My Main Display.
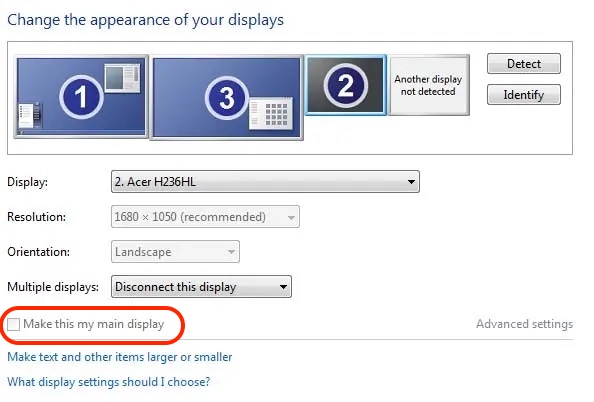
- Reboot your PC.
Inside the Display Option, you can change the display resolution, refresh rate, and orientation according to your needs.
Also, check out our quick solutions on how to fix Monitor goes black for a second.
Moreover, You can choose to extend your monitors, duplicate both screens or run any of the monitors according to your preference.
Here’s how to set the primary display monitor (For dedicated NVIDIA GPU users):
- Right-click on any empty space on your desktop and open the NVIDIA Control Panel.
- Select Set Up Multiple Displays from the left side of the menu.
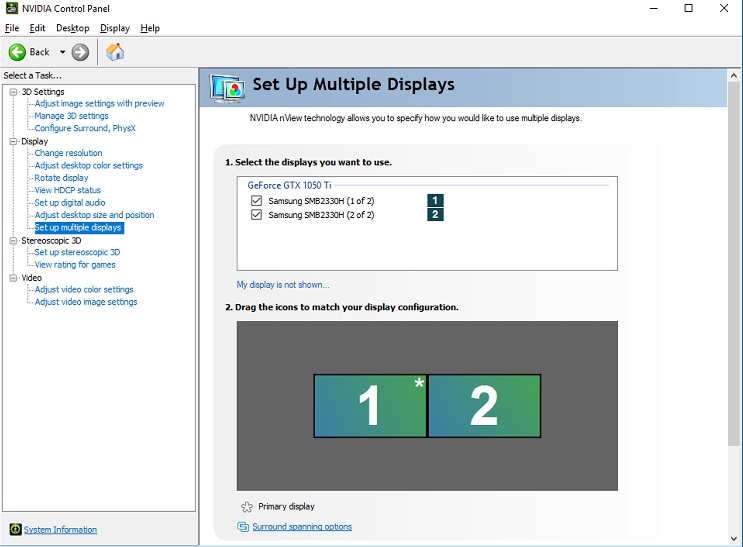
- Check the boxes for your needed monitor to set as primary.
- Save and quit.
- Restart your PC.
Here’s how to set the primary display monitor (For dedicated AMD GPU users):
- Right-click on any blank space on your display and open AMD Radeon Settings.
- Open AMD Eyefinity Multi-Display from the left side of the menu bar.
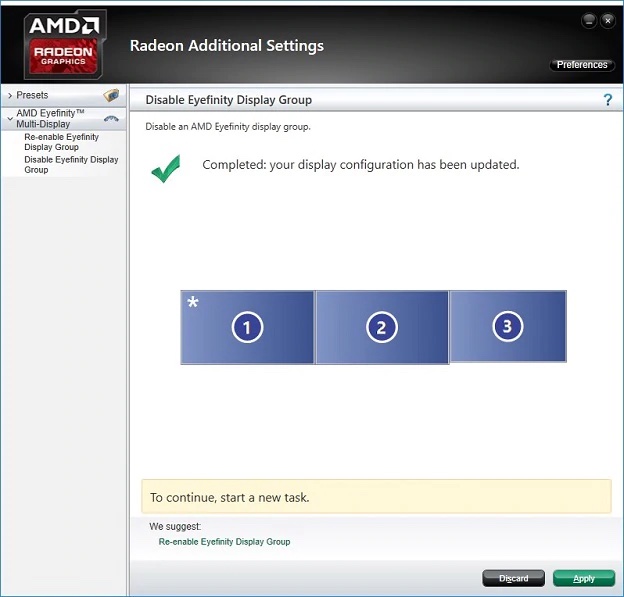
- Choose Set Preferred Display.
- Tick on your desired display and click on Apply.
Check out the easiest way fixes for Motherboard can’t detect Monitor.
3. Change the Screen from in-game Display Settings
Many newly released games now provide the option to manually select the monitor on which the user wants to run the game. It’s straightforward and readily serves our purpose.
Here are the steps to Change the Screen from in-game Display Settings:
- Load your game and open the game’s Settings.
- Look for Display Settings and open it.
- Select the monitor on which you want to run your game from Display Selection(option name may differ from game to game)
- Save the settings.
Here’s a complete guide on how to fix dual Monitor lag Windows.
4. Update OS and System Drivers
Regular updates in Windows bring new features and patches to fix bugs, and many gamers have claimed that simply updating the OS and Drivers has resolved their error.
Here is how to Update your Windows 10:
- Click on the Start menu and open Settings.
- Choose Updates and Security and check Optional Updates.
- Click on Check for updates.
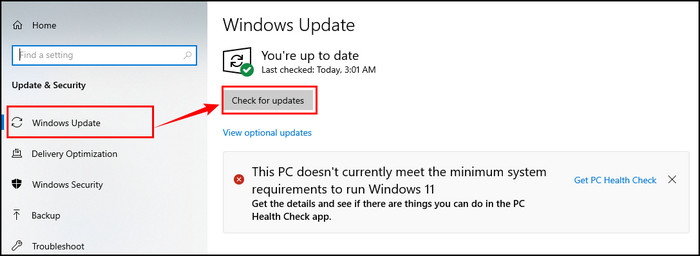
- Install any updates if available.
Follow these actions to Update your System Drivers:
- Type Device Manager on the Search Bar and open it.
- Right-click on Display Adaptors and Monitors.
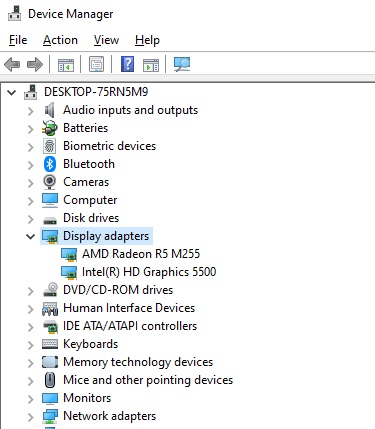
- Click on Update Drivers and select Search automatically for drivers.
- Install if any updated drivers are found.
5. Disable the Wrong Monitor
Disabling and re-enabling the wrong monitor has solved the issue in many cases.
Here’s how to disable your unwanted monitor:
- Close the game and press Ctrl+Alt+Delete.
- Open Task Manager and End all the processes related to the game.
- Open Settings from the Start menu and select Display Settings.
- Navigate to the Multiple Display option and choose your unwanted monitor.
- Click on Disconnect This Display and restart your PC.
- Launch your game in your required monitor and close again by following the procedure above.
- Repeat the steps to enable the wrong monitor again and check whether the issue is fixed.
6. Move the Game to the Desired Monitor Using Preview Screen
We already understand that the multi-monitor configuration glitch is one of the main reasons for games opening on the wrong monitor, and gladly, it can be resolved easily by moving the game to your required monitor with the help of Preview Screen.
Here’s how you can move games to your desired monitor using Preview Screen:
- Run your game and press the Window
- Drag your mouse on the Games icon in the Taskbar to see the preview screen.
- Right-click on it and choose Restore.
- Right-click on the game’s Preview Screen again and select Move.
- Press the Shift + Windows + Arrow (left or right) or drag the windows to move it on your needed monitor.
- Select the Restore button again and close the game in Windowed Mode.
Launch the game and check whether the issue is gone.
7. Switch between Screens
From my test, I have found that games starting on the unwanted monitor can quickly be dealt with by switching screens to move the running game to the desired monitor.
Follow these actions to switch between screens while gaming:
- Run the game you want to play.
- Press Win+P to open Project Menu and select Second Screen Only to run your game on the primary monitor.
- Press Win+P keys again and choose the PC screen only.
- Quit the game and re-open it.
- Check whether the game runs on the correct monitor now.
8. Create the Game’s Shortcut Icon
Creating the game’s Shortcut option on your required monitor and customizing it accordingly can solve this annoying issue.
Here’s how you can create a games shortcut on your desired monitor:
- Find the .exe file location of your wanted game or application.
- Right-click on the .exe file and select Create Shortcut.
- Select the shortcut icon of the exe file and press Ctrl+X to cut it.
- Go to your required monitor and paste the icon (Ctrl+V).
- Run the game from the shortcut icon.
9. Dual Monitor Management Tools
You can try to use 3rd party Dual Display Management Tools to run your games on the proper display. Tools like NVIDIA View, Multi-Monitor Tool, and Display Fusion can help you to switch screens faster and efficiently without putting much load on your PC.
These tools are super stable and easily compatible with any running system. These tools help to quickly enable/disable the display screen, set up the primary display, and switch programs to another screen without any hassle. On top of that, they are fully free and safe to use.
How to Fix Games Launching on Wrong Monitor for Steam
Many users from Steam have stated that games launching through the Steam launcher also bring up the issue of opening on the wrong monitor in the Steam Community and Forum. Running the game in Windowed Mode is the simplest solution to the Steam-operated games.
Here’s how to allow the Windowed Mode in Steam:
- Run the game on Steam.
- Open Display Settings and click on Video Settings.
- Choose Display Mode.
- Click on the Dropdown menu to see display options.
- Select Windowed Mode and quit the Game.
- Reboot the PC.
If you don’t find the in-game option to change the display mode, you can do it manually from the Steam Client.
Here’s how you can enable Windowed Mode from Steam Client:
- Run the Steam Client on your PC.
- Open the Games Library.
- Right-click on your required game and choose Properties.
- Go to the General tab and select Set Launch Options. A new window will pop up, giving an advance user warning.
- Type your required parameter of Windowed Settings and click OK to apply.
- Relaunch the game.
What are the Problems of Multi-Monitor Setup for Gaming?
At present, PC equipment are powerful enough to support the Multi-monitor setup. Games and Software are also built and compatible to run through multiple monitors.
However, some common problems may arise while you set your arrangement and try playing games on multiple monitors. Frequently, you can see issues like Lower Resolution, Color Distortion, Wrong Refresh Rate, Improper Scaling Settings, or even unclear display images.
You have to handle each case individually and make the exact settings for every running monitor.
Look at some of the common problems and how to fix them below:
1. One Monitor is not Working
The first issue that may come up is that one of the monitors is not showing anything though being adequately connected. This may occur due to various reasons.
At first, you have to verify that your monitor is not defective. To check this, you can connect your inoperative monitor as the primary monitor and disconnect all the other monitors. Now, see if the monitor is working or not.
Always remember to check all the cables and attach every connection tightly and correctly. Use the appropriate wires for each port and try switching the port type of the connection. For easy understanding, you can try replacing your connection to VGA/DVI from the previous HDMI display port to test your faulty monitor.
Never use any damaged cable or ports. Minor damage to any parts can make your monitor not to work properly.
2. Monitor not Detected
After powering up the monitor, if you see any error message like No Signal or Monitor not Detected, it’s because of inaccurate software settings.
First, you need to let your OS detect your monitor. For this,
Open your Start menu > Go to Settings > Open System > Select Display > Click on Detect button.
Yet, if your OS fails to identify your monitor, update the Display Drivers and reconnect the plugs of the monitor.
3. Lower Resolution Issue
You can face lower resolution in your monitors unless they are configured properly. It’s always recommended to use the exact resolution for all of your monitors.
Here’s how to fix monitor resolution:
- Go to Start Menu and open Settings.
- Select System and go to Display.
- Navigate Display and open Advanced Display Settings.
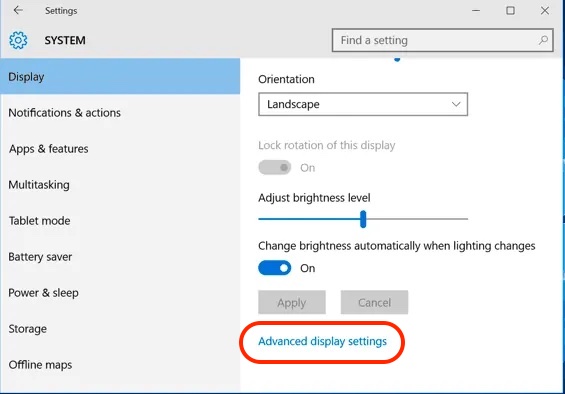
- Scroll to Display Resolution and open the drop-down menu. From here, you can see different resolution options for your monitor.
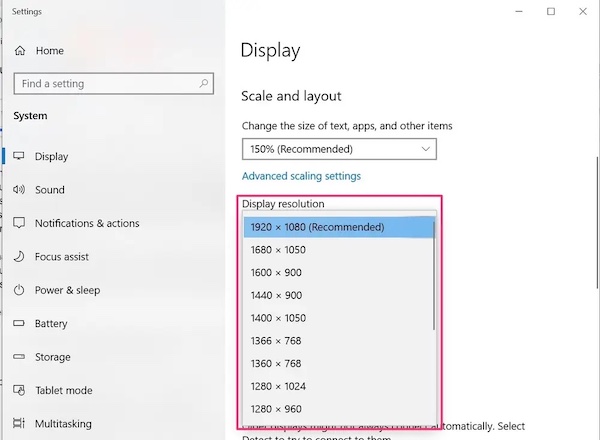
- Set the required resolution for all of your monitors.
Still, if you find poor image quality while gaming, you can lower the graphics settings and display resolution in the game and increase them gradually until you find your sweet spot for image quality.
5. Refresh Rate Issue
The display may show scattered and broken images when your monitors are set to an incorrect Refresh Rate. So, putting the refresh rate correctly for all your monitors is a must.
Here are the steps to solve Refresh Rate issues:
- Go to Start Menu and open Settings.
- Click on System and choose Display.
- Open Advanced Display Settings under the Display Tab.
- Select your monitor and look for the option of Refresh Rate.
- Choose the refresh rate according to your monitor’s manufacturer.
6. Color Distortion Issue
You may feel uncomfortable when you see different display colors and color distortion on your running monitors. So all monitors should be matched to the same color to give you a comfortable view.
Follow these steps below to correct your Color Distortion issue:
- Go to Settings from the Start
- Open System and choose Display.
- Go to Advanced Display Settings and select your required monitor.
- Click on Display Adapter Properties.
- Open the List All Modes from the Adapter tab.
- Choose the highest bit number and click OK to save changes.
- Repeat these steps on every connected monitor of your setup.
7. One Monitor Lags while Gaming
This is a common but annoying problem in multi-monitor setup as this significantly affects the performance and playing experience for gamers. Before taking action, you must ensure both monitors are running at the exact resolution.
Moreover, you have to set the refresh rate for the monitors in such a way that they are divisible by each other. To clarify, when one monitor runs at a 120Hz refresh rate, another monitor has to run at a 60Hz or 240Hz refresh rate.
Sometimes games lag due to the load on the GPU being too huge. Running multiple monitors takes a massive toll on the GPU, and games can become unstable because of this. To tackle this issue, you can close all the heavy games running in the background from the Task Manager.
You can also disable the Hardware Acceleration feature from your browser to take off some load from your GPU. On top of that, optimize your games and GPU settings to get a smoother gaming experience.
FAQs
How Do I Change What Monitor A Game Launches On?
Games and Applications generally launch on the primary monitor by default. So, you need to set your desired monitor as the primary one and launch the game on it.
Similarly, you can open your game in Windowed Mode and drag it to your needed monitor. Then, set it to fullscreen and enjoy the game.
Can I Run Two Monitors with Different Refresh Rates in a Dual Monitor Setup?
Yes, you can run two monitors with different refresh rates in a dual monitor setup. You need to set the refresh rates that are divisible by each other. For example, if one monitor runs at a 60Hz refresh rate, another monitor must run at a 120Hz refresh rate.
How do I stop a game from switching monitors?
Set the in-game resolution to match your display resolution to stop a game from switching monitors.
Final Words
To wrap things up, you can easily fix your games launching on the wrong monitor issue by carefully checking the cable connections of monitors, updating the OS and Drivers, properly selecting primary monitors, or even manually moving the game to the right screen.
Hopefully, this article has solved your problems and helped you to play games on your desired monitor effortlessly.
So, whether you are a pro streamer or a friendly neighborhood gamer, get your monitors ready and embrace the amazing gaming experience through multiple monitors simultaneously.
Happy Gaming!