The tablet mode is a fantastic feature present in previous versions of Windows. In this mode, you can use the touch screen of your Windows 11 device to navigate the operating system.
Sadly, in Windows 11, the tablet mode feature has been discarded. You can use the touch screen of your device by just disconnecting the keyboard from your system.
So you might ask, why is there no tablet mode in Windows 11?
So the only thing you can do on Windows 11 to use your device’s touchscreen is to disconnect your keyboard. Many laptops can be used as tablets, so it is not surprising if you want to know how you can use the touch screen of your device.
Read the full post for more details.
Overview of Tablet Mode on Windows 11
There are a few things that need to be cleared out first. There is no tablet mode on Windows 11.
As I previously mentioned, Microsoft wanted Windows 11 to have better touch screen support, so all you need to do on Windows 11 to use the touchscreen is to disconnect your keyboard.
Many tablets have keyboards that can be disconnected. Try disconnecting the keyboard from the tablet and the touchscreen can be used automatically.
Many smaller laptops can be used as tablets as they have removable keyboards. If you cannot use your device’s touchscreen, please check whether Windows 11 has touch screen support for your device.
Many users have reported that they can use the touchscreen but the touchscreen does not rotate. This means that the touchscreen is not shifting from portrait to landscape mode and vice versa.
If you are one of the people trying to fix that issue, look no further. The process on how to fix this is given in this post.
Check our latest post on how to Fix Sound Cracking Issue on Windows 11.
How to Fix Windows 11 Tablet Mode not Working
There are multiple different problems that you can face when you are using the touch screen of your device. One of the prominent issues is that the touchscreen does not rotate or change orientation.
The solutions to common problems regarding tablet mode on Windows 11 are below.
Here are the methods to fix the tablet mode on Windows 11:
1. Restart your Device
Follow this method if your device is stuck in tablet mode.
Restarting your device is one of the best, simplest and quickest ways to fix any issue. The great thing is that restarting a Windows 11 device is extremely easy.
The simple instructions on restart your Windows 11 device are extremely easy, so there is no reason for you to be nervous. Keep calm and follow the steps below.
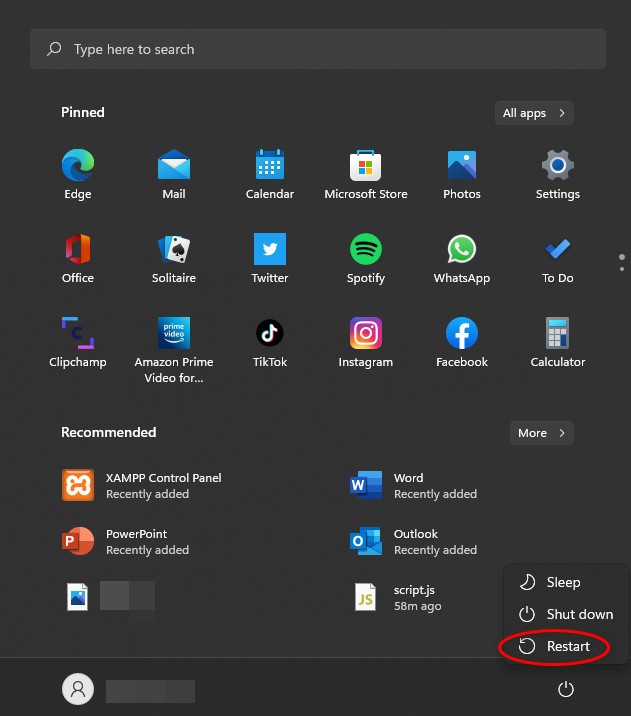
Here are the steps to restart your Windows 11 device:
- Tap on the Start button.
- Navigate to the power button and click on it.
- Select Restart.
If you have followed the steps correctly, your system must have restarted. Check whether the problem persists after your system boots up.
If this procedure did not apply to you, please follow the other methods given in this post.
Follow our guide on how to Use Tablet Mode on Windows 11.
2. Check the Keyboard Connection
Windows 11 does not have a specific tablet mode that can be turned on and off using a switch. The process of switching to tablet mode is automatic and can only be achieved by disconnecting the keyboard from the touchscreen.
If your keyboard is not disconnected correctly, Windows 11 will not use the touchscreen. Make sure you have disconnected your keyboard properly.
If your laptop does not have a removable keyboard but a flip keyboard, flip the keyboard to use the touch screen.
If this procedure did not apply to you, please follow the other methods given in this post.
3. Update Windows 11
Having an outdated Windows 11 running on your system can cause problems and errors. It is a great habit to update your Windows 11 operating system to avoid unnecessary problems.
Updating Windows 11 is a reasonably easy process consisting of very straightforward steps. There is no reason to be nervous; keep calm and go through the steps below.
Here are the steps to update Windows 11:
- Press the Windows and I keys together on your keyboard. You will be taken to the Settings menu.
- Click on Windows Update from the left pane
- Click on Check for updates.
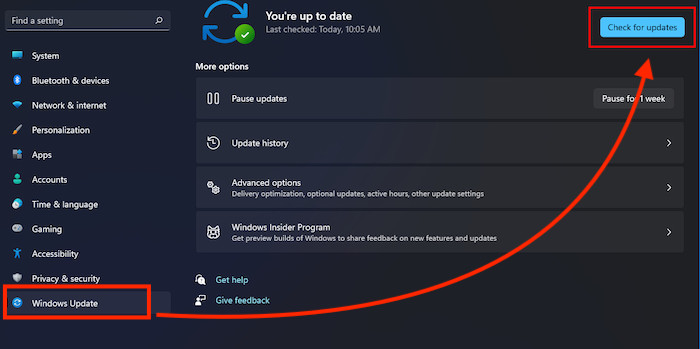
- Download and install any remaining updates, if there are any.
- Restart your device.
- Check whether the problem still occurs or not.
If this procedure did not apply to you, please follow the other methods given in this post.
Check out our expert-recommended post on how to solve Error 0x00000001 in Game Pass on Windows 11
4. Run an SFC Scan from the Command Prompt
SFC(System File Checker) scan is a great tool to see the state of the files present on your system. It can be used to get out of the tablet mode if you are stuck in it
Running an SFC scan might sound hard to do, but that is not the case. It is extremely easy to run an SFC scan; all you have to do is run a command line in the Command Prompt.
Please follow the steps to this process given below.
Here are the steps to run an SFC scan on Windows 11:
- Press the Windows and R keys together on your keyboard.
- Type in cmd and click on OK or press the Enter key on your keyboard. (5)

- Paste sfc /scannow in the Command prompt and press the Enter key. (6)
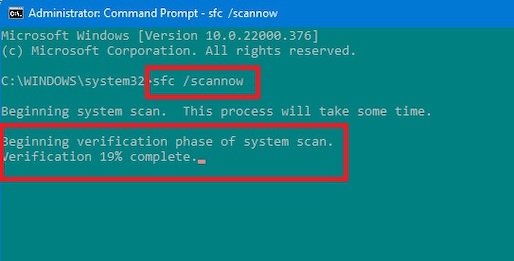
- Wait for the process to end.
- Check whether you are out of tablet mode or not.
If this procedure was not applicable to you, please follow the other methods given in this post.
5. Use a System Restore Point
A System Restore point is a feature that can be used to create an image of an instance when your pc was working perfectly and then access it when your current system is not functional.
It can also get out the able mode f you are stuck in it. The simple steps on how you can do that are given below. Keep your cool and go through the steps and you will be all set!
Here are the steps to access a System Restore point on Windows 11:
- Go to the Search button and search to create a restore point.
- Select where you want to create it and make the system restore point.
- Access the system restore point.
Following the steps given above will fix the problem and you should be out of tablet mode by now.
How to Fix Windows 11 Tablet Mode not Rotating
It is an essential feature in any touchscreen to go from portrait to landscape mode as the user wishes. Not being able to use this feature is very frustrating, that is why I have written the steps on how you can fix this problem.
The steps are simple so you can wipe the sweat off your forehead and dive into the straightforward steps given below.
Here are the steps to fix the Windows 11 tablet mode not rotating issue:
- Go to the Settings menu by pressing the Windows and I keys together at the same time.
- Click on System from the left pane.
- Go to the Display menu.
- Scroll down and uncheck the Rotation Lock option.
- Restart your pc.
Follow our epic guide to Fix Installation Failed Error 800f0830 on Windows 11.
Conclusion
I sincerely hope you could fix the tablet mode issue on your Windows 11 device. I know how annoying a problem like this can be.
That is why I tried my best to give you the best procedures that you can follow to fix this issue and I hope you never face a problem like this again.
I wish you good luck in whatever you do in the future. Take care and stay safe!