Every motherboard features an audio output, which is an electrical interface that transmits analog audio signals used for computer media playback.
However, users occasionally find that their audio ports have stopped working, and no audio signal can be detected from them.
I’ll therefore explain six proven and tested solutions to the audio port not working problem in this article.
Let’s get started.
How to Fix Audio Jack on Motherboard
You can repair the audio port by updating the system audio driver, running the built-in audio troubleshooter from the Windows Settings, and configuring the audio settings in Windows. You can also try another audio port if one of the ports is not working.
Note: These solutions are for audio jack software problems. If the audio jacks become internally damaged or stop working, you must either replace the motherboard or fix it.
Here are some methods for repairing audio jacks on the motherboard:
1. Disable Front Panel Jack Detection
When the front panel jack detection is enabled, the rear panel jacks are automatically disabled. As a result, disabling the front panel jack detection will resolve the audio jack problem.
The Realtek HD Audio Manager allows you to disable front panel jack detection. It is free audio software.
The following are the steps to turn off front panel jack detection:
- Download Realtek HD Audio Manager and install it.
- Type Control Panel in the Windows Search pane and click on the search result to open it.
- Type Realtek HD Audio Manager in the search option.
- Open Realtek HD Audio Manager.
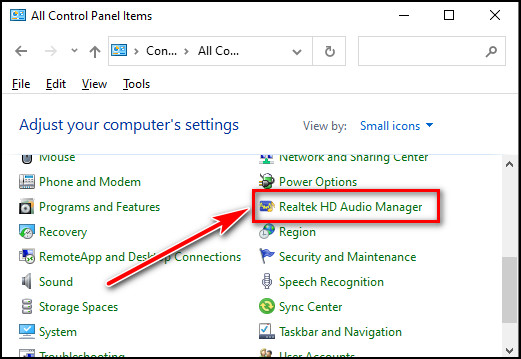
- Select the Connector Settings icon at the bottom right corner.
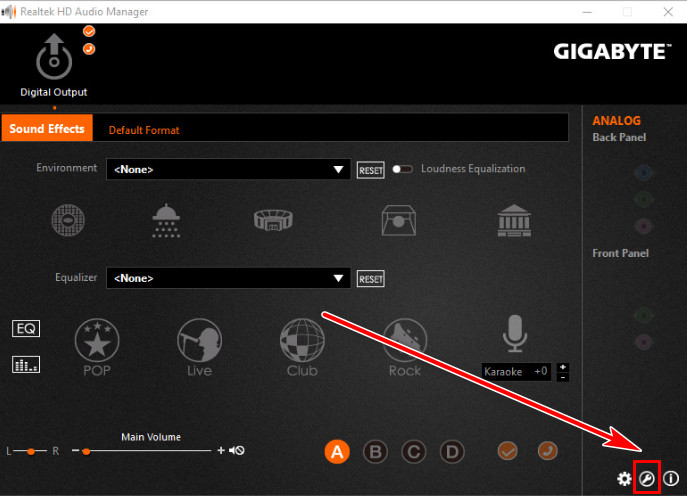
- Toggle off the Disable front panel jack detection option.
- Save the changes by clicking OK.

After you’ve disabled the front panel jack detection, put your headphones or soundbox in the rear jack panel and see if they work. If that doesn’t work, try the following method.
Also, don’t forget to check out our experts tested Chipsets and Motherboards that support Windows 11.
2. Update the Audio Driver
Older drivers are prone to glitches and issues. As a result, the audio driver may not function properly. Thus, updating the audio driver can resolve the issue of the audio jack not working.
The process for updating your audio driver is as follows:
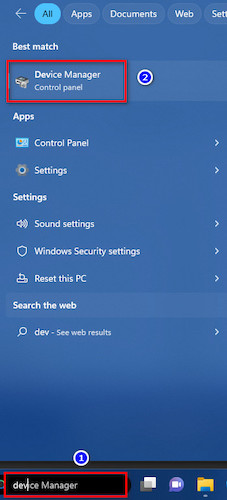
- Type Device manager in the Windows Search pane and click on the search result to open it.
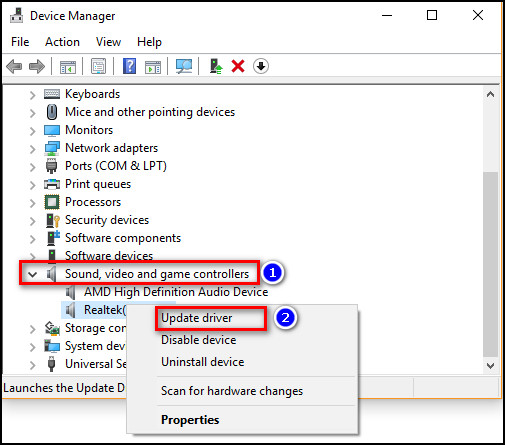
- Expand the Sound, video and game controller.
- Right-click on the Realtek audio driver.
- Choose the Update driver.
- Select Search automatically for updated driver software.
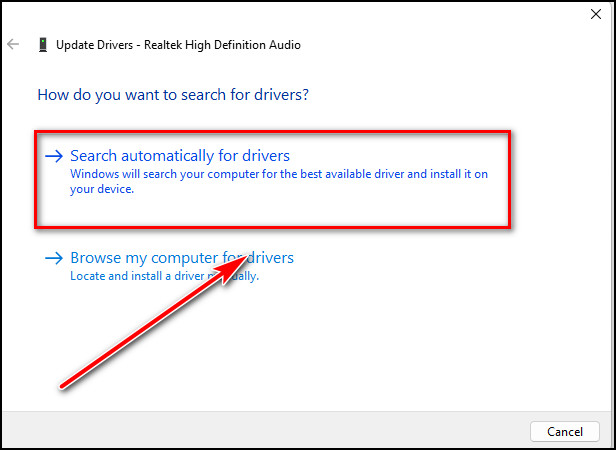
When you select the option Search automatically for updated driver software, your audio driver will update itself to the most recent version utilizing the internet. After that, check to see if your audio jacks are working; if not, proceed in the following ways.
3. Set Playback Device As Default
When your audio driver fails to recognize your playback device as a default device, it is unable to deliver audio signals to it. As a result, you will not hear any audio output from that device.
Switching the playback device to default will solve the audio problem on the motherboard.
Here is the way to set the playback device as the default:
- Right-click the Volume icon in the taskbar.
- Choose Sounds.
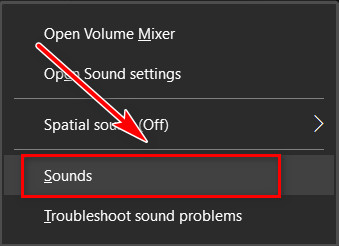
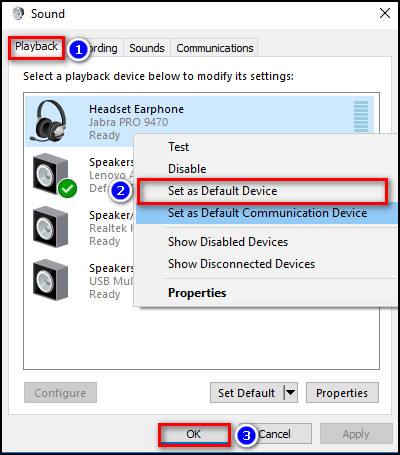
- Navigate to the Playback option.
- Right-click on your preferred audio device and choose Set as Default Device.
- Click Ok to save the progress.
After you’ve made your playback device the default device, check to see if your sound jack is working properly. If your audio is not working, proceed to the next step.
Follow our guide on how to connect extra Fans to Motherboard.
4. Run Audio Troubleshooter
Troubleshooting is a simple utility that you may start on your computer to examine and address common issues, such as audio problems. You can use Windows’ built-in troubleshooter to resolve the audio jack problem.
The steps to use the audio troubleshooter are as follows:
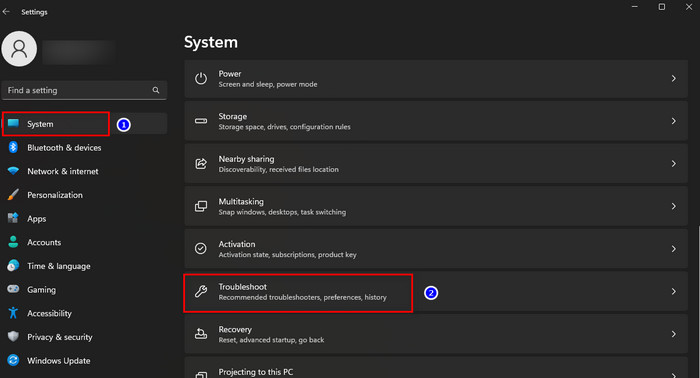
- Press Windows + I keys on your keyboard to open Settings.
- Select Troubleshoot from System.
- Choose Other Troubleshoot.
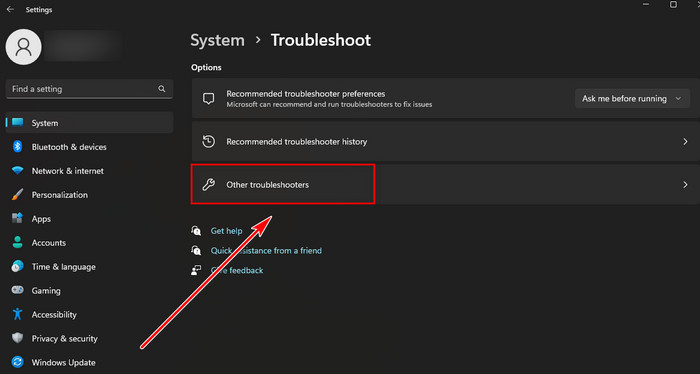
- Press Run beside the Playing Audio.
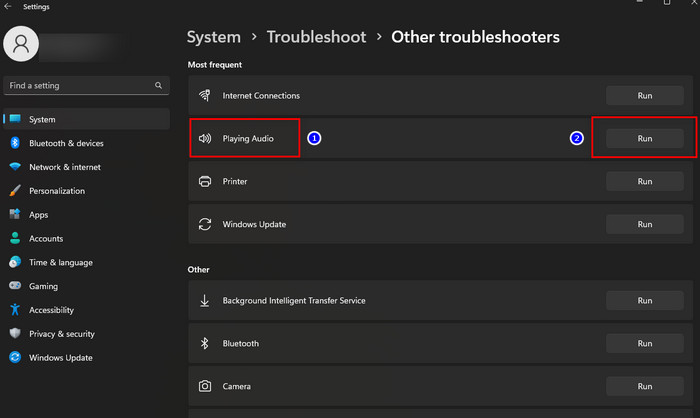
After running the troubleshooter, the tools automatically seek and resolve audio problems.
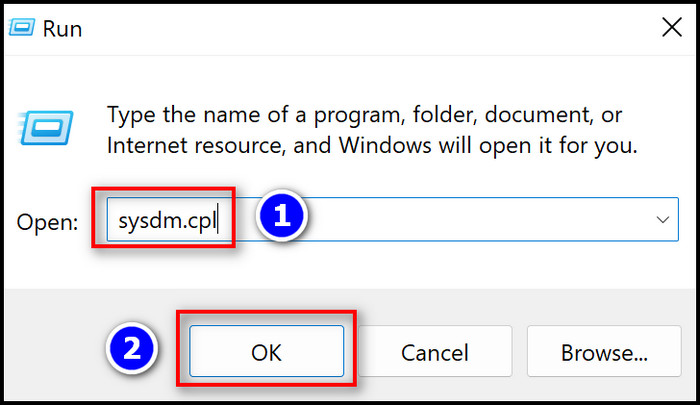
5. Restore the Original Settings
Sometimes, changing a setting can make your audio jacks unusable. Therefore, returning the settings to their initial configuration can resolve the motherboard’s audio jacks issue.
The steps to return to the default settings are as follows:
- Press Win+R to open Run.
- Click OK after typing sysdm.cpl.
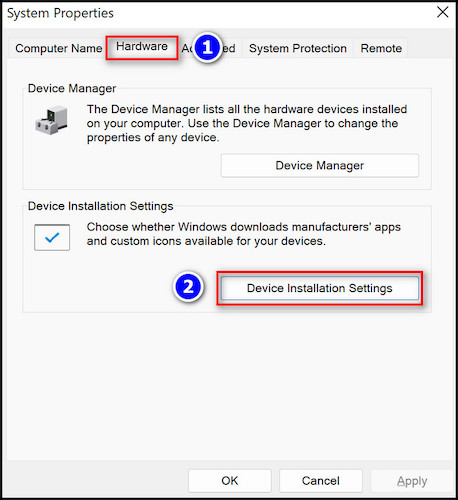
- Navigate to the Hardware tab and select Device Installation Settings.
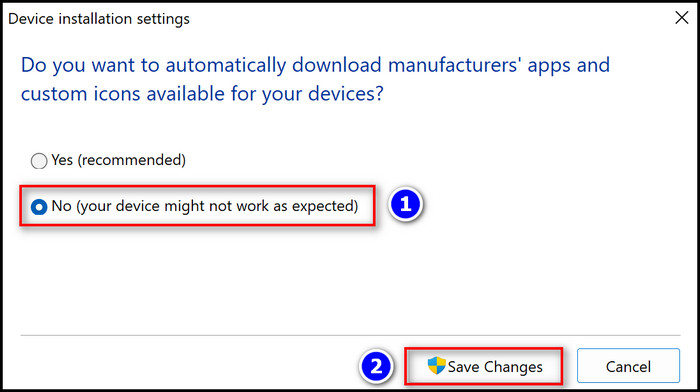
- Choose the No (your device might not work as expected) option and click Save Changes.
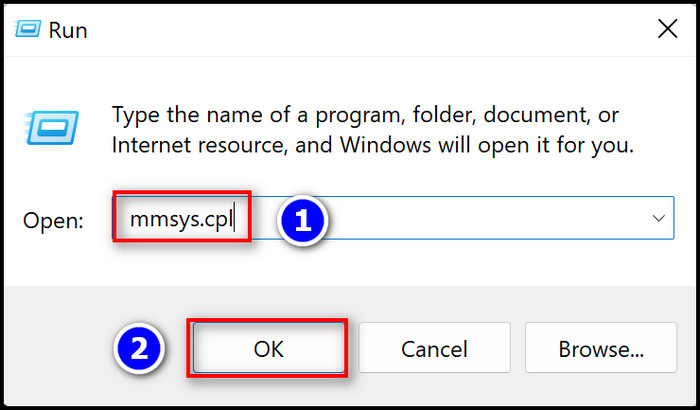
- Reopen Run, enter mmsys.cpl, and choose OK.
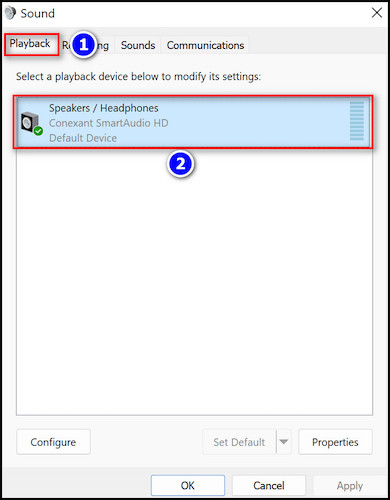
- Select the audio device you want to utilize by double-clicking on it in the Playback tab.
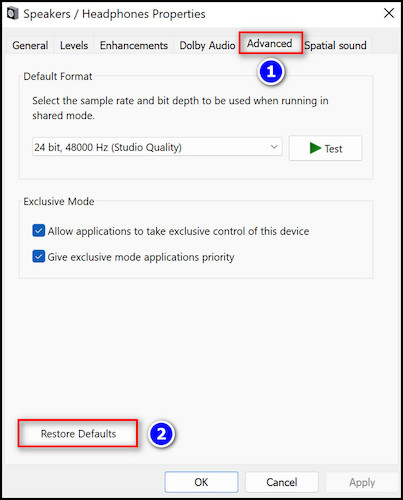
- Choose the Advanced tab and select Restore defaults.
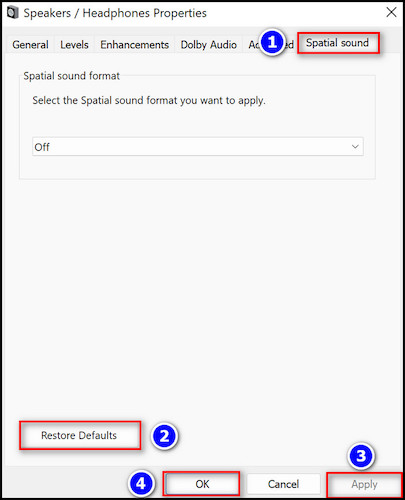
- Navigate to Spatial Sound and click on Restore defaults.
- Click Apply and hit Ok to end the process.
After the operation is completed, all of the sound settings will be restored to their previous state. Check to see if your audio jack is operational. If that doesn’t work, try the following method.
Follow our guide to fix Motherboard error 99.
6. Examine the Connection Settings
You can also check your audio connection to see if anything is out of place or if everything is connected correctly to the motherboard.
The steps to check the motherboard’s connection settings are as follows:
- Turn off your computer.
- Disconnect all the power sources.
- Open the side panel of your casing.
- Verify whether the audio connector is securely linked to the motherboard.
- Unplug it and then reinstall it in the motherboard socket, but this time in the other direction.
Note: Some users claim that by flipping the connector and motherboard connectors around, their problems were resolved. - Reset everything, then start your computer.
- Verify the functionality of your audio jacks.
After the procedure, if the audio jack on your motherboard isn’t working properly, you’ll need to send it in for warranty repair or buy a new one.
Why is the Motherboard Audio Port Not Working?
Motherboard audio port is not working due to physical damage, an out-of-date audio driver, or an operating system problem that causes the device to cease responding. The audio port may malfunction due to internal system software issues as well.
Sometimes, dust and grind accumulate on the audio port. That dust clogs the port, causing the audio port to stop responding. As a result of dust and filth, the motherboard audio port can be damaged and cease to function effectively.
Furthermore, some software on your computer may conflict with your audio driver. Because of this disruption, the link between the audio device and the software that controls the device is disrupted. As a result, the audio port may stop functioning.
Finally, an outdated audio driver may be to blame for your motherboard’s audio port not working correctly. An outdated driver contains numerous faults and issues that can cause the audio device to cease responding.
FAQs
Why is my motherboard audio port not working?
The primary cause of the sound port not functioning is a faulty connection between the chipset and the connector. Furthermore, the issue is caused by incorrect audio settings and obsolete drivers.
How do I enable the audio jack in BIOS?
To enable the audio jack in BIOS, press F2 during boot. Select Advanced > Devices, then Onboard Devices. Select the Audio option and press the Activate button.
How do I enable audio on my motherboard?
To enable audio on my motherboard, first, open the case and gently slide the audio pic into the audio socket on the motherboard.
Conclusion
When an audio jack fails to send an audio signal to a playback device, experiencing any content without audio is pointless for the computer user.
So, in this article, I’ve demonstrated precise approaches for resolving the audio jacks not working in the motherboard issue.
I hope these solutions solve your audio problem. Leave a remark if you have any queries or feedback.