Startup programs are useful when you use some specific applications so often. But, those applications are not used frequently on your system and always run during startup; they consume excessive power and slow down your computer whenever you boot your system.
However, you can stop the unnecessary Startup programs by removing or disabling them to eliminate this issue. Also, those applications are used so often you can add or enable the applications to Startup programs on your Windows 11 PC to run the applications automatically.
So, in this post, I will walk you through some effective and practical methods to add, remove, enable or disable the Startup programs on your Windows 11 PC.
Keep reading and follow the instructions to add or stop Startup programs.
Let’s get started.
Also related: How to Unblock Websites on Windows 11
How to Enable or Disable Startup Programs in Windows 11
Enabling or disabling the Startup programs in Windows 11 is easy and simple. Following effective and straightforward ways, you can quickly and effortlessly enable and stop the Startup programs on your Windows 11 PC.
There are three proven and tested ways to enable or stop the Startup programs on Windows 11. Follow these three steps to stop or enable the Startup programs within a few minutes.
Let’s see these methods.
Here are the steps to enable or disable startup programs in Windows 11:
1. Use Task Manager
The first effective and easiest way to enable or disable the programs from running at startup on Windows 11 is using the Task Manager. In the Task Manager, you can control which programs are running at startup or not.
Here are the steps to enable or disable startup programs in Windows 11 using the Task Manager:
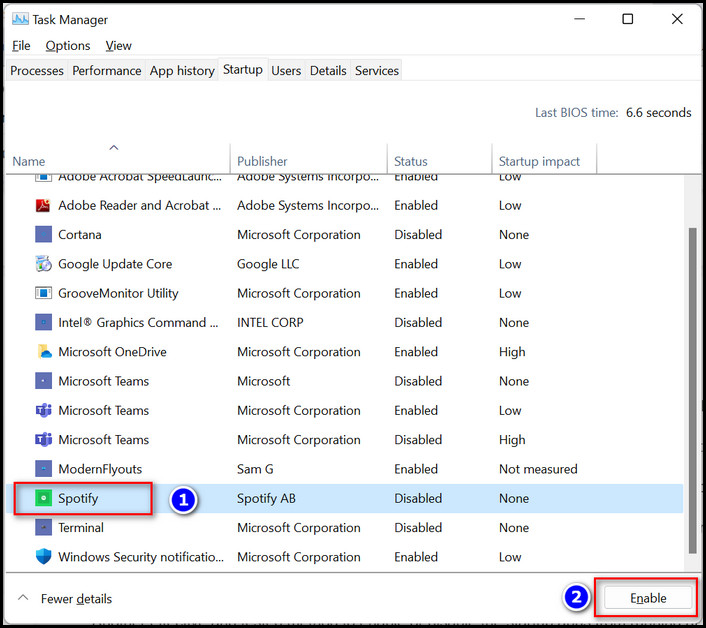
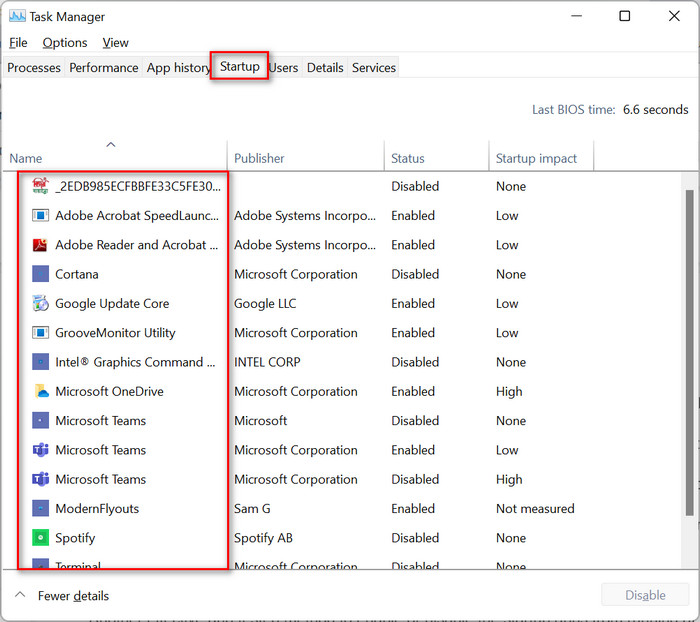
- Open the Task Manager by pressing Ctrl+Shift+Esc on your keyboard, or right-click on the Start Menu and select Task Manager.
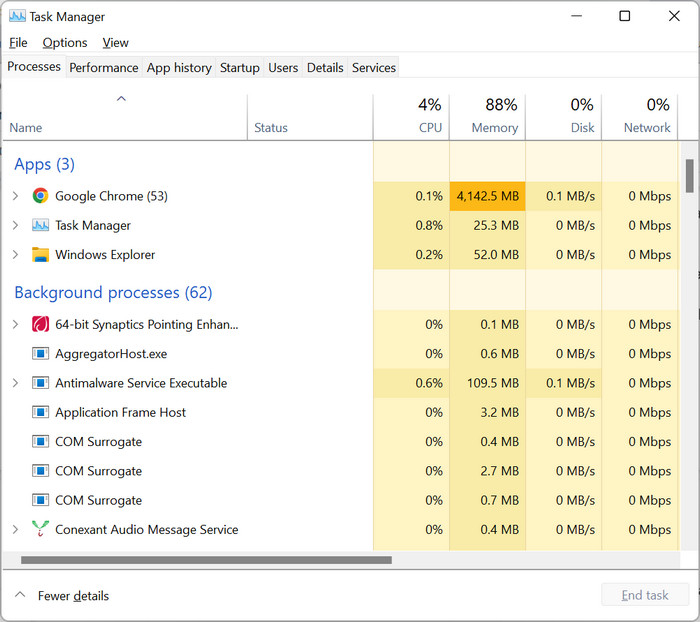
- Select the Startup tab to see the lists of startup programs. Here you will see the startup programs enabled and disabled on your system.

- Select a startup program and click on the Disable button to disable the program from running at startup. Or,
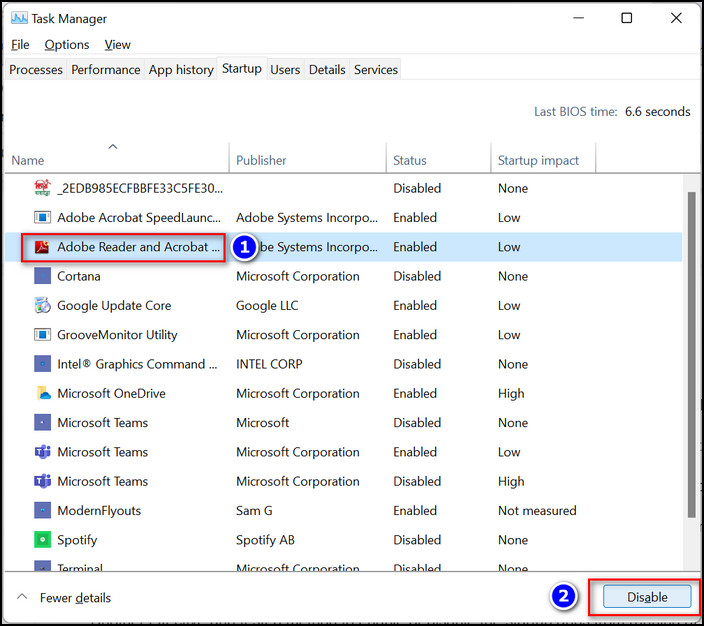
- Select a startup program and click on the Enable button to enable the program from running at startup.
2. Use Apps Startup Options in Settings
Another effective and tested method to enable or disable the startup apps from running at startup is using the Startup options in Settings.
Here are the steps to enable or disable startup programs in Windows 11 using the Apps Startup Options from Settings:
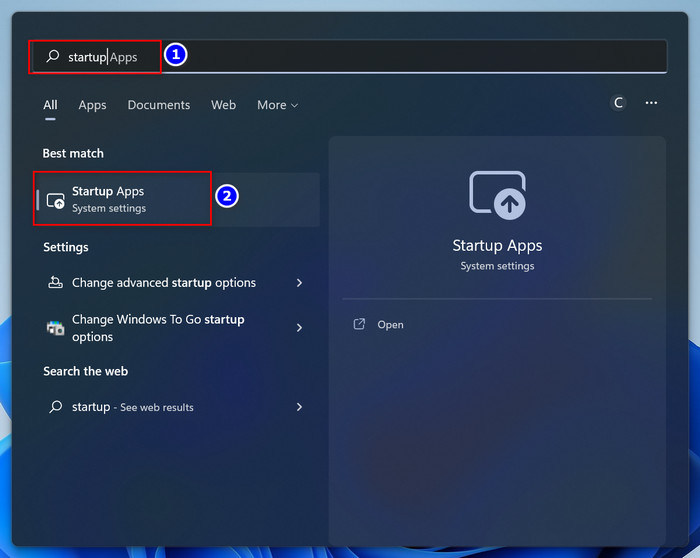
- Open the Windows Search pane by pressing Windows+S on your keyboard.
- Type startup and click on the Startup Apps on the search result. Or,

- Open Windows Settings by pressing Windows+I and go to Apps > Startup.

- In the Startup screen, you can see the lists of programs that automatically start when you sign in.
- Toggle on the button next to the program that you want to enable to run at startup automatically. Or,
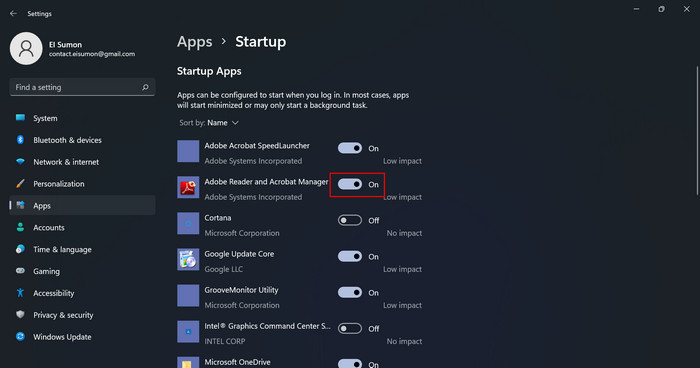
- Toggle off the button next to the program you want to disable from running at startup.
Check out our separate post: Disable File Compression on Windows 11/10
3. Use App Advanced Options in Settings
Using the Advanced App options in Settings is another practical way to disable or enable the startup programs on Windows 11.
Here are the steps to enable or disable startup programs in Windows 11 using the Advanced App options in Settings:
- Open the Windows Search pane by pressing Windows+S on your keyboard.
- Type apps and click on the Apps & features on the search result. Or,
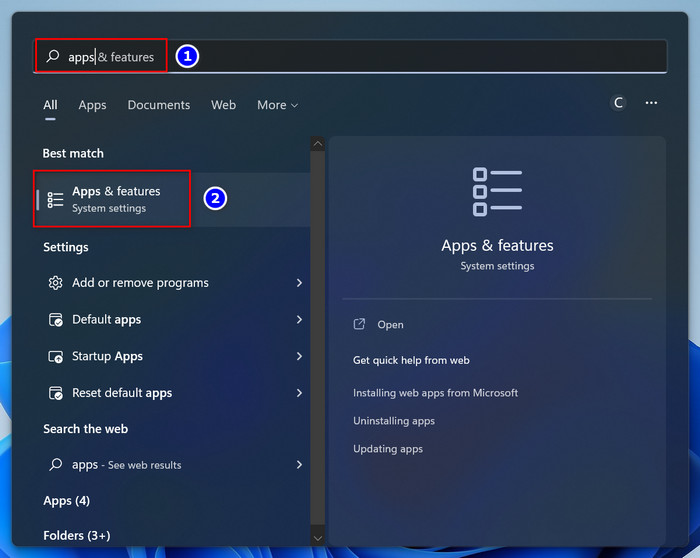
- Open Windows Settings by pressing Windows+I and go to Apps > Apps & features.

- Click on the three-dot menu next to the application you want to enable or disable under the startup programs and choose Advanced options.
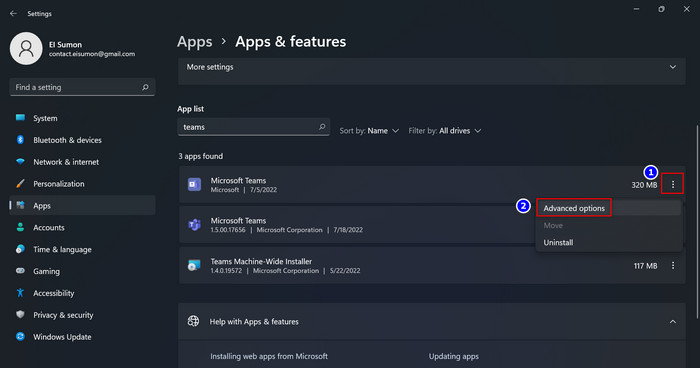
- Scroll down and find out Runs at log-in section.
- Toggle off the button to disable the application from running at startup when you log in. Or,
- Toggle on the button to enable the application to run at startup when you log in.
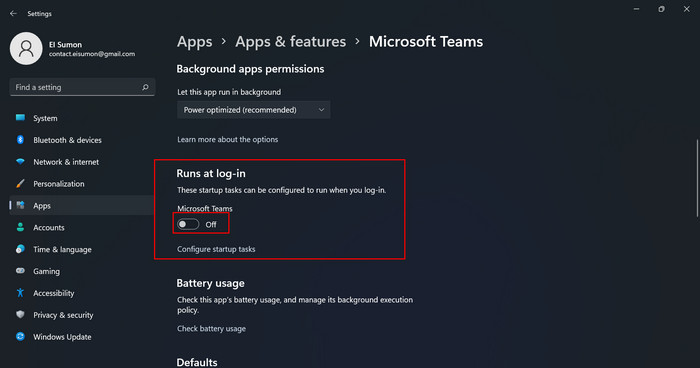
Note: The Runs at log-in option is only available for Microsoft Store apps.
How to Add Programs on Startup through Startup Folder in Windows 11
In Windows 11, you can add programs on startup to automatically run the programs when you log in to your computer. To add programs on startup, you need to add applications in the Startup Folder.
However, the main fact is the Startup folder is not easily accessible on your Windows 11 computer. You must run a command or navigate a path through File Explorer to open and access the Startup Folder.
After accessing the Startup Folder, you can add programs to run the applications automatically during the startup. Let’s see how to add programs on startup on Windows 11.
Here are the steps to add programs on startup through the Startup folder on Windows 11:
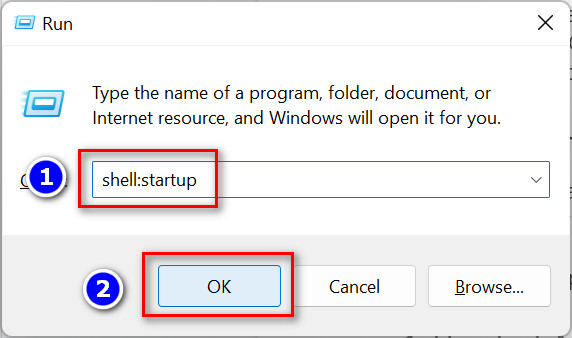
- Open the Windows Run program by pressing Windows+R on your keyboard.
- Type shell:startup and click on OK to open the Startup Folder. Or,

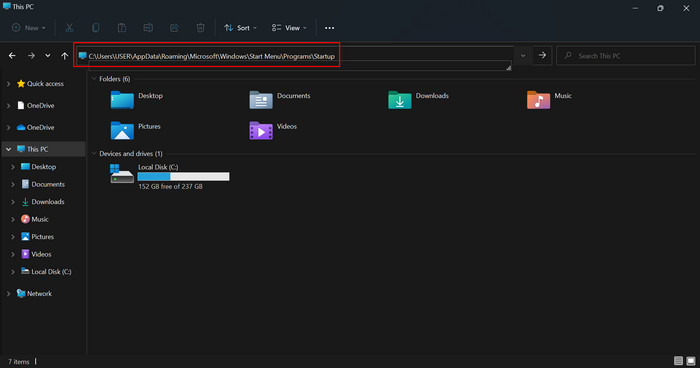
- Open Windows File Explorer and navigate the following path:

- C:\Users\USER\AppData\Roaming\Microsoft\Windows\Start Menu\Programs\Startup
- Copy an application shortcut to the Startup Folder to add the application to the Startup program. Or, press and hold the Alt key and drag an executable application file to the Startup Folder to add the application shortcut to the Startup program.
Related content you should read: Remove Bloatware From Windows 11/10
How to Remove Startup Programs in Windows 11
Removing the Startup programs in Windows 11 is similar to disabling the Startup programs. Follow the approaches below to remove the Startup programs on your Windows 11.
Here are the steps to remove the startup programs in Windows 11:
1. Use Task Manager
The first way to remove the programs running at startup on Windows 11 is using the Task Manager. In the Task Manager, you can stop the programs running at startup.
Here are the steps to remove startup programs in Windows 11 using the Task Manager:
- Open the Task Manager by pressing Ctrl+Shift+Esc on your keyboard, or right-click on the Start Menu and select Task Manager.
- Select the Startup tab to see the lists of startup programs. Here you will see the startup programs enabled and disabled on your system.
- Select a startup program and click on the Disable button to disable the program from running at startup.

2. Use Apps Startup Options in Settings
Another proven method to remove the startup apps from running at startup is using the Startup options in Settings.
Here are the steps to remove the startup programs in Windows 11 using the Apps Startup Options from Settings:
- Open the Windows Search pane by pressing Windows+S on your keyboard.
- Type startup and click on the Startup Apps on the search result. Or,

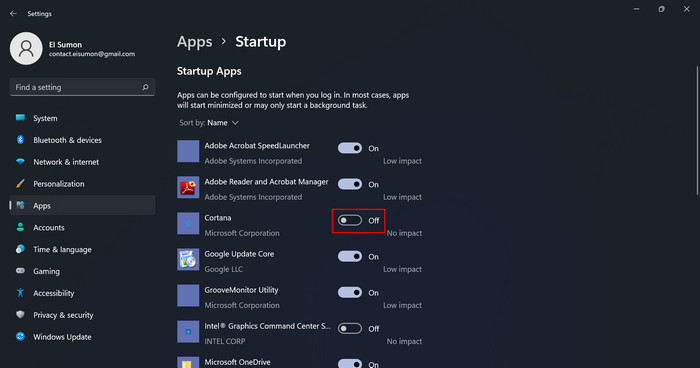
- Open Windows Settings by pressing Windows+I and go to Apps > Startup.

- In the Startup screen, you can see the lists of programs that automatically start when you sign in.
- Toggle off the button next to the program you want to disable from running at startup.

Read more on how to Fix Update Error Code 0x80004005 in Windows 11
How to Check Startup Programs in Windows 11
On Windows 11, you can easily check the program lists that are automatically running on your Windows 11 PC. You may need to see the lists of Startup programs before enabling or disabling the apps that are automatically running on startup.
Here are the steps to check the startup programs in Windows 11:
1. Use Task Manager
The first way to check the programs running at startup on Windows 11 is using the Task Manager. In the Task Manager, you can see the programs running at startup.
Here are the steps to check startup programs in Windows 11 using the Task Manager:
- Open the Task Manager by pressing Ctrl+Shift+Esc on your keyboard, or right-click on the Start Menu and select Task Manager.

- Select the Startup tab to see the lists of startup programs. Here you will see the startup programs enabled and disabled on your system. select-startup-tab
Also related: Registry Filter Driver Exception BSOD in Windows 11
2. Use Apps Startup Options in Settings
Another proven method to check the startup apps from running at startup is using the Startup options in Settings.
Here are the steps to check the startup programs in Windows 11 using the Apps Startup Options from Settings:
- Open the Windows Search pane by pressing Windows+S on your keyboard.
- Type startup and click on the Startup Apps on the search result. Or,
- Open Windows Settings by pressing Windows+I and go to Apps > Startup.

- In the Startup screen, you can see the lists of programs that automatically start when you sign in.
How to Access Windows 11 Startup Folder
On Windows 11, startup programs are stored on the Startup Folder, which automatically allows the programs to run when you sign in to your PC. But, the Startup Folder is not easily accessible through the Settings app.
There are two ways to access the Startup Folder on Windows 11. You need to enter a command into the Windows Run program or follow a path on File Explorer to access the Startup Folder on Windows 11.
Okay, let’s discuss both methods to access the Startup Folder.
Here are the steps to access the Startup Folder on Windows 11:
1. Use Windows Run Program
Here are the steps to access the Startup folder using the Windows Run program:
- Open the Windows Run program by pressing Windows+R on your keyboard.
- Type shell:startup and click on OK to open the Startup Folder.
2. Use File Explorer
Here are the steps to access the Startup folder using File Explorer:
- Open Windows File Explorer by pressing the Windows+E on your keyboard.
- Navigate the following path:
- C:\Users\USER\AppData\Roaming\Microsoft\Windows\Start Menu\Programs\Startup
What Programs Should Always Run at Startup
Certain apps should not be disabled since they must run automatically when the computer starts. Computer audio services and managers like Realtek HD Audio Manager are among these products, along with antivirus software and services.
You shouldn’t disable any essential software or services that start with your computer and are necessary to function your system correctly.
Different programs, for example, Mail apps, OneDrive, iCloud, or Messaging apps, automatically sync data with the cloud and are needed in the Startup programs.
If you stop these applications from running at startup automatically, you miss real-time notifications until you manually open the applications. It is better to disable software that doesn’t sync data continuously or is not used so often.
Frequently Asked Questions (FAQs)
How do I change which programs open on startup Windows 11?
To change which programs open on startup on Windows 11, open the Task Manager, go to the Startup tab, select the app you need to open on startup and click on the Enable button at the bottom right corner of the window.
How do you edit what opens on startup Windows?
To edit what opens on startup on Windows 11, open the Task Manager, go to the Startup tab, select the app you need to open on startup and click on the Enable button at the bottom right corner of the window.
How do I add and remove programs from Windows 11 startup?
Open Windows Settings and go to Apps > Startup. Here, you can see the programs listed on the Startup programs. Toggle on or off the button next to the application to add or remove the application from the Startup programs.
How do I control what programs open on startup?
To control what programs open on startup, open Windows Settings and go to Apps > Startup. Here, you can see the programs listed on the Startup programs. Toggle on or off the button next to the application to enable or disable the application from the Startup programs.
Final Words
Startup programs are those applications that are automatically run when you boot up your system. On Startup programs, some applications are helpful and essential to run the system adequately. But, some are unusual in that they increase boot time and slow down the PC.
Surprisingly, you can fully control the Startup programs, which means you can add or remove the Startup programs based on your preference. You can enable or disable the Startup programs using the Task Manager, Startup option on Windows Settings.
Here, I describe the Startup folder and how to add the programs to the Startup Folder. I also explain how you check the Startup programs on your Windows 11.
That’s all. Thanks for staying with me till the end. I hope you enjoyed the post. See you in the next one.