Many users, including you, install a new SATA SSD on the PC to boost its performance. After the installation, you may notice you need to get the speed you expected. But you are not.
One of the main reasons for this is you are using your Windows storage system in IDE mode, not in AHCI. Here I will explain how you can activate AHCI in Windows 10.
So, tag along.
What is AHCI Mode & Why Do You Need to Enable It?
AHCI stands for Advanced Host Controller interface. For serial ATA or SATA connections, it’s a more modernized and advanced data connection mode than Integrated Drive Electronics (IDE).
You are probably wondering why you need to activate it for your PC. The real reason is that enabling AHCI mode reduces the significant amount of travel required for data searches. That means your PC responses from your SATA SSD or hard drive increase by 20-30%.
All current motherboards support AHCI. Some even come with it by default. When a SATA SSD is attached to your PC, you must enable the AHCI to get the best system performance.
I have explained the process of enabling AHCI in the following section. You can also check our article on how to enable SLI in BIOS.
How to Enable AHCI Mode in Windows 10
You can turn on the AHCI mode in your Windows 10 operating system in two ways. You can use the command prompt or the registry editor to enable it. It’s your choice.
Though when you install the Windows OS on your PC, it automatically sets to AHCI. But if it doesn’t, you can still enable AHCI in Windows 10 after installation.
But no matter which method you apply to activate it, you must enter your BIOS settings. And you will need the boot menu key to go there. Make sure you know which key (F2, F12, Delete, Esc, etc.) to press to enter the BIOS. Follow our guide to fix if the pc won’t boot to BIOS.
Here are the methods to enable AHCI mode in windows 10:
1. Use Command Prompt
Command prompt, or cmd is a default Windows command line interpreter tool. Using a couple of commands, you can effortlessly activate AHCI. Let’s see how to do that.
Follow the way to turn on AHCI mode using the command prompt:
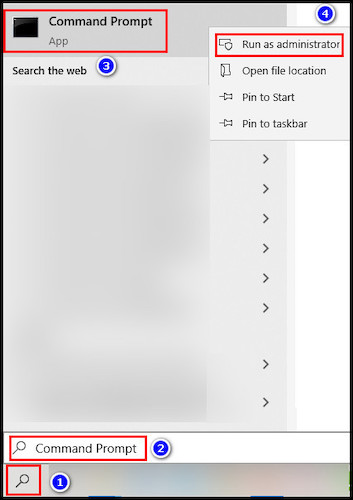
- Click on the search icon, type Command Prompt, and select Run as administrator.
- Copy-paste the command in the cmd and hit Enter.
- bcdedit /set {current} safeboot minimal
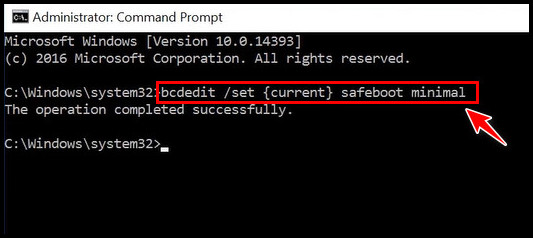
- bcdedit /set {current} safeboot minimal
- Reboot your PC and go to your BIOS settings.
- Start your PC in a safe mood.
- Open the Command prompt again.
- Type the following command and press Enter.
- bcdedit /deletevalue {current} safeboot
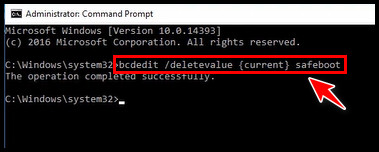
- bcdedit /deletevalue {current} safeboot
- Restart the PC.
The AHCI drivers will automatically install in your Windows. Read our excellent guide if you don’t know how to get out of safe mode in Windows 10 or 11.
2. Use the Registry Editor
Another way to enable AHCI is by using the registry editor. To do that, you have to modify some files from the registry.
But be cautious while you edit any files inside the registry application. Any incorrect editing can cause severe issues on your PC. Change the files I mention here. Not anything else.
Here is the process to enable AHCI by using the registry editor:
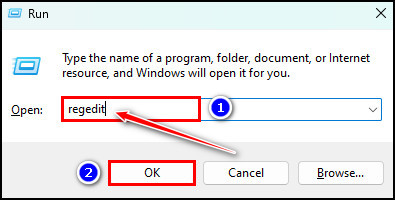
- Press the Windows + R button to open the Run command.
- Type regedit and click OK.
- Copy-paste the following path to the registry editor.
- HKEY_LOCAL_MACHINE\SYSTEM\CurrentControlSet\Services\iaStorV
- Move to the right pane. Double-click on the Start DWORD, put the value 0 in the Value data field, and select OK.

- Go to the left pane. Expand the iaStorV menu and select StartOverride.
- Double-click on the 0 DWORD, enter 0 in the Value data portion, and click OK.

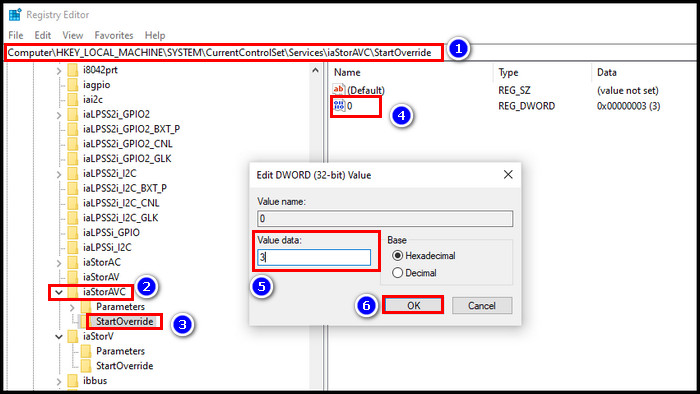
- Copy the address below and again paste it into the registry address bar.
- HKEY_LOCAL_MACHINE\SYSTEM\CurrentControlSet\Services\iaStorAV\StartOverride
If this is not available, use this one.
- HKEY_LOCAL_MACHINE\SYSTEM\CurrentControlSet\Services\iaStorAVC\StartOverride
- Go to the 0 DWORD from the right pane and double-click on it.
- Type 0 in the Value data box for iaStorAV. If you are on iaStorAVC, type 3 in the Value data field. Select OK.
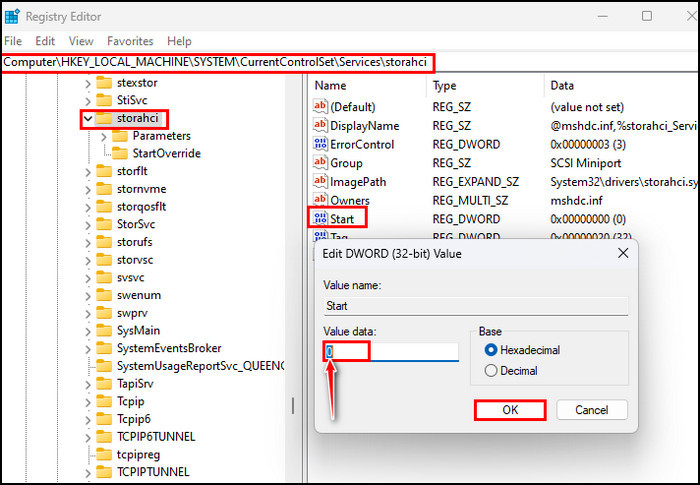
- Copy the location and paste it into the registry editor address bar.
- HKEY_LOCAL_MACHINE\SYSTEM\CurrentControlSet\Services\storahci
- Double-click on the Start DWORD, enter 0 in the Value data box, and click OK.
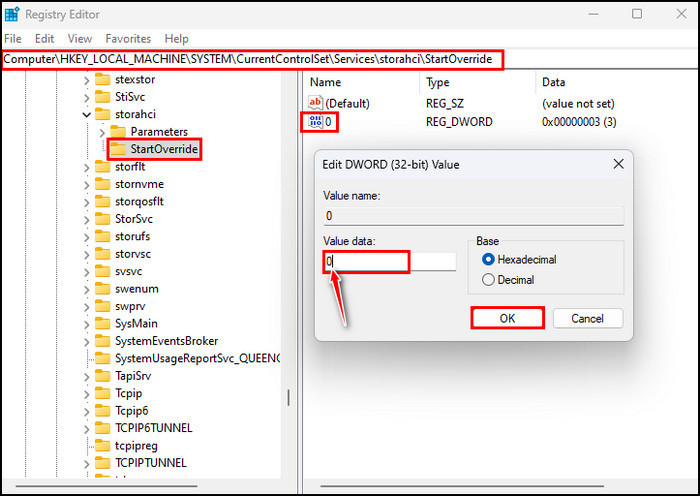
- Expand the storahci menu from the left pane, and click on StartOverride.
- Double-click on the 0 DWORD, enter 0 in the Value data section, and select OK.
- Restart the PC and enter the BIOS using the boot menu key.
- Switch to AHCI from RAID or IDE in the BIOS. You will probably find that option under the SATA section.
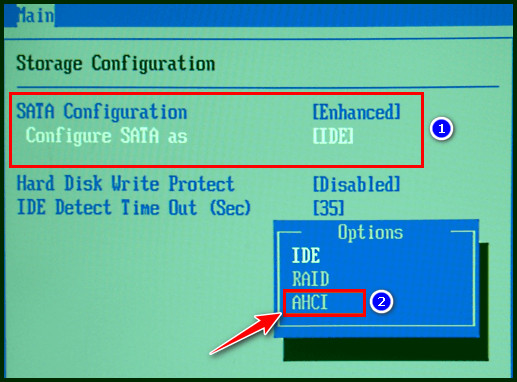
- Save the changes and exit from there.
- Restart the PC.
While the PC is on boot, the AHCI driver will install automatically. Once the installation is complete, the PC will ask for a restart again. When you give your PC the required restart, enabling AHCI is complete.
If the changes you make in BIOS don’t save, read to find out the reason and solutions why won’t your BIOS settings save.
FAQs
Should I activate AHCI mode?
Yes, you should. AHCI mode allows the PC to work 20 to 30% faster than usual. So, when you activate it, the PC will perform any function quicker and save more time.
How do I enable AHCI mode?
To enable the AHCI mode, you need to go to the BIOS. To enter the BIOS settings, start or restart your PC. Press the boot menu key(F2, F8, etc.). You must find System or Hardware configuration(the option name can be different) and SATA mode. In the SATA operation, set it to AHCI.
How do I know if my SSD is in AHCI mode?
Go to Device Manager first to know if your SSD is in AHCI mode. Expand the IDE ATA/ATAPI Controllers menu. If there is any file with the AHCI name and has no exclamation mark or X sign, you can settle that AHCI is enabled & your SSD is in AHCI mode.
Conclusion
AHCI is far better and faster than IDE. If there is no AHCI option in BIOS, it sets as default. You don’t need to change anything to get the AHCI mode.
I hope by following the methods, you have successfully enabled AHCI. If you have any questions, leave them in the comment section. I will gladly answer them.
Peace out!