For business or Outlook, the margin is important to determine the correct measurement. It’s applied to define the beginning and end of a text line in an Outlook mail.
When composing a large email, the lines don’t always line up well and become discursive. But the margin helps to keep your writing in good shape. It makes the email look more refined and comfortable to read.
This article aims to provide a quick and straightforward process of changing the margin in your Outlook mail.
So, let’s start.
Go through our epic guide to fix cannot start Microsoft Outlook invalid XML.
How to Change Margins in Outlook Email
The blank space before and after a line in Outlook mail is called margins. They indicate each line’s starting and ending point to give the paragraph a professional look. You can find and adjust the margins of your Outlook email from the Paragraph Settings.
The default margin in Outlook mail from left and right is 0 inches. To change the margin size, follow the procedures below.
Quickly check out our epic guide about how do I know if my email was recalled in Outlook?
Here is the procedure to change margins in Microsoft Outlook mail:
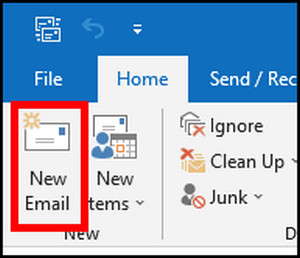
- Launch Microsoft Outlook on your PC.
- Press on New Email from the top ribbon.
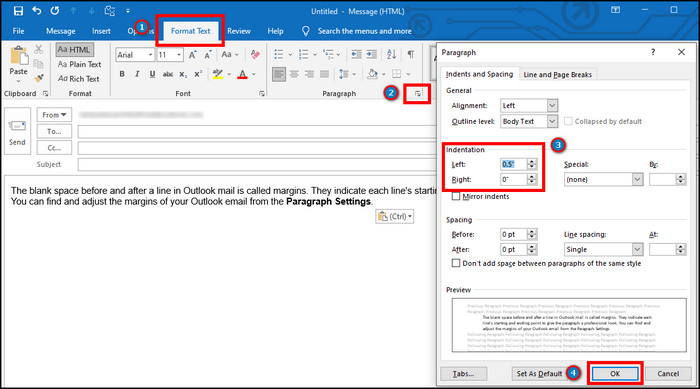
- Select the body of the email.
- Navigate to the Format Text tab from the top.
- Click on Paragraph Settings from the Paragraph section.
- Change the Left and Right values from Indentation to add margins in Outlook mail.
This process will add margins to the left and right of the email. If you like removing the margin from the email, change the margin size to 0 inches to reset them.
However, if you want to customize the margins quickly and see the margins visually, there’s an additional method. Consider reading the following passage to add a ruler to your Outlook email.
You may also like to read about how to add Teams meeting in Outlook?
How to Change Margins in MS Outlook Mail Using Ruler
Visual representation is the best way to understand the measurement and see the changes in the margin. Inserting a ruler in your Outlook mail body can speed up the margin-adding process. It will help you to adjust the left and right indent and modify the default margin.
But, Outlook ruler is disabled in the mail by default. You must enable it before using the process. Follow the instructions carefully to add the ruler to your Outlook.
Do check our latest post on Microsoft Teams meeting not showing in Outlook.
Here is the method to insert a ruler in Microsoft Outlook:
- Open New Email in Outlook.
- Press on Customize Quick Access Toolbar from the Quick Access Toolbar.
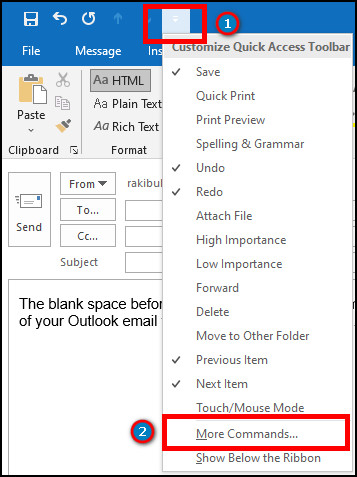
- Click on More Commands.
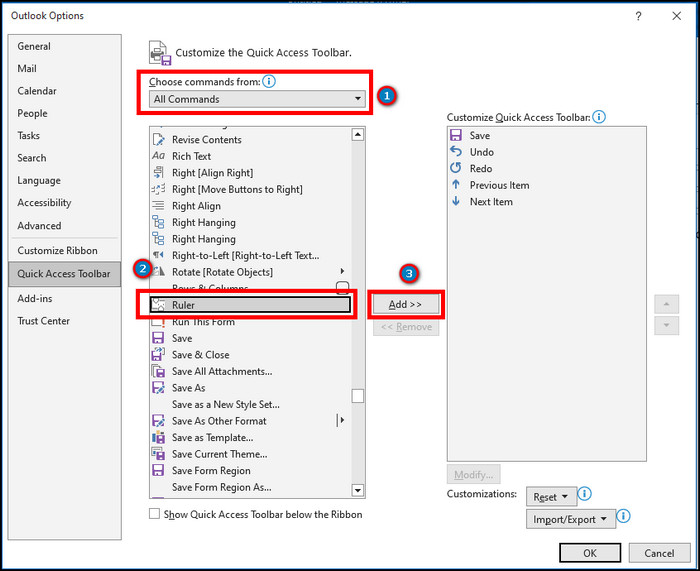
- Choose All Commands from the drop-down menu.
- Find and select Ruler from the list.
- Press on Add and click OK.
- Press on View Ruler from the Quick Access Toolbar to view the ruler in Outlook mail.
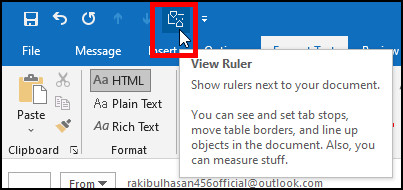
It will enable and show the ruler on top of your email body. After that, consider reading the following procedures to change the margin using the ruler.
Here is the method to change margins in Outlook mail using a ruler:
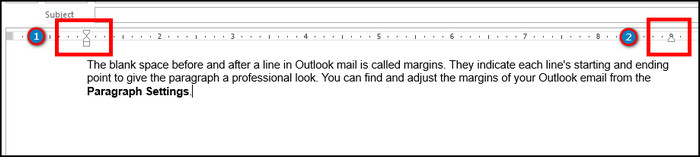
- Navigate to New Email.
- Drag the Left Indent from the ruler to add margins at the left.
- Drag the Right Indent to insert margins at the right.
Once you complete the above process, it will add margins to your Outlook mail and make it look nicer.
Related contents you should read about fix Outlook rules not working.
Frequently Asked Questions
How do I change margins in Microsoft Outlook mail?
To change the margins in Outlook email, go to New Email > Format Text > Paragraph Settings > change Left and Right to insert margin.
Can I add a margin in Outlook on mobile?
No, Outlook mobile doesn’t have the option to insert a margin in the mail. It only available for the desktop application.
What are the default margins in Outlook?
The default margin size to print a message is 0.5 inches on all four sides. However, you can modify the margin size from the settings.
Conclusions
Adding or customizing the margin is useful to keep your emails neat and clean and give them a professional look. It increases the productivity of an individual or a company.
In this article, I’ve described the effortless ways to adjust the margins in an Outlook mail, and I hope you’ve read it thoroughly and utilized it in your everyday email.
Share your experience in the comment box below, and I’ll see you at the next one with another fascinating article.
Until then, Goodbye.