You can set up a fully installed instance of macOS on an external drive. This separates your work and home environments by using two different drives.
This feature is not limited to the newer Macs with M1 or later processors. So, if you are still rocking an old Mac, you needn’t worry.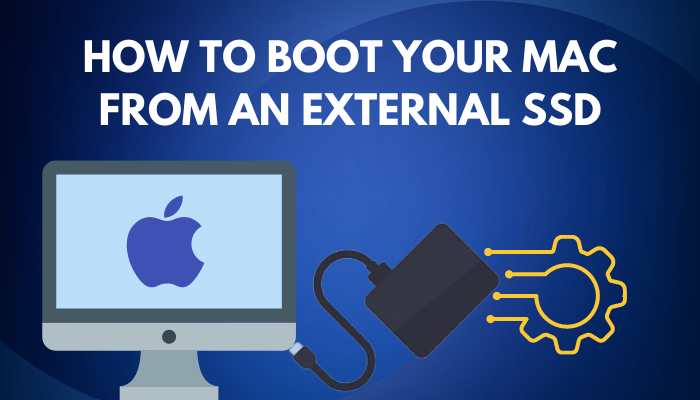
So, follow this step-by-step guide and set up the macOS on an external drive in no time.
How to Boot Your Mac From an External SSD
Before going through the booting process, let’s see which external drives to get.
You can use any external SSD with Macs. Some are recommended specifically for macOS, but most of them will work just fine.
For newer Macs, buy an SSD with a Type-C port. Older Macs will work with external drives having USB 3.0 ports. For the SSD type, buy an nVME-supported one rather than a SATA based. You will get faster speeds when you connect the nVME SSD with a Thunderbolt port.
If you have a USB Type A external drive and looking to use it on a Mac with a Type C port, use a dongle to connect the drive. By now, many people have already embraced the dongle life, so you may already have one if you purchased a Mac in the last few years.
With everything out of the way, let’s go to the first step.
Also, check out our latest guide to use old SSD on a new computer.
These are the steps to boot a Mac from an external SSD:
Step 1: Download macOS
The files required for macOS setup are found on the App Store. You can also download previous versions of the OS, but not all Macs will support it. For example, the M1-based Macs can only boot the versions starting from macOS Big Sur.
For the best results, use the version of macOS installed on your Mac. The most recent version is macOS Monterey. I have used this to set it up on my external drive.
Follow the steps to download macOS from the App Store:
- Open the App Store.
- Search for Monterey on the search bar and click on the results to open the download page.
- Click Get and the Download button in the pop-up window.

When the download finishes, proceed to the next step.
Which macOS Version is Supported by your Mac?
The table below shows which macOS is supported by your Mac. All these are available to download using the App Store.
Apple guarantees a minimum of 5 years for software support provided to Macs. So use this as a rough estimate against the launch date of these OS versions to know if a recent Mac update supports your device.
| macOS | Supported Macs |
|---|---|
| Ventura (Fall 2022) | Starting from iMac 2017 and later, including the Retina 4K versions to present models. |
| Monterey (Fall 2021) | iMac 2015 (Retina and 4K), Mac mini 2014 and later |
| Big Sur (Fall 2020) | iMac 2014 (Retina and 4K) and later |
| Catalina (Fall 2019) | iMac 2012 and later |
Your Mac can run Windows 11 via Bootcamp. Read our guide on how to download Bootcamp drivers for windows 11?
Step 2: Erase the External SSD
Now, we need to format the SSD. Set the correct file system used by macOS so that the Mac can recognize the drive when you plug it in the next time.
I have used the Disk Utility app built into the macOS to do this.
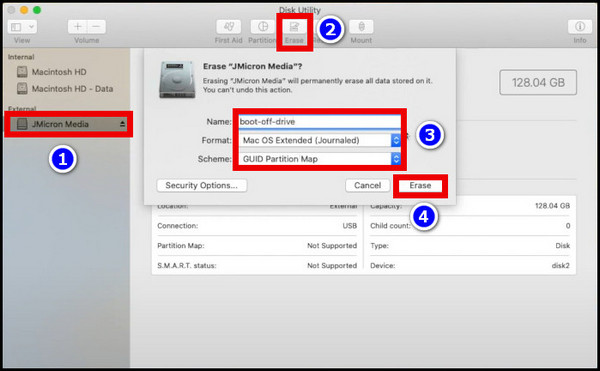
These are the steps to Erase the SSD using Disk Utility:
- Search for Disk Utility after pressing Command + Spacebar.
- Click on the SSD from the drives connected to the Mac.
- Now, press the Erase button at the top.
- On the new window, enter the drive’s name.
- Under Format, select Mac OS (Extended Journaled) or APFS with M1 or later processors.
- Now choose GUID Partition Map as Scheme.
- Press the Erase button at the bottom.
This will take a few moments, and you will see an alert upon completion.
Step 3: Install macOS on the External Drive
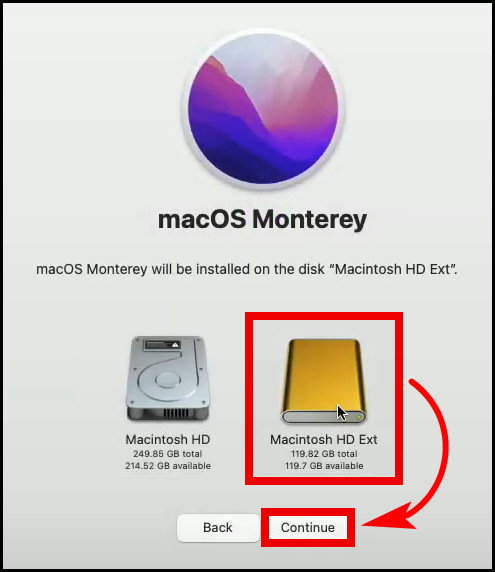
For this step, point the installer to the SSD as the install directory. By default, the installer will select the internal drive/SSD installed on the Mac. If you do not change this, all your files and apps will be deleted.
Here are the steps to install macOS on an external drive:
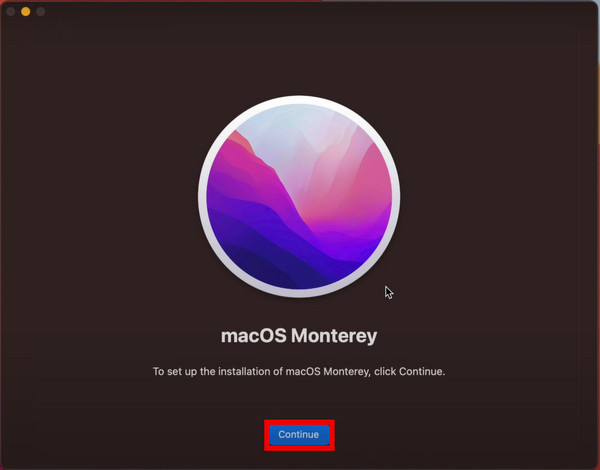
- Search the macOS installer using its name by pressing Command + spacebar and typing (in my case) Monterey.
- Click on it, open it and select Continue.
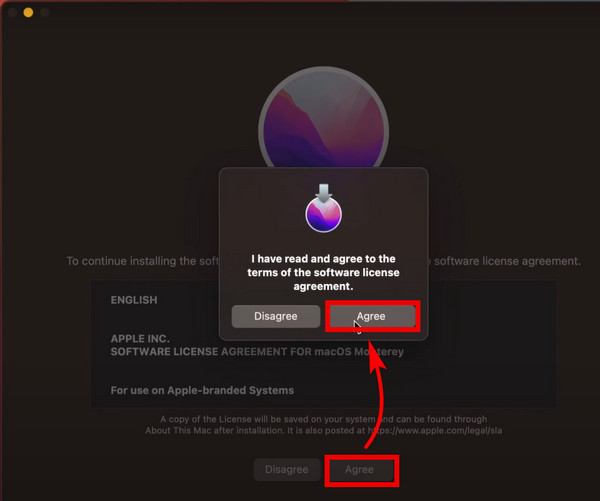
- Press the Agree button to acknowledge the terms and conditions.
- Press Show all Disks and select the SSD that you named earlier.
- Click the Install button to start installing the macOS.
It will take some time to complete the installation. Meanwhile, you can take a coffee break instead of staring at the same screen.
The Mac will restart when the installation is finished. Does that mean the setup is done? Not just yet.
Are you looking for the easiest way to run Windows 11 on your Mac? This complete guide on upgrading to Windows 11 on mac using Bootcamp will certainly help you out.
Step 4: Set your Mac to Boot from the External Drive
When the Mac is back on, the system loads the OS from the internal drive. But that is not what we want.
You need to change which drive is the one that the Mac should use to boot. In our case, it is the external SSD.
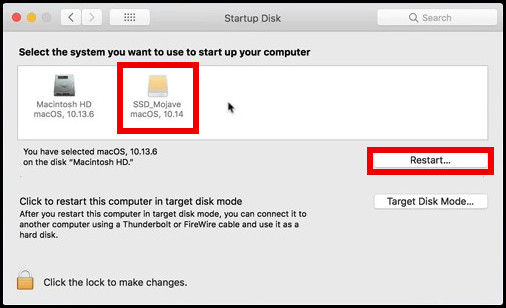
These are the steps to change the startup disk on a Mac:
- Click the Apple icon in the menu bar and go to System Preferences.
- Open Startup Disk.
- Select the SSD from the list of drives and click the Restart button.
Now, when the Mac boots up, you can see a fresh Mac installation. If you want your previous files from the internal drive, you can access them easily using the Finder app. Just click on the drive in the left pane.
For your reference, this is how my internal drive shows up on my Mac.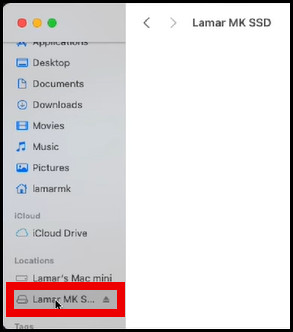
How to Enable a Mac to Boot From an External Drive
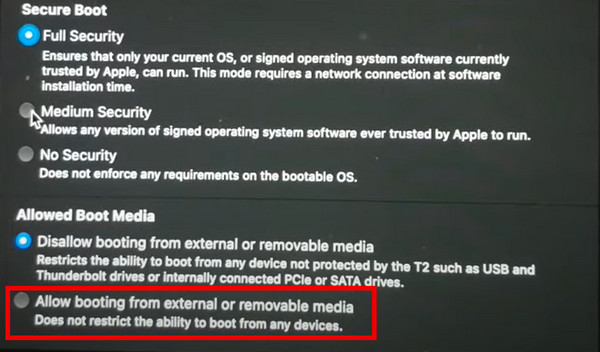
Sometimes, the Mac won’t boot an external SSD even when it is properly configured. This is because of additional security rules that prevent the Mac from booting up from unknown devices. For example, a hacker can get access to your files by loading a custom OS from a flash drive.
To enable external booting on your Mac, you need to open Startup Security Utility and allow booting from external devices such as a flash drive.
These steps will enable external booting on a Mac:
- Restart your Mac.
- Press the Command and R buttons after the Apple logo appears. For M1 Macs, long press the power button.
- Log in using your email and password.
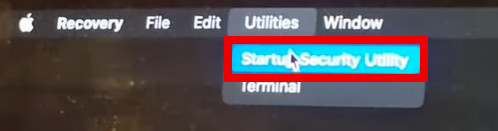
- Now click on Utilities and open Startup Security Utilities.
- Find Allow booting from external or removable media and check the radio button.
- Restart your Mac.
Now, if you already configured the Mac to boot from the external SSD, it will load it immediately. If you want to load a different drive the next time, press the Command key when starting up your Mac and select a different drive.
An external drive can save you from unforeseen disasters by keeping the backed-up files. To help you in this matter, we have compiled 5 easy ways to backup and restore your files in Windows 11. Do take a look.
Frequently Asked Questions
Can you boot an M1 Mac from an external SSD?
Yes, you can boot an M1-based Mac from an external drive. To do that, install the Mac on the external drive and set the USB drive to load it during boot. Go to System Preference > Startup Disk > SSD > Restart.
Can I boot my Mac from an external drive?
To boot a Mac using the external drive, press the Command and R buttons at the apple logo. Alternatively, press the power button for M1 Macs. After that, select the external drive, and the Mac will boot using it.
Closing Words
We use external drives mostly for file backups. But they can also function perfectly as a storage medium to load your files and applications, the same way a Mac would. During visits to other offices or locations, you will have all your files by your side ‒ thanks to the external drive.
I hope this guide helps you out.
Until next time it is goodbye.