Adding an image border isn’t essential. But, immediately after inserting one, you can differentiate the presence and elegance of a picture.
The picture border in Microsoft Outlook adds an outline around your image and creates a space between the writing and the picture. Inserting one is very easy, and you definitely won’t want to miss it.
This article will provide effortless methods to add a border around the image in Outlook email and customize them to improve the appearance.
So, let’s start.
How to Add Border Around a Picture in Microsoft Outlook
There’s no better way to make your picture fancy and eye catchy other than adding a picture border. Users can insert a border on every side of the image and enhance the visual representation by using Picture Style, Picture Border, and keyboard shortcuts.
Consider reading the following methods to use the default borders or customize them with your preferences.
Here are the methods to add a border around pictures in Microsoft Outlook:
1. Use Picture Style
The Picture Style option has popular and most used predefined image border collections. You can choose any of them and insert them into your image.
Follow the instructions below to use the Picture Style option for adding a border around your image.
Here is the procedure to insert a picture border in Outlook using the Picture Style:
- Open Outlook desktop client.
- Create a New Email or go to your picture.
- Select the image.
- Go to the Format tab from the top ribbon.
- Press the More button from Picture Styles.
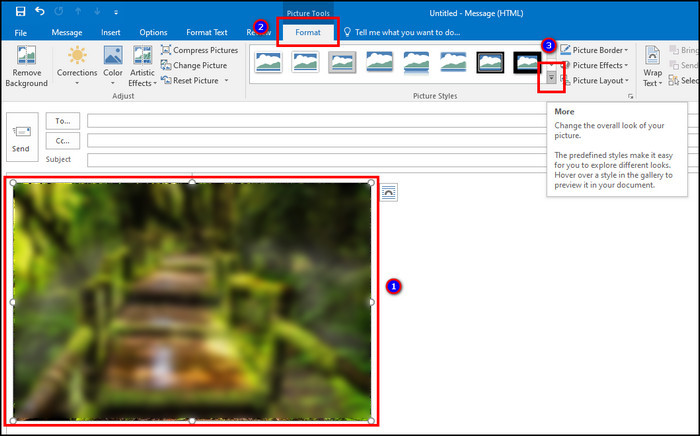
- Choose a style to put borders to your picture.
After selecting a style, it will add borders around your image. They all came with the Outlook default settings. But, users can customize the borders and make it as they like by using the steps below.
Also, check out our separate post on why automatically archive Emails in Outlook.
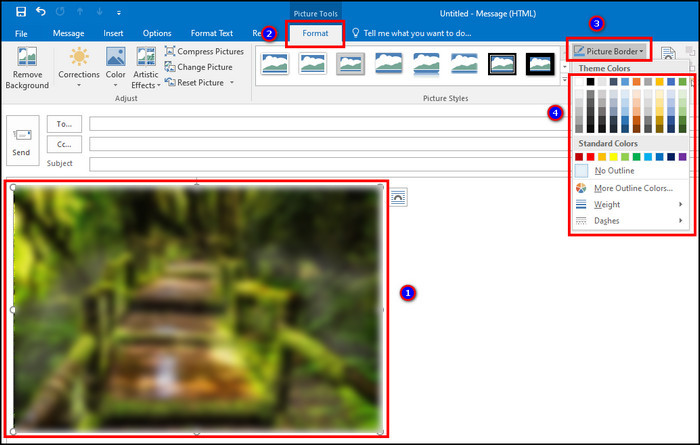
2. Use Picture Border
If you prefer custom image borders, colors and outlines, the Picture Border option is surely for you. It allows you to customize every element of an image border.
Consider reading the procedures below to add customizable picture borders around your image in Outlook.
Here is the process to add a border around an image in Outlook using the Picture Border:
- Launch the Outlook application.
- Navigate to your picture.
- Click on the image.
- Press on Format from the ribbon.
- Click the drop-down menu from Picture Border under the Picture Styles section.
- Select Colors, Weights, and Dashes from the menu.
With the Picture Border customization, you can make many combinations and use different borders each time.
Also, read how to add AOL email to Outlook.
3. Use Keyboard Shortcut
Professional people always prefer shortcuts. You can choose or add a border around an image and customize them in Outlook using the keyboard shortcuts.
Read the following steps carefully to learn the shortcuts of inserting borders around an image in Outlook.
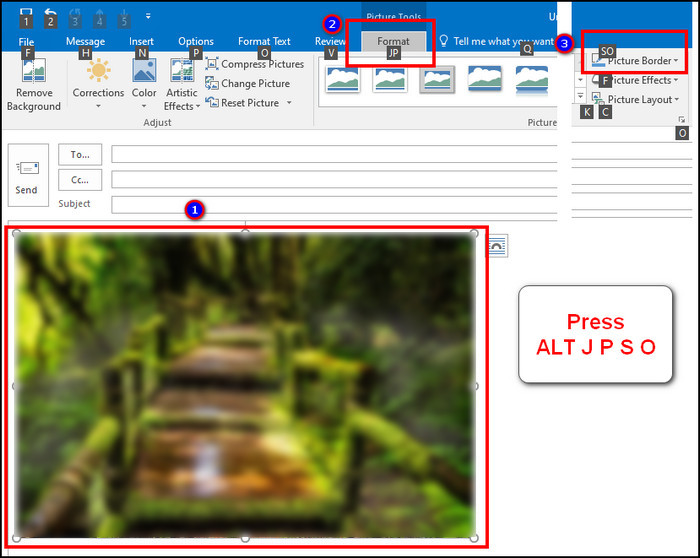
Here is how to use the keyboard shortcut to insert a border around a picture in Outlook:
- Open your email in Outlook.
- Select the picture.
- Press ALT J P S O respectively to open the Picture Border.
- Choose the Colors, Weights, and Dashes from the Picture Border menu.
Note: The picture border settings are only available for desktop clients. Unfortunately, mobile clients and Outlook on the Web (OWA) don’t have picture border options.
Check out our separate post on how to change margins in Outlook Email.
Frequently Asked Questions
How do I put a border around a picture in an Outlook email?
To put a border around a picture in Outlook, go to Outlook email > Picture > select image > Format > press on Picture Border > choose colors, weights and dashes.
Can I add a picture border in Outlook mobile?
No, the picture border option is unavailable on Outlook mobile version. It’s available for the Outlook desktop version.
How to remove picture borders in Outlook email?
To remove the picture border from an image in Outlook email, select the picture > Format > Reset Picture.
Wrapping Up
While you send a formal email, especially documents with Outlook email, adding a picture border is a must. It shows the professionalism and creativity of your email.
In this article, I’ve explained the quick and easy ways to put a border around the image, and I hope your email is now looking more elegant.
Share your thoughts in the comment box below, and I’ll see you at the next one.
Cheers.