Have you ever experienced a slowdown of Windows, an unresponsive taskbar, screen flashing, and the vanishing of desktop icons for a moment? If you are reading this article, you are lucky.
When your computer runs slow as a sloth, the frustration is indescribable. I faced the same issue before, so I know how annoying this can be.
This article will help you fix high disk usage once and for all. I’ll explain all the possible fixes for this problem. Run your computer smooth as butter from the next boot up.
Let’s bite the bullet!
How do I diagnose High Disk Usage
Diagnosing high disk usage is a bit tricky. You can identify the high disk usage problem easily by observing some patterns.
Here are the most common symptoms of high disk usage:
- Slow Windows boot-up process.
- Lag in the UI.
- Taskbar freezing.
- Log in mouse movement.
- Delay in app opening.
- Program crashing / not responding.
- Vanishing of desktop icons while refreshing.
- Sometimes complete freezing of the OS.
If you experience the problems I listed above, the first thing you have to do is to fire up the taskbar.
- Press Ctrl + Shift + Esc on your keyboard, and you will see a window pop up.
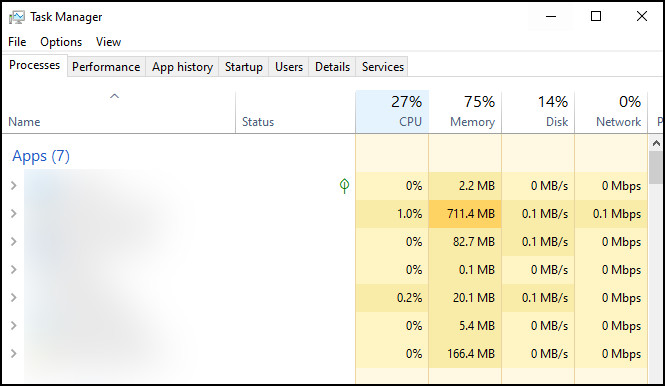
- You may not be able to see much when you first open up the taskbar. Click on More Details at the bottom.
- Now, you can see multiple tabs in the taskbar.
- On the top, the first tab is Have a look at it, and you’ll see Disk at 3rd index from the left.
- You can see that your disk usage is over 90%, which is a red flag.
Apparently, you now know the reason why you are experiencing the weird slowdowns. I will guide you to fix it step by step.
Check out my new post on how to Fix Windows Error Reporting High CPU and Disk Usage.
Why is Windows 10 Disk Usage at 99?
In Windows 10, disk usage of 99% can occur mostly due to Automatic Windows Update, Malwares, Outdated Drivers, etc. Open the windows taskbar to detect the factors leading to the problem. Also, there are multiple major and minor circumstances under which a system can show the symptoms of high disk usage.
Diagnosing numerous computers from work and friends, I can assure you it is hard to tell what actually is triggering the high disk usage problem.
Here are the reasons behind your Windows 10 disk usage at 99%:
Automatic Windows Update
Windows auto update and installation behind the scene is a common reason which leads to a bizarre disk usage percentage.
In the case of Windows 10, you can not directly turn off automatic Windows updates as you could in Windows 7. Hence, Windows always look for updates, and when a new version gets released, it starts downloading immediately.
The process keeps on running in the background. Utilzing the CPU and Disk. Oddly enough, the disk gets pegged at 95-100%. As a result, everything in the OS becomes unusable.
Malware
Malware is one of the common reasons why your disk is loaded to its neck. They run behind the scene and use system resources, which takes a heavy toll on your disk.
Malware often runs unnecessary operations or mining operations such as crypto mining. Hence it requires resources which it gets from your computer.
Check out the easiest way to 7 tested solutions for Windows 11 High Disk Usage.
Windows Search Service
Windows search service is another reason why you are experiencing such an issue.
To confirm, here is what you have to do:
- Ctrl + Shift + Esc to open the taskbar. Look for which program is using the disk.
- You will see something like Windows Search Service/Windows Search. Notice that its impact on the disk is pretty high. Higher than usual.
Disk Defragmentation Configuration
Disk defragmentation gathers files on your disk and creates efficient and rapid access to the storage location on the disk.
Nevertheless, applications can corrupt this process, resulting in high disk usage.
Windows Superfetch Service
Superfetch in Windows performs some optimization tasks. It’s a background service of Windows.
This service consistently observes the memory usage behavior of the user. It shortlists the apps that are repeatedly used.
It then preloads these apps on the memory. The main goal is to provide the user with a tailored experience.
However, this service can crowd the disk with random read and write operations. And that can lead your disk usage to 99%.
Here’s a complete guide on how to Run Check Disk From BIOS.
Outdated Device Drivers
When your devices are not up to date with the current drivers, Windows automatically tries to update those. It populates the disk with the reading and writing processes.
Therefore, disk usage gets cranked up, and the computer becomes unresponsive.
Virtual Memory
Virtual memory in a computer generates some temporary memory zone that can be used as RAM.
Basically, virtual memory is some space that is taken from the storage disk. Sometimes it can cause unnecessary reading and writing operations. This keeps the disk busy and bumps the usage percentage up to 99%.
You check out our new post Will SSD Reduce High Disk Usage.
How to Fix Windows 10 Disk Usage at 99
Apparently, we know the reasons which initiate 99% disk usage. It might seem a bit scary at first glance, but I’ve got you covered. I will address each one of them and fix the computer.
Try the fixes one by one. After performing one, if the issue is resolved, then you don’t need to do anything further. But if not, then try the next one.
Remember to revert back to the original state if your attempt at a certain fix is not effective. It simply means that the specific fix is not going to work for your computer. Hence try the other fixes.
1. Disable Windows Automatic Update
Turning off Automatic Windows Update often resolves the high disk usage problem. I will explain to you exactly how you can disable it so that it does not run in the background and make our life miserable.
Here is how we can disable auto Windows Update :
- Press Windows + R key on your keyboard.
- Write services.msc in the box. A window will pop up, and you’ll see all the services running behind the scenes.
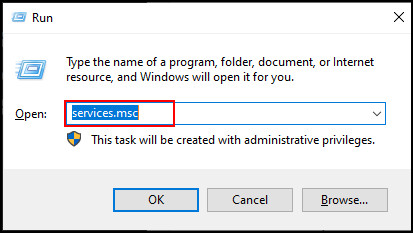
- Look for Windows Update. To find it out quickly, just keep pressing the W key on your keyboard until you find the service.
- Right-click on it. When a window comes up, simply at the lower half, you will see Startup Type
- Choose Disabled, and hit Apply
- Restart your computer
Check your disk usage now. If it is lowered to a normal level (20-30%, below 10% at idle state), we can permanently turn off our auto Windows Update feature.
Follow these steps to turn it off permanently :
- Open Windows Run as before.
- Type Regedit and click ok.
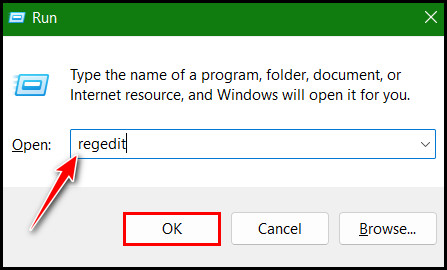
- Click on HKEY_LOCAL_MACHINE from the opened window.
- Follow this sequence Software > Policies > Microsoft > Windows
- Do a right-click on the folder name and choose New.
- Create a Key.
- Name it Windows Update.
- Right-click on it and create a new key having the name AU.
- Click on AU.
- Right-click on the right side box and make a new DWORD (32-bit) value.
- Rename it as NoAutoUpdate.
- Double-click on NoAutoUpdate and select Hexadecimal.
- Set the value to 1 to ensure the auto-update is off.
- Restart your computer.
Windows auto-update is now permanently turned off.
2. Remove Malware
Malware can invade your system in quite a different way, such as Installing illegal softwares, visiting suspicious websites, inserting thumb drives without scanning, etc.
Here is a quick process to remove malware:
- Choose an antivirus (I use Malwarebytes as it is lightweight).
- Download and install.
- Skip any activation prompt that shows up. You’ll have a 7 days trial period in any antivirus.
- Perform a Full System Scan, and you will find some critical viruses.
- Delete them and restart your system.
- Check in the Task Manager.
Now you have normal disk usage.
3. Disable Windows Search Service
If the Windows search service is causing a high disk usage problem, you need to disable this service.
Here is how you can disable Windows Search Service:
- Open the taskbar by pressing your keyboard’s Ctrl + Shift + Esc button.
- Navigate to the Services tab.
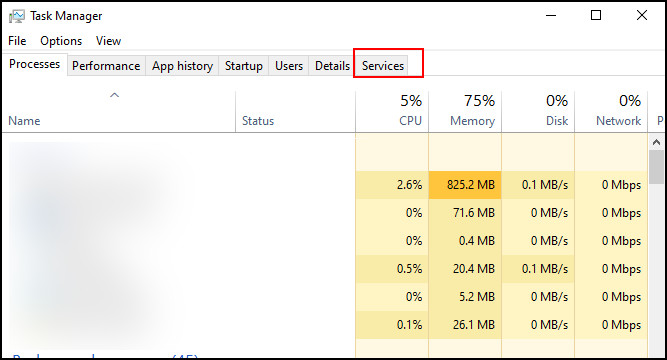
- Click Open Services from the bottom. This will open up a list of Windows containing all the services running in your OS.
- Keep pressing W until you see Windows Search.
- Right-click on it once you find it.
- Click on properties from the dropdown menu. In the General tab, you will see an option box labeled Startup Type.
- Choose Disabled.
- Hit Apply.
- Restart your computer.
Your problem should be fixed by now.
4. Disable Auto-Scheduled Disk Defragment
Disabling the auto-scheduled disk defragment is a proven solution to mitigate the high disk usage issue.
Here is what you need to do to disable auto-scheduled disk defragment:
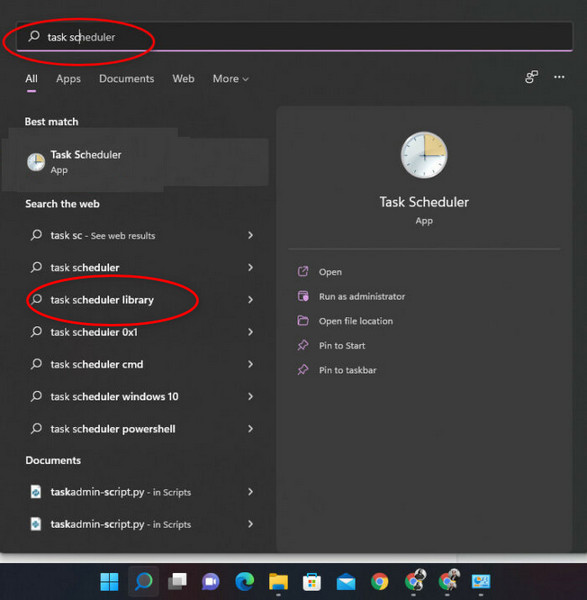
- Press Windows + S key on your keyboard. A search bar will appear.
- Type Task Scheduler.
- Expand Task Scheduler Library.
- Click on Microsoft. It will show some subfolders.
- Click on Microsoft.
- Go ahead and expand Windows.
- Click You will see a tab on the right side of the folder list.
- Select ScheduledDefrag from the top box.
- Click on End from the action tab to the right.
- Click Disable Click yes if any prompt opens up.
- Restart your computer.
Check the task manager now. Your problem is fixed. If not, try the following one.
5. Update Device Drivers
Before Windows try to update your device drivers and junk the disk 99% usage, you should always update the drivers by yourself.
Here are the steps to update your device drivers:
- Open the Windows Search bar.
- Type Device Manager. You will see a window with all the devices listed there.
- Click to expand the device.
- Right-click on the device from the list of which you want to update the driver.
- Click on Update Driver.
- Choose Search Automatically For Drivers.
- Click on the driver to install when found.
- Restart your computer after the completion of the updates.
Check the taskbar, and I believe your problem is solved by now. If not, move to the next one.
6. Disable Superfetch Service
Here is how you can disable Superfetch:
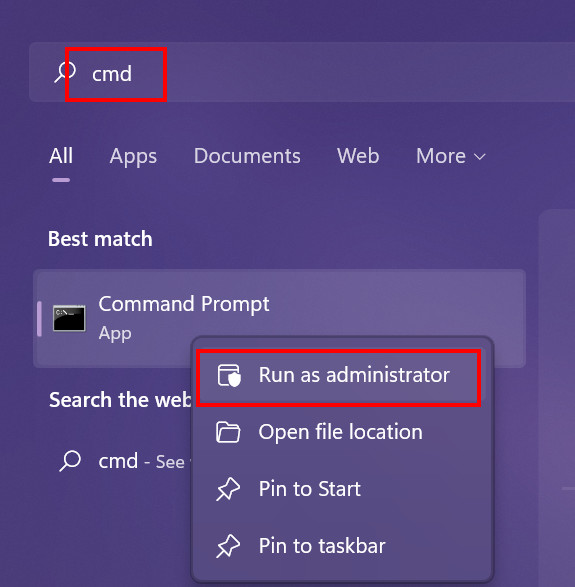
- Open Windows Search Bar.
- Type cmd.
- Click the right mouse button and run as administrator.
- Type net.exe stop superfetch.
- Hit Enter.
Following these steps will stop the Superfetch service. Check if the disk usage has come down to normal. If positive, then you should permanently disable the service.
For permanent disable, follow this:
- Open up Task manager.
- Navigate to the Services tab.
- Click on Open Services at the bottom.
- Search for Superfetch by pressing the S Keep pressing until you see the service.
- Right Click on the service name from the list and click on A dialogue box that will pop up, and you’ll see Startup Type in the lower half.
- Choose Disabled and hit Apply.
- Restart your computer.
Now, if you check the taskbar, the disk is not populated with weird read and write operations, lowering disk usage.
7. Reset Virtual Memory
To avoid possible high disk usage, resetting virtual memory can help.
Here is the manual process to reset virtual memory:
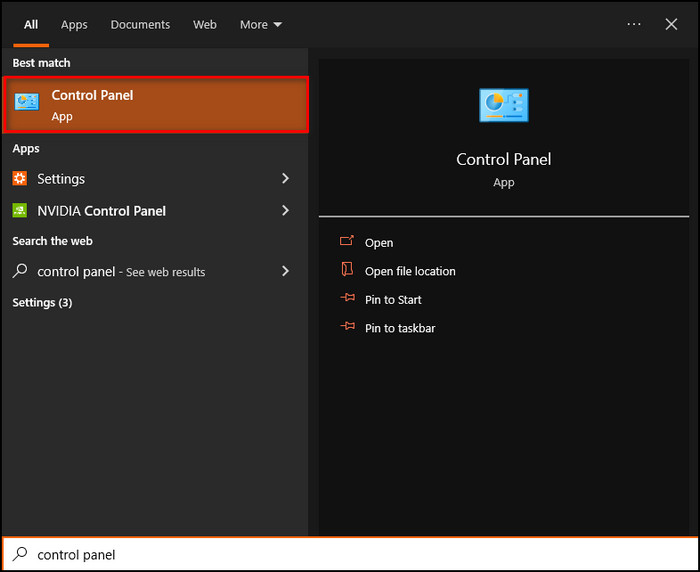
- Open up the Windows Search bar.
- Type Control Panel.
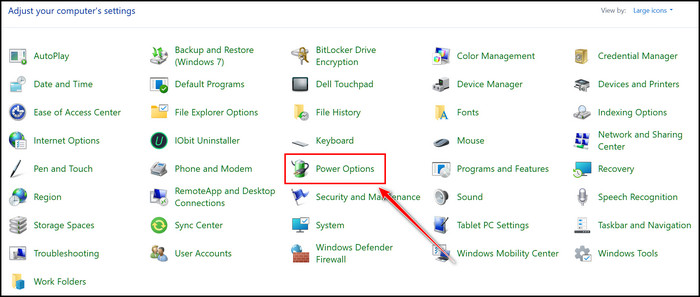
- Select large icons from the top right corner.
- Click on System.
- Click on Advanced System Settings from the right-most list under the Related Settings menu.
- Click on Settings under the Performance headline.
- Navigate to the Advanced tab from the new window.
- Click on Change.
- Uncheck Automatically managed paging files from the new Window.
- Check Custom Size.
- Set recommended size for the paging file you see at the bottom, inside the Initial Size Input box.
- Set the Maximum Size 1.5x of your existing RAM; for example, if you have 4GB, (4*1024*1.5) = 6144 should be your paging file size.
- Click Apply and Restart.
Now your disk should be down to normal usage territory, and all the lags and crashes are gone.
8. Disable MSI
When Message Signaled Interrupt (MSI) is enabled, the disk may not respond properly and create 99% disk usage. Let’s fix it immediately without getting into the technical terms and scaring you.
Follow the steps to disable MSI :
- Open Windows Search bar.
- Type Device Manager.
- Search for IDE ATA/ATAPI controllers in the device manager window.
- Expand the option, and you’ll see Standard SATA AHCI Controller.
- Right-click on it and choose properties.
- Click on the Driver tab.
- Click on Driver Details. If you see storeahci.sys driver in the list. We need to disable it.
- Go back to the controller properties Window.
- Select Device Instance Path from the Property dropdown. You will have value. Take a screenshot or note down the value.
- Close everything and get back to your desktop screen.
- Open Windows Search.
- Type Registry Editor and Click on it.
- Navigate to HKEY_LOCAL_MACHINE > SYSTEM > CurrentControlSet > Enum > PCI
- Locate to your copied/saved value now. Match it carefully.
- Expand the next folder.
- Click on Device Parameters.
- Click on Interrupt Management.
- Click on MessageSignaledInterruptProperties.
- Double Click on MSISupported from the right-hand side box.
- Set the value to 0 in Hexadecimal Unit.
- Hit Ok and quit the registry.
- Restart your computer.
Your problem of high disk usage should be fixed by now if this was creating it.
9. Disable Third-Party Antivirus
Windows has a built-in antivirus program, yet users install third-party antivirus programs to protect the system. These programs often trigger scheduled scanning of the disk. Hence, disk usage goes through the roof.
Disable any antivirus program that you have installed from an external source. Check if the disk usage is back to normal. If it was the culprit, you got your problem fixed.
10. Enable High-Performance Mode
Many users have reported that after enabling high-performance mode on their system high disk usage problem has been fixed.
Here are some steps to enable high-performance mode:
- Open Windows Search by pressing Windows + S.
- Type Control Panel.
- Choose Large Icons from the top right corner.
- Click on Power Option.
- Click Change Settings.
- Click Advanced power settings.

- Choose High Performance.
- Hit Apply.
Your computer is now set to high-performance mode. The overall performance of the system should be better now.
12. Perform a Clean Installation of Windows
If you are still reading this, that means you have tried all the fixes I have already explained. But there’s always something that can erase all the issues.
Perform a clean installation of the Windows. Sound like a cheesy fix but trust me, it works. A fresh copy of Windows will give you a fresh start.
Don’t junk your system with unnecessary, malicious programs that come from unknown sources on the newly installed OS. This should help you keep your system clean and reliable.
13. Remove Faulty Disk Drives
Although you have tried all the fixes by now, you got no luck! Are you thinking about smashing your computer? Wait! Don’t do it yet. I got one last thing for you.
The disk drive on your computer may be causing the issue. A faulty drive behaves strangely. As a result, problems like 99% disk usage arise. The drive tries to keep up with the instruction from the user but fails.
Therefore to fix it, you need to replace your disk with a new one. And high disk usage problems should be gone.
Epilogue
99% disk usage is an annoying problem that hampers user workflow and destroys user experience completely.
The fixes and reasons I have explained in this article should help you completely eradicate the high disk usage problem and prevent happening it in the future.