Is it just irritating for me while launching SteamVR, a sudden error message appears Error: Shared IPC composition connection failed (306)? Or do you feel the same getting this error? Well, if the answer is affirmative, let’s discuss this issue from it’s very core.
Ever since I joined this VR developer team, I have used multiple VR headsets to discover their flaws and necessary measures to develop them more user-friendly. Having said that, SteamVR was also a part of my project, and with researching a bit, I found that Error 306 affected so many people with their virtual reality experience.
So, In this article, I have decided to share some proven methods for you to try if you are interested in eradicating the issue on your own. I will help you along the journey, and you just have to tweak your system a little bit.
To begin with the process, let’s start with answering the obvious question,
Why does SteamVR Error 306 occur?
Have trouble understanding the causes? Don’t worry. I will explain these in the following section. Continue reading till the end to procure expertise.
Why do I Get SteamVR Error 306 so Often?
In the earlier part, I provided only the surface of the information. If you want a deeper understanding of the error, this section is for you.
You can skip this section if you want to. That won’t affect solution procedures. But, to me, understanding the actual problem is halfway solving the matter. So, I would recommend not overlooking this chapter.
So, let’s dive deeper into the matter to find the valid reason behind error 306.
Here are the reasons behind your encounters with the error 306:
- Connection Issues: Your VR headset needs to be connected with the primary port of your graphics card to achieve proper functionality. If you fail to do so, connect it to a secondary port, to be exact, you are likely to face the error message.
- Outdated Software Version: When was the last time you checked the software version of your headset? Can’t remember? I think I made my point clear. If you are using an outdated driver version of the GPU, or the headset itself, getting the error message is not surprising.
- Beta Version of Steam: Another reason for getting the SteamVR failed to initialize for unknown reasons error is lack of knowledge using the beta version. Most of us don’t know when to enable the beta, as well as disable it. This inadequacy leads to the 306 error on your headset.
- Natural Locomotion: This software is not always the culprit per se. This was designed to improve the practicality of the SteamVR experience. But, sometimes, it causes the recognition error on your VR headset.
These are the common grounds for your unsatisfactory interactions with the VR headset. Let’s make headway to the ultimate purpose of this article- Solve the SteamVR Error 306.
You may also like to read: Steam Not Working on WiFi.
How to Solve SteamVR Headset Error 306 Quickly?
Now that you have sufficient awareness about the error and a confident mindset (thanks to the previous chapter) solving the issue, it is time to act on the methods.
Before jumping to the solving techniques, make sure you have restarted both your computer and the VR headset. This initial step eliminates software glitches and bugs which can be identified as harmful for the following prospect.
All good? Let’s start the settlement mechanism of error 306.
Here are the methods you can implement to resolve error 306 on SteamVR:
Method 1. Connect VR cables to Primary HDMI Port
As described earlier, the error could be because of an improper cable connection. If you have connected the HDMI cable to your secondary display port, you might face this error. Connect the wires to your primary port to avoid such a scenario.
Here are the steps to connect VR cables to the correct port:
- Disconnect the HDMI cable from your graphics card.
- Plug the VR cable into the main port that comes out of the VR box.
- Connect your monitor through your graphics card’s secondary port.
- Close the SteamVR application if it’s still running in the background.
Restart your computer, launch the VR application and check if the issue persists. If yes, jump to the subsequent methods.
Method 2. Keep the Drivers Up to Date
You can’t fathom the benefits of keeping your drivers up to date unless you are already doing that. It is always considered as a preventive measure to any kind of error. Try updating the drivers once in a while. You’ll surely get a positive outcome if you do so.
For instance, I am sharing the method that you can use to update the VR headset driver.
Here are the steps you can follow to update your drivers:
- Disconnect the headset from your computer.
- Press the Windows + S button to launch the windows search box.
- Type in Device Manager and click on the result.
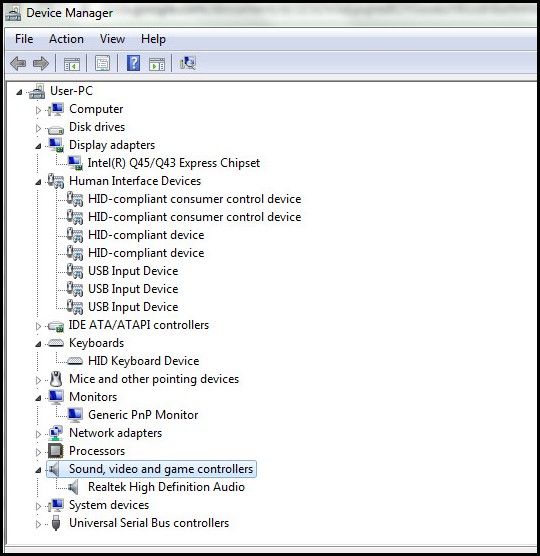
- Locate your headset in the device manager, and right-click on the driver.
- Select Update driver from the list.
- Select Search automatically for drivers option from the following window.
Restart your computer after the updating is completed. If you have any other drivers that are outdated, update them and check if the problem resolves.
Related content you should read: SteamVR not Recognizing Oculus Quest 2.
Method 3. Clean Boot Windows
If there’s anything wrong with the Operating system, you might encounter this error. Cleaning the system files would help you to resolve the issue.
Here’s the process to clean boot windows:
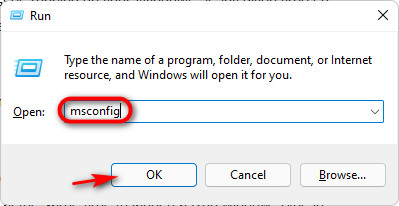
- Press the Windows + R button to launch the run prompt.
- Type in msconfig and hit enter.
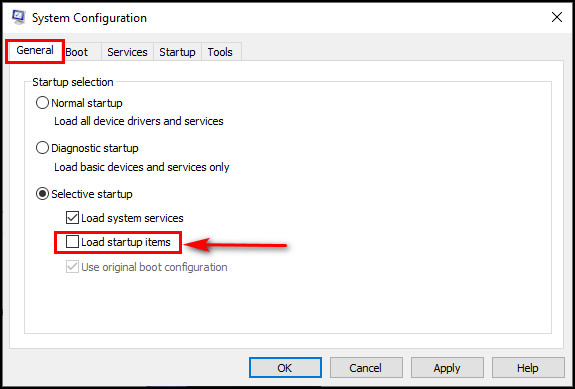
- Choose the Selective Startup option and untick the load startup items.
- Click OK and move to the services tab on the next window.
- Untick the option Hide all Microsoft services from the bottom.
- Select Disable all after that and click Apply, then ok to save the changes.
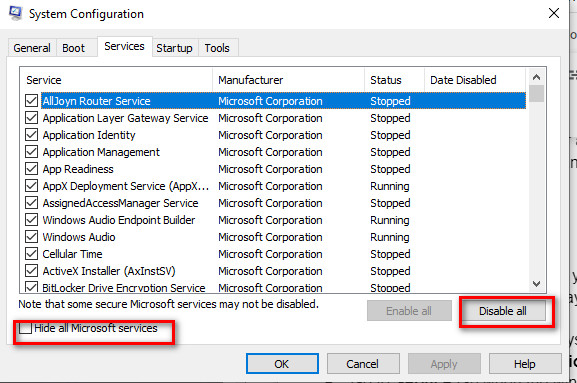
- Select the Restart option on the following dialog box.
Launch the SteamVR application after completing all of the steps and check if the error message still appears or not.
Method 4. Uninstall USB Drivers
If the USB drivers are corrupted, you can encounter serious error messages, including Error 306. Uninstalling the USB drivers will let you a fresh start in driver management, which can be helpful in solving the SteamVR failed to initialize error.
Here are the steps to uninstall USB drivers:
- Press the Windows + X button to open up the windows menu.
- Select Device Manager from the list.
- Expand the Human Interface Device from the list.
- Right-click on the USB input device and select the Uninstall driver option.
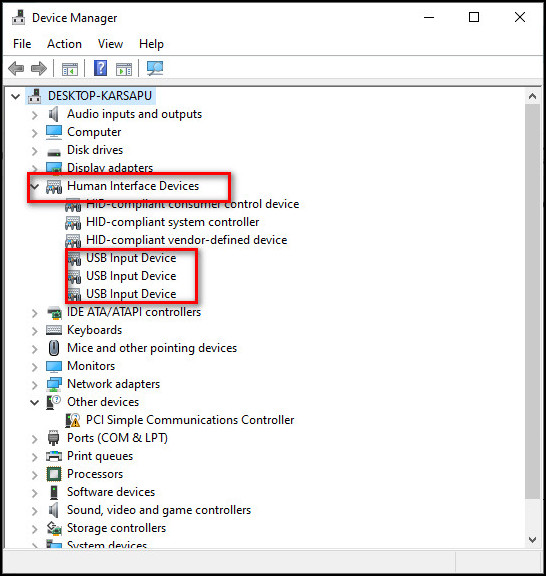
- Restart your computer when the process is finished.
Note: Your PC will automatically install the latest version of the driver while restarting. So, no need to hesitate to perform this method.
If the error message still appears, try the following methods. You will surely solve the problem if you stick to the plan.
Check out our separate post on how to Calibrate Steam VR.
Method 5. Tweak Steam Beta
If you change the StemVR properties settings, sometimes it can solve the Shared IPC composition connection failed (306) error. Change the Beta settings, for instance, and see what happens.
Here are the steps to change Steam beta:
- Run the Steam software on your computer.
- Navigate to the library tab.
- Locate the SteamVR option and right-click on it.
- Select properties. One in the next window, click on the Betas tab.
- Choose the option beta – SteamVR beta update.
- Wait for a moment to complete the update.
Launch SteamVR after the completion of the process and check if the issue has been resolved.
Note: You can turn off the beta by following the exact process but select None- Opt-out of all beta programs.
Method 6. Uninstall Natural Locomotion
At the earlier stage, I have described what natural locomotion is and how it affects the VR experience. Now I will help you remove this application from your computer so that you can enjoy virtual reality without any disturbance.
Here are the steps to uninstall natural locomotion:
- Open the Windows search box and type in the control panel.
- Click on Uninstall a program from the Program menu.
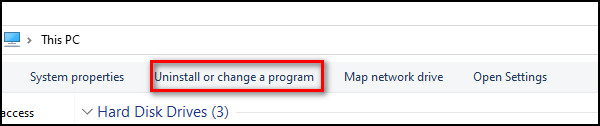
- Locate natural locomotion within the list.
- Click on the application and select Uninstall from the dashboard.
- Follow on-screen instructions to complete the process.
Restart your computer and run SteamVR to check whether the issue has been resolved or not.
These are the proven methods I have tried, and I am recommending you implement them. Select the one you are going to try on and read that part again. You will surely be able to solve the issue by leveraging the skills you already have.
Also read, how to Fix Steam Link Setup: No Host Computers Found.
Conclusion
The last thing I would like to add is, re-install the SteamVR application if all of these standard procedures couldn’t resolve your problem. Contact the support team if you want to. But always remember to chin up.
If you have read this article from top to bottom, you will realize how much I have tried to solve this irritating error message. If any of the written discussion was difficult or unclear for you to understand, please mention it in the comment box, and I will be delighted to explain again.