MacOS can sometimes unrecognize a new SSD. It can also happen when you connect your old hard disks. As a result, you will see the file manager unable to access the files on that drive.
To troubleshoot this issue, I have laid out some fixes, which you can go through sequentially.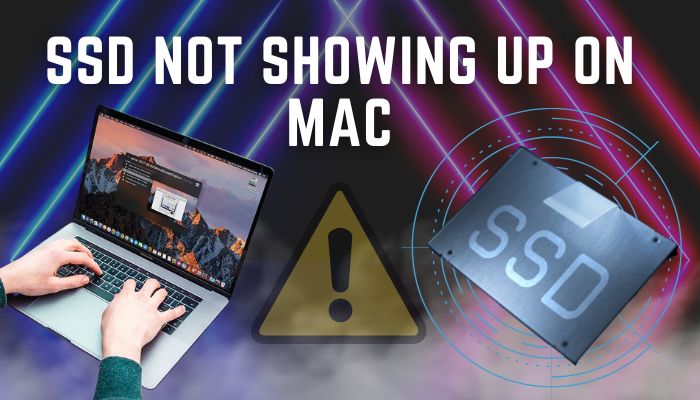
By the end of this article, you will have determined whether you need a new SSD.
So, let’s start.
How to Fix an SSD that is Not Showing Up On Mac
To fix an SSD that does not show up on a Mac, first check if it is connected properly. Ensure that SATA and power cables are slotted in securely. Next, check if the drive is detected in the Terminal. After the drive shows up, run First Aid and then format it using the Disk Utility app.
That’s the order we will maintain to troubleshoot the SSD that is acting weird.
So, have a screwdriver nearby. You are going to need it for the first step.
These are the steps to fix SSD that does not show up on your Mac:
1. Check the SSDs Connection
Did you connect the SSD properly? The SATA and power cables must properly connect to the logic board. Also, the SATA cables must be functional for the Mac to discover it. This is only applicable for older Macs that allowed you to upgrade the internal storage as they used a 2.5-inch drive.
For newer Macs that have an M.2 slot, you must insert the SSD in the correct order and secure it using a screw.
The most recent models with M1 or newer processors do not even have the option to upgrade the SSD. In that case, connect an external SSD with a Type C port. Also, check beforehand that this cable is operational.
As a tip, connect the SSD to a Windows computer and look if it is detected in the Disk Management app. If you see an unallocated drive, the SSD is working fine; you just need to format it correctly for the Mac to identify it. In that case, proceed to the next steps.
If you do not see any drive pop-up, things are not looking bright for now. Nevertheless, go through the next steps to see if you’re in luck.
Is your internal drive popping up every now and then, even if it is connected securely? Read on to know how we fixed our internal disk drive from disconnecting on our PC.
2. Configure Finder to Show Disk Drives
Before formatting the SSD, Finder needs to be configured to view the disk drives. If you do not set this, even the working drives will not be visible on your Mac.
Follow the steps to enable Finder to view the disk drives:
- Open Finder from the dock.
- Click on Finder > Preferences from the top menu bar.

- Go to Sidebar.
- Select HDD from the checkbox.
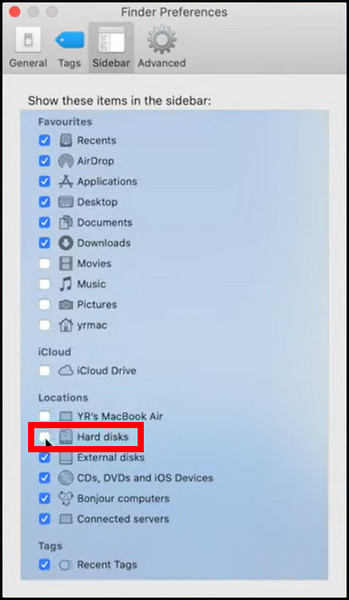
Now, close the Preference window. Go to the Finder app and look for the hard drive in the left pane. If it is not visible yet, you will need to format it first.
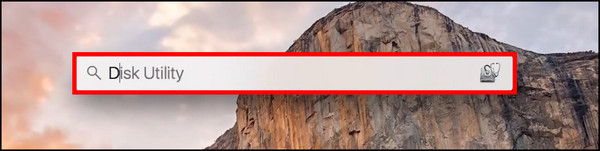
3. Run First Aid on SSD
First Aid is a diagnostic check that you can run on disk drives to determine if it has any errors. You can find it built-in Disk Utility on your Mac’s Settings.
These are the steps to run First Aid on your Macs SSD:
- Search for Disk Utility from the Spotlight and open it.
- Select the disk drive from the left pane.
- Click on the First Aid button.
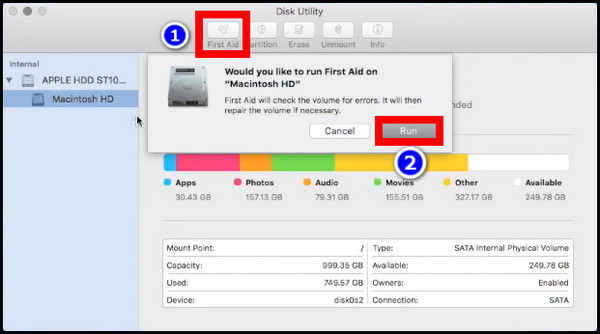
After running a thorough scan, the program will attempt to fix the issues with the drive. When the check is completed, restart your Mac and open Finder. You should see the SSD now.
Did you know Mac allows booting from an external drive? That way, you can speed up an old Mac using an external SSD. Read this detailed guide to boot your Mac from an SSD.
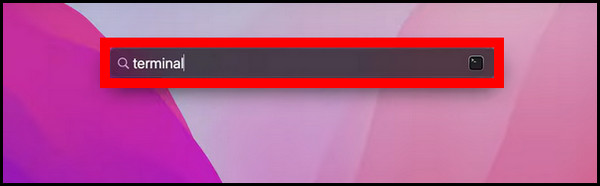
4. Repair the SSD from Terminal
The Terminal also has built-in tools for checking errors with disk drives. But first, we will have to determine which drive letter is assigned for the SSD.
Here are the steps to repair the SSD drive from the Terminal:
- Press the Command and Space bar and type in Terminal.
- Click on the Terminal icon to open it.
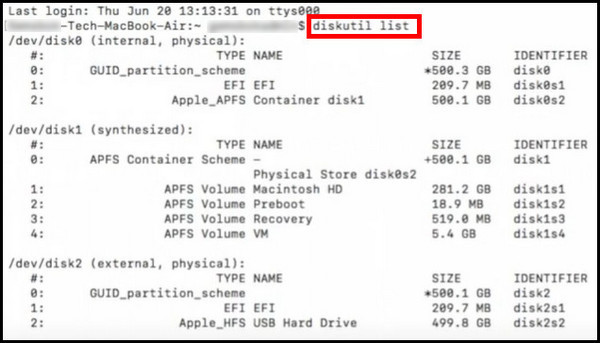
- Write diskutil list and press Enter. Note down the SSD’s identifier/location from the list of drives.
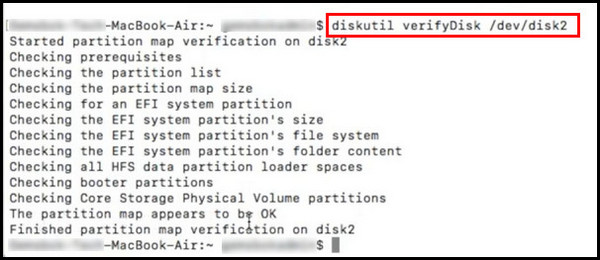
- Now type in diskutil verifyDisk /dev/disk n, and replace disk n with your disk number.
- Next, write diskutil repairDisk /dev/disk n.
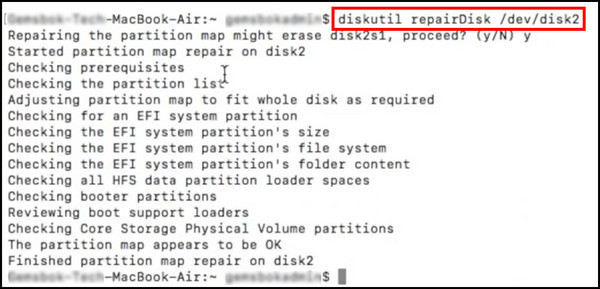
Wait for both processes to complete. The total file system will be verified and repaired if any error is found.
Once the process completes, close the Terminal and reboot your Mac.
5. Format the Drive in Disk Utility
The last step involves erasing the drive. As we cannot access the drive using Finder, there is no way of backing up any existing files present on the SSD. For a new drive, formatting is not a problem, though.
There are certain file formats that you can select when formatting the drive. If you plan to use the drive on the Mac only, select APFS. For older Macs, selecting Mac OS Journaled will do just fine.
However, choose FAT or exFAT if you intend to transfer files between Mac and Windows computers. This way, the SSD will be recognized by both OS.
Follow the steps to format your drive in Disk Utility:
- Press Command and Space and type in Disk Utility.

- Select the drive from the left pane.
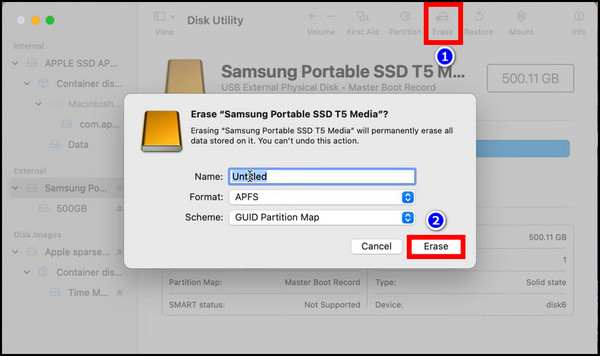
- Click on the Erase button.
- Select the drive name and choose a file format from the dropdown list.
- Now, select GPT from Scheme.
- Finally, click the Erase button.
Once the formatting is done, you can finally access the drive from the Finder app.
By now, your Mac should recognize the SSD or the external drive connected to it. If the drive still does not appear, try formatting it on a Windows computer. To do that, open Disk Management > Right-click on drive > Format.
If you are not getting any luck in detecting the drive on Windows, there is a good chance that the drive may be damaged. In that case, return the drive for a replacement if it is covered under warranty.
Frequently Asked Questions
Why is my SSD not being detected on Mac?
If there are loose connections between your SSD and Mac, it will fail to recognize it. Additionally, the SSD must be formatted in the correct format for the macOS to detect it.
How do I make my SSD readable on Mac?
To make the SSD readable, format it using the Disk Utility app. And do not forget to select the File Format as APFS or Mac OS Journaled.
Why isn’t my Mac detecting my hard drive?
If the Finder isn’t configured to show the disk drives, you will not see any hard drives. To change this, open Finder > Preferences > Sidebar > Tick on HDD.
What format should I use for Mac SSD?
But if you only plan to use the SSD for Mac only, choose APFS, which supports all recent models. In addition, Mac also supports NTFS, exFAT and Mac OS Journaled as file types.
Wrapping Up
I hope you troubleshot the SSD out of its troubled waters easily. Considering how user-friendly macOS is, this should not be that difficult for you.
Unless your SSD has suffered a hardware issue (which happens rarely), most problems with disk drives can be resolved.
With that said, that’s all for today.
Farewell for now.