Would you intentionally leave your wallet in a restaurant or your car in public parking with keys? Even if both places have proper security measures?
No, right? Because we all want to protect what is ours with extra care. The feeling is also true for our SharePoint site. Though Microsoft provides basic protection for all SharePoint sites, there are some extra measures you should take to secure that protection.
Follow this post to learn the key tricks to strengthen your SharePoint site security.
Key Takeaways
- You should only impose security measures that don’t contradict your site’s purposes. Blindly applying unnecessary protections will only hinder your daily tasks.
- It’s always better to give the minimum required access to all users. Because when too many people have admin access, chaos occurs.
- Remember to train your employees altogether on the updated SharePoint security to get the best results via proper collaboration.
Before starting to tweak the security settings, you need to decide the purpose of your SharePoint site. Because if you set security measures contradicting your needs, all the site users will face unnecessary difficulties.
For example, once, I restricted file access for all users/editors in my SharePoint Site, which I created for a client presentation. As a result, my co-workers couldn’t complete their tasks properly because they couldn’t access the data files.
That’s what you need to determine these things before applying any customized security measure:
While making a SharePoint site or tweaking its Security, you have to make a decision regarding external sharing.
If you initially create a site within a site collection that doesn’t allow external sharing and later decide to share content externally, you may need to start over.
Also, don’t restrict the data access if you plan to share content from a site externally.
Will you use security settings from the parent site or make unique protection for your sub-site?
In case of the sub-sites, you can either use the Parent Site Security Settings or create a unique protection system. However, the methods will change according to your choice, and changing the settings at a midpoint is very difficult. So it’s better to decide which one you prefer the most.
What roles or levels of access will you give to your site members?
There are 3 types of user groups by default in a SharePoint site; Site Owners, Site Members, & Site Visitors. They get different levels of access, roles, and permission. You should outline those work groups before imposing any restrictions or granting new access.
Note: You should only give required access to the group. If the group requires adding, editing, or deleting files or contains, giving them Full Control is unnecessary!
Contain sharing also greatly impacts the security decision of your SharePoint site.
If you created a SharePoint site for a group assignment, limiting content sharing will create complications to complete the task. However, restricting data is necessary if you create that site for the HR department.
These are the questions you should ask yourself before setting up any security measures for your SharePoint site. It will help you to avoid unnecessary hassle and issues in the future.
Since SharePoint sites store sensitive data about your organization, you must secure it against internal or external threats. But the security measures differ according to user needs.
So when you are 100% sure what you want from your SharePoint, you should apply new security measures.
Here are some policies you can apply to make your SharePoint site more secure:
1. Assign One Admin Per Site
Too many cooks spoil the broth. When you give full site control to too many people, you can’t maintain security or prevent unauthorized sharing. Also, more than one site owner will create chaos or interrupt the workflow because there isn’t any proper authority.
That’s why choose one admin per SharePoint site.
2. Manage External Sharing
By default, all Teams sites on SharePoint have an external sharing feature. However, if your SharePoint site contains important organizational data like the financial statement or the memorandum of association, you must disable external sharing.
Follow these steps to disable external sharing in SharePoint:
- Go to your SharePoint admin center and select Site Collections.
- Check the box next to the site that you want to turn off sharing settings.
- Click the Sharing option and select Don’t allow sharing outside your organization.
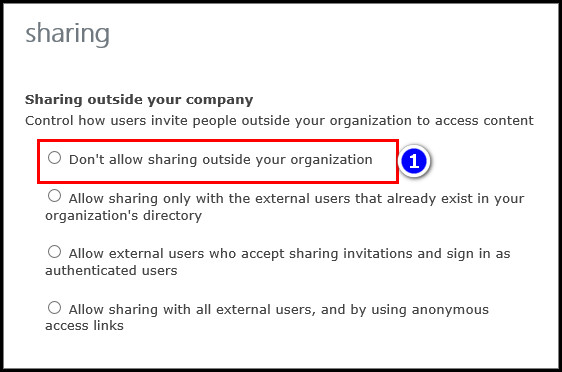
This method will prevent site users from sharing files, documents, or media outside the organization. So your data will become more secure.
However, suppose external sharing is necessary for your site. In that case, you should select the Allow external users who accept sharing invitations and sign in as authenticated users option to ensure data security.
3. Restrict Edit Access
The edit access lets you modify the SharePoint site and its contents. If you don’t want anyone to mess with your site, delete the files in it, or even delete your SharePoint site, you must keep the edit access to yourself.
Follow this guide to restrict users from editing the SharePoint site effectively.
4. Implement Custom Permission
Sometimes Microsoft’s default permission settings give users higher authorizations than they actually need. In that case, you must set custom permission authority for your Sharepoint site users.
Here’s the process to customize site permission on SharePoint:
- Go to your SharePoint site and click the gear icon.
- Select the Site Permissions option from the menu list and choose Advanced Permissions settings.
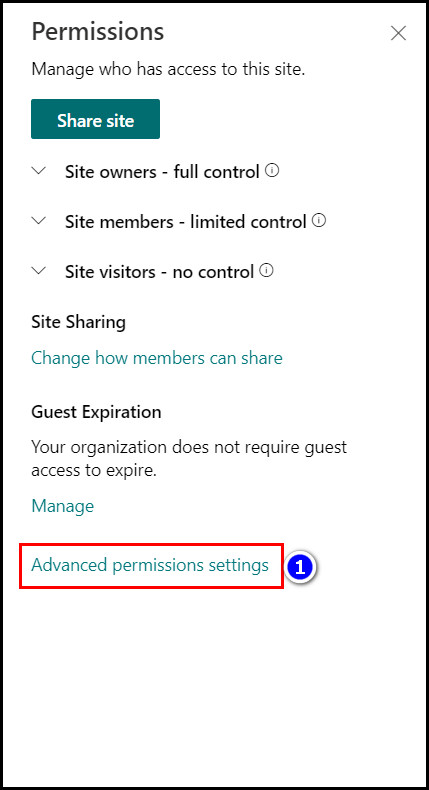
- Mark the square box next to your selected user group and click Edit User Permissions from the top ribbon.
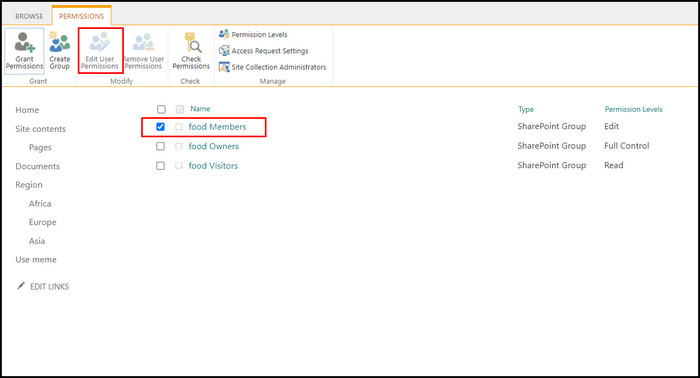
- Select the access you want to give from the list and click OK to save.
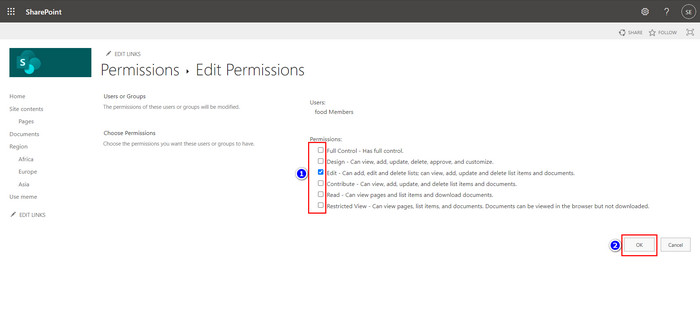
And it’s done. With this method, you can also set separate access for each user group per your need.
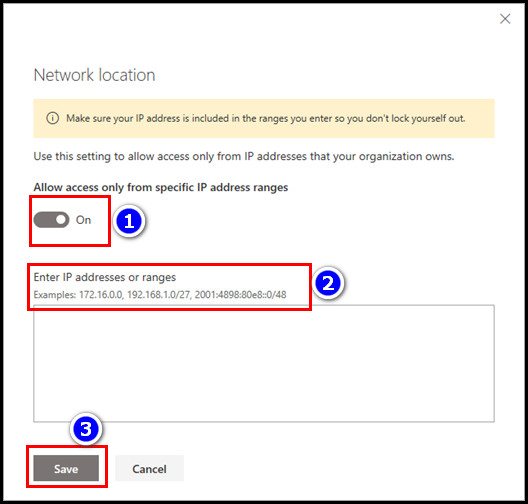
5. Block Untrusted IP location
Usually, any members with access can enter your SharePoint sites from any location using any IP address. However, this free access can cause data leaking issues from your organization.
But if you don’t want users to access your website outside your trusted network locations, you can set the location restriction accordingly. Use this method to do so:
Note: You may have to wait up to 15 to 20 minutes to see the restriction.
- Go to the SharePoint Admin Center Access Control using the admin account.
- Click on the Network location menu and toggle the Allow access only from specific IP address ranges slider.
- Input the IP addresses and IP ranges (use commas to separate multiple IPs).
Another method to safeguard important documents is to lock them from appearing in the SharePoint search result. You easily do it using the Admin center of your SharePoint.
Check out this detailed walkthrough to prevent documents from appearing in SharePoint search.
7. Add Password to Files
You can also set a specific password for specific files if you like. This method is perfect when you want to safeguard important documents but don’t want to prevent visitors from accessing your SharePoint site.
Here’s the method to add passwords to specific files on your SharePoint site:
- Open SharePoint and go to the Documents section.
- Select the files and click on the Share icon.
- Click on the Sharing settings option from the top.
- Choose the Anyone option and click on the Set password option.
- Type a strong password and select the Can view option.
- Turn on the Block download slider if you want.
- Tap Apply to save changes.
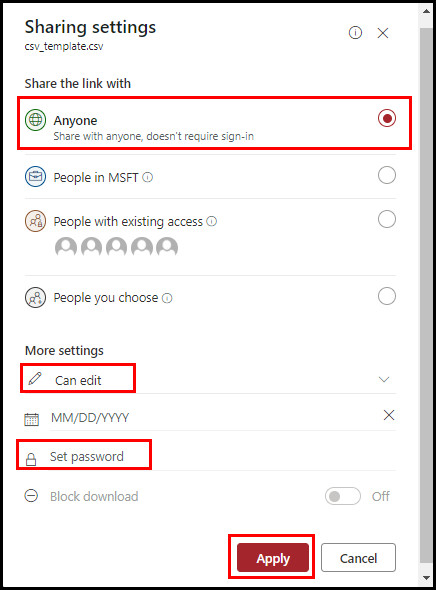
After completing the steps, only the people with the password can access the files from your SharePoint site.
8. Customize Retention Policies
In large organizations, there is more than one person who has admin permissions. In that case, someone can accidentally delete your data from the SharePoint site.
To avoid these issues, you can set Data Retention Policies for your SharePoint site. Not only that, but the data Retention features also help you avoid unnecessary government audit hassle.
To create a new Retention policy for your data:
- Go to your Microsoft Admin center > Compliance > Data > Retention.
- Click the + New Retention Policy option.
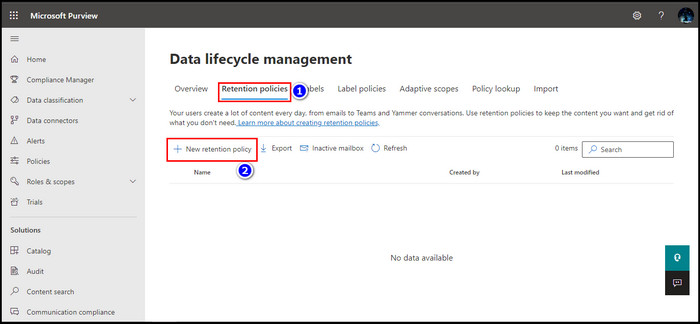
- Insert the Name and Description of that retention policy.
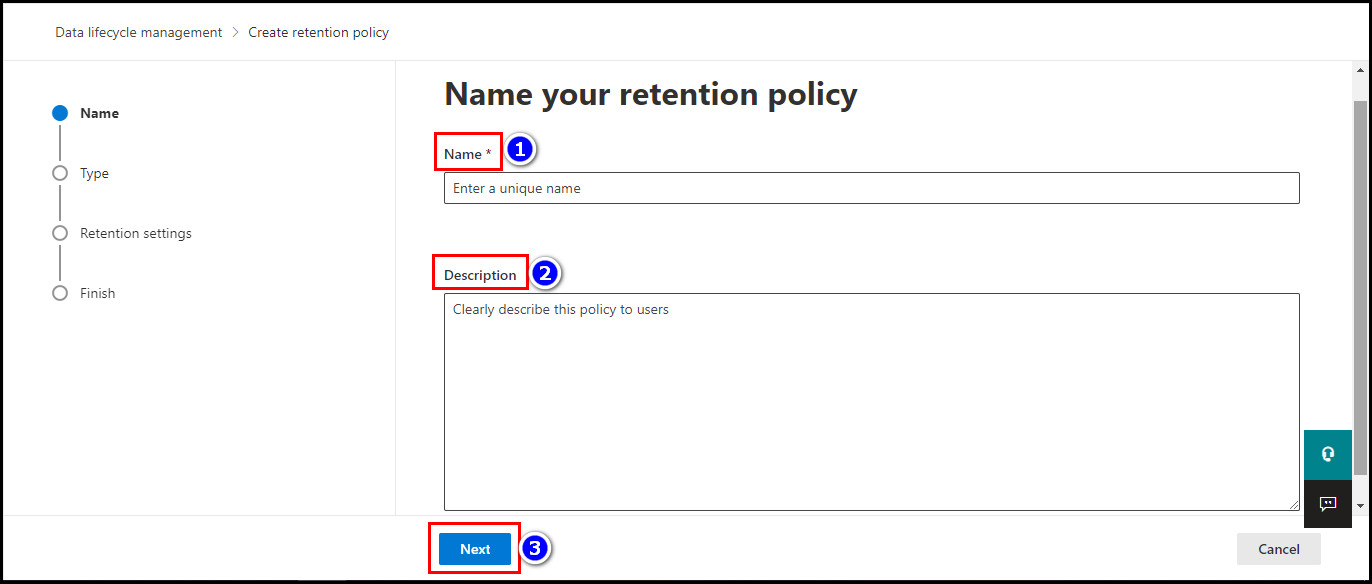
- Select the Type of Retention on the following screen and select the Next option.
- Set up the date range on the Settings tab and choose other options as you like.
- Review the Retention in the Finish window and click the Create this policy option.
After completing this process, you may have to wait up to 24 hours for the new policy to take effect.
9. Use the Data Inscription Tool
Microsoft has some secured Data Inscription Tools like BitLocker and Azure encryption. You can encrypt your data using these tools. But you must enable SharePoint permissions in the Azure Active Directory(AAD).
10. Stop Confidential Data Sync in the Library
Sharepoint has a very excellent Data Sync feature that syncs the data from your OneDrive. However, users with site access can view this data.
Another major problem is that SharePoint data sync is a two-way feature. So When you accidentally delete any files from the synced SharePoint document library, the file will also erase from other locations without any warnings.
So you should stop the data sync option in your SharePoint Library.
Bonus Tip: Employee Training
To gain the most effective outcome, Humans and technology must go side by side. So your organization should not only focus on the technical security of SharePoint but also on the people using it.
And training is the most effective way to do so. You or your organization must arrange in-depth training so that they know about these new security measures, how they work, and what they should do to keep the system running smoothly.
Because only proper collaboration can only ensure the growth of your organization.
FAQs
Can you password-protect a SharePoint site?
You can set a password for any SharePoint folder or file that you share, but not the whole site. But you can disable the external site accessing option from the share settings or make your site private.
Can I make a SharePoint site private?
Yes, you can easily make your SharePoint site private. Just go to the Privacy Settings menu on the site information panel and choose the Private option. After that, only the member can view your SharePoint site.
Can a SharePoint site have two owners?
Yes, you can set as many owners as you want on a single SharePoint site. Just select the Full access option while sharing the site with other members. If they accept, they will also be the owner of that site.
Conclusion
Long story short, Not only is SharePoint a powerful content management tool, but it also has many layers of protection features to guard your important data.
In this article. I’ve shown you some advanced data protection tips and tricks to make your files more secure. But you should only apply those protection measures that don’t hamper the site’s work.
Which one of the protection features from this article did you apply? Comment below.