Don’t just go blindly and set your PC fans to spin like a hurricane! As a result, it won’t cool down your temp effectively, and additional noise from the fan will ruin your quiet ambiance.
Why not set the fan curve in an ideal way?

A perfect fan curve is like a blessing for your PC’s health. You need to set the fan curve to cool down the system components. Default fan settings intermittently are not ideal. Spinning high when too hot and making a loud noise is the only scenario you will get from a default fan setting.
You are not alone in who wants a perfectly balanced fan curve. If you are looking for a balanced fan curve guide, this article is for you. Let’s get started.
Why Is Setting a Fan Curve Important?
To reduce the noise and at the same time continue the ambient cooling while gaming, a perfect fan curve is all you need. A balanced fan curve helps you cool down the temperature by spinning with accurate rpm. Setting an ideal fan curve keeps the rpm steady with a noiseless performance.
So, what exactly is a fan curve in the PC, and how does it work? Allow me to explain it.
Fan Curve in PC
A fan curve is a graph-based fan control system that shows how fast your fan is spinning when your system hits a specific temperature. In the graph, you will see the temperature on the X axis and the fan speed as a percentage of a max speed on the Y axis.
It is a simple process to understand the fan curve. The graph represents how your fans respond when your system components hit different temperatures. The fan will increase its RPM when the temperature hits high.
A computer is a powerful and complex machine, and It performs lots of complex calculations at a time. It just needs a fraction of seconds to perform any computations. It doesn’t mind heating up in the twinkle of an eye.
Modern computers are so powerful that you will treat them as magic boxes instead of machines. Just throw a task at it, and it will finish the job within a second. Marvelous, isn’t it?
The computer needs to be well maintained to get the most out of it. You don’t need to worry about getting it dusty and rusty. However, heat is the main threat to a computer that can negatively impact its performance.
While gaming, the CPU and GPU can heat up so much. If they don’t cool down immediately, they could be damaged permanently. You will be pissed off when you see your games stuck due to an overheated GPU.
Laptops and desktops have built-in fans to cool the components and blow out the hot air. The desktop has both intake and exhaust fans to maintain a perfect airflow. You can buy those fans separately, and they are pretty cheap. They come fine-tuned out of the box, but it’s not perfect.
It needs to be tuned perfectly to cool down the system. When required, you need a balanced fan curve to spin those fans with a perfect rpm. Default fan settings aren’t good enough to cool your gaming rig.
Let me guide you by setting a perfect fan curve and spinning them as hard as possible when you want.
Follow our guide on Fix: PC won’t go to sleep mode in Windows 11.
How to Adjust Fan Curves on PC?
There are a few ways to adjust your fan curves. If you are not satisfied with the preloaded fan controlling profile, you can follow my guide. But before starting, you will have to note down your temperature rise points and fan speed. Just follow the below steps to set a balanced curve for your fans.
Pro Tip: Make sure all your fans are connected to your motherboard through PWM connectors. Without connecting them to the PWM connections, you won’t be able to control them with any softwares.
Here are the methods you can apply to set a custom fan curve:
1. Fan Control Software
Fan control software is free, and you can use it to control all your PC’s fans, including CPU cooler fans, Radiator fans, Casing fans, and GPU fans.
Here are the steps to use fan control software:
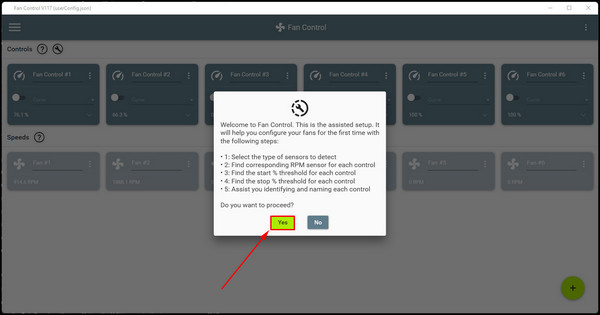
- open the fan control app after downloading and installing it.
- Click on YES on the prompt to automatically detect the sensors and the fans by the app.
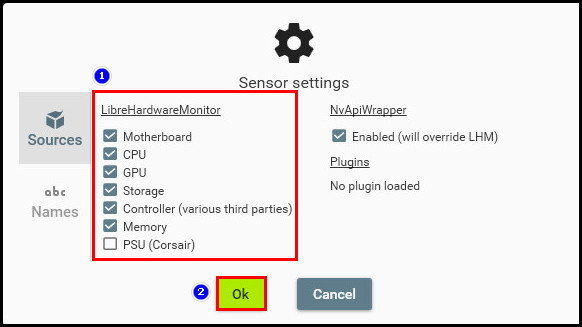
- Check only the boxes that you want to detect the sensors from the Sensor Settings prompt and click the OK button.
- Identify the fans by sliding the rounded button at the end of the left side. Now look at the rig and check which fan stops spinning. Do it for all of the fans and identify each of them.
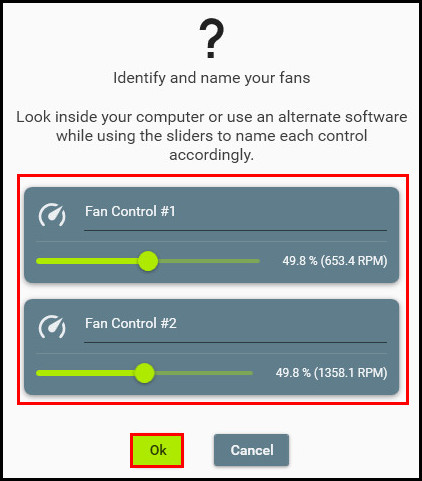
- Rename the fans according to their positions. By default, every fan is named Fan Control #1, Fan Control #2, etc.
- Click on the Add button at the lower right bottom side to add auto, Sync, mix, flat, target, graph, and linear fan controlling option cards according to your need.
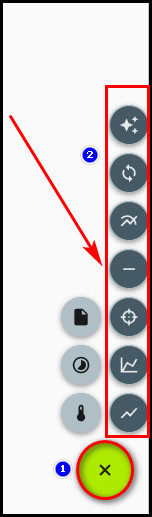
- Find all the fans under the Controls section. Click on the add button and select the rounded button with the flat bar icon. It will add a flat fan curve card. With this, you can control the speed of a specific fan. You can individually add a flat fan curve for each fan and rename them.
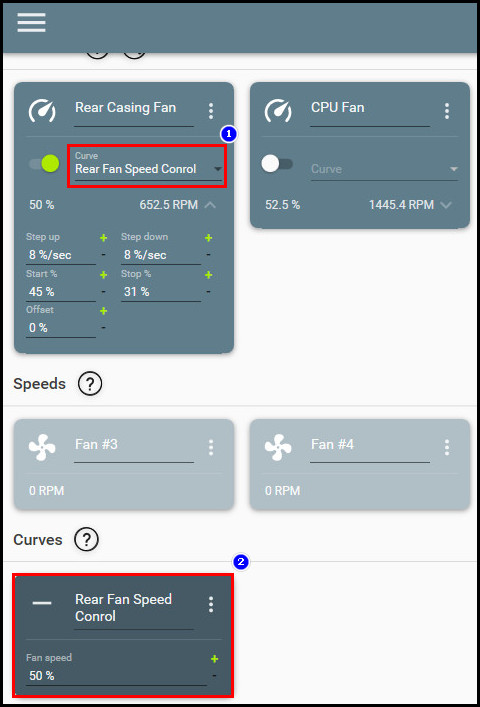
- Add Graph Fan Curve by clicking on the Graph icon button. You can add this control feature for each fan individually and rename them according to your fan’s position.
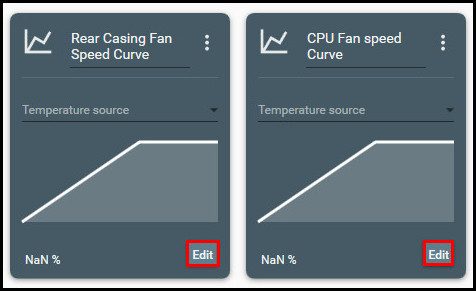
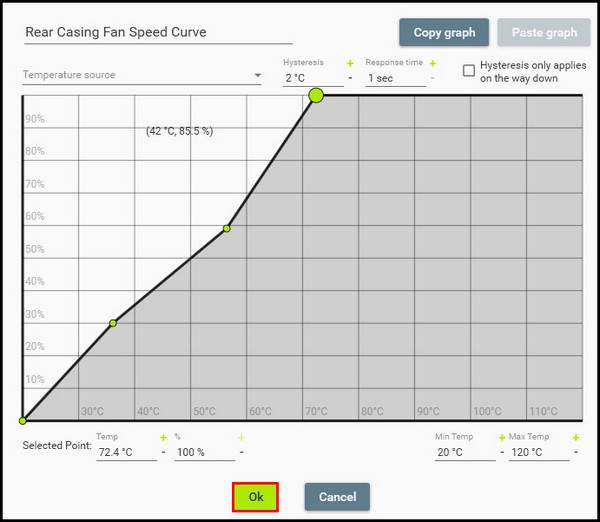
- Click on Edit from the graph fan curve card, and you will find a graph. Where temperature on the X axis and fan speed at the percentage of max speed on the Y axis. Adjust them according to your needs. Keep the fan speed at 40% for temperatures above 40℃, 60% for 50℃, and upper, make it 100% for 70℃ and upper temperatures.
- Change the response time to 3 sec and Hysteresis to 5℃. It will make the fans respond after 3 seconds for every 5℃ temperature increase. Then click on the OK button.
Now do this for each fan you want to control by adding a graph fan curve. This Hysteresis feature lets the fans not speed up suddenly by adding a response time for a specific amount of temperature increase.
You can control your GPU fans, casing fans, radiator fans, AIO liquid cooler pump fan, etc. This app is the best app to handle all the fans from one space, and there are tons of features to play with.
Also, check out our separate post on Can you use PCI-e Cable for the CPU.
2. Speed Fan App
Speed Fan software is another PC fan controlling software, and it’s freeware too. Like the previous app, this app doesn’t give you so many controlling functions, but this will do the job for you.
Here are the steps to use the Speed Fan app:
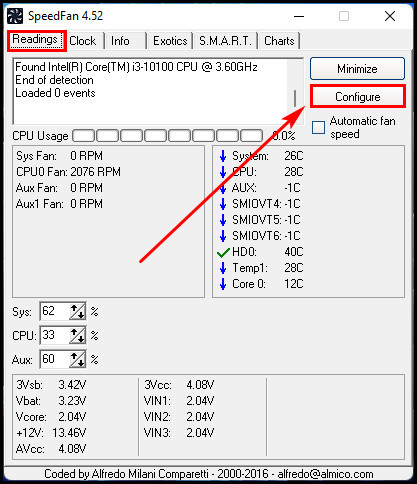
- Open the app after downloading and installing the Speed Fan app.
- Click on the Configure button from the Readings tab.
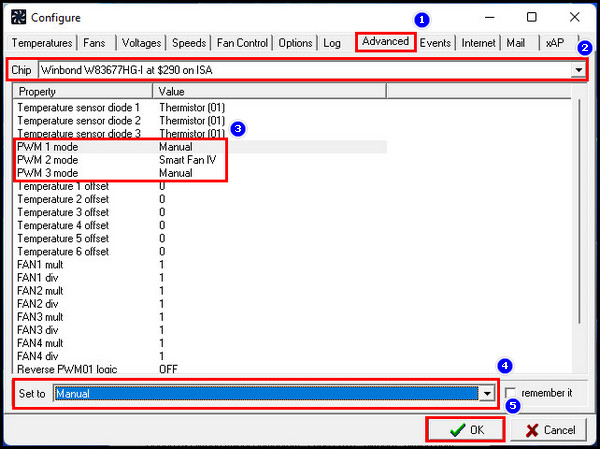
- Select the Advanced tab and click the drop-down menu of Chip.
- Select an option that starts with IT and ends with ISA. In my case, I have to select the option that begins with Winbond and ends with an ISA word. This option varies for the different motherboard brands.
- Select PWM 1 mode, or PWM 2 mode, and so on. You will see only the fans that are connected to your motherboard through PWM connectors.
- Go to the Set to option at the bottom, and click on its drop-down menu. Then select the Manual option, and hit OK It will give you complete control over the fans in your system.
- Click on the System fan(Sys) or CPU fan’s speed controlling dialogue box’s arrow up or down button. It will increase or decrease the fan speed at a percentage rate.
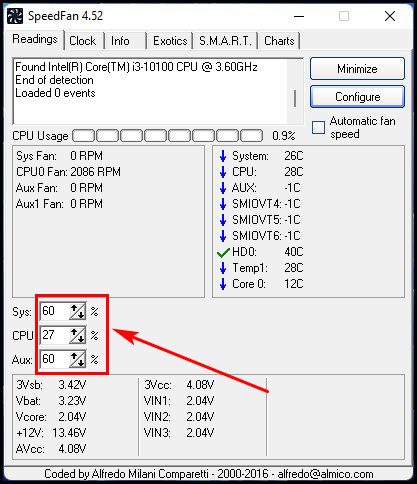
You can now manually control your systems and CPU’s fan speed. Perhaps, you can select your graphics card from the Chip option’s drop-down menu. You can also manage your graphics card’s fan speed by specifying your graphics card.
Here’s a complete guide on Fix Mass Effect Legendary Edition PC.
3. MSI Afterburner for GPU Fans
MSI Afterburner is an app by the famous gaming brand MSI company. This app is widely used for overclocking GPUs and manually adjusting the GPU fans. Non-MSI graphics card users can also use this software to tune their GPU fans.
Here are the steps to use MSI Afterburner to tune the GPU fans:
- Open the app after installing it.
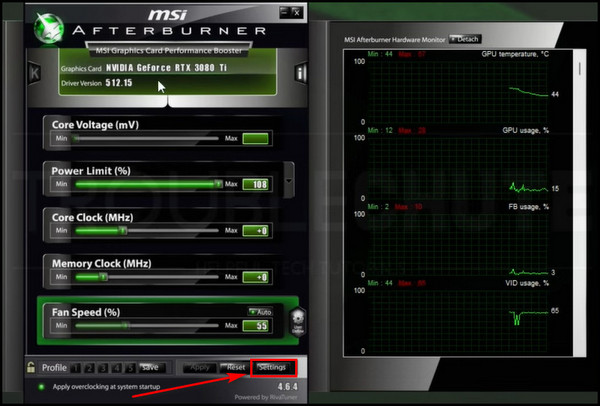
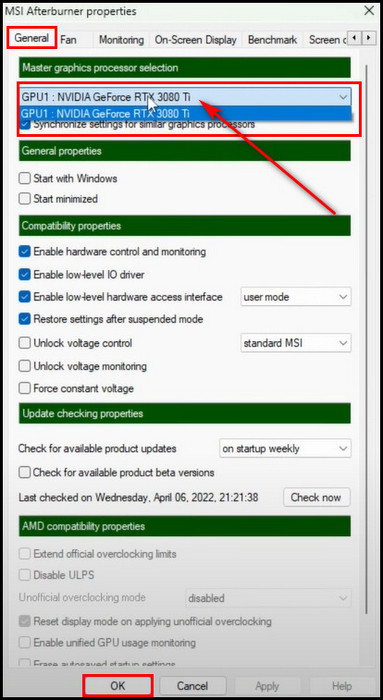
- Click on the Settings button in the lower right corner of the interface.
- Select your graphics card from the dropdown menu under the general tab section and click on OK. If you have multiple graphics cards, select the one you want to control from the drop-down menu.
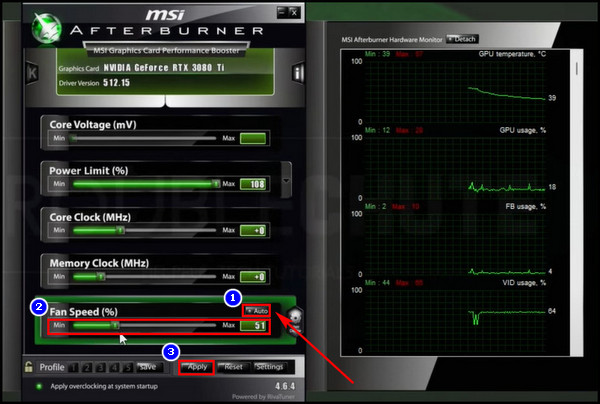
- Untick the Auto option from the fan speed section, and now you can see the slider option is open to control the fan speed. Fan speed increased and decreased by percentage.
- Move the slider to set an appropriate speed and click the Apply button.
- Go to Settings again and click on the Fan To spin the fan when MSI Afterburner is on and according to your custom fan spin settings, uncheck the Use firmware control mode.
- Set the preferred fan speed curve to Custom mode from the drop-down menu. Hit Apply, and then OK.

- Adjust the fan curve according to your need by clicking and dragging the pointers. Where temperature on the X axis and fan speed is at the percentage of max speed on the Y axis.
- Keep the fan speed at 40% for temperatures above 40℃, 60% for 50℃, and upper, make it 100% for 70℃ and upper temperatures. Now, click Apply and OK.
- Click and turn on the User Define button to run the fan according to custom fan curve settings.
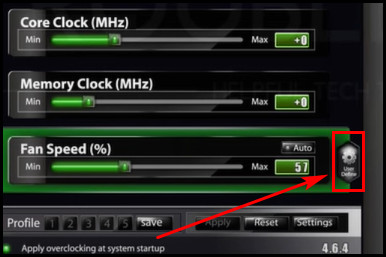
Done. Now you can control your GPU fans with the MSI Afterburner app. You can spin the fan harder whenever you want. But make sure to set the fan speed according to the temperature ratio.
Follow our guide on Airpods Not Working on Snapchat.
4. Set Fan Curve from the BIOS
You can also set your fan curve from the motherboard. As you know, the motherboard’s BIOS interface may differ from one board to another. In my case, I am using an ASUS motherboard. Your motherboard may have different namings for the settings.
Here are the steps to set the fan curve from the BIOS:
- Go to your motherboard BIOS by pressing the F2 or the Delete button while powering on or restarting the system.
- Go to the Monitor tab and scroll down to click on the Qfan Tuning. In the permission window, click on the OK button.
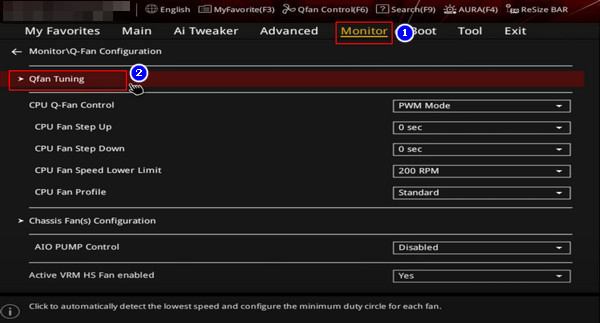
- Click on the Qfan Control options to control the fans manually, which is on the upper side of the Monitor option.
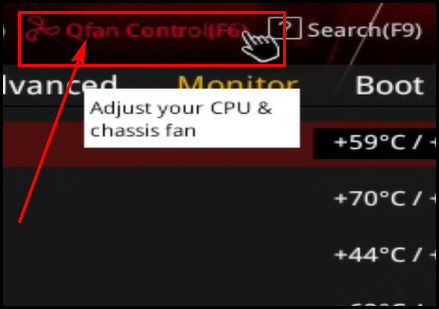
- Click on the fan which you want to control. It may be CPU FAN, CHA FAN, OR AIO PUMP FAN. Choose yours and adjust the fan curve according to your requirement.
- Click and drag the pointers to set the curve where the temp is on the X axis and speed by a max percentage on the Y axis. You can follow method 1 or 3’s same temperature to speed percentage guide to set your fan curve.
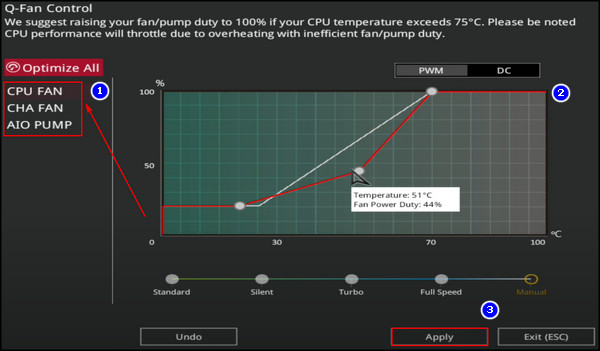
- Click on the Apply button and click on Save Settings and Restart.
Congrats! You have set the fan speed against temperature from the BIOS settings. Settings will be unchanged because you have done this from the BIOS level settings. To change the settings, you need to go to the BIOS again.
Setting the fan curve with custom settings may improve your thermal condition in the rig. Meanwhile, you can also adjust the fan curve according to your needs. It’s not mandatory to set the curve in the graph the same as mine.
All you have to do is go through our latest Fix Oculus Quest 2 not Detected to PC.
FAQs
What is an appropriate RPM for a PC fan?
Fan RPM represents how fast a fan can spin with full power. You must select your PC fans with RPM depending on the size of the fans. 400-1200 RPM for 140mm, 500-1500 RPM for 120 mm, 600-2000 RPM for 92 mm, and 800 – 2500 for 80 mm fans are the perfect specs.
How to read a fan curve graph?
It’s quite an easy task to do. Fan curves have both the X axis and Y axis. The X axis represents the component’s temperature in the fan curve, and the Y axis shows the highest percentage of the fan speed.
PWM or DC, which one is better?
PWM fans are generally more efficient than DC fans, and PWM fans consume less power. Take a look at the duty cycles of PWM fans. When a fan is set to 40% of the duty cycle, it only consumes electricity 40% of the time. On the other hand, DC fans will operate at a slightly lower voltage.
Closing Thoughts
It’s essential to keep your system cool and keep the airflow running. Fans do that job for you by blowing out the hot air from the CPU or GPU as an exhaust fan and blowing the cool air into the component as an intake fan.
Try to set the fan speed to 100% when the temperature hits 70℃ or higher. Keep it always 40%, no matter how lower the temperature is.
I think you got all the points by reading the article till the end. Let’s see how you set your fan curve with all the apps that I have shown in this article. Don’t forget to share your thoughts by comment.
Have a nice day.