Fascinated to see your friend is using decal id on Roblox? And you want to assemble the accessories with your own choice but you are not sure how to make that thought into reality?
You are in the right place if you are in that situation. I have been creating games and other stuff in Roblox for a long time and I know the exact process to decal assets in Roblox.
If you are interested in learning the procedure, read this article until the end.
Let’s start with clearing out your first confusion, Can I decal asset id in Roblox?
So you got the basic idea of the decal, right? Let’s dive deeper.
What is Roblox Asset id Decal?
Think this in a more conventional way. Imagine you have bought a new mobile or laptop per se. What differentiates your laptop / mobile from other units? A serial number or a registration number, right?
When you create a game on roblox or make an outfit for your own use, the certain number you see on the URL of the product is your asset id.
Roblox has its own method to store images and other stuff. Basically, it stores them using a unique number for each of the photos, outfits, and avatars. This unique number is your asset id. Got it?
Hold on tight and read the existing parts to create your own asset in Roblox.
Information You Need to Decal Asset ID
As I explained earlier, all assets on Roblox use a unique ID linked with a single Roblox account. And the submission procedure is automated. After creating an asset ID, you will need only a few minutes to get approval from the moderators.
Enough with the basics, let’s jump into the procedure of decal. There are certain things you need to submit. In this part, I am going to discuss them.
Here’s what you need for asset moderation:
Images
If you want to include images in your asset id, you should upload images in .jpg, .png, .tga or .bmp format. Roblox only utilizes those formats. You can upload images within Roblox studio as textures in the 3D world.
You can upload images in the following manner:
- Go to your Roblox window and click on the View tab.
- Click on Asset Manager which is on the toolbar.
- Select the import button to add images.

Note: Make sure of selecting a starting place from the settings to upload an image for a certain game. If you want to create a new place for further usage, right-click in an empty space and select add a new place.
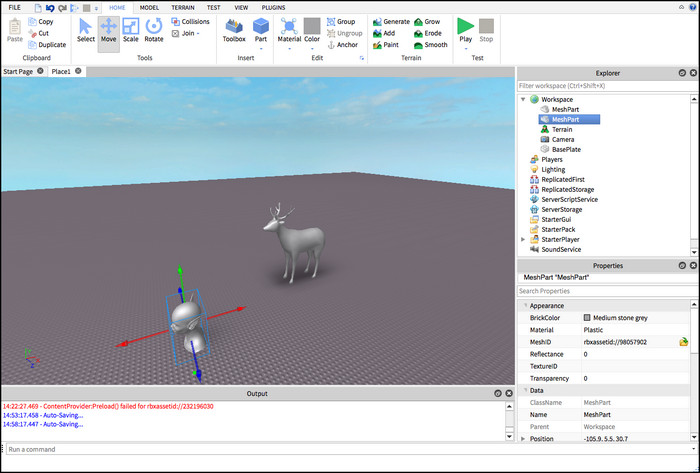
Meshes
You can upload a physically stimulated object in .fbx or .obj format. Meshes are the primary constructions unit in Roblox. Any 3D object you create inside the game like a hat, or a firearm considered a meshes.
Here’s how you can upload meshes:
- Go to your Roblox window and click on the View tab.
- Click on Asset Manager which is on the toolbar.
- Select the import button and locate your mesh files to upload.
Note: Make sure you created a workable object before uploading.
Here’s our free guide to Fix Roblox Screenshot Folder.
Audio
Uploading audio in your Roblox asset can be complicated if you don’t have a proper idea. To lessen your headache, I have included the easiest method of uploading audio files.
Here’s how you can manage audio in Roblox asset:
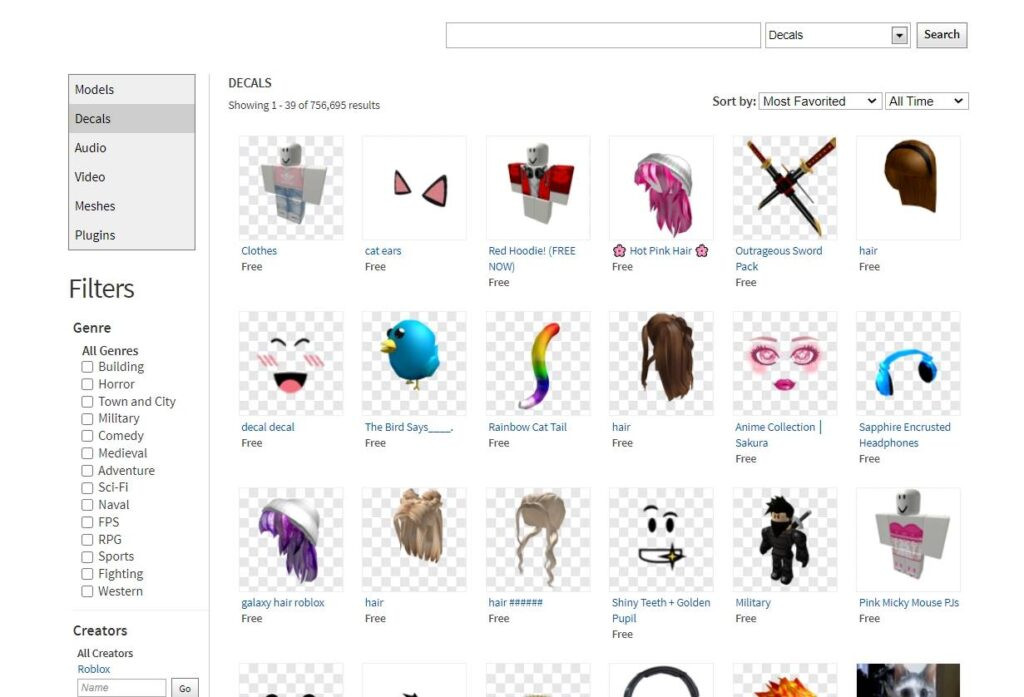
- Go to your Roblox window and click on the marketplace tab.
- Select Audio from the menu.
- Click on the icon beside your search button. That will open the creator field.
- Type in Roblox in the creator field and select the first result displayed on.
- Adjust the sound length if you have any preference.
- Click on Apply to save the filtering criteria.
- Go back to the main panel and search the music genre you want to use.
- Copy Asset ID by right-clicking on the preferred media file once you have found the optimal one.
You can also upload the audio you have created earlier or downloaded from your Spotify. Read through to learn the process.
Here’s how you can upload customized audio:
- Open the Asset manager from the view tab in the Roblox window.
- Click on the import button.
- Select the audio files from your computer or other devices.
- Select Confirm to complete the importing.
- Right-click on the item you have just imported and select Copy ID to Clipboard.
You are all set. Your copied ID will be required for playback testing, but that’s the thing you want to worry about. Playback testing won’t be an issue if you have completed these steps correctly.
Models, Animations, and Videos
These objects are also important in order to decal an asset ID. I am not going to teach you how you can create 3D models or animations. I assume you already know how to do that. I will only share how you can add them to your asset ID in this part.
Here’s how you can upload models/animations/ videos:
- Select the three dots (…) you can notice in the upper left corner of the editor window.
- Click on Export from the context menu.
- Choose between creating a new animation/overwriting an existing one.
- Copy the animation/ Video ID by right-clicking on the product. ( After the uploading is completed)
You will be able to upload videos or animations with the exact same process/
So, let’s get started by getting the latest Fix Roblox Error Code 403: Access Is Denied.
Packages
Roblox packages allow you to re-use the items you created more than once. The main benefit is, you don’t have to create items every time you want to use them for different games. You can keep the items with the advantage of using them repeatedly.
All you have to do is convert your existing objects into a package.
Here’s how you can convert objects to packages:
- Go to your Roblox window and move into the explorer.
- Select any object by right-clicking on it.
- Choose the option Convert to package from the menu.
- Click on the Ownership section and choose between the options for allowing permission for that package.
- Click on the Submit button.
After you complete the steps, a package link menu should be created for all of the objects. This package link can’t be modified directly, so check everything twice before converting.
If you are a beginner then you should definitely go through our guide on How to Fix Roblox Error Code 267
Roblox Decal ID List
So you know the process of the decal. If you don’t want to jump through all of the tasks that I explained in this article, there is a simpler way to get your job done.
All you need to do is copy the codes I am going to provide here and use them.
| Roblox Decals | Catagory | IDCode |
|---|---|---|
| Cat Ears | Anime | 112902315 |
| Rainbow Cat tail | Anime | 469008772 |
| Aesthetic Anime | Anime | 5191098772 |
| Angel Wings | Anime | 1163229330 |
| Pickachu | Anime | 732601106 |
| Halo Helmet | Memes | 75076726 |
| Freckle Face | Memes | 12656209 |
| Sparta | Memes | 2011952 |
| No Noobs | Memes | 9328182 |
| Red Tango | Memes | 16889797 |
| Indian Hair | Memes | 111235934 |
| Scooby-Doo | Cartoons | 84034733 |
| Popeye the Sailor | Cartoons | 6147277673 |
| Mr. Bean | Cartoons | 91635222 |
| Military | Cursed | 30994231 |
| Aureus Knight | Cursed | 139437522 |
| Invisible Kitty | Cursed | 2483186 |
| Cyborg Face | Cursed | 95022108 |
| Galaxy Hair | Aesthetic | 275625339 |
| Nerd Glasses | Aesthetic | 422266604 |
| Girl Hair | Aesthetic | 110890082 |
| Black and white Dress | Aesthetic | 91602434 |
| Doge | Doge | 130742397 |
| Doge Face | Doge | 525701437 |
| Doge Hat | Doge | 489058675 |
How to Use Decal Id on Assets
Found the ideal IDs to use as your asset in Roblox? Good, now it’s time to copy the ID and paste it on your Roblox account. Not sure how to do that? Don’t worry, I am here.
Here’s how you can use decal ID on your inventory:
- Go to the Roblox website and log in to your account.
- Copy the ID from the above.
- Paste the ID into the URL like this https://www.roblox.com/library/{ID}
- Type in the numeric code instead of {ID}
- Click on the Get button to add the item to your collection drawer.
After the decal, you can easily enjoy the item while playing any game.
Conclusion
Throughout this article, I tried to provide the appropriate knowledge you need in terms of decal asset ID into your inventory.
If you have read every word I have put there and acted accordingly, then one thing you can cross off from your list is trying to get asset IDs like your friend used to have. I can assure you; you will have even better.
But, if you face any difficulties understanding the process, feel free to comment. You know, I am here to help you.