While working on the computer, you may need to take a picture of something useful for later reference. So, what will you do?
Will you take out your mobile phone and photograph the screen?
Apparently not! Instead, you can use the Snipping Tool, a built-in Windows tool. Just open Snipping Tool, take the screenshot, and save it.
But, if you didn’t use this app, this is the perfect guide. So, read till the end and learn. Here it goes!
How to Launch Snipping Tool from Windows 10 & 11
If you want to use the Windows Snipping Tool urgently, hit the Win key + Shift + S button from the keyboard, and you will see a dark overlay on the screen with the snipping mode above. Choose any one from the Rectangular, Freeform, Windows, or Fullscreen snip modes.
Well, there are other ways to lunch Windows Snipping Tool too. Let me show you real quick.
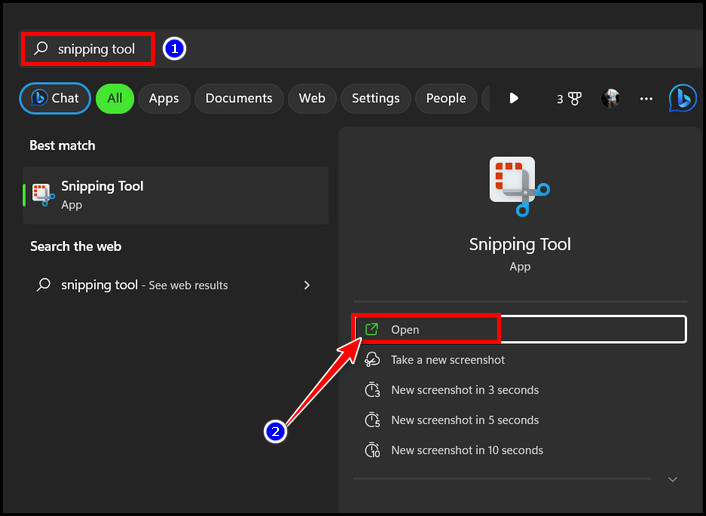
1. Use the Windows Search
- Go to Windows search and type the snipping tool.
- Click on the Snipping Tool app from the search result to launch it.
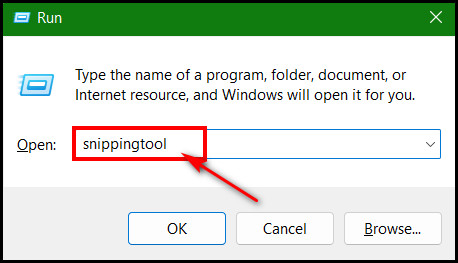
2. Use Run Command
- Press Windows logo key + R, and type in snippingtool.
- Hit Enter, and it will launch the Snipping Tool.
3. Use the Prt Sc Keyboard key
- Press the prt sc (Print Screen) key from the keyboard. In case it doesn’t work, follow these steps on your Windows 10:
- Go to Windows Settings by pressing Win key + I.
- Navigate to Ease of Access > Keyboard > Print screen shortcut.
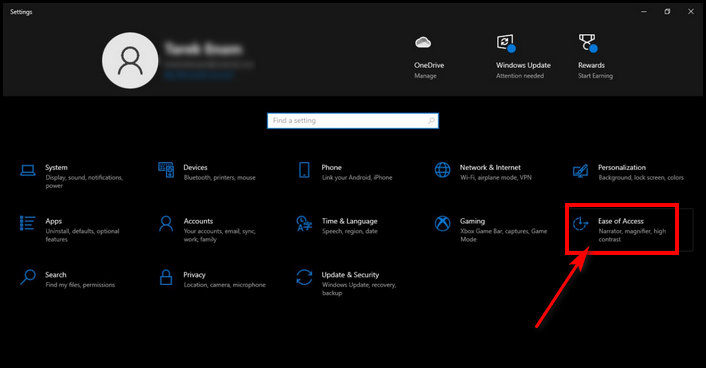
- Toggle the button to turn it on.
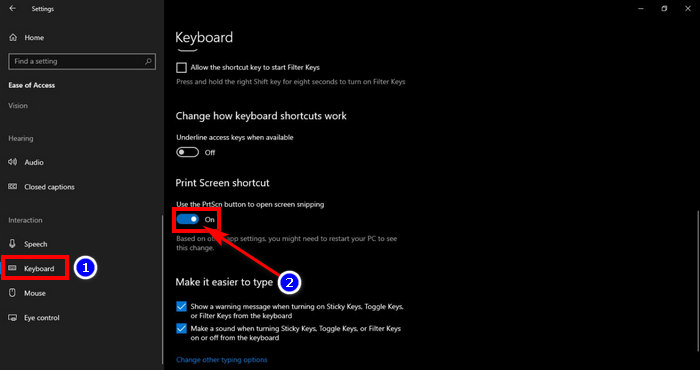
- Restart the PC.
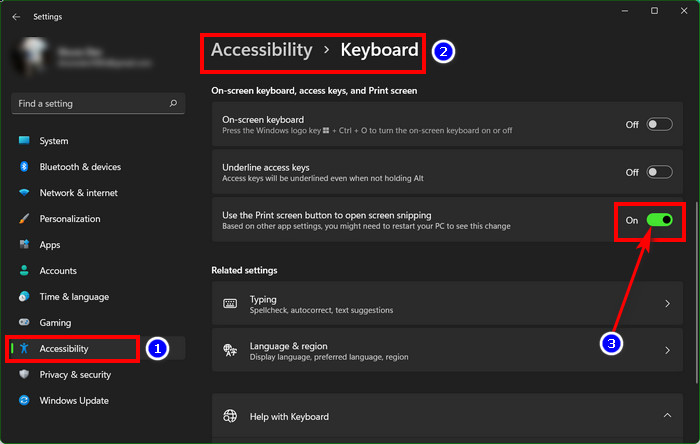
If you’re using Windows 11, follow the below:
- Launch Windows Settings app by pressing Win key + I.
- Navigate to Accessibility> Keyboard.
- Look for the Use the print screen button to open the screen snipping option.
- Click the toggle switch to turn it on, and restart the PC.
By the above way, you can launch the Snipping Tool easily. Now, allow me to show you how to use it.
How to Use Snipping Tool to Capture Screenshots
Press the Win logo key + Shift + S to launch it and then click on the + New button, and you’ll see a dark overlay with the screenshot modes above the screen. Choose one among the Rectangular, Freeform, Windows, or Fullscreen snip modes and use the mouse to snip the screen.
After taking the screenshot, click the Save button or press Ctrl + S to save it on the local disk. You can also annotate the snip by using the Ballpoint, Highlighter, Eraser, Ruler, Touch writing, or Image crop tool. These tools are available in the latest version of Snipping Tool & for Windows 11.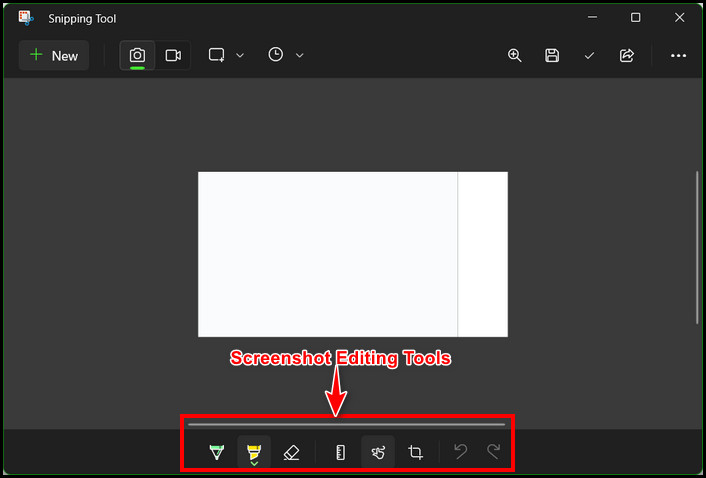
In the older version and Windows 10 Snipping Tool, you will see only the Color pen tool, Highlighter, and Eraser. For further editing, you can select the Edit with Paint 3D option. But to use it, you must install it first. Well, the above is a glimpse of the features of the Snipping Tool and how to use it. For a better understanding of the user scenario, let me show you the using scenario part by part.
Capture a Screenshot
- Launch the Snipping Tool.
- Select the + New button and choose the snipping mode.
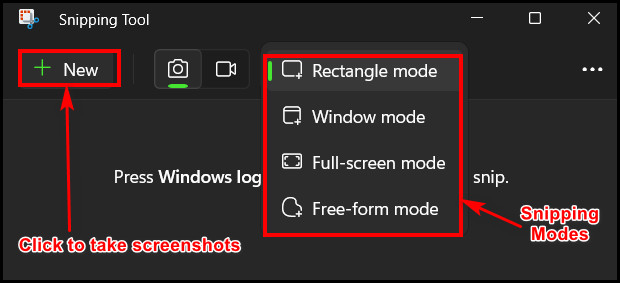
You’ll see snipping modes on the top of the screen. And there will be a dark overlay throughout the entire screen. Use the mouse to take a snip of the screen. The Rectangular mode will be selected by default. Choose the other modes if you want from its right side.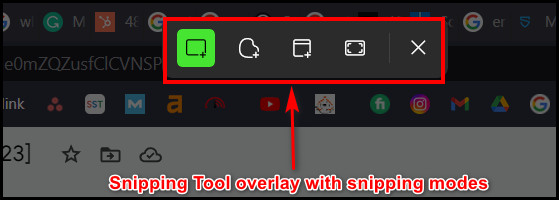
When you’re taking the screenshot, right-click on the mouse and drag the cursor to select the area you want to capture. After selecting the area, release the mouse’s right button to capture it. As simple as that.
But can you select the area without the mouse?
You can take screenshots and select the area with the keyboard only. Just press the Prt Sc key or Win key + Shift + S to bring out the Snipping Tool recording overlay. Hold the Shift key and use the keyboard arrow keys to select the area.
After releasing the keys, the selected area will get snipped and saved automatically.
Annotate a Screenshot
After taking the screenshot, you can modify it using several tools, such as Ballpoint, Highlighter, Eraser, Ruler, Touch writing, or Image crop tool. All these tools are available in Windows 11 and the latest version of Snipping Tool.
You’ll find a few tools in the older version and when running Windows 10. In Windows 11, these tools are located in the bottom part. For Windows 10, you’ll get them in the upper ribbon.
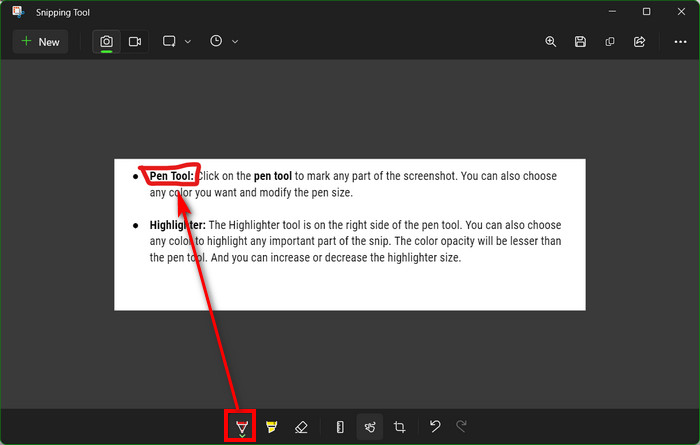
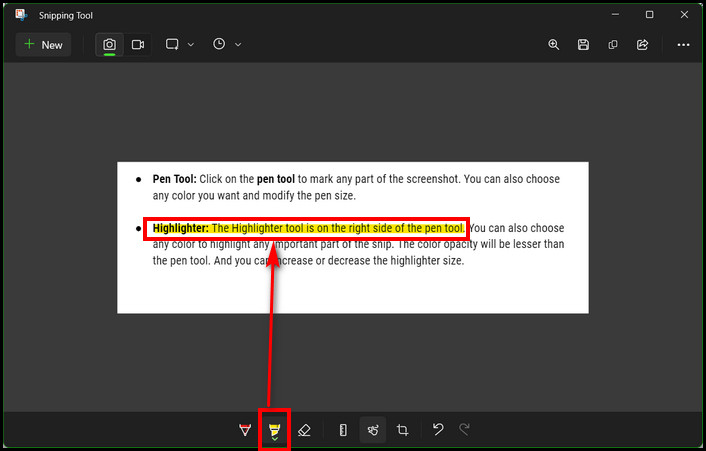
- Pen Tool: Click on the pen tool to mark any part of the screenshot. You can also choose any colour you want and modify the pen size.
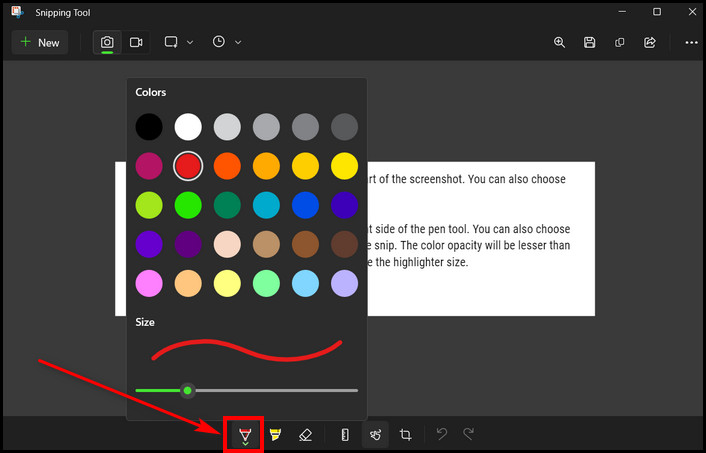
- Highlighter: The Highlighter tool is on the right side of the pen tool. You can also choose any colour to highlight any important part of the snip. The colour opacity will be lesser than the pen tool. And you can increase or decrease the highlighter size.

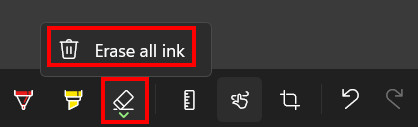
- Eraser: Select the Eraser tool to erase the screenshot’s highlighter or pen tool annotation. To erase all ink at once, click the down arrow button and select Erase all ink option.
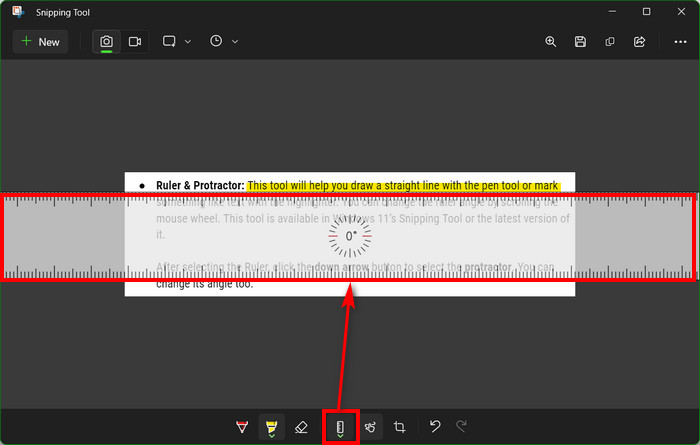
- Ruler & Protractor: This tool will help you draw a straight line with the pen tool or mark something like text with the highlighter. You can change the ruler angle by scrolling the mouse wheel. This tool is available in Windows 11’s Snipping Tool or the latest version of it.
After selecting the Ruler, click the down arrow button to select the protractor. You can change its angle too.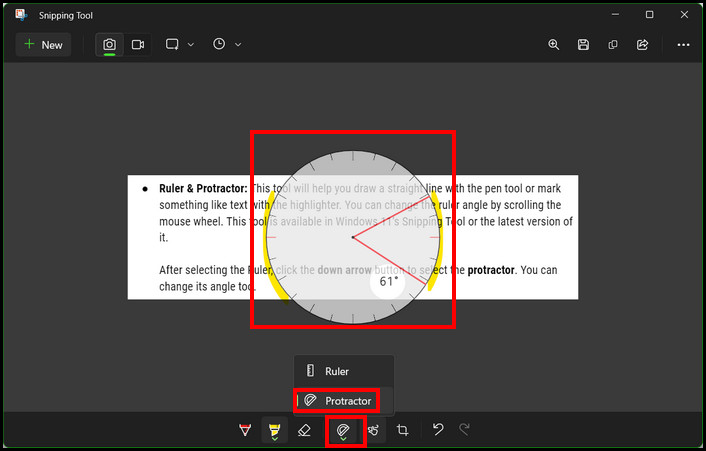
- Touch Writing: You’ll find this tool in the latest Snipping Tool or Win 11 OS version. This Touch writing tool works the same way as the Ballpoint pen tool. The writing colour will be the same as the colour you select for the pen tool.

- Image Crop: If you still need to crop the screenshot, you can select the image crop tool.

There is also a undo & redo button beside the image crop option. So, click undo button if you want to revert the changes.
Delay Snip
If you want to take the screenshot later, like 5-10 seconds, and keep things ready within this time, click the Delay snip button. Beside the Snipping mode, you will see a clock icon. Click on it to see No delay and 3-10 seconds delay options.
Suppose you select the 10 seconds delay option. So, after 10 seconds, the snipping tool will kick in automatically, and you’re good to go.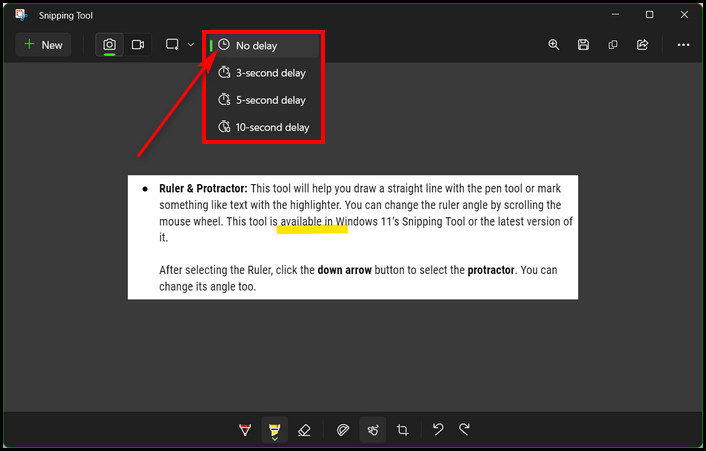
Save the Screenshot
To save the screenshot after taking it and do some modifications, click the Save button or simply press Ctrl + S key from the keyboard. Choose the right location to save the image and select the image file extension type such as .png, jpg, or .png.
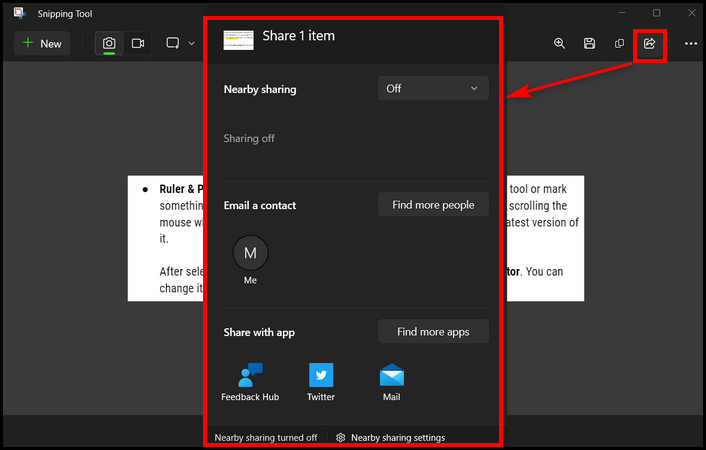
Select the Share button to share the screenshot via nearby sharing, email contacts, or app sharing. To copy the screenshot select the Copy icon or press Ctrl + C to copy it to the clipboard.
Keyboard Shortcuts of Snipping Tool
Shortcut keys mainly save your time and reduce hassle. And there are many Snipping Tool shortcut keys. Among those most used shortcut keys are the followings:
| Keyboard shortcuts | Snipping Tool Actions |
|---|---|
| Alt + N | Take a new screenshot with the previously selected snipping mode. |
| Alt + M | Open and select the snipping mode. (Working in Windows 10) |
| Alt + D | Open the snipping Tool delay time for taking screenshots. (Works in Windows 10) |
| Ctrl + C | Copy the screenshot to the clipboard. |
| Ctrl + S | Save the Screenshot |
| Shift + Arrow keys | Select areas for taking screenshots without a mouse. |
How to Record Screen Using Snipping Tool
To record the screen, launch the Snipping Tool app first. Click on the Record icon beside the Snip. after that, select the area and start recording with the Snipping Tool. Microsoft added the recording feature in Snipping Tool by launching their Beta Channel (version 11.2212.24.0) for Windows 11.
So, after adding this feature, Snipping Tool gets more attention, and more people are using it now. Let me show you the steps to record the screen using Snipping Tool.
- Launch the Snipping Tool.
- Click on the Record icon and select the + New button.
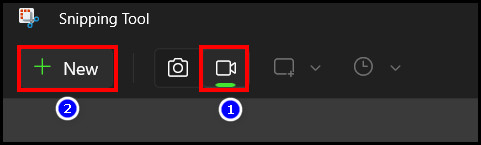
- Right-click and drag the mouse to select the recording area in a rectangular shape.
- Hit the Start button from the overlay.
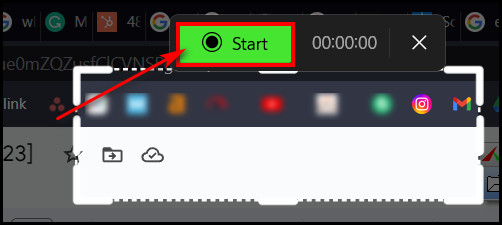
The recording will start after a 3 seconds countdown. Click on the Stop button to stop the recording or the Pause button to halt the recording for some time. You can also select the Bin icon to cancel the recording without saving it.
After clicking the Stop button, the Snipping Tool window will prompt with the recorded video. Hit the Play button to see the record. And click the Save button to save the video.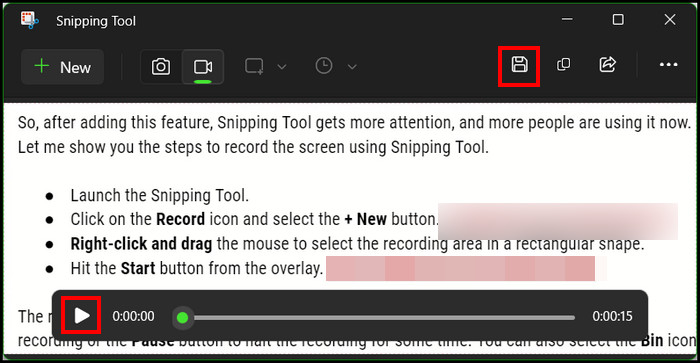
FAQs
How to launch the Snipping Tool?
Press the Win logo key + Shift + S or Prt Sc (Print Screen) key from the keyboard to launch Snipping Tool. but you must turn on the Print screen shortcut from Windows keyboard Settings. Otherwise, go to Windows search and search for Snipping Tool. Launch it from the search result.
What is the keyboard shortcut key to change the snipping mode of the Snipping Tool?
Ensure the Snipping Tool is already opened, and then press the Alt + M key to change the snipping mode before selecting the area. But this shortcut key won’t work in Windows 11.
What is the keyboard shortcut to take a new screenshot with the same mode in Snipping Tool?
To take a screenshot with the same mode previously used, press Alt + N. Then select the area and take the screenshot.
Conclusion
Snipping Tool is a great screen-capturing app, and the main factor is it’s a Windows built-in tool. And you can edit the image with it after taking the screenshot. Additionally, Microsoft added a Recording feature in it. Now, besides taking snips, you can record the screen too.
In this post, I have included all the features of the Snipping Tool and how to use those. It’s just an all-in-one Snipping Tool guide. Even if you need additional help, comment below.
Enjoy snipping!