Sweeping through a document or surfing the web in search of your revered content, and you urgently need a quick screenshot?
Well, Windows lets you take a snapshot apace via the built-in snipping tool just by pressing buttons on the keyboard from the get-go.
In this article, I’m going to walk you through all the snipping tool keyboard shortcuts to capture the screen when required.
Open Windows 10/11 Snipping Tool with Keyboard Shortcut
To open or launch the snipping tool on Windows 10 or 11, simply press the Windows logo key + Shift + S on your keyboard. The entire screen will get darkened with menus on the top, offering you to choose from your favorite screenshot mode Rectangular Snip, Freeform Snip, Window Snip, or Fullscreen Snip.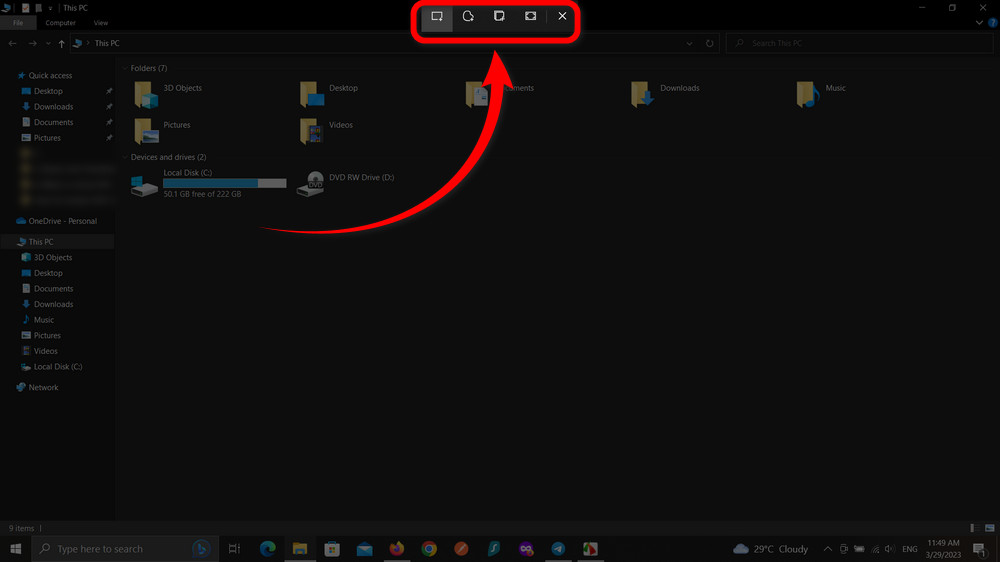
By default, the rectangular snip option is selected, and you have to pick the area of the screen to capture with your mouse. Don’t let go of the left mouse button until you have selected your preferred screen area. When you stop pressing, a notification will appear indicating that a snip is captured.
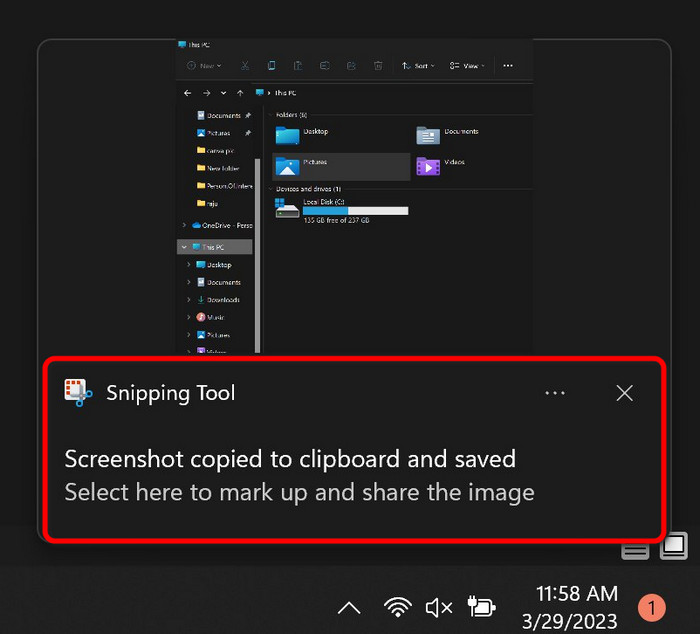
Once you press on the notification, the current screenshot will open inside the Snipping Tool app on Windows 11 but on Snip & Sketch app on Windows 10.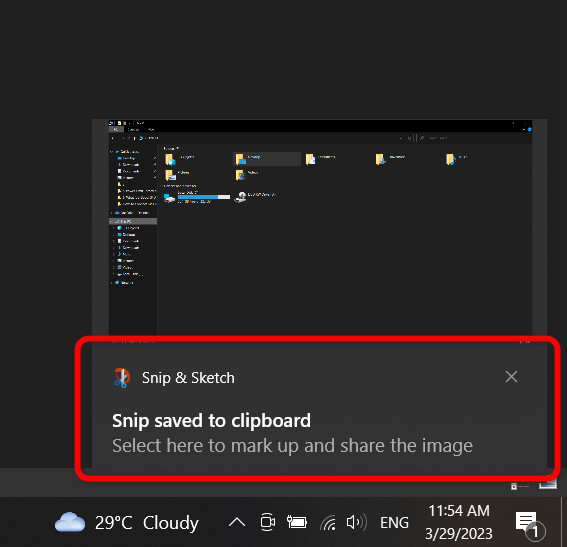
When you are in the app, you do heaps of editing you can perform further with your keyboard. We’ll take a look at it in the later section.
Before that, let’s look at the different screen capture options briefly.
Rectangular Snip: You can only take a screenshot in a rectangular shape. It’s the default mode when the keyboard shortcut launches the snipping tool.
Freeform Snip: Capture the screen in any form you want. No particular shape binds the snapshot.
Window Snip: To quickly capture the entire window while you are in an app, this is the snip mode to choose.
Full-screen Snip: This snip mode allows you to take a screenshot of the entire screen with everything on the screen, including multiple app windows and the taskbar.
Check here the easy step to turn on keyboard shortcuts in Windows 10.
Helpful Snipping Tool Keyboard Shortcuts in Windows 11/10
Now, as I’ve stated earlier in the above section, once you are in the Snipping tool app, you can navigate to all the functionalities with keyboard shortcuts. This will save a great amount of time altogether.
For your convenience, I’ve accumulated all the keyboard shortcuts and their functionalities. These shortcuts work perfectly fine on Windows 11 as well as on Windows 10.
| Keyboard Shortcut | Functionality |
|---|---|
| Ctrl+ N | Take a new snip |
| Alt+ M | Choose different snipping mode |
| Alt+D | Take a snip with delay |
| Esc | While you are in capture mode, this key will cancel taking a screenshot |
| Ctrl+ C | Copy your current screenshot to the clipboard |
| Ctrl+ P | Print your current snapshot |
Note: Some of the shortcuts may not work on Windows 11 as on the newer version Snip & Sketch tool is merged together.
Keyboard Shortcuts for Snip & Sketch Tool in Windows 10
Interestingly enough, on Windows 11, Microsoft dissolved the Snip & Sketch tool. Whenever you capture the screen using a shortcut, it no longer opens in this app, but rather in the Snipping Tool. So if you are rocking Windows 11, you can skip this section.
Things are a bit different on Windows 10, however. Snip & Sketch app is still in use. Once you are in this tool, follow the shortcuts below to execute different operations within the app.
| Keyboard Shortcut | Functionality |
|---|---|
| Alt/Ctrl + B | Select ballpoint pen tool |
| Alt/Ctrl + I | Select pencil tool |
| Alt/Ctrl + H | Choose highlighter pen |
| Alt/Ctrl + E | Eraser tool |
| Alt + R | Crop tool |
| Alt/ Ctrl + S | Save screenshot |
| Alt/Ctrl + N | New snip |
| Alt+ Z | Zoom taken screenshot |
| Alt+ T | Select touch writing |
| Alt+ U/ Ctrl + Z | Undo |
| Alt+ D/ Ctrl + Y | Redo |
| Alt+ A | Share |
| Press Alt+ M to open Sketch & Snip menu and then follow the shortcuts below to select sub-options | |
| Alt+ O | Open the snapshot with other application |
| Alt/Ctrl + P | Print snip |
| Alt+ S | Settings |
| Alt+ T | Tips & Tricks |
Capture Screenshots Using the Snipping Tool Hotkey
Creating a hotkey is another brilliant way to make a custom snipping tool shortcut other than windows defined keys. But you need to walk some extra miles to set a hotkey or a new custom keyboard shortcut.
Prior to that, navigate to This PC > View > Show > Select Hidden Items on Windows 11.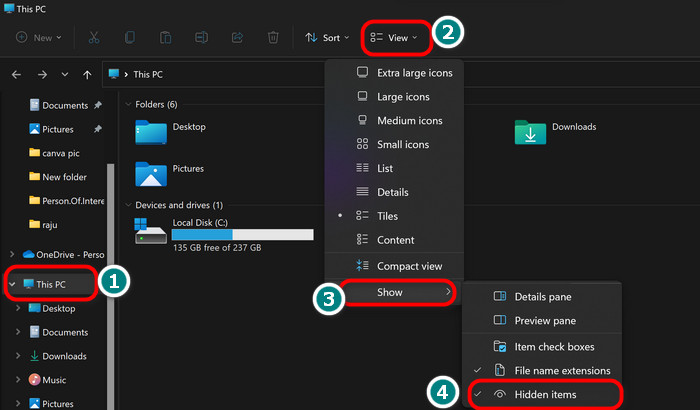 On Windows 10, however, go to This PC > View > Check Hidden Items box.
Next, follow the subsequent steps to create a new hotkey for the snipping tool:
Activate Built-in Print Screen Hotkey for Snipping Tool
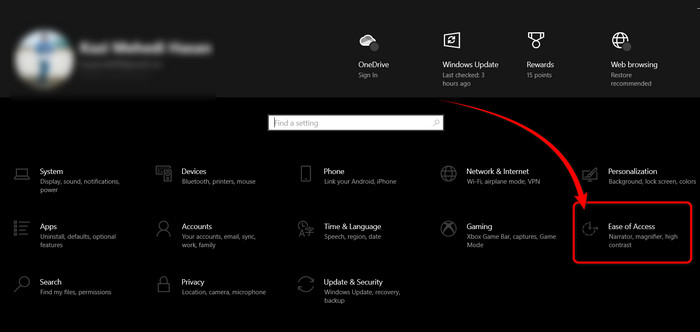
- Navigate to Windows Settings > Accessibility > Keyboard. On Windows 10 go to Ease of Access > Keyboard from the settings.
- Find Print Screen Shortcut and switch on the toggle.

- Restart your machine, otherwise, it will not work.
Custom Snipping Tool Hotkey
- Navigate to This PC > Local Disk (C:) > ProgramData > Microsoft > Windows >Start Menu > Programs > Windows Accessories >Snipping Tool.
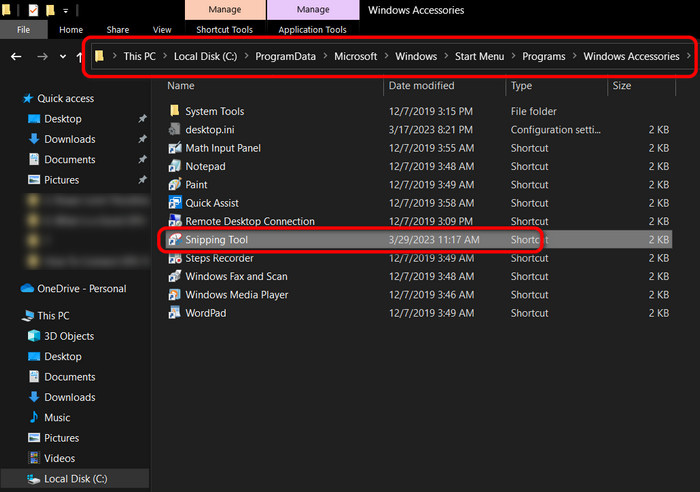
- Right-click on the Snipping Tool icon.
- Choose Properties.
- Switch to the Shortcut tab.
- Set your preferred keyboard hotkey, e.g. F5, in the Shortcut Key box.
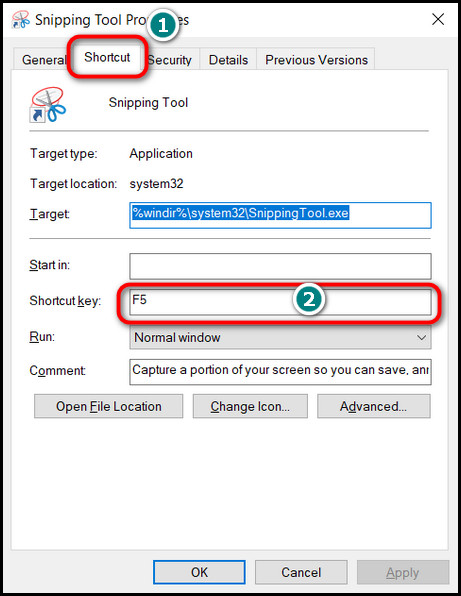
- Click OK and Apply.
Now, go press the key you set a moment ago as a shortcut, and hooray! The snipping tool is now active and ready for you to take a screenshot.
If anything goes wrong, the snipping tool may not work on your computer, nevertheless. The good news is, you can fix it with simpler approaches.
Here is the simple step for create a keyboard shortcut for any Program In Windows 11.
Launch Snipping Tool from Desktop Shortcut
Excluding the keyboard shortcut, you can additionally create a desktop shortcut to access the Snipping Tool quickly.
Here’s how to make a shortcut for the snipping tool on the desktop:
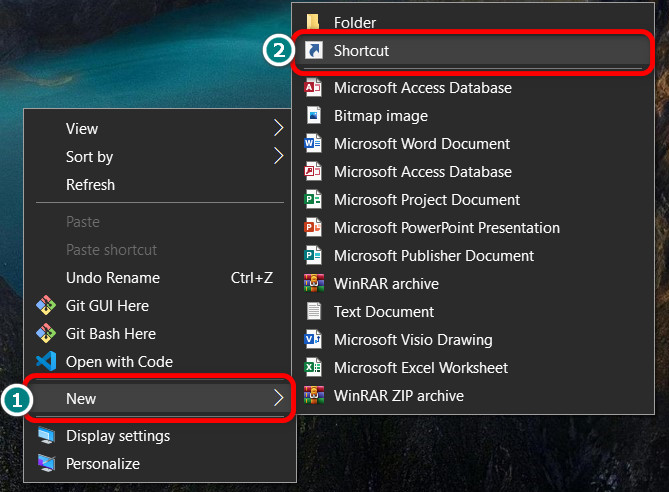
- Right-click on the desktop to open the context menu.
- Navigate to New > Shortcut.
- Type snippingtool.exe in the box.
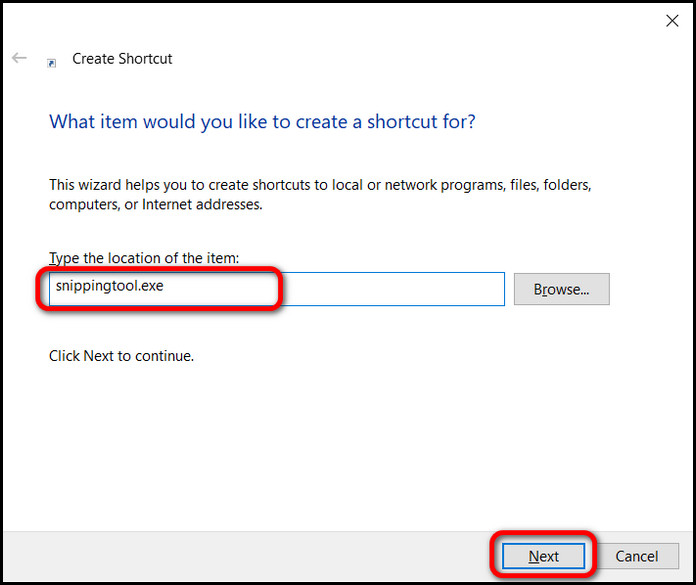
- Click Next from the bottom. A shortcut will appear on the desktop.

Double-click on the shortcut icon, and voilà! You’ve successfully created a functional snipping tool shortcut on your desktop.
Go through our epic guide with 4 quickest ways to take screenshots on Windows 11.
Ending Remarks
Snipping tool shortcut is exceptionally effective in various instances, reducing complexity and saving time. This article is a complete guide on snipping tool shortcuts. I hope you find it useful.
If you have more queries, leave a comment down below.