The software comes from heaven when you have suitable hardware. And the CPU is your computer’s brain that executes all software commands.
It’s essential to ensure your CPU is functioning properly. Excellent physical condition and top-notch performance are keys to a great CPU.
If you are here to check whether your CPU is running reliably, you are in the right place. This article will assist you in checking the CPU conditions.
So, let’s get started!
How to Check if CPU is Working Properly
You can effortlessly check if your CPU is functioning properly by examining the physical conditions and checking the processor’s performance. Inspect the CPU for damages and then stress test the CPU to check the performance. A soak test will also help to determine the CPU quality.
Consider the following methods to check if your CPU is running and functioning correctly.
Here are the methods to know if the CPU is running correctly:
1. Examine Physical Conditions
Before anything else, it’s essential to identify if the CPU has any physical damage. To ensure maximum performance, your processor should be in excellent physical condition.
Using several methods, you can determine the physical condition of your CPU. Consider the subsequent procedures to check the physical condition.
Go through the following processes to examine CPU physical conditions:
Check for Broken or Bent Pins
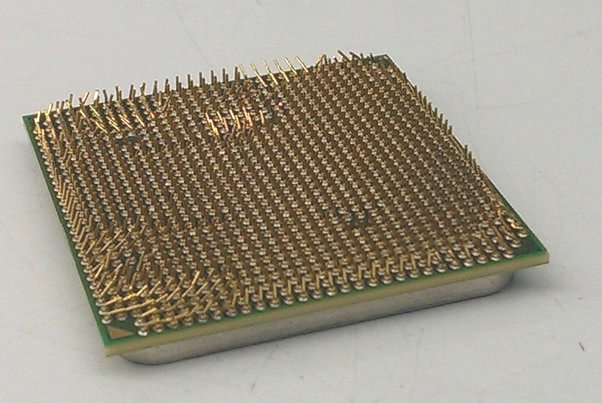 Depending on your CPU socket type, the pins are either on the CPU itself or the motherboard. Among different types of CPU socket technology, Intel uses the LGA for its processors. Contrarily, AMD uses PGA.
The main difference between LGA and PGA is the position of the pins. Detach the CPU from the motherboard carefully and ensure not to touch the processor with your hand; instead, use a pair of clean antistatic gloves.
After detaching the CPU, closely inspect the pins with a magnifying glass or anything that can magnify smaller objects.
Looking from the edge of the processor will bring the rows of the pins to your viewing angle, and it’s easier to detect bent pins from this angle.
Bent pins are easier to fix, and you can do it with some basic household instruments. Check out another post on how to fix bent pins on a CPU and motherboard.
On the other hand, broken pins are easier to identify and complicated to fix. You should not use the CPU if it has broken pins.
Look for Discolored Areas
 Consider inspecting the CPU edge-to-edge and top to bottom for any discoloration. If you notice discolored areas, avoid using this CPU because it can also damage your other PC components.
If your find your CPU is overheating, it can badly damage the processor, and you may find some symptoms of a burned CPU, such as a darker spot or a blue tint on the metal surface.
Ensure everything is perfectly colorized, and avoid using the processor if you find any discolored areas. Besides, examine the CPU pads and pins for any discoloration. If you find any part without the proper color, it’s a bad sign for the processor.
Examine CPU Pad
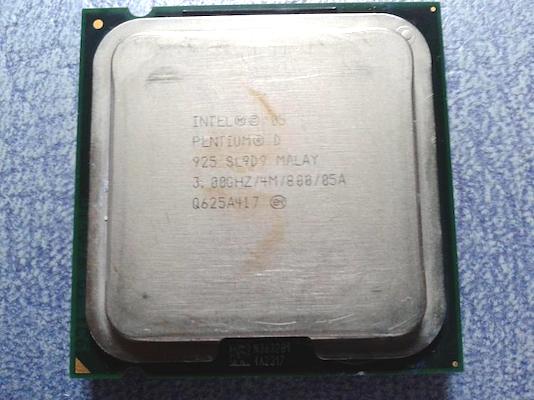
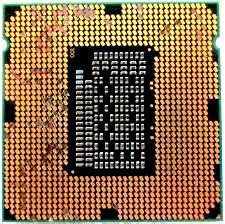 Mainly, the Intel processors have pads instead of pins. Touching it with a bare hand can damage the CPU pads. Because your skin’s oils can create a layer on top of the pad, restricting it from transferring to the motherboard.
Also, ensure to use the magnifying glass to check each pad individually. If you find any physical damage, it wasn’t handled carefully before.
Sometimes, the thermal paste can mess up the CPU pads. In that case, you must carefully clean the thermal paste. You can use rubbing alcohol to clean the CPU. Also, use a lint-free cloth, and repeat the process until the pads are properly clean.
Inspect CPU IHS (Integrated Heat Spreader)
The CPU Integrated Heat Spreader is a metal component that provides extra protection and better heat transfer.
The CPU can get too hot without a heatsink or a cooler. It’s essential to ensure the IHS is in good condition. Otherwise, it will fail to spread the heat efficiently, and overheating may damage your CPU.
Closely inspect the processor lid for any possible scratches or oddly worn patches. Someone probably used a metal part to clear the old thermal paste if you notice any scratches on the lid surface.
In that case, I wouldn’t suggest using this processor as it can damage the CPU entirely. And the IHS will fail to spread out the heat, leading to numerous CPU-related issues.
After checking the physical condition of the CPU, you can easily detect any physical damage. If your processor is clean and looks like a new one, you should check its performance to know if your CPU is running properly.
2. Check for Performances
By going through the performance test, you can quickly check if your CPU is working correctly. Using several methods, you can determine the CPU performance. Consider the following procedures to find out the CPU performance.
Here are the ways to check your CPU performance:
Basic Hardware Requirements
You must ensure some basic hardware requirements before starting the performance test. Check the following list of hardware requirements for checking CPU performance.
Consider the following list of hardware requirements:
- A stable motherboard.
- Storage devices with good health.
- A working memory module.
- A new Operating System (OS).
- CPU without overclock.
- Newly applied thermal paste.
- A suitable CPU cooler.
After ensuring these pieces of hardware, you can move on to the next section to test the CPU performance.
Stress Test the CPU
Stress testing the CPU will push the processor to its limit. Numerous stress test programs are available on the market. You can use any of them to stress test the CPU.
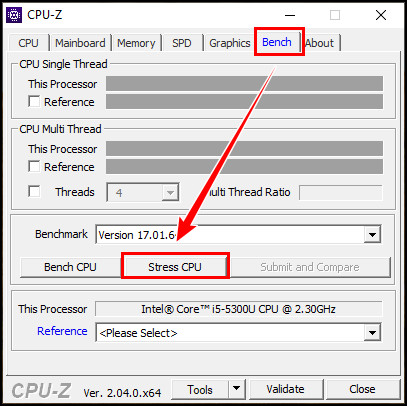
I suggest using the CPU-Z application to stress test the CPU among the numerous applications. Though, this application doesn’t offer fancy features like Prime95 or OCCT. But it is suitable for its compact size and portability.
After downloading and installing the CPU-Z application, perform the following procedures to stress test the processor.
Consider the subsequent instructions to stress test:
- Launch CPU-Z.
- Navigate to the Bench tab.
- Click on Stress CPU.
The above steps will instantly start the stress test and allow the application to continue the test for a more extended period to check how much stress your CPU can tolerate.
After completing the test, inspect the result and check the computer’s stability during the trial. If you notice any lag, stuttering, screen freezing, or restarts, it indicates that the CPU is overheating during the test.
Remember, a bad CPU can cause stuttering. If you don’t see any of those signs, your PC is functioning normally, and you are good to go with this processor.
You should continuously check the processor temperature to prevent the CPU from overheating damages during the test. Move on to the next section to learn how to check the CPU temperature.
Check the CPU Temperature
Let’s take the test one step further by using a temperature-checking application. While running the stress test, you can quickly check the CPU temperature using a temperature monitoring program.
You will find numerous programs that can constantly monitor CPU core temperature. However, I suggest you use the CoreTemp application for its portability and simple user interface.
Quick Note: Most graphics driver software has the option to monitor CPU temperature. If you are already using any graphics driver software, you can continue the test with that software.
Download and install the CoreTemp application during the stress test. And carefully inspect the temperature rise. If the CPU temperature stays below the manufacturer’s recommended temperature, move on to the next test. 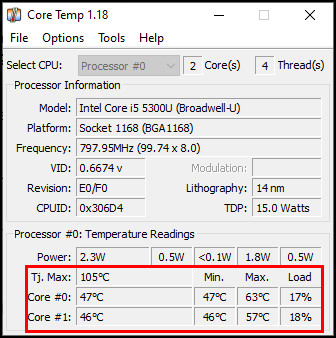
Otherwise, you should consider the performance of your CPU cooler and reapply the thermal paste to improve the heat distribution.
Investigate Power Consumption
Another vital point to consider is power consumption or Thermal Design Power (TDP).
Each CPU has an individual TDP. And you must ensure the CPU is not using more power than the manufacturer’s specifications.
Additionally, you should consider what power supply you have. Know your CPU wattage and ensure it is enough to provide power for your entire setup.
Using the CoreTemp or Prime95 apps, you can monitor the CPU power consumption. 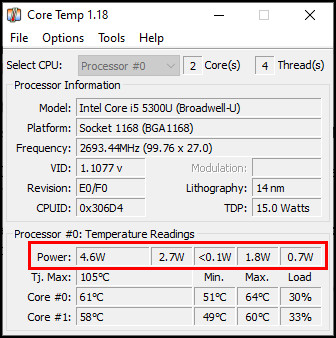
If the CPU uses more power than the max TDP, something may need to be corrected, and you should handle the processor more carefully. Ensure the CPU is not overclocked and the power settings are default.
Look for Freezing and Stuttering
Just stress testing is not enough to determine the CPU condition. You should also look for stability during the test.
If the computer slows during the trial, it indicates the CPU cannot handle the stresses. Also, look for frame drops, freezing, and stuttering.
If the games or apps are not optimized, they may fail to run smoothly. So ensure to try using different games and applications before blaming your processor. Check out another post on how to tell if a game is CPU or GPU intensive.
Start a Soak Test
A sock test is a performance test for a more extended period to check the reliability and system behavior under intensive pressure.
After going through all the above methods, the CPU is undoubtedly working properly. However, the soak test will tell you if the CPU can perform without dropping the performance for longer.
You can start the test with games like Halo Infinite or Forza Horizon 5. Keep playing the game for at least 48 hours to complete the test. If the CPU can handle the soak test, your CPU is reliable and functioning perfectly.
How to Check How Many CPU Cores are Running
Using the Task Manager, you can quickly check how many CPU cores you have and how many of them are running. Press Ctrl + Shift + Esc keys together to open the Task Manager and navigate to the Performance tab to check the CPU usage and CPU cores.
Perform the following instructions to check the number of cores and how many are constantly performing.
Here are the steps to check how many CPU cores are running:
- Press Ctrl + Shift + Esc keys. It will open the Task Manager.
- Click on More details to expand the Task Manager.
- Switch to the Performance tab.
- Select CPU from the left pane.
- Right-click on the CPU activity.
- Navigate to Change graph to > Logical processors.
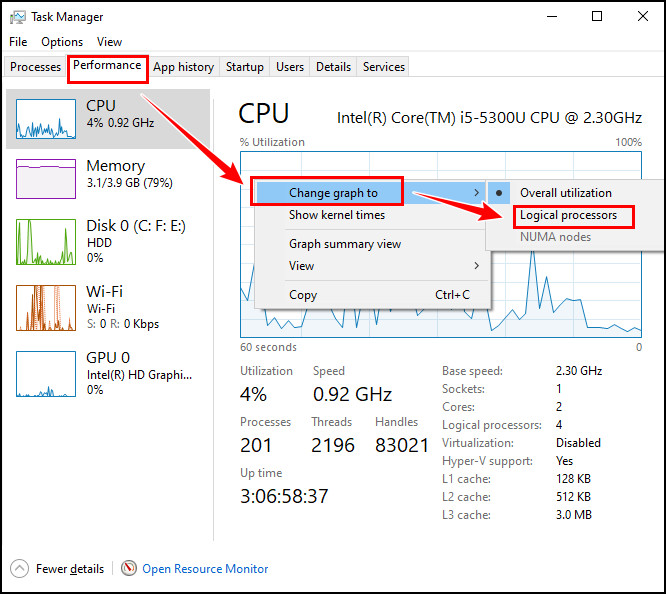
The above procedure will open the graphs of all cores and threads. Here you can effortlessly check the details of your CPU cores. Check out a separate post on how to check how many CPU cores and threads you have.
Frequently Asked Questions
How do I know if my CPU is not working?
You can identify whether the CPU is working correctly by checking common symptoms of CPU failures. You may notice random freezing, lagging, or stuttering while logging into the system or using it for an extended period.
Does 100% CPU usage damage the PC?
A CPU can easily handle its 100% utilization without damaging the PC components. However, you should avoid 100% CPU utilization as it can affect PC performance.
How to find out what processor I have?
Using the Task Manager, you can efficiently check your processor name and model along with other CPU-related information. Press the Ctrl + Shift + Esc keys to launch Task Manager. Switch to the Performance tab and locate the processor name in the top right corner.
Wrap Up
It is crucial to ensure the best performance from your device. You must identify whether the CPU runs appropriately and can handle extensive pressure.
This article has covered all the possible ways to determine the condition of a CPU. You should closely watch the performance test result and other aspects to track down the main culprit.
If you have any additional queries, feel free to mention them in the comment below.