A stress test is a vital source to quickly determine a PC’s performance or stability. This helps to identify if any hardware is not functioning properly or not.
Whether to check CPU overclocking limits or health, stress testing is the best way to find out. Because it pushes the chip to its maximum capability & performance, thus giving a quick glimpse of the chip’s status.
In this article, I will guide you on how to push the processor’s limit by stressing, its duration & causes failing the test. Let’s dive in.
What is a CPU Stress Test & Why Do You Want It?
A CPU stress finds the real performance of a chip by continuously torturing the cores & pushing its max limit. This test specifies how much processing power the chip can handle at its absolute condition.
Whether using grandpa’s PC, which degraded over time, or a modern desktop on which you want to overclock, finding stability is crucial for day-to-day use. Otherwise, random freezes or BSOD crashes will hamper your serious work.
While the processor is stressed, it operates at the max frequency while consuming max power. This leads to a high temp, which lets you know about your processor’s present condition.
Eventually, this will also help to determine the OC’s stability you just made. Because the high temp indicates an insufficient cooling system, whereas a failed test will warn about a failed overclock.
Besides this, there is synthetic testing & real-world testing. The first one is manual testing with software like Prime95 to test the chip’s capability at 100% load. On the other hand, the latter hammers all the hardware & doesn’t target any particular one, like in gaming.
Speaking of stress tests, here’s everything you need to know about GPU stress testing.
What is the Preliminary Steps & Cautions Before Stress Testing?
As you will put the max pressure on the chip, it will produce the max heat in a short time with an air cooler. For an AIO or Liquid cooler, that’s a different case, as it will take some time to reach its max temp.
You need a baseline to ensure your PC is stable at the moment. Back in 2016, for the first time when I tried to stress my FX-6300 CPU, it went almost 90° C instantly. Guess why? Because I forgot to reapply the thermal paste after cleaning my PC.
Luckily, the chip survived & gave me a lesson to take preliminary cautions. As I was stress testing. I was aware of the temps. If I didn’t check the temp & went directly for gaming, the chip would get fried.
So, to avoid such circumstances, following some precautions before stressing is a must. If the primary intent of the CPU stress is to check the stability of overclocking, you should benchmark with 3DMark before a long session stressing test.
If the benchmark fails, it’s easy to interpret that the OC is not stable & will save your precious time. During stress testing, some aspects should be followed to avoid inconvenience & validate the purpose of the test.
Here are the conditions you need to look out for during the stress test:
- CPU is using 100% utilization: Ensure the CPU is using max frequency at max usage, so it’s not throttling.
- Stress until the app crashes or find errors: Set a goal for a crash or shutdown. So that you know, that’s your last line.
- The temp is within a safe range: It is important to keep the temp under safety value during stressing.
Remember, stressing the processor will create overheating, which can lead to the system crashing or corrupting files. So use the software mentioned below with CAUTION.
Now, you take precautions, let’s head to the section on how to stress test a CPU.
On a side note, if you’re interested in overclocking, you should definitely know whether overclocking can damage a CPU or reduce its lifespan.
How to Execute Stress Test CPU on a PC
So now you are all set & ready to stress test your processor. It’s time to check how your chip is capable at max status. I will show the process of stressing the CPU with some 3rd-party software step by step.
Before diving into stress, you must make sure to use HWiNFO, Core Temp, or HWMonitor to monitor the CPU temps, usage & voltages.
Here are the ways how to perform a stress test on a PC’s CPU:
Prime95
Prime95 is one of the popular stress test software to torture the CPU. It tries to find the large prime numbers by using your chip, thus the software name consists of the word.
You will have a Small FFTs option that will put immense pressure on the CPU & consumes massive power. Another option is Large FFTs which put pressure on the memory controller & memory itself. If you want combined stress for CPU & RAM, there is a Blend option.
Here is the way to stress test the CPU with Prime95:
- Download & open Prime95 with run as administrator.
- Select the max number of CPU cores in the “Number of cores to torture test”.
- Click on Small FFTs from the “Run a Torture Test box to torture the processor”.
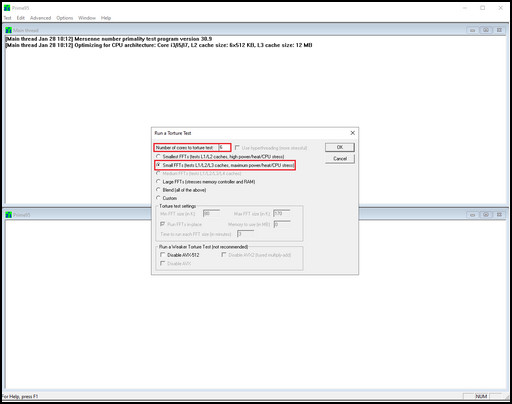
It will start stressing the CPU at max level. If any core fails to pass any test, that core will stop the test & the tab will show Not Running. If there is not enough voltage or the chip is unstable at the max frequency, the app will freeze, or even the system will crash.
On the contrary, if your rig passes the Small FFTs for 24hrs, then it’s rock solid.
If you encounter critical CPU temp, to stop the stress, click on the Test tab from the top left menu, then click on Stop… & OK. To begin the process again-Go to Option tab>Torture Test…>Small FFTs & hit OK.
OCCT
Another great tool to stress test for a longer session is OCCT. This app allows both single-core and multi-core pressurization.
It has Small, Medium & Large data set where the small data set stresses the CPU & cooling system, while the large set tortures the processor, memory controller & RAM. You can also manually set the timer of testing.
This software also has the option to stop stressing if it reaches a critical point or finds errors.
Follow the steps below to do these optional settings:
- Download & run the OCCT.exe app.
- Go to Settings from the left panel.
- Choose a comfortable temp from the “Critical temperature if you desire”.
- Click on Enabled for “Stop on error”.
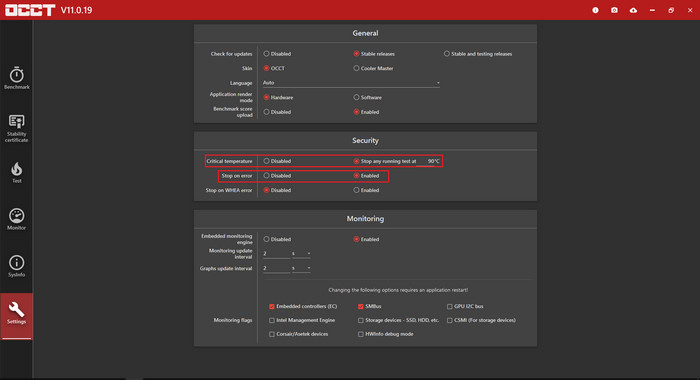
These two settings will stop the test if it reaches the thermal threshold or detects errors. Now it’s time to start the test.
Here are the steps to work with the software:
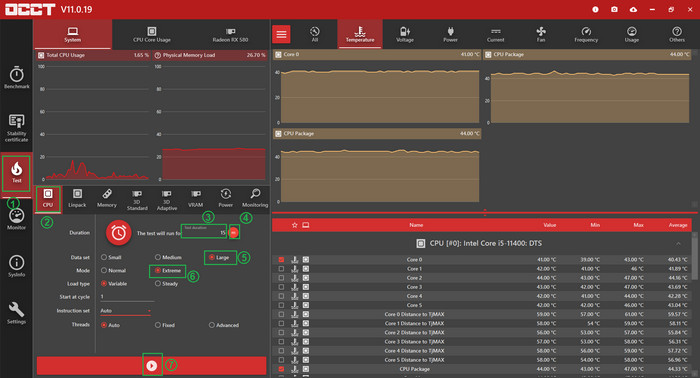
- Click on Test from the left panel.
- Select CPU from the bottom left side.
- Set a time as you desire in the “Duration section”.
- Click on m or h to change the duration to minutes or hours. Hit the big clock icon for infinite time.
- Select Large or Small Data set & Extreme Mode.
- Keep other settings at default value & start the stress by clicking on the play button.
- Wait for 10s for the free version & hit the play button again.
At this stage, the stress test will start. If it identifies any errors, it will stop the process & show errors in the left bottom box. On the contrary, it will show Test schedule completed.
Remember I told you to keep some default settings after setting the mode to Extreme? Well, this will stress all the cores at the same time. However, to stress one core at a time, choose Advanced for the Threads.
Then click on the setting icon for Advanced thread settings. Set both Physical & virtual cores. Set a duration to cycle the cores. Note that, depending on this time, the main duration time needs to be set accordingly.
For example, if you have 6 cores, 12 threads CPU, for 5 mins cycle time, it will take a total of 30 min. So it is required to set at least 30 min Duration time on the main page.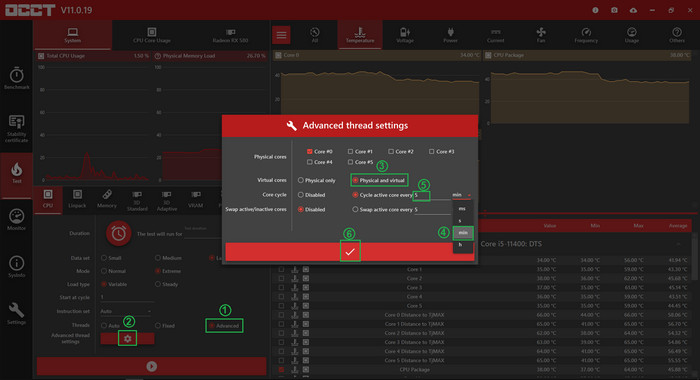
Cinebench R23
However, for a short time stressing, Cinebench R23 is another great utility to generate heat by torturing the chip. Most PC tech reviewers use this software’s score to compare a processor’s performance. The software runs a loop & accelerates the CPU temp in a short time.
The test renders a 3D scene to torture all the CPU cores. With the 10-min throttle test, you can quickly assess your system’s capability to see how far it can push within a safe temp. The 30-min test is for checking CPU stability.
Follow the steps below to stress test with Cinebench R23:
- Download & open Cinebench.exe.
- Click on File from the top left menu & select Advanced benchmark.
- Find “Minimum Test Duration” from the left panel.
From the list, select the 10 minutes option for a quick thermal test. Carefully look out for the temperature. For a short stability test, choose the 30 minutes option. Then click on Start for CPU (Multi Core) to start the hammering on cores.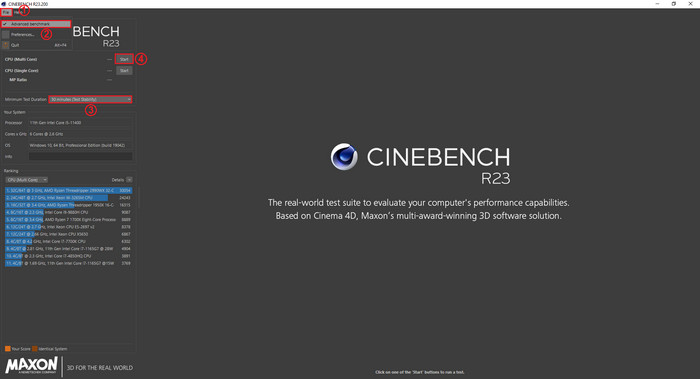
Linpack Extended (For Intel Processor Only)
Linpack Extended is a great choice that is based on Intel Math Kernel Library to stress test a 64-bit Intel chip. For a short time, it pushes the chip to its limit. So use it with caution.
Using this utility is very simple. Whenever I want some quick stress test, this is the one I use most for Intel processors. If I don’t have the file, I download this from here.
Then I go to the downloaded folder. Right-click on the Linpack Extended.bat file & open it with run as administrator. It will start the batch file & initiate the stress test.
It will show GFlops score, by which you can determine your processor’s performance. If a test is completed successfully, it will show passed under Check. Otherwise, if it shows failed, then the chip is not stable.
Ryzen Master (For AMD processor Only)
For Ryzen chips, they have a software called Ryzen Master. You can test OC stability with this software too. After opening the app, select Auto OC from the Profile section. Then click on Apply & Test. It will stress the CPU & check for stability.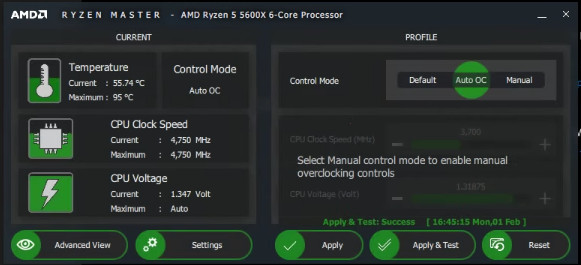
Besides these, some honorable mention apps are HeavyLoad, AIDA64 Extreme, and CPU-Z. With the help of this bunch of software, you can easily stress-test a processor.
But how long should a stress test run? Will it kill the CPU? Let’s find out.
How Long Should I Stress Test a CPU & Will it Damage the Chip?
You will stress test to see how much your processor can perform at its 100% load. This will push the limits to a very high temperature. But, don’t worry. In general cases, stress testing doesn’t kill your CPU.
Intel & AMD implemented safeguard technologies in their chips if it detects critical temperatures. So when the processor realizes it’s in a vulnerable situation, it reduces the frequency or in severe cases shut down the system. So, in normal cases, it shouldn’t damage your chip.
However, while it’s just a click to start a stress test, it needs a longer session to validate the test. Usually, you need to run the test for around 24hrs to validate an overclock.
While for an air cooler, the chip reaches its potential max temp in a short time, for AIO or Liquid cooling, it takes around 30 minutes to warm the liquid. So look out for the temps during this session.
Now, after spending a lot of time on stress testing, what can trigger a failed test? If you are curious, read along.
What Causes a Fail Stress Test?
If the stress test fails, it indicates that your overclock is not stable, or the processor passed its prime time if it’s used for a long time.
So what can cause the test to fail? Here are some reasons you should check out:
- Dried-up Thermal Paste: If the PC is aged, its thermal compound may get dried. This will reduce the thermal conductivity, which will increase the CPU temp at a bad rate.
- Poor Ventilation: Poor airflow is another reason to heat the CPU quickly. If there is no positive airflow inside the casing, it will be unable to force out the heat outside.
- Hardware lost its glimpse: If the computer is old, failing the test also indicates that the hardware lost its edge.
- Inadequate Cooling System: The cooler can also fail to scatter the heat from the chip. Thus, it increases the temp & will crash the test.
Also, go through our discussion on whether overclocking the CPU can cause random stuttering.
FAQs
What is dangerously hot for a CPU?
Under heavy load, the max safe temperature is below 80 °C or 176° F. Above 85 °C, the CPU will start to throttle & can get damaged if running for a longer period.
Which software to check CPU temp?
You can use Core Temp, HWiNFO, Speed Fan, HWMonitor, AIDA64 Extreme, etc. to monitor processor temperature.
How to OC memory?
You can enable XMP or D.O.C.P. from the BIOS to operate the memory sticks at the rated frequency advertised by the manufacturer. Though these settings are more stable, they have usually loose timings than the memory is capable of.
Final Thought
Whether to check OC stability or the performance of a CPU, stress testing is the best way to know. After taking proper precautions for the stress, start the test with Prime95, OCCT, or other aforementioned apps.
Look for 100% CPU usage & maintain a safe temp. Stop the testing apps immediately if you encounter very high temp. In that case, ensure a proper cooling system & reapply the thermal test.
In this article, I showed the proper way to stress a CPU. Don’t forget to tell your experience in the comment. Remember, stress the chip, not yourself.