Using more than one monitor with your Macbook Pro can give you all the screen space to utilize its power. But this introduces an issue in the form of high CPU usage.
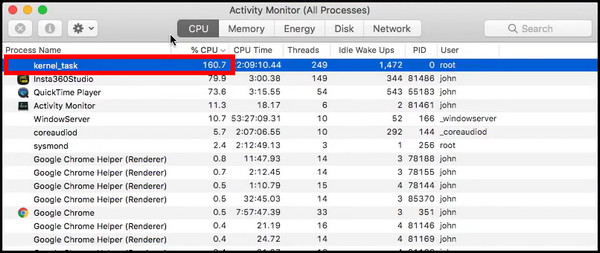
A closer look will reveal that the kernel_task is the process that seems to be using all the CPU. This specific problem is closely related to the temperatures of your Mac, which needs to be maintained at a lower value.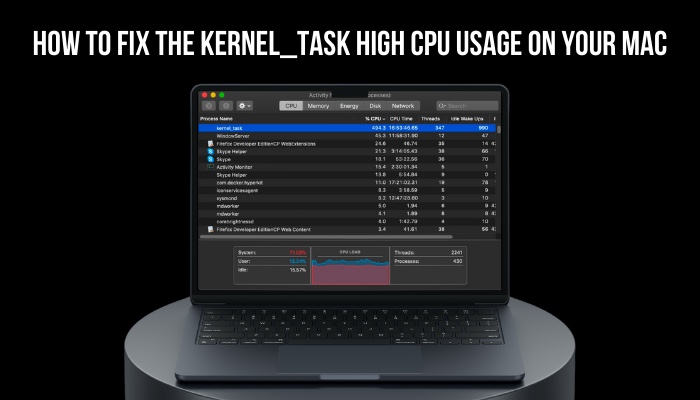
So, join me as I assist you in cooling down your Mac and eliminating this issue.
Why does the kernel_task Use a High CPU on your Mac?
The kernel_task is a process designed to keep the temperatures of your Mac under limits.
When you use applications that utilize the most CPU, it spikes up Mac’s temperature. To ensure that the Mac does not go beyond its processor’s temperature limits, the kernel task instead allocates all the CPU’s resources to itself. This is when you will see abnormally high CPU usage by this process.
Until the Mac cools down, the kernel task ensures that no other applications can use your CPU and increase its temperature.
Now, you might ask, do all applications increase kernel task usage?
Not exactly. When encoding video using Premier Pro, your Mac is expected to run the CPU at 100%. And the system monitors the temperature to ensure it is within safe limits.
But, if you use multiple monitors connected to a dongle, this can draw more power from the Type C port. Not only this but using multiple peripheral devices connected to the Type C port can build up the temperature and hence the kernel task kicks into action.
Mac OS’s Sidecar functionality can also be behind this problem. This feature on Mac OS allows you to use an iPad as an external monitor. If you use this on your setup, this can also trigger high CPU usage.
If you are getting high CPU usage with Malwarebytes on your Mac, follow the steps mentioned there, and you will bring CPU utilization in no time.
How to Fix the kernel_task High CPU Usage on your Mac
In a nutshell, you need to do the following.
To fix the kernel task’s high CPU usage, first disconnect any monitors, USB dongles, or peripherals attached to your Mac. Next, shut down the Mac, clean its fan, and ensure it is running cool. Closing unwanted applications and clearing the NVRAM will also help you out.
Let’s go through these in detail now.
These are the steps to fix high CPU usage of kernel tasks on a Mac:
Disconnect External Monitors
Disconnect any external displays connected to your Mac. For multiple monitors, also disconnect the dongles which are connected. Even if you do not connect any monitors, but use external drives, disconnect them too.
Now shut down the Mac and keep the lid open for a few minutes. Allow the Mac to cool down and dissipate the heat. If needed, place the Mac in a cooler place.
Fire up your Mac and check the CPU usage now. You should see a drastic change. Also, check how the CPU temperatures are holding up. Don’t know where to find the apps for these? I have got you covered.
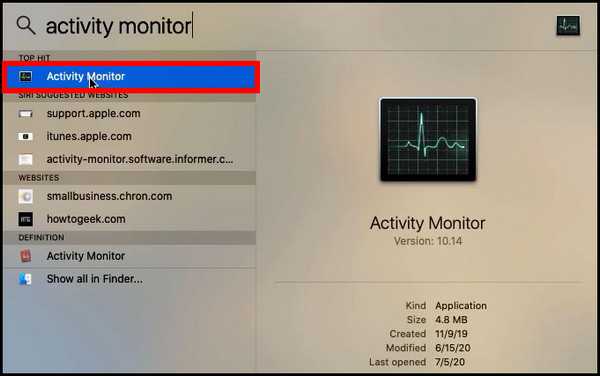
These are the steps to check CPU utilization using Activity Monitor:
- Press the Command and Spacebar to bring up Spotlight search and type in Activity Monitor. You can also open it from Finder > Applications > Activity Monitor.
- Look at the %CPU Take a look at which app has the highest CPU usage.
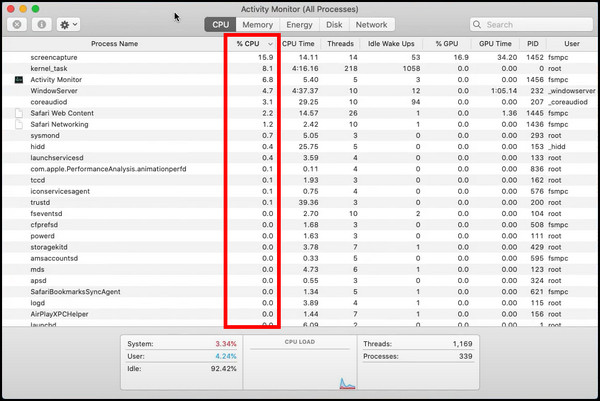
If the kernel task shows a percentage in single digits, you have successfully fixed the issue for you. And if the issue persists, your Mac is overheating. You can verify this by looking if any other applications are using the CPU resources. The chances are slim, as you just restarted the Mac.
Taking Note of the active CPU temperature during this time is also a good indicator. Let’s take a look at how you can do this.
Follow the steps to check the CPU temperature on your Mac:
- Press Command and Spacebar and type Terminal in Spotlight. Click on its icon to open it.
- Now type the following commands: sudo powermetrics –samplers smc | grep -i ‘CPU die temperature’ and press Enter.
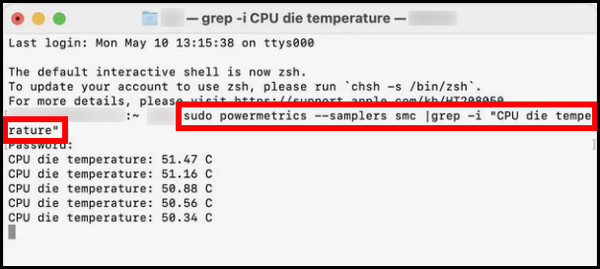
This should display Mac’s temperature based on the individual CPU cores.
So, how do the temperatures look? Anything below 80°C is fine. But as diagnosed earlier, a persistent high temperature means that you should clean the Mac first and remove any blocked-out vents.
The next section sheds a light on this.
Check out our separate article where we explore how temperatures affect your CPU. Do check it out.
Clean the Mac’s Fan
Let me get this out of the way first. A Mac is not designed as serviceable by the users themselves. Just fire a Youtube video about any Macbook Pro disassembly and you will know what I’m talking about.
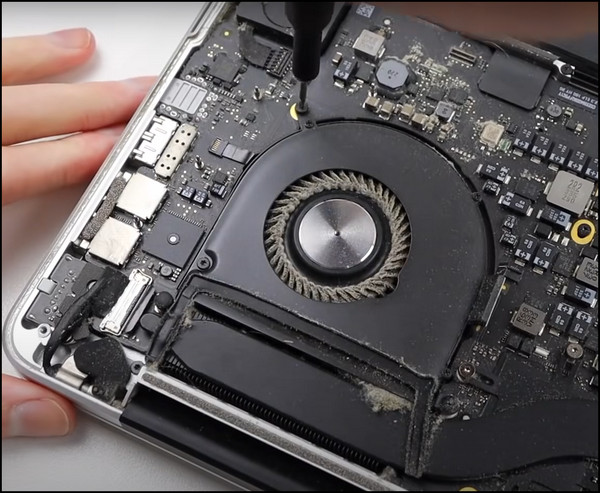
However, if you can open the Mac and take apart its fan, nothing is stopping you. Cleaning the fan blades and changing the thermal paste between the CPU and the heatsink will get you improved thermal performance.
Because now the processor can push out more heat and the fan can dissipate it away faster. If the thermal paste won’t go away, just use some isopropyl alcohol to soften it up and then remove it.
But what if you are not confident about opening up your Mac? Taking it to a computer repair shop for a thermal paste replacement is then the best-recommended thing for you.
Mds stores can sometimes use all your CPU resources on a Mac. If this happens with you, check our separate article where we fix this issue for you.
Reset Mac’s SMC and NVRAM
You can try resetting Mac’s management controller and the NVRAM memory too. This help when some settings or application is not working in the intended way.
The Mac’s SMC or System Management Controller is in charge of controlling the hardware devices. These include the cooling fans, hard drives, status LEDs, etc.
You can reset this controller if you face abnormally high CPU usage such as the kernel_task using all the CPU resources.
How you can reset the SMC depends on Mac’s model. Newer Macs with an M1 chip do not come with such a controller. As everything is based on a unified chip, the processor handles all the communication between the hardware devices.
So, a simple power off and restart after 10s is all that is necessary to reset an M1-based Mac.
For earlier models of Macs with Intel Core series processors, you do need to press some combination of keys for resetting the SMC. This applies to Macs with a T2 chip and those which do not have removable batteries.
These are the steps to reset the SMC on a Mac with a built-in T2 chip:
- Power off your Mac.
- Press the power button for ten seconds and then turn it off.
- Press the Control + Option + Shift + Power button on your Mac.

- Wait till you see the Mac power on. Do not release the keys until it powers off again.
- Now press the power button normally to turn it on.
When the Mac powers on, its SMC would be reset. A simple way to know it would be the brightness indicator of your Mac’s display. You will see it cranked all the way up.
For older Macs without a T2 security chip or a removable battery, you can perform a simple shutdown and remove all the wires/batteries. Keep these unplugged for 15s. After that plug-in your battery and connect the power cables. Press the power button for 5s. The Mac should power on with a reset system controller.
Similarly, the NVRAM on a Mac is similar to the BIOS on a PC. It stores the default settings and is unaffected even after the power runs out. An NVRAM reset can also fix some common problems with your Mac.
Follow the steps to reset the NVRAM on your Mac:
- Restart your Mac.
- Now press the following key combinations: Option + Command + P + R.

- Let go of the keys when you hear the system boot up.
When the Mac powers on, any settings that may have caused the Mac to misbehave are removed. It will load with the stock settings as you power it on.
But, for a serious hardware issue, resetting SMC or NVRAM is unlikely to help you. In that case, sending your device to Apple support is the only way out.
Check out my new post on how to Fix Windows Error Reporting High CPU and Disk Usage.
Frequently Asked Questions
Why is the kernel task taking so much CPU on Mac?
The kernel task takes a high CPU usage when the processor on your Mac heats up. It does this to prevent any app from further using the CPU. This continues until the Mac cools down to a lower sustainable temperature.
What is the normal kernel task CPU usage?
Under normal usage, the kernel task should occupy less than 10% of your CPU. If this exceeds, that means your processor is overheating.
How do I close the kernel task on Mac?
The kernel task is Mac OS’s system reserved process. You cannot terminate it as it is designed to stay open all the time. It helps to keep the CPU temperature in check.
Final Thoughts
External Monitors are primarily responsible for the kernel task process to use more CPU resources than other applications. And it is due to the build-up of temperature, rather than a virus attack or any misbehaving application.
And I have outlined the measures to take to solve this error. You may need to take a trip to the Apple Center if underlying hardware issues are persistent.
That’s all for today. Comment below on how your troubleshooting went.