Suppose you are right in the middle of an online Zoom meeting. You were requested to present your own via screen share. But your Zoom Share Screen is not working?
You do not want to think more about this sort of nightmare, right? But, in reality, if it happens, what will you do? Do you know how to tackle this? Is not it essential to have this knowledge?
As a tech enthusiast and expert, I found numerous people falling into this situation. Analyzing those incidents along with the reasons, I concluded a package of efficient solutions.
So, without wasting time, let’s get started. By the way, do not skip any part because I will try to express it thoroughly.
Types of Problems with Zoom Screen Sharing
You know, these days, Zoom turns into a boon for not only students, rather professionals and citizens from all walks of life. Zoom made things easier. It is practically fantastic when you share your computer screen with others for Zoom meetings, presentations, lesson demonstrations, and so forth.
But, how will your experience be when you find your screen stuck, or not working, or there appears an irritating black screen? These are the typical sorts of problems users face and report. Therefore, I will give you a thorough guideline on fixing these issues within a wink of your eyes.
You can do many things to restore your Zoom experience- some with the software itself and some with hardware. All solutions in vogue are not that feasible in practical experiments. Therefore, a list of tested results I am going to demonstrate.
Let’s begin.
Here are the simplest possible fixes for your Zoom screen share issues:
1. Close Zoom Application Completely from Task Manager
When you run the Zoom application, along with all the functions in the background, it may conflict with some functions of Zoom, i.e., screen sharing, video calling, etc. So, after your use, close the application completely. For doing so, you can use Task Manager.
Here are the steps on how to close the Zoom application from Task Manager:
- Open the Task Manager. You can use the shortcut key (Ctrl+Shift+Esc) as an alternative.
- Navigate to the Processes
- Find Zoom from the active applications.
- Click on Zoom.
- Press the End Task located at the bottom-right corner of the dialog box.

2. Enable the Screen Sharing Permission for All Participants
As a default setting, Zoom disables the screen sharing option for all participants. So, sometimes host does not know much about these sorts of default settings. As a result, they cannot allow any participant to share their screens.
From your end, when you become a host, enable the screen sharing beforehand. If you do not, there will be no bigger issue, though. The participant on a Zoom call will ask you to allow him to share his screen. Only then will he be able to share.
If you want to change the setting, go to the Advanced tab from the Zoom window. Choose the option of enabling screen sharing for all the participants. That’s it.
3. Check If your Internet Connection Is Stable
You are probably aware that it is highly recommended to have a stable internet connection at high speed for a smooth Zoom meeting.
Specifically, it is better to have a double-digit internet speed for screen sharing; because the application needs to pass multiple types of data from multiple ends.
4. Update your Zoom Application
Most of the modern software releases their updated versions regularly. It improves the stability, features, and user experience of the software.
It may happen that your screen sharing is not working correctly due to your outdated version of Zoom. If you do not get the notifications for updates automatically, you can even manually check for it.
Here are steps on how to check updates for your Zoom application:
- Open your Zoom application.
- Go to the Profile icon at the top-right corner of the window and click on it. A drop-down menu will appear before you.
- Find the option Check for Updates from the options.
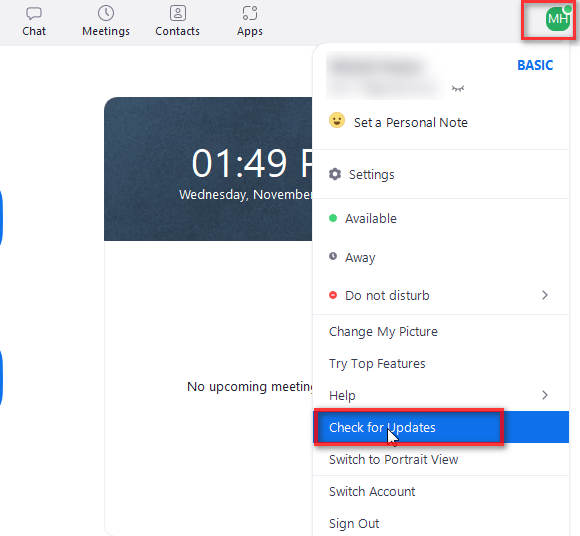
- Click on it.
Just wait till the process finishes.
It is a matter of your system’s hardware. According to the system’s configuration, you may face some difficulties. More precisely, running video and screen sharing on a single Zoom call can be a cumbersome task for a feebly configured CPU. As a result, a blank screen or not working window may appear before you.
This concept is not obligatory to perform; instead, it is a recommendation. Therefore, I suggest you, if you are on a video call, stop the video first, then share the screen and do the rest accordingly.
6. Decrease Display Resolution of your System
This is the fix applicable for the users using Zoom on a highly configured and high-resolution display system. If you do so, bear one thing in mind- the higher the resolution is, the more strain and pressure it takes for Zoom to share one’s screen with others.
So, lower your resolution if you have a display of 4K or more. Fortunately, there is an option in Windows to adjust or scale down the resolution.
Here are the steps to reduce display resolution from the Settings:
- Go to the Start menu and then Control Panel.
- Navigate to Display.
- Click on Display Resolution from the left pane.
- Tap to the Resolution A maximum and minimum resolution with a range slider will appear.
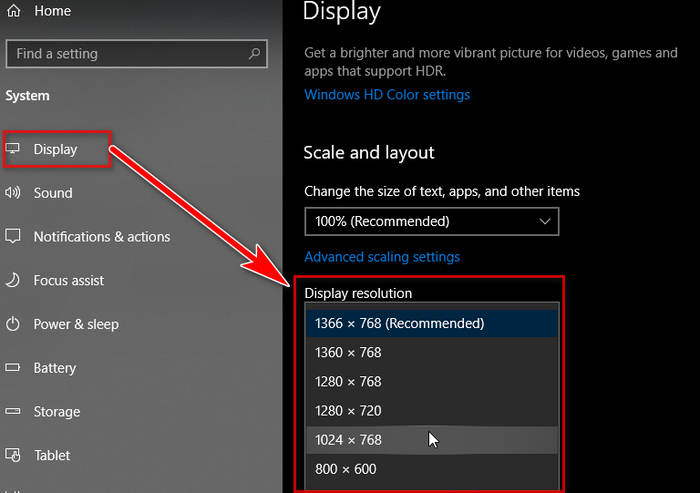
- Tune the slider as per your requirement. Pull the slider a bit down.
Now, for better results, restart your computer and open your Zoom application. Then see the magic!
7. Reduce Frame Rates While Screen Sharing
If you want Zoom to use lesser CPU power and low internet bandwidth for Screen Sharing amongst all, there is a suitable option for you.
Here are the steps to reduce Frame Rates from the Zoom Settings menu.
- Open the Zoom application on your computer.
- Tap to the Profile icon located at the upper-right corner of the window.
- Go to Settings.
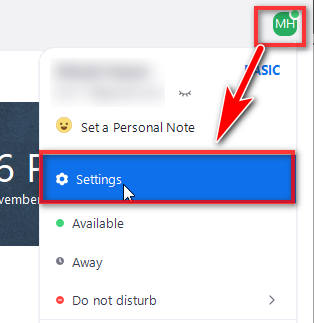
- Go to Share Screen from the left pane.
- Enter the Advanced
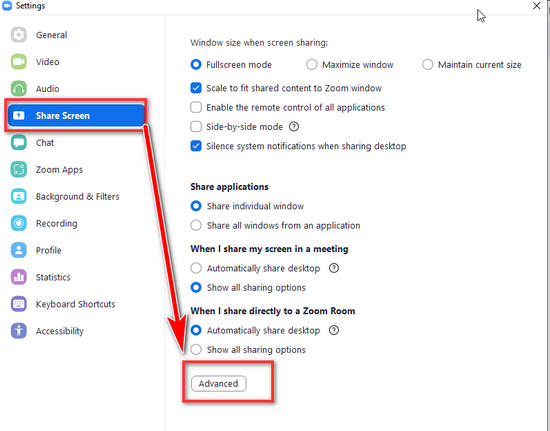
- Enable the checkbox to limit your screen share frame rates per second.
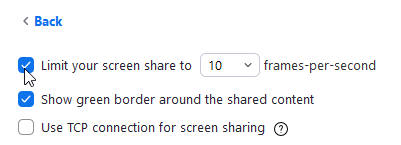
You are done. For a better experience, I am telling you to go for around 30 frames per second. This will give you the best performance.
8. Enable your Hardware for Screen Sharing
Though the option of allowing the hardware to share the screen is enabled to any user by default, I advise you to check it twice. You can check it from the Zoom Settings menu quickly. But, for your convenience, I will go deeper.
Here are the steps to enable your system’s hardware for screen sharing.
- Open the Zoom application on your device.
- Tap to your Profile icon located at the top
- Navigate to Settings.
- Choose Share Screen.
- Select the option
- Enable or turn on Share Screen under the Use hardware acceleration for
You are done.
Final words
To wrap up, the screen sharing feature of Zoom or other video-conferencing apps is quite impressive for academic and official purposes. However, I am sure the problem with screen sharing went away after successfully implementing one of my methods.
Please, share your opinions in the comment section. Also, let me know what other problems are you facing? I will reach you as fast as I can.
Do share this article if you find it helpful.