While presenting your slide show in front of a large crowd, it is challenging to keep the audience engaged.
The laser pointer allows you to focus on a specific part of the slideshow by pointing the red laser pointer at that particular part to enrich engagements. This article will guide you through the process of using the laser pointer on a PowerPoint Slide Show.
Without wasting more time, let’s get started!
How to Turn On the Laser Pointer in PowerPoint
You can use several methods to turn on the laser pointer in your PowerPoint slide show. The most accessible way to start a laser pointer is to use keyboard shortcuts. You can also use the Pointer Options to change the mouse cursor to a laser pointer.
To switch the default PowerPoint cursor arrow into a laser pointer using keyboard shortcuts, open your presentation file, start Slide Show View (press F5), and then press Ctrl + L keys. It will immediately change the cursor to a laser pointer.
You can also press Ctrl Key, then hold the left mouse button and drag the cursor to accomplish the same. Keyboard shortcuts work on most PowerPoint versions excluding PowerPoint 2007 and 2010.
If you are using a Mac for PowerPoint, press the Option key, then click and drag the left mouse button to turn on the laser pointer.
Besides, you can use the context menu to turn on the built-in laser pointer for your presentation. For a step-by-step guide, consider the following instructions.
Here are the steps to turn on the laser pointer:
- Launch PowerPoint on your computer.
- Open your PowerPoint file.
- Press F5 to start the Slide Show.
- Right-click on the slide to open the context menu.
- Place your mouse cursor on the Pointer Options.
- Select Laser pointer.

Following the above steps will instantly change your mouse cursor to a red laser pointer. You can simply drag your mouse to highlight any particular part of your presentation.
Fortunately, you can use the laser pointer in Slide Show View (F5) and Presenter View (Shift + F5).
By default, the laser pointer color is red. However, you can change the color to blue and green. I will discuss it later in this article.
Follow our guide on how to add or load a PowerPoint Add-in.
How to Turn Off the Laser Pointer in PowerPoint
Turning off the laser pointer is straightforward. While the laser pointer is on, just press the Esc key to remove the laser pointer. Besides, you can use the Pointer Options to turn off the feature. Right-click on the Slide show and navigate to Pointer Options > Arrow Options > Visible.
Consider the subsequent instructions to turn off the laser pointer in PowerPoint Slide Show.
Follow the procedure below to turn off the laser pointer:
- Right-click on the Slide Show.
- Place the mouse cursor on Pointer Options.
- Click on the Arrow Options.
- Choose Visible.
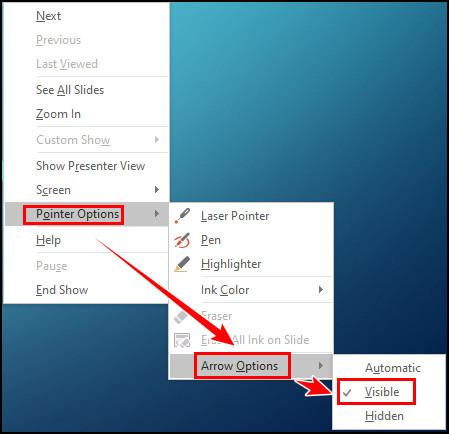
You can also choose the Pen or Highlighter from the Pointer Options to accomplish the same. Changing the Arrow Options to Visible will change the cursor to the normal PowerPoint arrow cursor.
Check out our separate post on can’t group objects in PowerPoint.
How to Change the Color of the Laser Pointer
The laser pointer color is red by default. However, you can change the color of the laser pointer to blue, green, or red using the Set Up Slide Show menu. To do so, navigate to Slide Show > Set Up Slide Show > Laser Pointer Color, and change the color to the suitable one.
Are you wondering why you need to change the color of the laser pointer? Because it helps to stand out against the background color of your slide show.
Suppose your slide background is red; hence you can’t use the red laser pointer for this slide show. Instead, you can change the color to blue or green to make it more visible.
Now, let’s have a look at how to change the laser pointer color for a particular PowerPoint Slide Show.
Check the following instructions to change the laser pointer color:
- Open your presentation file and switch to the Slide Show tab.
- Click on Set Up Slide Show in the Set Up group.
- Locate Laser Pointer Color under Show options.
- Click on the down arrow and choose Green, Red, or Blue.
- Click OK to save the changes.
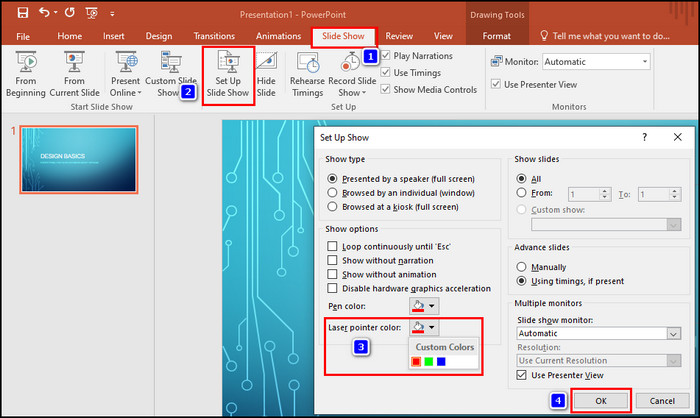
Changing the laser pointer color only applies to the specific slide. The slide will show the laser pointer as the changed color until you change it again.
This change will not apply to other presentation files. You need to change the color for those files using the Setup Up Slide Show dialog box.
Here’s a complete guide on how to add Grammarly to PowerPoint.
Frequently Asked Questions
Why should you use the laser pointer during a presentation?
Using the laser pointer during a presentation helps to focus the audience on a specific part of your slide and increases engagement.
How do you always show a laser pointer in PowerPoint?
Open the PowerPoint slide and start presenting the slide show once you are in Slide Show mode. Right-click on the slide and navigate to Pointer Options > Laser Pointer to show a laser pointer.
What is the shortcut key for the laser pointer in PowerPoint?
You can use shortcuts to start the laser pointer in PowerPoint. Press Ctrl + L, and it will instantly change the mouse cursor to a laser pointer. Press Esc to remove the laser pointer.
Concluding Words
Choosing the correct color laser pointer is essential to stand out and increase visibility while presenting your Slide Show.
You can effortlessly enable or disable the laser pointer using the keyboard shortcuts. Besides, I have covered the process of adding or removing the laser pointer using the context menu.
I hope you find this article engaging and stress-relieving for accessing the laser pointer feature in PowerPoint. Don’t forget to leave a comment below for further assistance.