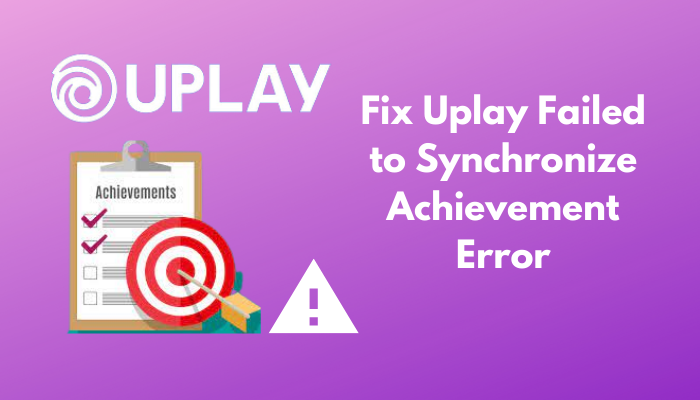
Whenever you are trying to launch a game on your Uplay client and suddenly a yellow-colored disclaimer appears on the monitor saying Failed to synchronize achievements? If that’s not the most annoying situation, then what is, right?
Being a professional gamer for around fourteen years, I have encountered that type of complication more than you could ever imagine. And the best outcome is, I know how the most workable methods you can apply to overcome this issue.
Do you want to learn about fixation? All you need to do is read this article till the very end. But before that, you must know, Why Uplay failed to synchronize achievement error occurs?
So many variables to consider, right? Do not worry that much. After reading the entire article, you won’t even contemplate these as a threat.
Why does Achievement Synchronization Issue Occur?
Why are you facing the problem? I know this question is eating your head like a bug. And I will disclose the common grounds for having the issue.
Here are the causes behind Uplay failure to sync achievement:
- Corrupted game files or missing load files of the Uplay can generate the problem
- An outdated Uplay application can cause a failed sync.
- Existing firewall and antivirus software prevent the app to work with full potential. Hence the synchronization fails.
- If you don’t update your OS and GPU driver from time to time, it also triggers the issue.
These are the popular culprits that cause you the issue. Find out the exact reason and act accordingly while solving the problem.
Repair Uplay Failed to Synchronize Achievement Problem
Now that you know the primary reasons behind this error message it is time to solve it. But you are confused would you be able to figure out the situation on your own?
Another thing you can cross off from your mind. Reading this essay with an intent mind and by following my instructions there will be no obstacles remaining that can prevent you from playing the game.
Feeling confident yet? Now, let’s start the procedure. You can choose any of these methods I am going to share and implement on your computer. But, I would recommend employing them one by one. That would increase the probability of accomplishment in a short time.
Here are the workable methods to solve the Synchronization Achievement Error:
1. Check for Corrupted Game files
One of the biggest threats that you can face is corrupted game files. If the game you are playing with the Uplay client gets corrupted, it can show the achievement sync error. You need to verify the files of the game.
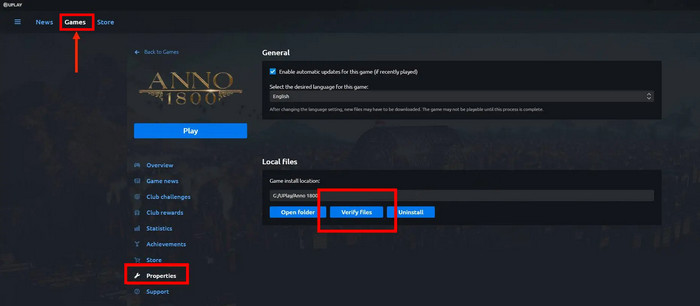
Here is how you can verify the game files:
- Go to the Uplay client and log in.
- Select the game option when logged in.
- Choose the game that is occurring you the headache.
- Select the Properties option from the left panel.
- Select the Verify files from the right side of the screen.
- Wait for the verification process to end.
If there are any corrupted or missing files found by the process, you will need to download the files. For that, following the on screen instructions should be enough. Once you download the files, launch Uplay again and check if the synchronization error still exists.
If yes, then follow the next methods.
2. End Uplay process Via Task Manager
Sometimes, Uplay process gets stuck and can’t work properly. You can solve this problem by killing all the tasks running in the background and relaunching the processes again.
Follow these steps to end Uplay processes.
- Right click on the start button of your computer.
- Select Task manager from the appeared menu.
- Locate the Uplay processes one by one. (Also the Ubisoft processes)
- Select the processes and click on End task.
- Restart your computer after completing the procedure.
This is one of the basic solutions you can try. Any minor glitch of the Uplay client will be solved if you apply this.
Note: if you are using the steam version, Select steam related tasks instead of Uplay tasks.
3. Reset the network system
As the synchronization happens only when you are connected to the internet, It is quite possible that your bad internet connection can cause the issue. If that’s the case, you can apply the following steps to resolve the internet problem.
- Close the Uplay app and end all the tasks regarding the app from the task manager.
- Turn off the router you are using and plug out the internet cables.
- Wait for a few minutes and turn it on.
- Disconnect the internet cable from your PC and reconnect.
Run the Uplay application to check the issue has been resolved or not. If not, continue applying the following methods.
4. Allow Uplay in Firewall
Has it ever occurred to you that you are installing a game on your PC and your antivirus blocks the essential files/ folders due to security reasons? I am sure you have faced the issue more than once.
That issue can also happen to your Uplay / Steam client. To overcome the situation, disabling the antivirus or turning off the firewall for some time would be worthwhile.
But, remember that, allowing any applications through the firewall settings can divulge your system to various threats. If you are not sure, you can always avoid this procedure.
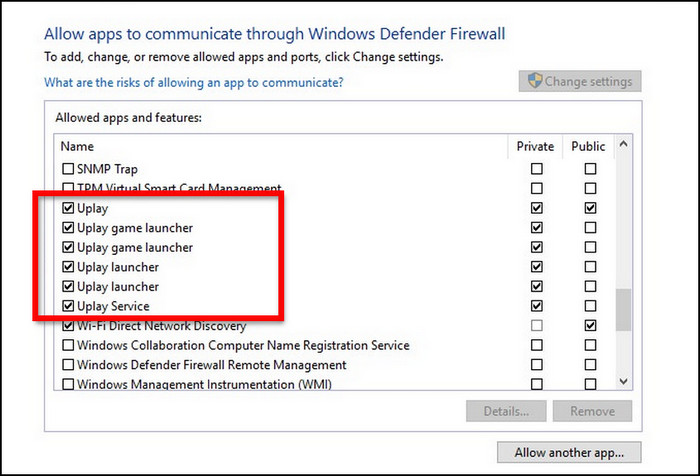
Here’s how you can allow your Uplay client through the firewall:
- Close the Uplay client with the task manager.
- Type firewall in the windows search button.
- Click on Windows firewall from the list.
- Select Allow apps to communicate through Windows Defender Firewall from the left panel.
- Tick mark on all of the Uplay options.
You are all set. Check if the sync issue still remains. Whether the answer is yes or no turn on the firewall application.
5. Delete Files from Uplay Client
Uplay is an online platform where you can download lots of games and play using this single tool. In order to maintain the optimum output, Uplay creates some essential files and folders. If any of those files get corrupted you might face a sync issue.
You can solve it by deleting the essential folders. No worries, these folders will regenerate once you launch the application. Which folders should you delete? Keep reading to complete the procedure.
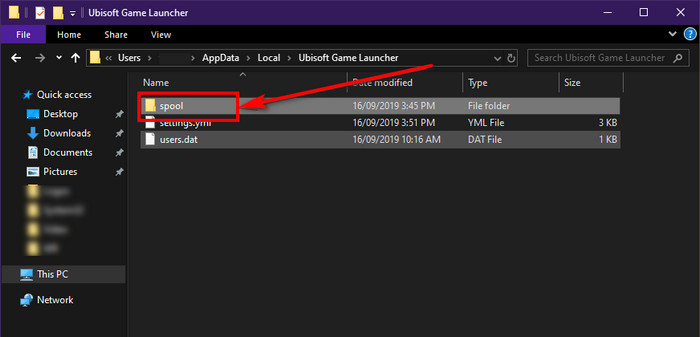
Here is the process to delete Files from Uplay:
- Turn off the Uplay client.
- Close all the relative processes of the application through the task manager.
- Open the File Explorer of your system.
- Navigate to this location %userprofile%\Appdata\Local\Ubisoft game launcher\ spool.
- Open the folder and create a backup of the .spool file.
- Delete the .spool file once you have created the backup.
Check if the issue resolves or not by launching the Uplay application. This method should solve your issue. But it’s okay if that doesn’t happen. I have still some tricks left. Continue reading to know them.
6. Delete Saved Files
Deleting the saved game files will erase the achievement you currently have. Thus, no longer the achievement error message. But as I mentioned, these files will regenerate again whenever you launch the game.
Let’s see how you can delete the saved files.
- Right click on Uplay and select run as administrator.
- Unmark the enable cloud save synchronization for supported games.
- Create a backup of your save games folder.
- Delete the original same games folder.
- Launch the application and start playing the problematic game.
- Quit the game and tick the option that you unmarked a few minutes ago.
The game will create save files automatically. Copy the files you backed up and paste it into the folder.
Now relaunch the game and check if everything works just fine, I can assure you after applying this method, you will face no issues regarding the cloud synchronization.
7. Re-install Uplay
If any of the above-mentioned procedures didn’t solve the problem, just re-install the programme. All of the previous data will be wiped but you should be able to play the games without any obstacles.
Here is how you can re-install the Uplay:
- Type Control panel on the windows search box.
- Select uninstall a programme underneath the application menu.
- Choose Uplay client when the next window appears and select Uninstall.
- Follow the on screen prompts to complete the process.
- Restart your computer once the program is uninstalled.
- Download the Uplay client from the official website.
- Right click on the application once downloaded.
- Select run as administrator.
Follow the on screen instructions to complete the re-installation process.
These are the proven methods of solving the sync failed issue. These worked for me all the time and I know these will work for you as well.
Conclusion
Throughout this article, I have tried my best to share all the information you need for solving Uplay failed to sync achievement error.
If you have read every word I put throughout the article and followed the methods, I can assure you the synchronization achievement will not be a problem for you.
But, then again, If you face any obstacles implementing the methods, feel free to comment. I will clear out your confusion as soon as possible.