People like more organized and tidied-up Excel sheets with a particular space in the row.
By default, an Excel row has a certain height, and users can automatically fit it using the AutoFit Row Height option. However, sometimes it doesn’t work, and you may face difficulties with AutoFit.
But there’s nothing to worry about because here, I’ll discuss the quick and easiest ways to resolve AutoFit Row Heights.
So, let’s begin.
How to Fix Autofit Row Height Not Working in Excel
Users can resolve the AutoFit Row Heights not functioning issue by selecting the correct row and inputting the heights. Additionally, unmerging the cells, unprotecting the spreadsheet, and using the VBA formula will fix the AutoFit Row Heights in Excel.
The following methods will guide you to fix the automatic row heights issue in Excel.
Here are the methods to resolve the AutoFit Row Heights functioning in Excel:
1. Manually Input Row Height
When you apply the Wrap Text option to a merged cell, the height automatically changes to fit the text. But, after using the AutoFit Row Height option, the text gets hidden and doesn’t show the full text.
To overcome this problem, you can unmerge the Excel cells. However, it can make your work difficult sometimes.
For this reason, it’s better to use manual input to overwhelm the issue. Consider reading the following procedures to input the row height manually.
Here’s how you can input the row height manually in Excel:
- Select the cells.
- Navigate to the Home tab.
- Press on Format and click on Row Height.
- Insert your preferred row height and press OK.
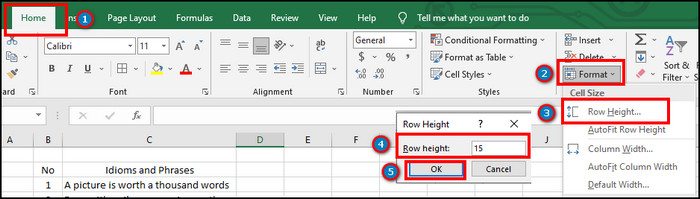
Note: The default row height for a line in Excel cells is 15.
2. Use AutoFit Column Width
Sometimes, copying and pasting objects in the Excel cell occupies more than the average cell space. You need to wrap the text to fit in the cell perfectly.
But, after wrapping the text, it leaves some extra space at the top or bottom of the cells, and AutoFit row heights don’t resolve the problem.
You need to use the AutoFit Column Width option to remove the unnecessary space by following the steps below.
Read the process below to use AutoFit Column Width in Excel:
- Click on the cells.
- Go to the Home tab and press on Format.
- Click on AutoFit Column Width.
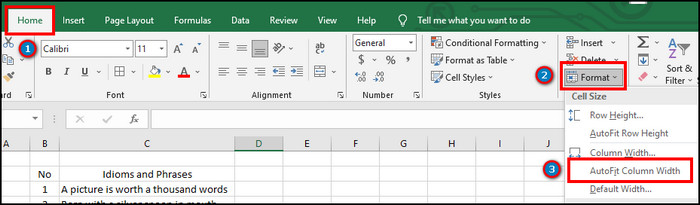
It will remove the space from the top or bottom of the cell. If you have a long number from a calculation, you can round up the number in Excel to reduce the column width.
3. Unprotect Sheet
The protected spreadsheet restricts the user from making any changes to the cells. It also hinders you from changing the Excel row heights.
Follow the steps below to unprotect the sheet and use the AutoFit Row Heights option.
Here is the process to unprotect the Excel sheet:
- Navigate to the Review tab from the top ribbon.
- Click on Unprotect Sheet.
- Provide your password and press OK.

However, if none of the methods work from the above, you can use Microsoft Visual Basic for Application to apply the auto height formula.
4. Use VBA
Microsoft Visual Basic for Application or VBA allows you to use a formula or code and apply it to your Excel sheet.
You can use the AutoFit Row Heights formula from below to fix the row heights automatically.
Read the following steps carefully to use the VBA formula to use AutoFit Row Heights:
- Click on the cells.
- Right-click on your sheet name.
- Press on View Code from the context menu.
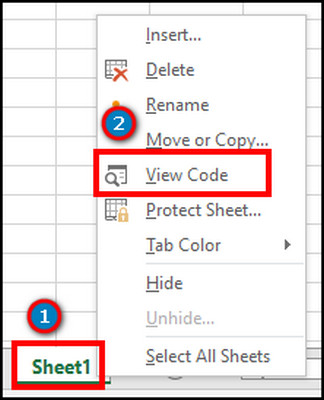
- Copy and paste the following code:
With Selection.CurrentRegion
.Rows.EntireRow.AutoFit
End With
End Sub
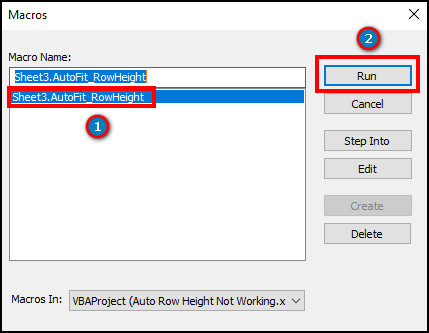
- Click on the Run button from the top ribbon.
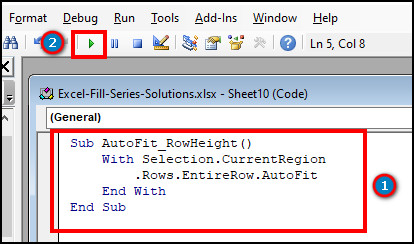
- Select the Macro Name and press on Run.
After running the formula, it will automatically fit the row heights in the Excel sheet.
I believe the above solutions have fixed the problem with your AutoFit Row Heights. If you want to know more about the reason, continue reading the following passage.
Also, check out our separate post on how to install macro in Excel.
Why is the Autofit Row Height Not Functioning in Excel
You can’t AutoFit the Row Height in Excel because of the merged cells in rows or columns and for using wrap text in an Excel cell. Additionally, enabling password protection will restrict you from accessing Excel’s Autofit Row Height feature.
Read the following reasons carefully to pinpoint and identify your problems quickly.
Here are the causes behind the Autofit Row Height not functioning in Excel:
Merged Cells
Sometimes, the AutoFit Row Heights feature doesn’t work in the merged cells, especially in Excel 2003 and older.
If you are using an older version of Excel, you are likely to encounter a problem with AutoFit Row Heights.
Using Wrap Text
After using the Wrap Text option in Excel, some unnecessary space appears at the top or bottom of the cell. In this instance, the AutoFit Row Heights fail to work correctly and remove the unwanted space.
Protected Sheet
A protected Excel spreadsheet prevents unauthorized users from making changes to the sheet. When the sheet protection is enabled, you’ll see the AutoFit option as gray.
If you’ve added protection to your Excel sheet, you won’t be able to use the AutoFit Row Height option in Excel.
The above reason will help you to distinguish your problem and ease the resolution process.
Here’s a complete guide on how to copy values without formulas on Excel.
Frequently Asked Questions
What is the default row height in Excel?
The default row height in Microsoft Excel is 15. But, you can increase or decrease the row height from settings.
How do I adjust the row heights automatically in Excel?
To adjust the Excel row heights automatically, select the cell > Home > Format > AutoFit Row Height.
Why is Excel row height locked?
The Excel row height is locked because the sheet is password protected. You need to unprotect the sheet before start modifying.
Conclusion
The AutoFit Row Height option helps to organize the spacing between rows and gives a more excellent look to your sheet.
This article has provided the easiest methods to fix the AutoFit Row Height option and ease the row arranging.
Share your thoughts in the comment box below, and I’ll catch you at the next one. Until then, goodbye.