Many of you can be tech enthusiast or IT expert who wants to run numerous operating systems on a single computer. Thanks to Hyper-V because this feature makes it easier to run several OS on Windows as virtual machines.
To use this feature, you must enable it. And this article contains three different methods to activate Hyper-V on Windows 10 operating system.So, tag along.
Go through our epic guide on what does Unparking Cores do in Windows 10?
How to Enable Hyper-V on Windows 10
Before you make an attempt to install Hyper-V on your PC, it needs to meet a few requirements.
First, you must have 64-bit Windows 10 Pro, Enterprise or Education edition installed on your PC. If you don’t know which edition of Windows you are using, type winver in the Windows search bar and press Enter. A small About Windows box will show which Windows version you are using. What about Windows 10 Home Edition? Technically, Hyper-V does not come preinstalled in the Home edition by default. That doesn’t mean you can’t install it. You can set up Hyper-V in the Home version of Windows using a few commands. I will explain those later in this article.
Second, your PC needs a minimum of 4 GB RAM to use Hyper-V. Make sure your PC has that. Also, if you want to clear your RAM cache, check out our awesome guide on how to clear the RAM cache in Windows 10.
Third, and most importantly, virtualization needs to be enabled on your PC. To verify whether the virtualization is enabled or not, press the Ctrl + Shift + Esc button to launch Task Manager. Click on the Performance tab, and you will see Virtualization at the bottom. If it is enabled, you can effortlessly turn on Hyper-V. In case it is disabled, you need to activate it from the BIOS. Having a problem with the BIOS?
Here is the way to enable virtualization from BIOS:
- Restart the PC.
- Tap on the boot menu key from your keyboard (F12, F8, F2, Esc or Delete, etc.) that your PC manufacturer has set for your PC to go into the BIOS settings.
- Select the BIOS Setup.
- Extend the Virtualization Support option.
- Click on the Enable Intel Virtualization Technology option.
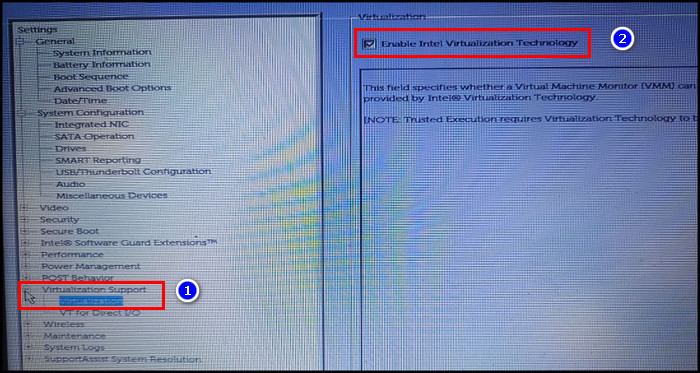
Note: For various PC manufacturers, the virtualization function may go by multiple names in the BIOS. If you don’t find any options with a virtualization name with it, find the SVM feature on AMD or the VT-x feature on Intel.
Now virtualization is enabled, you can now activate Hyper-V in Windows 10.
Here are the steps to turn on Hyper-V in Windows 10:
From Windows Features
- Press on the Windows search icon.
- Type Turn Windows features on or off and hit Enter.
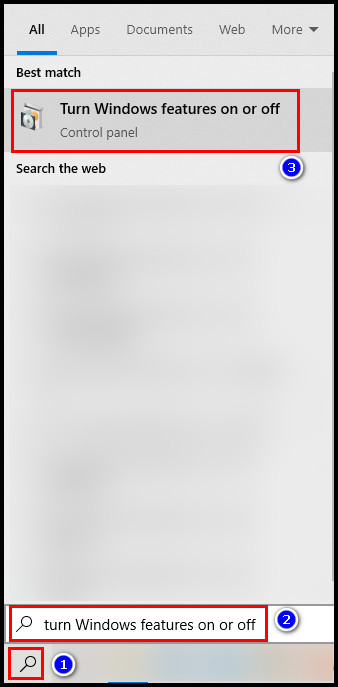
- Select Hyper-V.
- Expand the menu. Make sure you check all the Hyper-V options there.
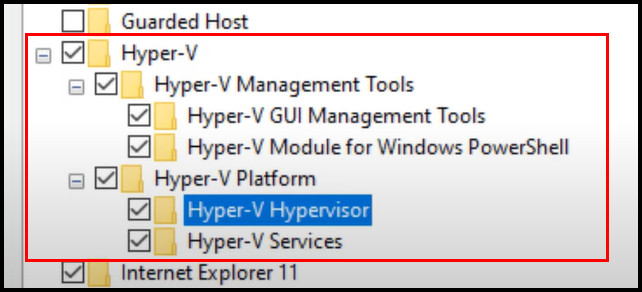
- Click OK.
- Select Restart now.
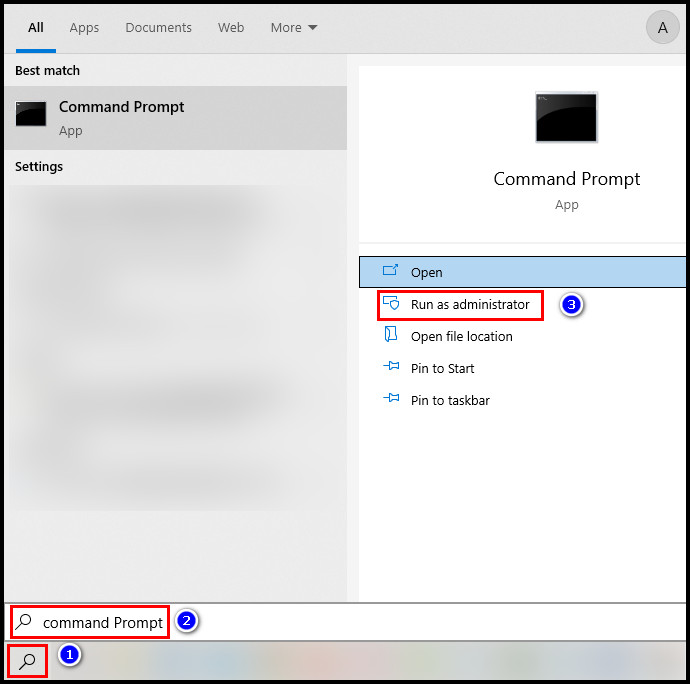
From Windows Command Prompt(Administrator)
- Click the search icon.
- Type Command Prompt and select Run as administrator.
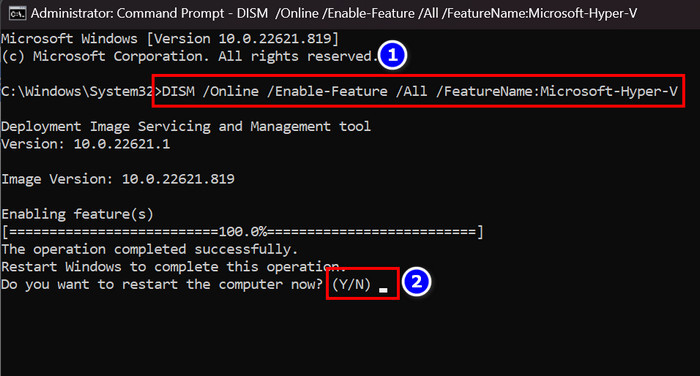
- Copy and paste the following command and hit Enter.
- DISM /Online /Enable-Feature /All /FeatureName:Microsoft-Hyper-V
- Type Y to restart the PC.
After the restart, Hyper-V will be enabled.
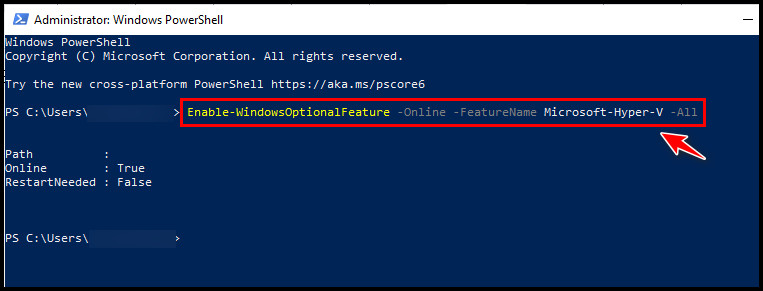
From Windows PowerShell(Administrator)
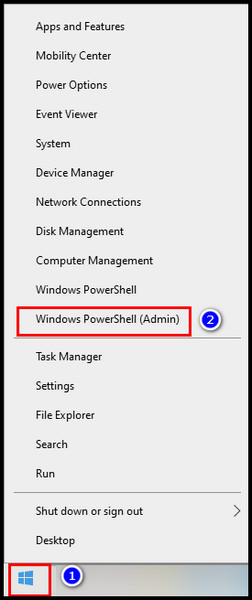
- Right-click on the Windows icon and select Windows PowerShell(Admin).
- Type the command in the PowerShell window and press Enter.
- Enable-WindowsOptionalFeature -Online -FeatureName Microsoft-Hyper-V -All
- Enable-WindowsOptionalFeature -Online -FeatureName Microsoft-Hyper-V -All
- Reboot the PC.
The Hyper-V will be activated once your PC takes a restart. If you are planning to upgrade from Windows 10 to Windows 11 and also want to turn on Hyper-V on Windows 11, check out our separate post on how to enable Hyper-V in Windows 11.
How to Turn On Hyper-V in Windows 10 Home
You don’t need to be dishearted if you use the Windows 10 Home version. It’s true that by default, there is no Hyper-V feature in Windows 10 Home. However, it is possible to install Hyper-V. The process is a bit tricky but not complicated to activate. Simply follow the given steps.
Before you go ahead, open the command prompt, type systeminfo and press Enter. Go to the Hyper-V Requirement section. If all four options are set to Yes, your PC can enable Hyper-V. If any one of the options says No, you must modify some settings in BIOS to change those options to Yes. Also, ensure the virtualization is activated. Having it disabled, you won’t be able to enable Hyper-V.
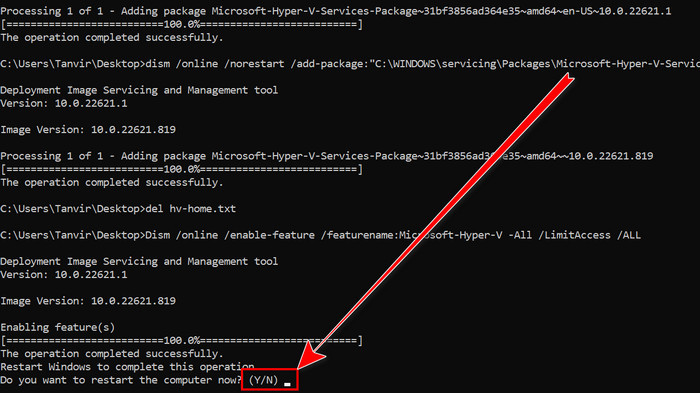
Here is the process to activate Hyper-V in Windows 10 Home:
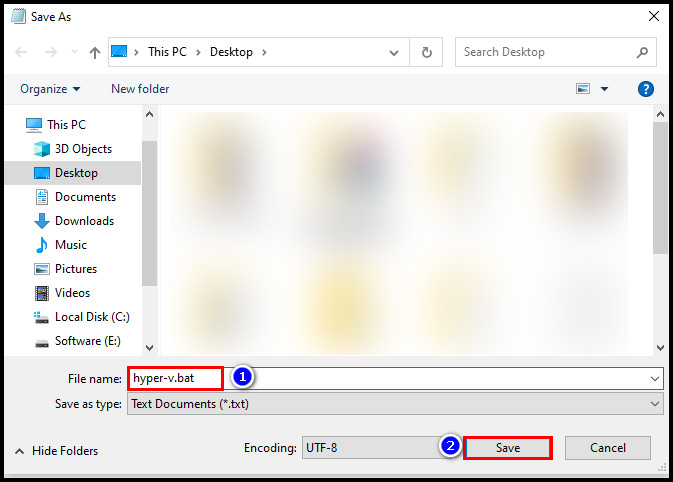
- Open Notepad.

- Copy the following code and paste it into the notepad.
dir /b %SystemRoot%\servicing\Packages\*Hyper-V*.mum >Hyper-V.txt
for /f %%i in (‘findstr /i . Hyper-V.txt 2^>nul’) do dism /online /norestart /add-package:”%SystemRoot%\servicing\Packages\%%i”
del Hyper-V.txt
Dism /online /enable-feature /featurename:Microsoft-Hyper-V -All /LimitAccess /ALL
Pause
- Click File and select Save as.
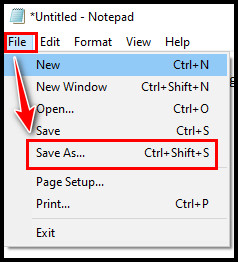
- Save the file name as Hyper-V.bat and click Save.
- Go to the location where you saved the file.
- Right-click on that file and select Run as administrator.
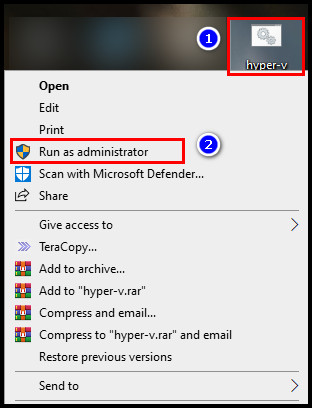
- Wait a while until the process is finished.
- Type Y to restart the PC.
When the PC starts, the hypervisor will be installed on your Windows 10 home. In addition, follow our guide if the notepad cannot open large files.
Have some time to spare? Check out our step-by-step guide on how to enable Remote Desktop in Windows 10 Home edition.
FAQs
Why is Hyper-V not enabled?
Hyper-V is not enabled because of incorrect BIOS and Windows settings. Also, if you are using Windows Home edition and Virtualization is disabled, you won’t be able to enable the Hyper-V feature.
Should I enable Hyper-V on Windows 10?
If you want to open or create multiple operating systems on a single computer, you should enable Hyper-V. Otherwise, you don’t need to turn on the hypervisor.
How do I know if Hyper-V is installed?
Using Command Prompt, you can know whether Hyper-V is installed or not. Follow the steps: Open Command Prompt > type systeminfo > Enter. Locate the Hyper-V section. If you see A hypervisor has been detected. Features required for Hyper-V will not be displayed message in the requirement line; it means Hyper-V is installed.
Conclusion
Hyper-V is a virtualization technique built on hypervisors. However, it’s also known as Microsoft’s hardware virtualization product. One of the advantages of using Hyper-V is that it improves cloud migration of virtual workloads.
If you followed the steps accordingly, Hyper-V should now be enabled on Windows 10. Let me know comment section which method you have used to turn on Hyper-V.
You can also comment if you have any additional queries. I will gladly answer them.
Peace!