Every time you boot up your PC, the login page prompts you to enter your PIN or password. But what if I showed you there’s a way to skip this step and immediately log in to Windows.
Sounds crazy, right?
Do you want to enable the Auto-Login feature on your Windows 11 system to log in your system automatically without using a PIN or password?
Enabling the Auto-Login feature on your Windows 11 computer is easy and quick.
In this in-depth guide, I will show you the steps to help you to login in Windows 11 system without your login credentials. You will learn the process of enabling the Auto-Login feature on your Windows 11 computer.
Keep reading and precisely follow the step-by-step guide.
So, let’s begin to learn the process.
Why do you Need to Enable the Auto-Login Feature?
Whenever you turn on your Windows computer, the system asks you to enter your user password. You need to select a user account and password if your system has multiple users in some cases.
It’s good to protect your data and information using an account and password when your system computer has multiple users.
But when you are the only user on your personal computer, there is no risk to lost or stealing your data and information by using your computer physically. You can use the Auto-Login feature to prevent entering a password every time you boot up your PC.
The auto-Login feature helps you log in to your desktop directly without logging in. It also helps to boost your system boot speed.
However, using the Auto-Login feature on your office or college workstation is not recommended because security is a big concern.
In the next section, I will show you some proven and tested methods to turn on the Auto-Login feature in your Windows 11 computer.
So, let’s dive into the main topic without further delay.
Check our exclusive tutorial on How to Fix Blue Screen on Windows 11
How to Enable Auto-Login on Windows 11
It’s quick and straightforward to enable the Auto-Login feature on your Windows 11 PC.
It’s only for your advantage that you make Windows logon automatic, and it’s useful if your account has a long password that you don’t want to type in every time you boot up your computer.
So, only use the procedures below if you’ve physically protected your system.
If you seek step-by-step instructions to enable the Auto-Login feature on your Windows 11 PC, you have come to the correct spot.
Check out the easiest way to fix Windows Can’t Access Network Drive On Windows 11.
Here are the steps to enable the Auto-Login on Windows 11:
1. Use System Settings
In Windows 11, you just need to disable the Windows Hello feature if your system has already set up a Windows Hello PIN before enabling the Auto-Login feature.
Without disabling the Auto-Login feature, you can not turn on or use the Auto-Login feature on your Windows 11 computer.
Here are the steps to turn on the Auto-Login feature using the System Settings:
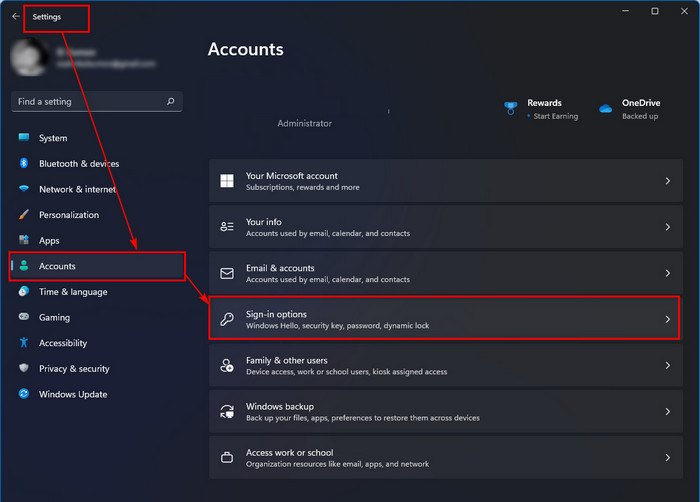
- Press Windows + I on your keyboard to open the Windows System Settings app.
- Select the Accounts tab on your System Settings window.
- Choose Sign-in options.
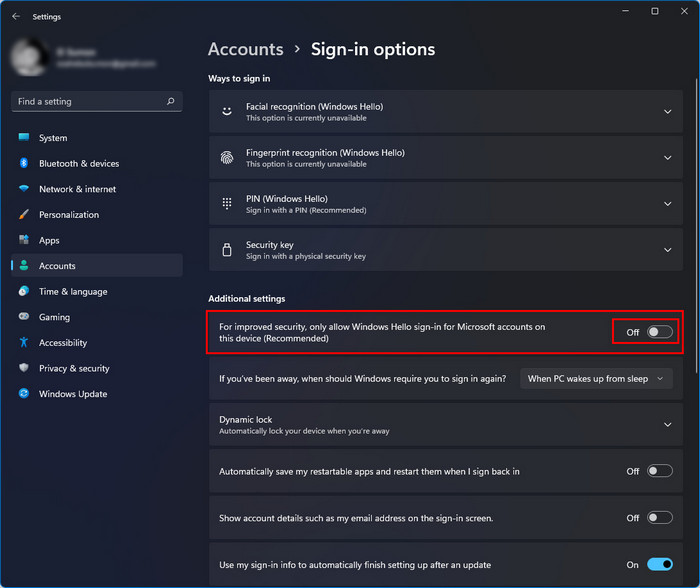
- Toggle off the For improved security, only allow Windows Hello sign-in for Microsoft accounts in this device (Recommended) option under the Additional settings section. Sign out of Windows and back in if this option is greyed out.
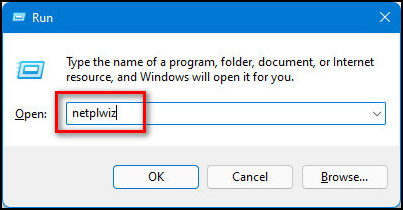
- Press Windows + R on your keyboard to open the Windows Run program.
- Type netplwiz and press Enter to open the User Accounts window.
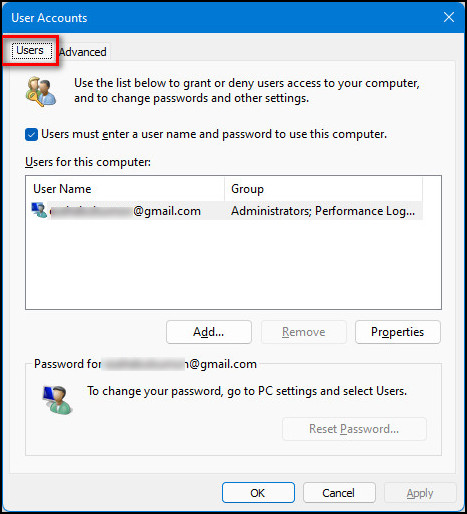
- Select the Users tab.
- Uncheck the Users must enter a username and password to use this computer checkbox.
- Click on the Apply button to save the changes.
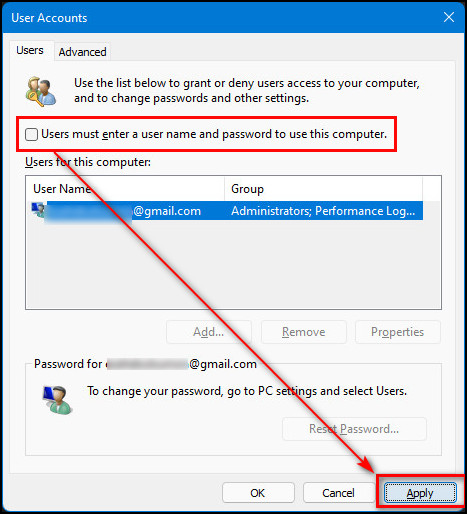
- Enter your user account password and click on the OK button to confirm your identity.

- Click on the OK button to exit the window.

- Restart your computer to check the Auto-Login feature is working.
Check out our expert-recommended guide on How To Enable Telnet On Windows 11
2. Use Windows Registry
You can use Windows Registry to turn on the Auto-Login feature on your Windows 11 computer.
Here are the steps to turn on the Auto-Login feature using the Windows Registry:
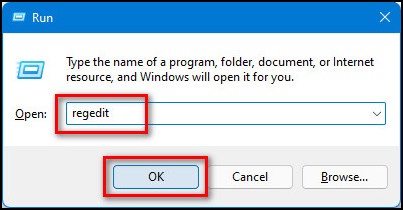
- Open the Windows Run program by pressing the Windows + R key on your keyboard.
- Enter regedit in the Run dialogue box to open the Registry Editor window.
- Copy and paste the following path into the address bar and hit the Enter key to navigate the destination location directly:
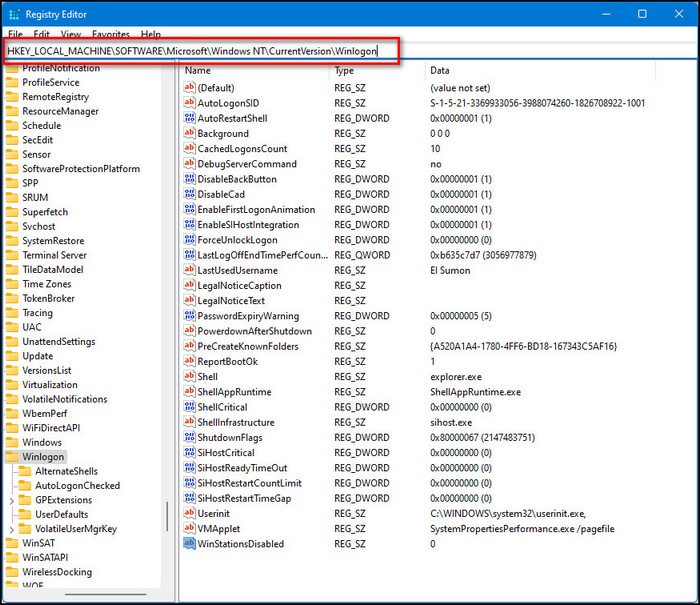
- HKEY_LOCAL_MACHINE\SOFTWARE\Microsoft\Windows NT\CurrentVersion\Winlogon
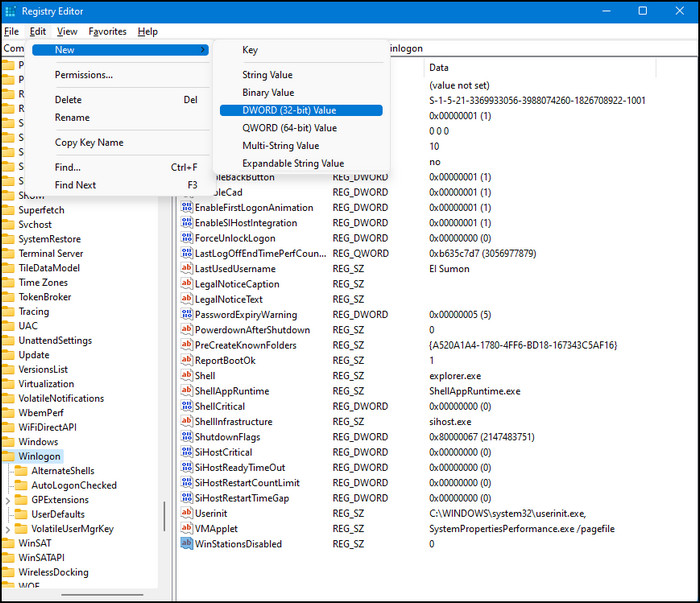
- Go to Edit > New and choose DWORD (32-bit) Value to create a new value, then set the value name AutoAdminLogon.
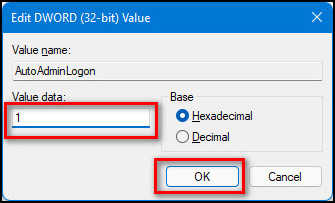
- Double click on the value and fill the Value data field by 1, then click on the OK button to save the changes.
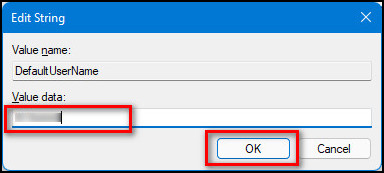
- Go to Edit > New and choose String Value to create a new value, then set the value name DefaultUserName.

- Double click on the value and set the Value data by your user name, then click on the OK button to save the changes.
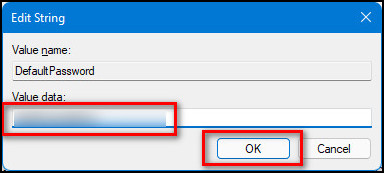
- Go to Edit > New and choose String Value to create a new value, then set the value name DefaultPassword.
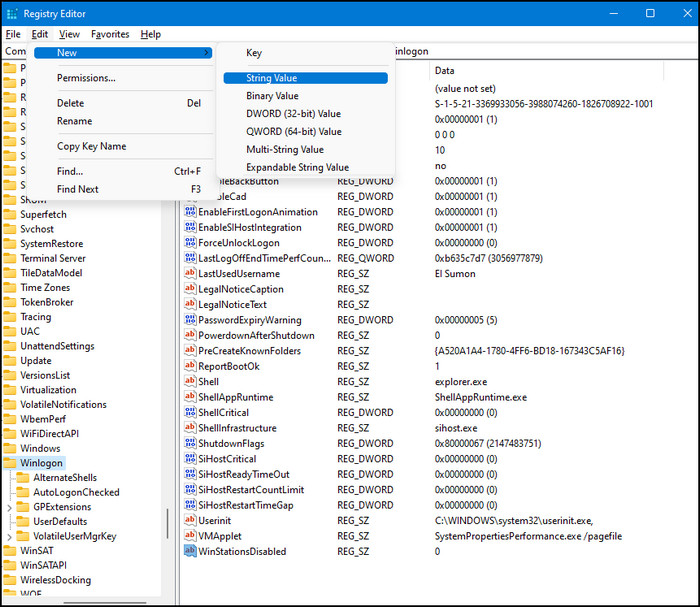
- Double click on the value and set the Value data by your user password, then click on the OK button to save the changes.
- Restart your computer to check the Auto-Login feature is working.
If you want to back to using the previous login system, just delete the AutoAdminLogon, DefaultUserName, and DefaultPassword keys you create.
You may also like to read: Show Folder Size in Windows 11.
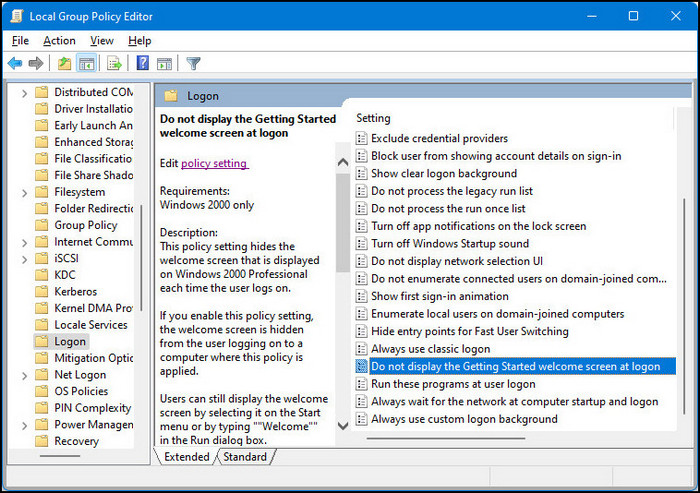
3. Use Group Policy Editor
Another effective and tested method to turn on the Auto-Login feature on your Windows 11 computer is using the Group Policy Editor.
Here are the steps to turn on the Auto-Login feature using the Group Policy Editor:
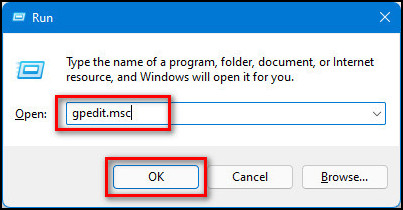
- Press Windows + R on your keyboard to open the Windows Run program.
- Type gpedit.msc and click on the OK button to open the Registry Editor window.
- Go to the following path:
- Computer Configuration > Administrative Templates > System> Logon
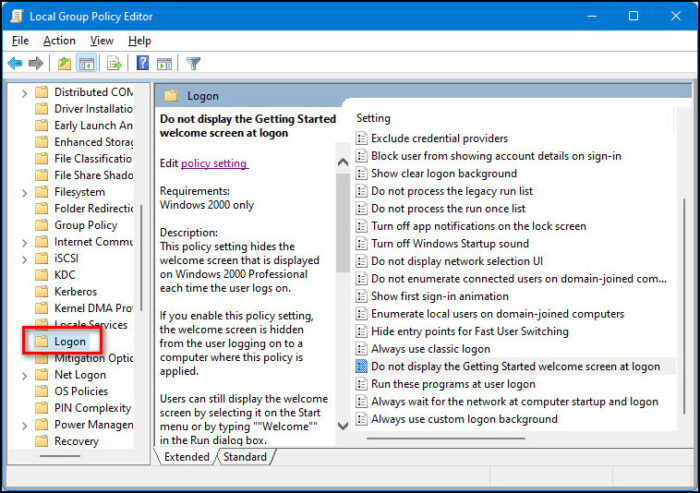
- Select Do not display the Getting Started welcome screen at logon.
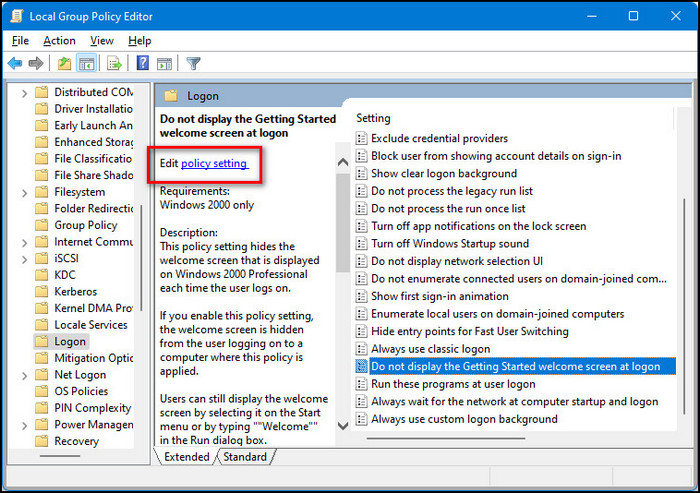
- Click on the Edit policy setting link or double-click on it to open the policy setting window.
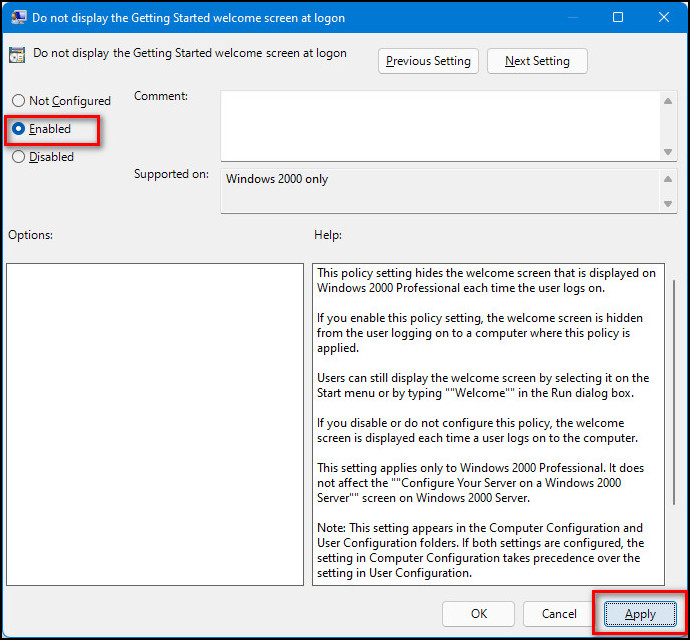
- Choose the Enabled option and click on the Apply button to save the changes.
- Click on the OK button to exit the window.
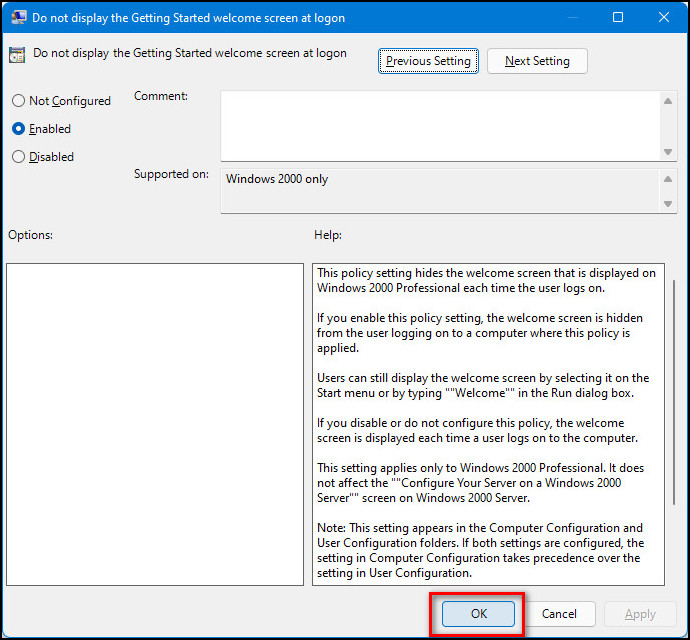
- Restart your computer to check the Auto-Login feature is working.
Here’s a complete guide on how to install VLC and Make it Default on Windows 11
4. Use AutoLogon Tool
The AutoLogon tool is another way to turn on the Auto-Login feature on your Windows 11 computer.
Here are the steps to turn on the Auto-Login feature using the AutoLogon tool:
- Download the AutoLogon tool on your Windows 11 computer from the official website.
- Extract the downloaded zip file.
- Click on the AutoLogon64.exe file to run the AutoLogon tool.
- Enter your account password and click on the Yes button.
- Enter your account password again and click on the Enable button to turn on the Auto-Login feature.
- Click on the OK button.
- Restart your computer to apply the changes and check the Auto-Login feature is working.
Final Thoughts
Whenever you turn on your Windows computer, the system asks you to enter your user password. To skip the log-in process on your Windows computer, you can turn on the Auto-Login feature.
After reading the whole post and following the steps carefully, I hope you can now turn on the Auto-Login feature on your Windows 11 computer using any methods I described.
Is it sufficient to meet your requirements?
Let me know the answer in the comments section, and share this post with your friends who need it.
If you found this post helpful, please like it, leave a comment and check out other similar posts if you’re interested in learning more about it.