Apollo landed on the moon successfully with a CPU frequency of only 2.048 Mhz.
Today’s computers have much higher frequencies and core counts but struggle to perform certain tasks with the default core count. To unlock the full CPU potential, you must enable all the cores of your processor.
Here, I’ll provide the necessary steps to tweak BIOS and activate all CPU cores on your Windows 10 PC. So, let’s begin.
How to Enable All Cores on Windows 10
Activating all cores allows the computer to perform multitasking with increased speed. You can enable all CPU cores on your Windows 10 by going to the System Configuration. The settings will give you the option to alter the default core count and select every available core.
But before changing the settings, you need to turn on the Multi Core support from the BIOS. If you’re new to the options, learn more about how to enter BIOS in Windows.
Entering the option is relatively similar for every manufacturer. Consider reading the steps below to enable the Multi Core Support for your physical cores.
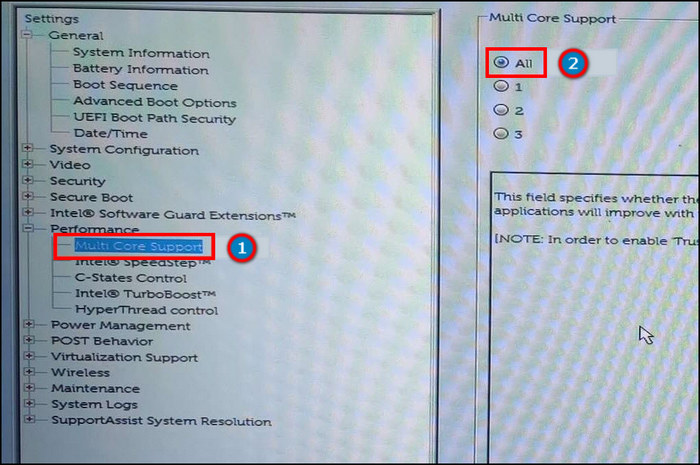
Here is the process to enable all physical cores from BIOS:
- Restart your computer.
- Press Del or F2 to enter into BIOS.
- Navigate to the Performance tab.
- Click on Multi Core Support.
- Select the radio button beside the All option.
After enabling the Multi Core Support, you need to turn on the hyperthreading. Activating the HyperThread option splits the physical cores into virtual cores and works as an independent processor.
Follow the procedures below to activate hyperthreading and increase the multitasking performance.
Here is the way to enable hyperthreading from BIOS settings:
- Go to your BIOS settings.
- Expand the Performance option.
- Press on HyperThread control.
- Choose the radio button beside the Enabled option.
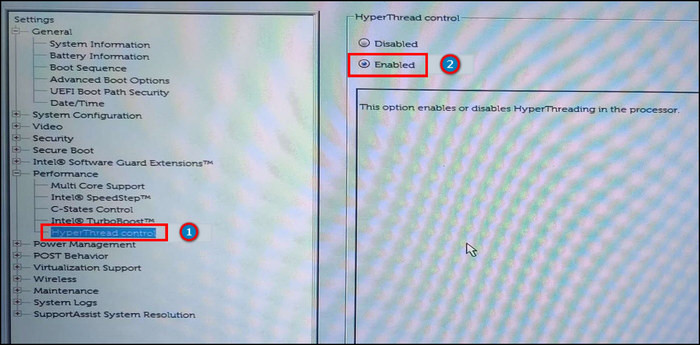
- Save and Exit from BIOS.
Enabling the Multi Core Support and hyperthreading will prepare your PC for activating all cores. If you are having problems entering the BIOS, fix the BIOS boot issue on your PC.
Read the instructions below to activate all CPU cores in your Windows 10 PC.
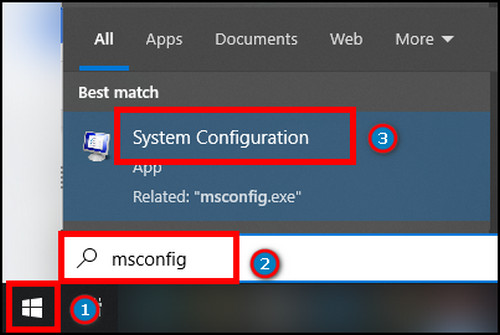
Here are the steps to activate all cores in Windows 10:
- Click on the Start button.
- Type msconfig in the search box.
- Open System Configuration.
- Navigate to the Boot tab.
- Press on Advanced options.
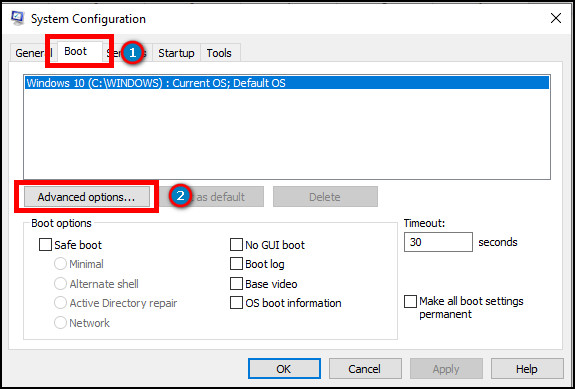
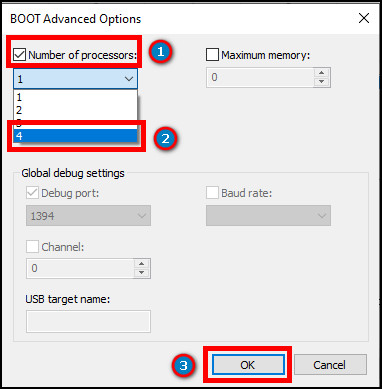
- Check the box beside the Number of processors.
- Click the drop-down menu and select the highest core number.
- Press on OK.
- Click on Apply and then OK.
Now, your PC will run all the cores and complete the task quicker than before.
Should I Enable All Cores on Windows 10?
The system automatically activates as many cores as needed to run a task. So, there is no need to enable all cores. There’s also talk about performance, battery life, and longevity. However, depending on your usage, there are some valid arguments behind keeping all cores active.
Performance is the first thing that comes to mind when using every core in your processor. In general, adding more cores means better performance for your PC. It lets you take advantage of your CPU during an intensive task, increase performance, and minimize latency.
But, greater service comes with a high price. Changing the default core counts and activating them at once will increase power consumption by a great margin. It can make your electricity bill heavier and take extra dollars out of your pocket.
In addition, it will drain your battery much faster if you’re a laptop user. And you may face difficulties when away from a charging spot.
Processors are built to last for a couple of good years. The default core settings are programmed by keeping this in mind. Having all cores working can cause the CPU temperature to jump up and down a lot and reduce CPU lifetime considerably.
But, if you are an intensive app user or a heavy gamer, enabling all the cores will help you improve your performance. And using a good CPU cooler will keep the temperature in control and extend longevity and performance.
Considering the pros and cons, activating all cores is a small price to pay for an enormous result. However, if you are a normal or moderate PC user, it is better not to enable all cores.
Frequently Asked Questions
How do I enable all processor cores in Windows 10?
To activate all processor cores in Windows 10, go to Start > type msconfig > Boot > Advanced options > check Number of processors > select highest core number > OK > Apply.
Does enabling all cores increase performance?
Yes, enabling all the CPU cores increases performance during multitasking and intensive processes.
Do cores affect FPS?
Yes, more CPU cores will improve performance and increase the FPS, especially in CPU-bound games and application.
Conclusions
The default core settings consume optimal power but take a bit before running a stressful process. This short period creates a massive gap in the outcome of some tasks.
In this article, I’ve provided a straightforward way to enable all the cores in your Windows 10 and increase the processor performance.
Don’t forget to comment in the box below, and I’ll see you at the next one.
Cheers!