While typing a document in Microsoft Word, you may want to add an extra space before the second para or a subsequent line. But why do you need to do this?
Because doing this will keep the information aligned and make it easier to read. Writers and content blog writers do this often to make the paragraph eye catchy.
Some writers add indentation in the second line to make it different from the first line in the reader’s eye. As a beginner or mid-level Word user, it’s common for you if you don’t know how to create or add hanging indents in MS Word.
To say, your lack of knowledge to create an indent is a good enough excuse to make me come up with this article. Read till the ending line to learn how to create an indentation in MS Word.
Let’s begin!
Check out the easiest way how to Enable Dark Mode in Microsoft Outlook
How to Create a Hanging Indent in Microsoft Word for Windows
Before learning how to create a hanging indent in MS Word, let’s know what the hanging indent is.
Let’s just say hanging indent is an APA (American Psychological Association) guideline for formatting your reference page. Regular lines will start from the left margin, but when you add a hanging indent in a second line, it will be indented or spaced one-half inch from the left margin.
Well, now you know what is hanging indents. Let’s jump into the main part, which is about creating an indent in MS Word. The below methods are for Windows OS Microsoft Word users.
1. Use the Indents and spacing option
You can add an indent in your paragraph or a selected line in MS Word using the Indents and Spacing option. Below are the steps to create a hanging indent in the paragraph.
Here are steps to add a hanging indent using the Indents and spacing options:
- Open the Document first and select the paragraph you want to format as a hanging indent.
- Go to Home > Paragraph.
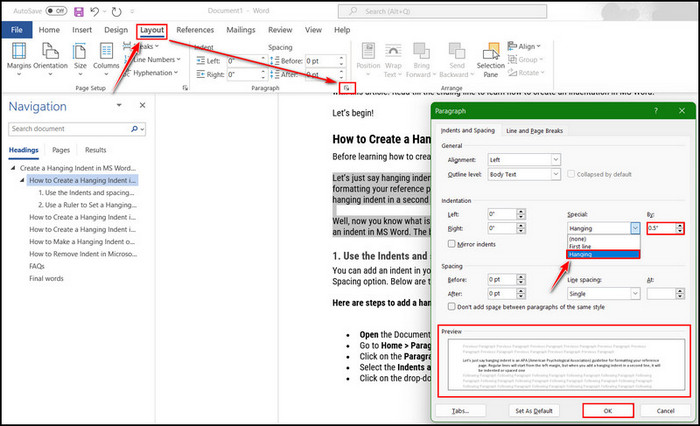
- Click on the Paragraph dialogue launcher.
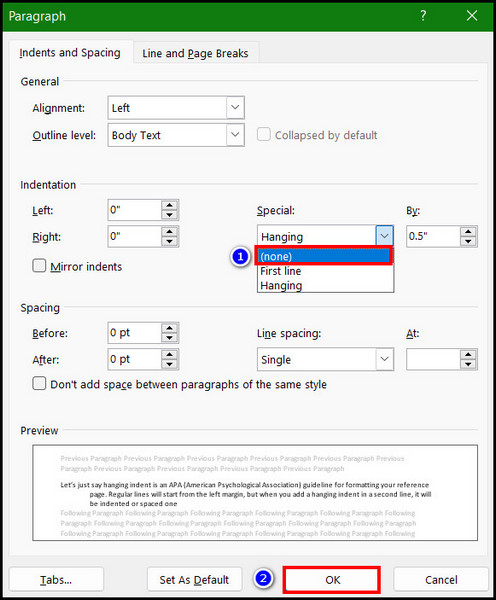
- Select the Indents and spacing tab from the Paragraph Window.
- Click on the drop-down icon and select Hanging under the Special section.
- Choose or input 0.5” from the By box. You can also choose according to your requirement.
- Check the preview of the indented text from the Preview box.
- Click on the OK button.
The paragraph you have selected has a hanging indent now. Moreover, you can also try the following method. 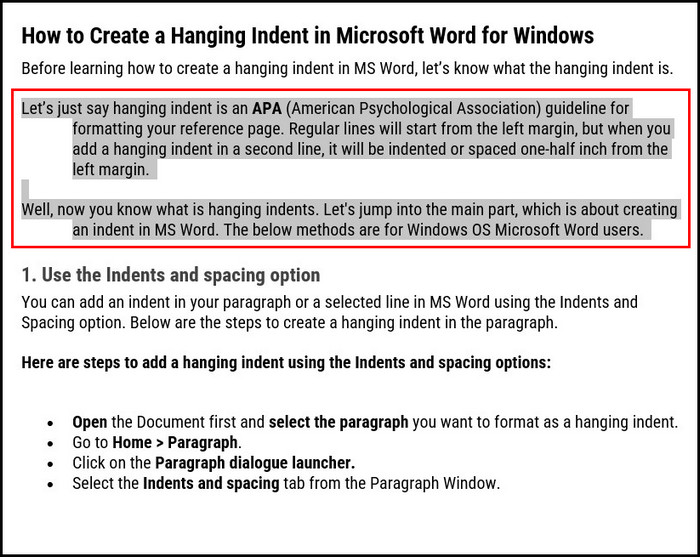
Also, check out the easiest way how to Enable Read Receipts In Outlook
2. Use a Ruler to Set a Hanging Indent
You can also add a hanging indent using a ruler in MS Word. The steps are simple as the previous one. With a Ruler, you can manually set the indent or space before the paragraph or the line.
Here are the steps to set a hanging indent using a ruler:
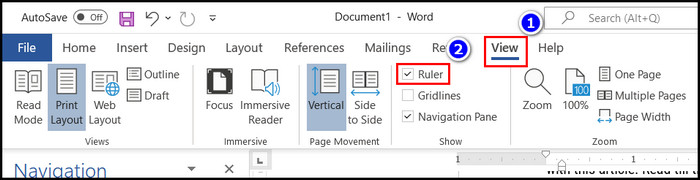
- Go to the View tab from the Ribbon.
- Check the box for Ruler from the Show group.
- Select the paragraph in which you want to add an indent.
- Take the mouse cursor to the ruler arrow buttons and Click and drag the upper side down arrow ruler button to give indent to the first line of the paragraph.
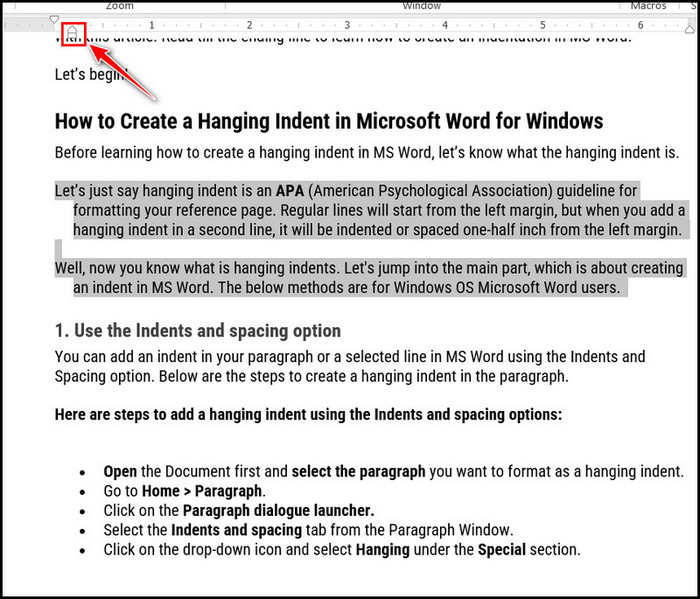
- Click and drag the middle-up arrow ruler button to give a hanging indent to the rest of the paragraph line.
- Click and move the last flat ruler button to add the left indent to all the paragraph lines.
Note: But don’t move the slider of the ruler too much. Giving a huge space before a paragraph or a line will make it look awful. Add a decent space or indent before the paragraph to make the document look eye catchy.
Now you have successfully added an indent before the paragraph. These are the methods by which you can quickly create a hanging indent.
How to Create a Hanging Indent in Microsoft Word for macOS
If you are a macOS user, you can also add an indent in the paragraph. The methods and steps are quite the same as the above Windows OS methods. Even then, take a look at the below steps to create a hanging indent in MS Word.
Here are the steps to create a hanging indent in MS Word from Mac:
- Select the paragraph to which you want to indent.
- Go to Format > Paragraph.
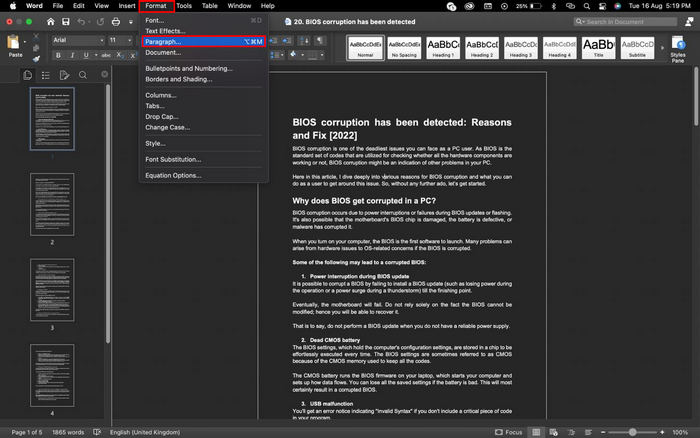
- Click on the Indents and Spacing tab and look for the Indentation section.
- Choose Hanging from the Special’s drop-down list.
- Choose 0.5’’ from the By box. It is the default indenting space value. You can change it too as per your need.
- Click the OK button to finish the Indent process.

After clicking the OK button, you will find that your selected text or paragraph has an indent now.
Follow our guide to know Outlook: Enable or Disable Macros
How to Create a Hanging Indent in MS Word for Web
Not everyone only uses the MS Office app by installing it on the PC, and some do use the Web version of MS Office. Those who want to access their Office app such as Word. Excel, PowerPoint, OneNote, etc., use the Web version.
As an MS Word Web version user, you may want to use the hanging indent. If that’s the case, follow the below steps.
Here are the steps to create a hanging indent in MS Word for Web:
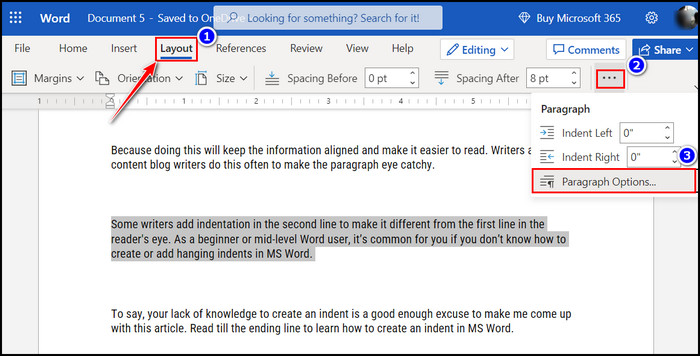
- Click on the Layout from the Ribbon.
- Click on the three-dot, the last option under the Layout section.
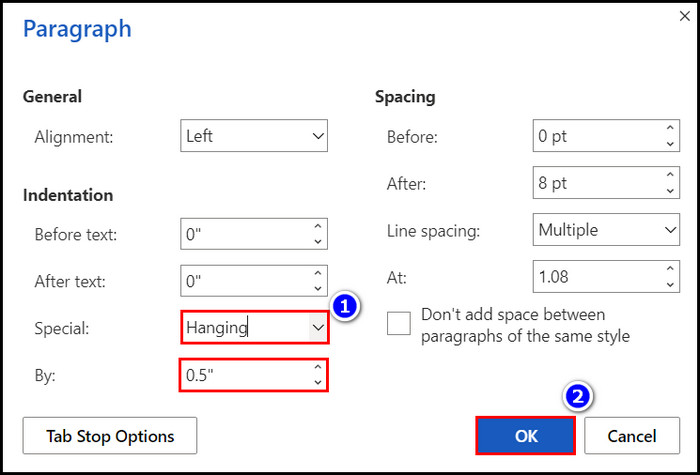
- Select Paragraph Options and look for the Indentation section.
- Click the drop-down menu of Special and select Hanging.
- Increase or decrease the space by clicking the up or down button from the By box.The default value is 0.5’’.
- Click on the OK button.
Now you will see the selected paragraph has indented except the first line. You can use the ruler option to move the first line to the right.
Here are the steps to add indent using the ruler:
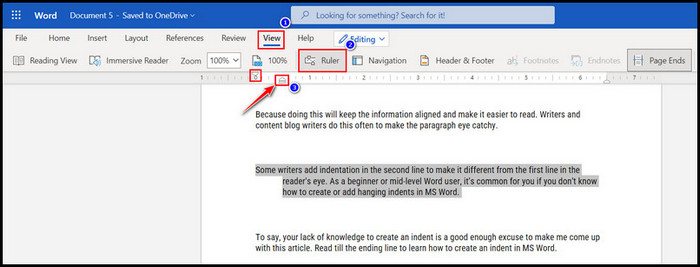
- Click on the View button from the Ribbon.
- Select Ruler to make the ruler option visible.
- Select the first line of the paragraph and take the cursor to the ruler.
- Take the mouse cursor to the ruler arrow buttons; after that button’s name will pop up. The upper side down arrow ruler button, the middle arrow ruler button, and the last flat ruler button will add the first line indent, hanging indent, and left indent consequently.
- Click and move the upper side down arrow ruler button to give indent to the first line of the paragraph.
- Click and move the middle-up arrow ruler button to give a hanging indent to the rest of the paragraph line.
- Click and move the last flat ruler button to add the left indent to all the paragraph lines.
That’s it. Now you can give an indent as you want in the paragraph. I have shown both methods to add indent in a paragraph when you are using the word web version. I hope you understood all the steps.
Check out our separate post on how to Change Client-Only Rule to Server in Outlook
How to Make a Hanging Indent on Word for iOS or Android Devices
For portability and mobility, many people use the Office app on their android and iPhones. Using the Word app’s mobile version, you might face difficulties adding indents in the paragraph.
Here are the steps to make a hanging indent on Word for Android devices:
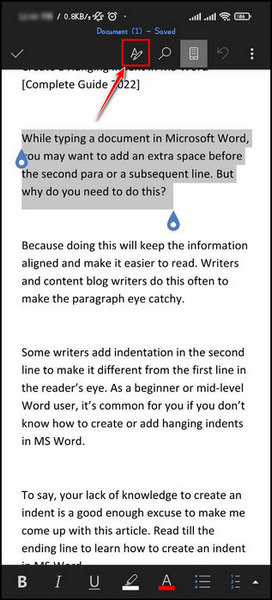
- Select the paragraph in which you want to add a hanging indent.
- Tap on the A icon from the home menu.
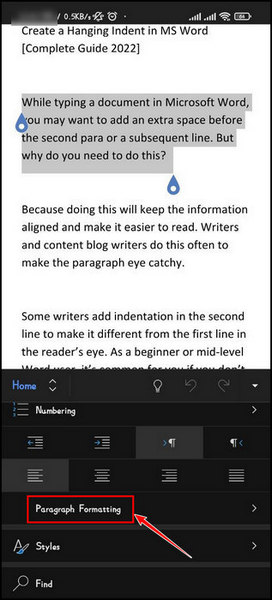
- Scroll down and tap on Paragraph Formatting.
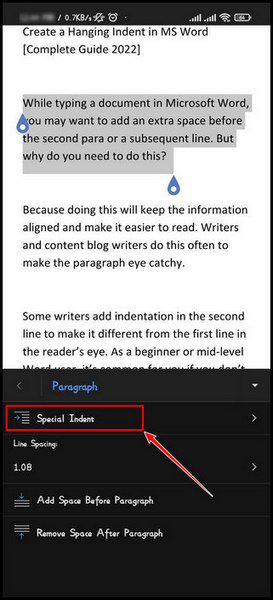
- Tap on the Special Indent and select Hanging.
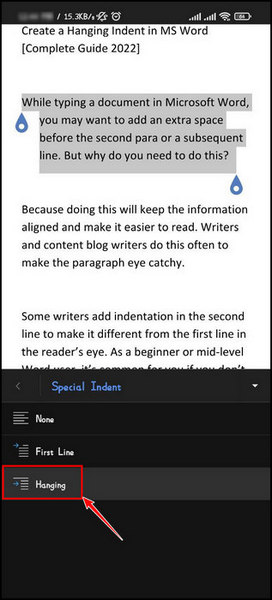
After choosing the hanging indent option, you will find the selected paragraph has been indented.
You can also do this indenting from your iPhone too. This option is also available for the iOS version of Word. Let’s take a look at the steps.
Here are the steps to make a hanging indent on Word for iOS:
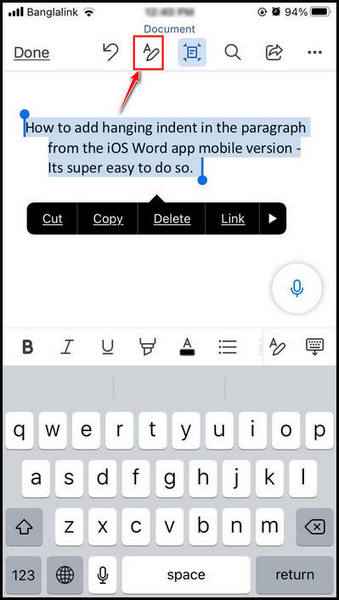
- Select the paragraph first.
- Tap on the A icon from the home menu.
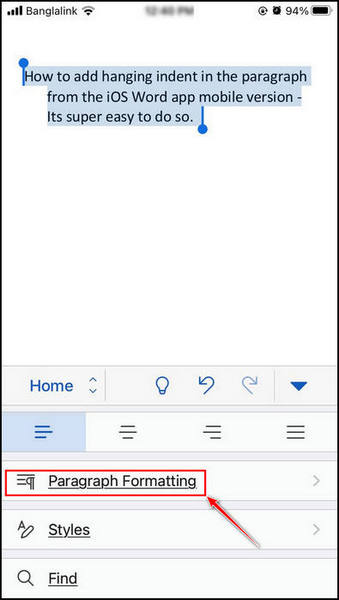
- Scroll down and tap on the Paragraph Formatting.
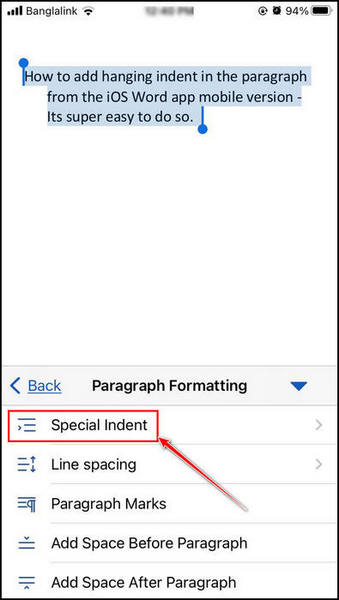
- Tap on the Special Indent and choose Hanging.
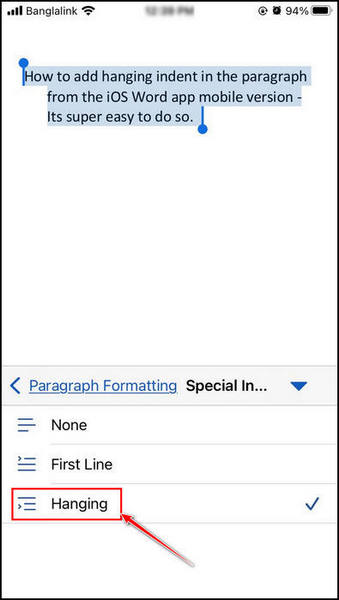
After selecting the Hanging option from the Special indent, you will find the selected paragraph has an indent now.
How to Remove Indent in Microsoft Word
Removing the indent in MS Word is like a reverse process. All you need to do is follow the backward steps to create a hanging indent.
Here are the steps to remove indent in MS Word:
- Select the paragraph from which you want to remove the indent.
- Navigate to Home > Paragraph.
- Click on the Paragraph dialogue launcher icon from the corner of the Paragraph group.
- Select the Indents and Spacing tab.
- Choose None from the drop-down menu of the Special section.
- Click on the OK button after that.
Now, you have removed the indent from the selected paragraph or text. I have told you earlier it’s just like the reverse process of creating the indent.
Related to our new guide post on how to Increase Outlook File Size Limit
FAQs
How do I apply a hanging indent in MS Word?
Select the paragraph and navigate to Home > Paragraph. Click on the Paragraph dialog launcher icon. Select Indents and hanging; then select Hanging under the Special section. Increase or decrease left margin space from By box. Click on the Ok button to finish the indenting.
What is the Windows keyboard shortcut to indent a paragraph in Word?
Press Ctrl+M to indent a paragraph in Windows OS. You can also remove the indent by pressing Ctrl+Shift+M.
What is the Mac keyboard shortcut to indent a paragraph in Word?
Press Ctrl + Shift + M from your mac keyboard to indent a paragraph in the macOS Word version. To reverse the hanging indent, just press ⌘+Shift+M.
What’s the hanging indent in an APA Format?
Hanging indent in APA format means that the first line of each entry is left aligned, while the second and subsequent lines are indented. The default MS Word indent spacing is 0.5’’ or 1.27cm.
Final words
Hanging Indents can represent a paragraph or a text differently and more meaningfully. Writers also use this indent for bulleted and numbered lists.
The main purpose of using the hanging indent is to keep the paragraph in a different alignment so that readers can understand that easily.
If you have read the article from top to bottom, you know how to create a hanging indent and remove it.
For further assistance, let me know in the comment box. See you at the next one. Peace out!