Let me lay it out.
You see an error message that says ‘BIOS corruption has been detected,’ and now you don’t know what to do about it.
If that is the case for you, you have come to the right place.
I will show you how to get rid of the warning and fix your computer correctly. So you will not see the message again in the future.
Before that,
What does ‘BIOS corruption has been detected’ mean?
Keep reading the whole post to learn in detail.
Check out our separate post: Gigabyte BIOS ID Check Error
What Is BIOS Recovery?
BIOS recovery is the process of fixing the BIOS from a corrupted state. BIOS recovery is usually made by resetting the BIOS, updating, or reflashing the BIOS. Often, the corrupted BIOS is irrecoverable, and the user needs to replace the BIOS chip or the whole motherboard.
BIOS means Basic Input/Output System. It is software or firmware that runs before anything else when you power on the device.
BIOS initializes the hardware and provides runtime services for the operating system or the OS.
In a nutshell, it is the first software to run that helps the hardware and the operating system to boot and work correctly.
If the BIOS gets corrupted for some reason, it will not run correctly, which will affect both the hardware and the operating system.
You might not be able to use hardware or even boot into the operating system with a corrupted BIOS. It depends on how the BIOS got corrupted.
So fixing the very first layer of your computer, the BIOS, is critical. In the worst-case scenario, your motherboard may be permanently damaged or bricked, and you need to buy a new one.
The following section will guide you through the possible fixes of a corrupted BIOS.
Follow our guide to fix CPU Fan Not Detected in BIOS
How To Fix BIOS Corruption Has Been Detected
BIOS can get corrupted due to many reasons. Whatever the reason is, there are some ways you can try to fix the issue.
The fixing methods differ slightly between motherboard manufacturers but are generally the same. Also, some manufacturers have special workarounds to fix the issue.
So I have put up some fixing methods, some of which are manufacturer-specific, and the rest are applicable for all manufacturers.
Here’s how to fix BIOS corruption:
1. Use the Dell BIOS recovery tool
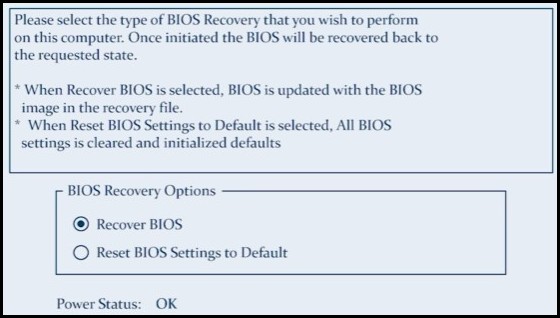
If you are using a Dell computer, it has a way to detect a BIOS corruption and automatically takes you to a BIOS recovery tool. The software is known as BIOS Recovery 3 (BR3).
The older BIOS Recovery 2 (BR2) does not have the auto-detection feature. But you can use it manually to fix the issue.
The BIOS auto-recovery Dell helps you fix a corrupted BIOS by using a recovery file stored in the primary hard drive or external USB drive.
Check out the easiest way to fix M.2 SSD Not Showing Up In BIOS.
Here’s how to use it:
- Make sure your desktop has a constant power supply. Power disruptions may permanently damage the motherboard. If you have a laptop, make sure at least 10% battery is left and the AC adapter is unplugged.
- Turn off your computer.
- Make sure you have a USB or PS2 keyboard connected to a desktop. There is no assurance all Bluetooth keyboards will work in BIOS. If you have a laptop, the laptop keyboard will suffice.
- Turn on your computer while pressing the CTRL and ESC keys. Keep pressing the keys until you are taken into the BIOS recovery tool. If you have a laptop, plug in your AC adapter right after turning on the laptop. You need to plug in the AC adapter for Alienware laptops right before turning on the laptop.
- Select Reset NVRAM (if you see it) and press enter.
- Select Disabled and press enter. It will save the current BIOS settings.
- Select Recover BIOS and press enter. The BIOS recovery process will now begin. It may restart a few times.
Once the recovery process completes, you should be able to boot into your operating system successfully without any BIOS corruption message.
2. Use Gigabyte backup BIOS feature
A lot of Gigabyte motherboards come with a BIOS backup feature. Gigabyte calls it the Dual BIOS.
Here, the motherboard keeps a backup of the BIOS for uncertain events like BIOS corruption.
Usually, it will automatically detect a corrupted BIOS and boot from the backup BIOS to fix things for you.
But if it doesn’t boot from the backup BIOS automatically, you can do the following:
- Turn off the computer.
- Press and hold the power button until the computer turns on and then turns off again.
- Press the power button to turn on the computer again. Now it should boot from backup BIOS.
Go through our epic guide on how to Fix Keyboard Not Working In BIOS
3. Use HP BIOS Update feature
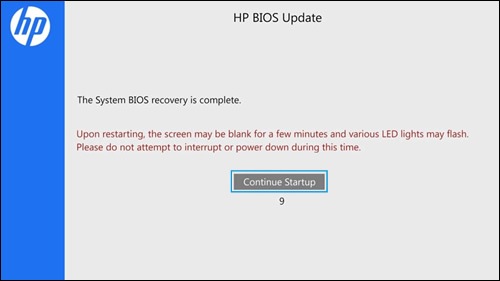
If you use an HP computer, there is an HP BIOS Update feature.
The HP BIOS Update feature will detect any BIOS issues during boot and offer you to update/reflash it to make the BIOS work again.
But before that, you should go through a power reset first as a safety measure.
Here’s how to do both of it one after another:
- Turn off the computer.
- Unplug all external devices and power cords.
- Press and hold the power button for 30 seconds.
- Plug the power cord.
- Press the power button. The device will turn on now. The power reset has been done. Sometimes it fixes the issue. If it doesn’t, keep following the next steps.
- Turn off the computer again.
- Plug the USB keyboard if you have a desktop.
- Press and hold the Win+B (Windows key and B key) simultaneously.
- Press and hold the power button for 2-3 seconds while holding the Win+B keys. After 2-3 seconds, release the power button but keep holding the Win+B keys. If you press the power button for less than 2-3 seconds, it will boot into Windows, and you have to repeat from the beginning. If you press the power button for more than 2-3 seconds, the computer will turn off, and you need to start from the beginning.
- Keep pressing the Win+B until you are in the HP BIOS Update menu or hear beeps. It will take around 40 seconds to do so. If you do not see any of them after 40 seconds, press the power button for once. Then immediately press Win+B keys repeatedly until you hear beeps or see the BIOS Update feature.
- Wait until the HP BIOS Update feature fixes the BIOS.
Now you should boot back into Windows without any BIOS corruption message.
If you cannot use the HP BIOS Update feature after many tries, it indicates that the feature is absent for your motherboard, or there is a hardware defect, and you probably need to replace the motherboard.
Do check our latest post: BIOS Application Error 501
4. Update the BIOS
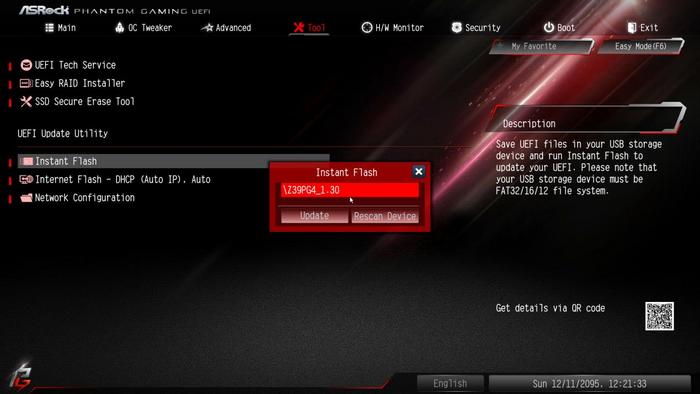
If you can boot into the BIOS, you can update it or reflash it to fix the corrupted BIOS.
Here’s how to do it:
- Search online using the motherboard model name for the latest BIOS. You will get the latest stable BIOS from the manufacturer’s webpage for your motherboard model.
- Download the updated BIOS file.
- Read the instructions for updating the BIOS. You will get the instructions from the manufacturer’s website for your motherboard model. It will vary between different manufacturers and models.
- Copy or flash the updated BIOS file into a USB drive as instructed by the manufacturer.
- Boot into the USB drive or use the computer BIOS to flash the updated BIOS from USB (as per the manufacturer’s instructions).
5. Remove the dedicated GPU
If you have a desktop with a dedicated GPU, you can temporarily remove it. If you have an integrated GPU with the CPU, you will boot into the PC and check if the BIOS corrupt message vanishes.
Do the following:
- Turn off the computer.
- Unplug the power source.
- Open the PC case and remove the dedicated GPU. You can follow online videos on how to remove a dedicated GPU.
- Put on the PC case.
- Turn on the PC.
- Check if the BIOS corrupt message went away.
If there is no BIOS corruption message, the problem is fixed. Now you can turn off the PC, attach the dedicated GPU, and use it.
6. Reset BIOS
If you can boot into the BIOS, you should reset the BIOS to fix the issue.
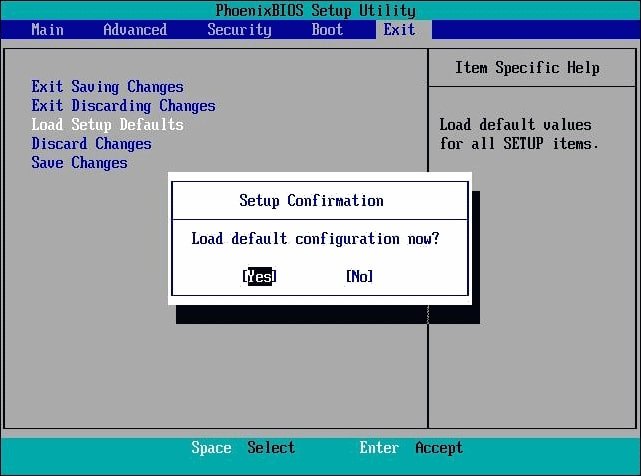
Depending on the manufacturer, there will be different synonyms for reset, like Restore Factory Defaults or Load Setup Defaults, etc.
Find the appropriate option, then select it to reset the BIOS. After the reset process completes, restart the computer, and it should now work flawlessly.
7. Remove the CMOS battery temporarily
Removing the CMOS battery temporarily worked for some users.
Here’s the process:
- Turn off the computer.
- Unplug the power source. If it is a laptop, remove the battery as well.
- Open the PC case/laptop back panel.
- Locate the CMOS battery on the motherboard. It is a small round battery about the size of a quarter.
- Remove the CMOS battery carefully.
- Wait for around 20 minutes.
- Put the CMOS battery back in.
- Put back the PC case side panel/ laptop back panel.
- Turn on the computer.
- Check if the issue is fixed or not.
If the above method does not work, you can replace the CMOS battery with a new one.
8. Replace the BIOS chip or motherboard
Some motherboards have slotted DIP or PLCC BIOS chips, whereas the others have soldered BIOS chips. If it’s the former, you can replace the BIOS chip and install a new one. If it’s the latter, you need to replace the whole motherboard.
Replacing the BIOS chip can get technical. You need to buy a new BIOS chip compatible with the model and manufacturer of your motherboard.
Also, it may require the new BIOS chip to be programmed like the old one. Thus the process is a bit involved and not for everyone.
On the other hand, replacing the motherboard is more straightforward.
You can buy the same or a compatible motherboard from online sites like Amazon, eBay, or Newegg. There are many guides online on putting a motherboard into a PC case and connecting all components correctly.
If it’s a laptop, replacing the motherboard can be challenging and require a repairer or technician to avoid trouble.
What Can Cause BIOS Corruption?
Power disruptions or failure during BIOS updates or flash is the primary reason behind BIOS corruption. Other causes are a defective BIOS chip or flash memory, a CMOS battery that cannot hold the charge, or a computer virus/malware designed to corrupt BIOS.
BIOS is the first software that runs when you boot up the PC. If it gets corrupted, it can lead to many issues ranging from hardware to software (OS-related).
The following reasons can cause BIOS corruption:
- Power failure or disruption while upgrading or flashing the BIOS. Many motherboards have a backup or a recovery ready for such a case. But that is not always the case.
- A defective flash memory/ROM. It might get worn out over time and start to malfunction, and flashing the BIOS again can fix the issue temporarily.
- A computer virus/malware that attacks the BIOS. The BIOS might get flashed incorrectly or might be corrupted intentionally.
- A dead/defective CMOS battery. The CMOS battery can run out of charge and cause the configuration settings to alter, resulting in BIOS corruption.
FAQ
Question: Can BIOS update damage motherboard?
Answer: Yes, BIOS update can damage the motherboard if there is a power cut or disruption during the update. It will result in an incomplete update resulting in the BIOS getting corrupted, and eventually, the motherboard becomes useless.
Final Thoughts
The ‘BIOS corruption has been detected’ is an important warning message. BIOS is the first program that runs on the computer and allows hardware and operating system to run.
So, a corrupted BIOS can lead to hardware damage or an OS issue.
BIOS recovery can fix the corruption quickly. If the BIOS recovery option is unavailable, your PC might need a motherboard replacement.
this is very resourceful, thank you so much.
i came for one solution but i met several.