So, you have bought new RAM sticks but do not know in which slot to install them? If that’s the situation, then you don’t have to worry. You’ve come to the right place.
As an experienced PC builder, I am here to guide you in installing your RAM in a perfect way so that you get the ultimate performance you’ve always cherished for.

Now the question is, which RAM slots to use?
Are you still confused and want to know about proper RAM installation in detail?
Then don’t look around and continue reading the article.
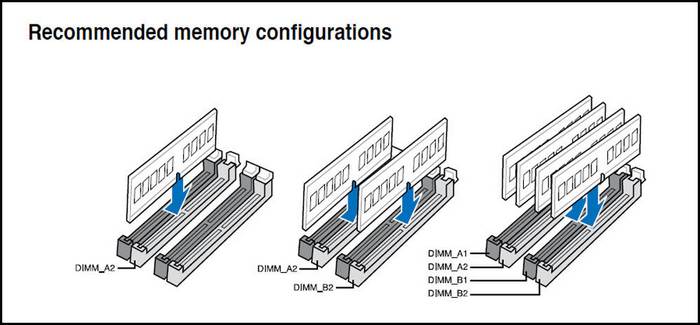
Which RAM Slot Should You Use?
In this part, I’ll explain which slot to choose according to your available RAM stick.
Whether you have a single RAM or multiple sticks you’ll know which slot will be perfect for your motherboard.
For a Single Stick
If you are planning to install a single RAM, then you don’t need to worry that much. At first, check how many slots are available. If one slot, then you just have to install it in there. If multiple slots are available, check your motherboard manual.
If no instructions were given in there, you can install it wherever you want to.
But, before installing make sure you’re installing the correct RAM compatible with your previously installed sick.
For Multiple Sticks
When it comes to installing more than one stick, you have to remember some important factors like colored slots, motherboard compatibility, and RAM module.
If your motherboard has multiple RAM slots, there might be a possibility that the slots are colored differently. Suppose, you are using a quad-channel motherboard and you are using the colored slots. Now, if you upgrade RAM use the other slots.
But, If your motherboard doesn’t contain color protocols, just read the manual and install RAM according to that.
How to install RAM
So, you know which slots to use for your RAM and you’ve bought a new one to improve your PC performance. The next thing you need to do is to install the stick on your motherboard.
But, You don’t know how to do that? No worries, After reading the next steps, you can perform the action just like an expert.
Installing RAM
Installing RAM is not the hardest thing to do. But, doing it carelessly can cost you. So, I’ll recommend you to read this manual properly and follow it accordingly.
Before installing you need to understand which RAM channels to use along with a few other things. I am providing the list of those preparation tasks.
- Make sure your computer is powered off.
- Lay the computer case to access properly.
- Remove the dust from your motherboard.
- Avoid yourself from static electricity.
- Try not to touch the connectors with bare hands.
When you are sure about those actions, then you can proceed to the next steps.
Here’s how you can install RAM:
- Locate the correct slot for single channel: If you are using a single channel stick, check the label printed on your motherboard to locate socket 1 (also known as socket 0). Try using the slot next to your processor. If that’s not available, use the next one.
- Locate slot for dual channel: If you’re using two memory sticks, and your motherboard has four slots available, try to avoid installing them next to each other. Try combining them like (!+3) or (2+4). It will help them perform better.
- Follow slot order: It is important for you to make sure you install RAM in sequence matching to those sockets.ALso make sure the RAM you install is the same in qualities like same type, same capacity, the same chip. Following these can solve the ‘interleaving‘ problem in the long run.
- Open RAM slot: Before installing, you need to unlock the RAM slot. You can do that by unlocking a small clip on the motherboard’s socket. It depends on your motherboard’s model whether you need to unlock one clip or two. Unlocking clips are easy, You will need a firm push outwards. Remember, Don’t push too hard. You might break the clip by doing so.
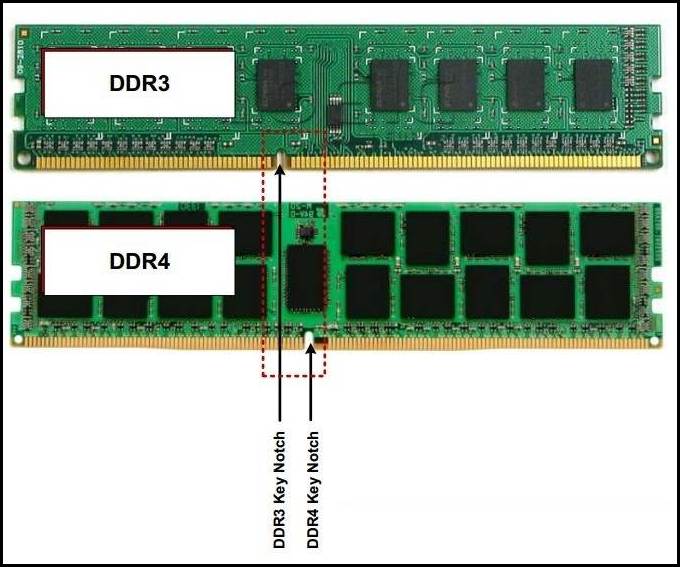
- Insert RAM stick: Remove your modules from the box. Don’t touch the exposed circuitry (the green boxes) unless you have to. Match your RAM’s cutout with your motherboard’s cutout exactly.Double check before pushing it inside. That’s right, after matching properly, you will have to push the stick to your motherboard till you hear the sweet ‘click’ sound. But remember, when you are inserting, push your RAM from top to down in order to install it properly.
- Verify the socket is locked: Make sure you have installed the memory stick properly. Check again if the socket is locked like it was earlier ( before opening the slot). This process is just for caution. If you insert RAM properly, then you will be able to feel the sound of locking and you won’t need rechecking. But, It’s always wise to confirm.
If you have performed these steps appropriately, then close up your computer case, plug every wire you need and turn your computer on. You might need to restart your computer for a few times in order to make your motherboard recognize the changes.
If your computer doesn’t work properly, don’t panic. Let it run for a few moments and restart. It will work just fine.
Is My RAM in the Right Slot?
If your RAM sticks are already in the slots, you can check if they are at the right place.
Don’t know how to do that? Do not worry. I’ll explain the process.
Here’s how you can check if your RAM is in the right slot:
Method 1: Use Windows Task Manager
Through this method, you’ll have to check your available memory slot using windows task manager. Follow the next steps properly.
- Open task manager: Type ‘Task manager’ in windows search box and open the first result showing on. Or right click on your taskbar and select ‘task manager’ from the list.
- Open performance tab: When the task manager opens, click on the ‘performance’ tab. You’ll notice a list including CPU, Memory, Disk and so on.
- Click on ‘memory’: From the list, Click on ‘memory,’ and you’ll notice on the bottom right corner, there should be a section named ‘slot used.’
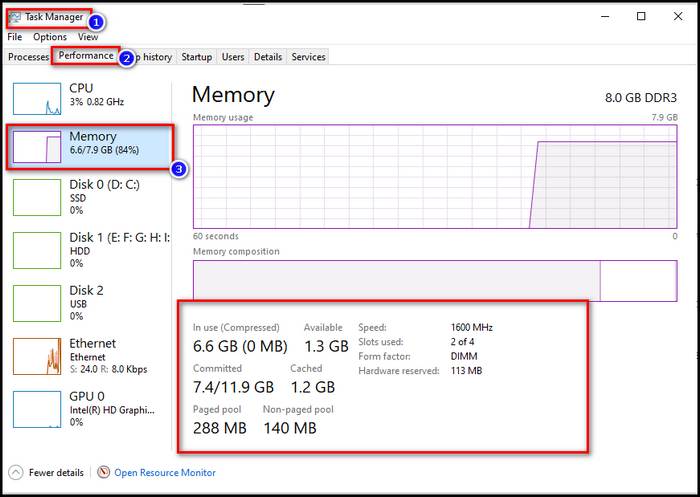
From there you can always know how many slots you’ve used and how many are available for you to use.
The top-end diffusion that the LEDs offer is world-class. Check out some of the best 4000 MHz RAMs for a faster gaming experience.
Method 2: Use CPU-Z Utility
If you are confused with the first method, you can use this commonly used utility and check your memory slot easily.
Just download and install the software and follow my instructions.
- Open CPU-Z: Double click on the software icon to open.
- Click on ‘SPD’ tab: After opening the software you’ll notice multiple tabs on your screen. Click on ‘SPD’ from there.
- Select ‘memory’ Section: After opening the ‘SPD” tab, click the down arrow key to open the ‘Memory slot selection’ Section.
You’ll notice all of the memory slots are listed in the drop-down menu.
Now, you can get to the part where you can learn the process of installing RAMs inside your computer.
Conclusion
Since you have read this article from top to bottom, now you have the knowledge and understanding of RAM slots and how to install RAM.
Now you can inspect the slots of your computer and you can buy suitable RAM for yourself. Moreover, you can now install a RAM properly like an expert.
Feel free to ask any questions regarding this article.