An SSD is the best upgrade for any computer due to its fast access times. But that also means the applications stored on a slower HDD will open slowly as before. Does that mean you have to invest in a larger SSD if you want all your apps to speed up?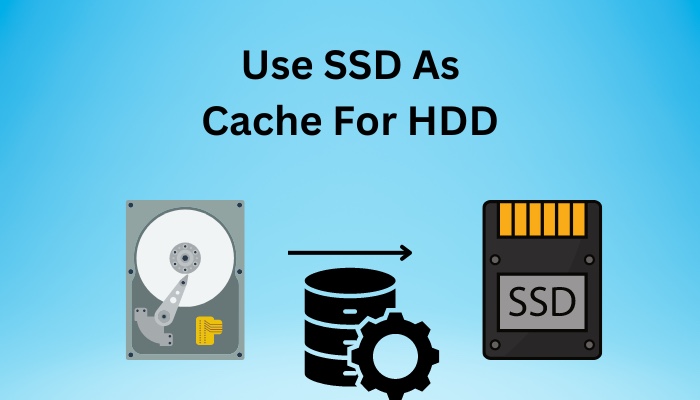
Not exactly. Storing the frequently used files to an SSD will result in the same snappiness with a slow-moving HDD.
So, tag along as I set up an SSD cache.
What is SSD Caching?
SSD caching refers to storing files temporarily on a fast solid-state drive which normally resides on a hard drive. That way, when you want to access a file from an HDD, accessing it from SSD is very quick.
SSD caching helps you when you have many files on a hard drive. Normally opening it will take a long time. In that case, the SSD cache will act like a nitrous boost working in tandem with the old drive.
But how does the caching work?
When a program needs data, it first looks at the RAM to see if it has loaded it. The next stop is at the disk drive where the application is installed.
For hard drives, the access time is extremely slow. This has everything to do with how they are designed to store data. A lever seeks the mechanical disk drive until the data is found. As you can expect, this process is extremely slow.
In the case of an SSD, the files are accessed at a much higher rate than HDDs. This is due to the presence of flash-based storage. So if you set an SSD as an intermediate stop in this process, you will require less time to do any activity, let’s say, open an application.
This diagram perfectly shows how an SSD cache positions itself when a data request is made.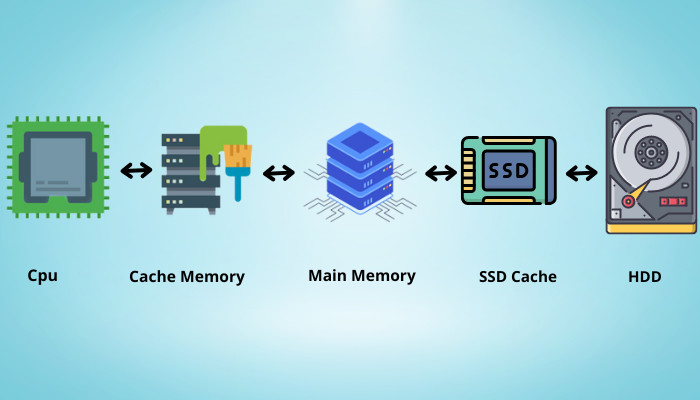
SSD caching improves the system’s responsiveness across all workloads whether be it reading files or loading Windows from a cold boot.
Are you wondering if you can repurpose an old laptop’s hard drive? Read our fantastic piece that explains how to do so.
How to Set Up SSD as a Cache for HDD
There are different softwares to configure SSD cache for Intel and AMD.
For Intel processors, you have Smart Response Technology (SRT) and Intel Optane. Similarly, the AMD processors use the Store MI app to set the aforementioned cache.
But the big issue prevalent on both these platforms is the support for the app. Just because you have an Intel processor does not guarantee you can use the SRT app. Only a handful of processors, along with motherboard chipsets, guarantee this.
So, let’s start setting up the SSD cache.
For Intel Systems
There are two ways of enabling an SSD cache on your Intel system. First, use Intel’s Smart Response Technology app with your existing flash-based drive. Secondly, purchase an Intel Optane SSD and use its proprietary software.
Due to falling SSD prices and a majority of PC users using a solid state drive purely as their boot drive, SSD caching is getting less popular daily. We will evaluate whether it is worth using it in a later section.
We will go through both ways of enabling SSD cache with Intel systems.
For the SRT app, an Intel second-generation processor or newer is required. And, when using Intel Optane, you must have an Intel 7th processor or newer. For both cases, the underlying approach is similar.
Take a look at a detailed recommended specification from Intel’s website below.
| Processor | Intel 2nd gen and upwards |
|---|---|
| Chipset | Intel Z68, H77, H87, H97 |
| SSD Size | Minimum 16 GB |
| Interface | RAID 0/1 |
Before setting up the SSD cache, you must set the SATA Configuration as RAID from the BIOS. Now every computer has a different name for this setting, but you can find this inside Advanced or SATA Configuration.
To do this, enter the BIOS by pressing the DEL key. Next, go to Advanced > Integrated Peripherals > SATA Mode > RAID.
Once this is done, let’s set up the SSD cache for an SSD different from Intel Optane.
Here are the steps to enable SSD cache with Intel Smart Response Technology:
- Download the Intel SRT app and install it.
- Open the app.
- Click Enable Acceleration under Accelerate.
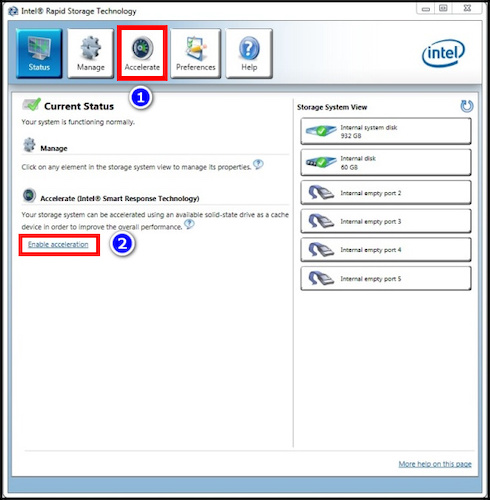
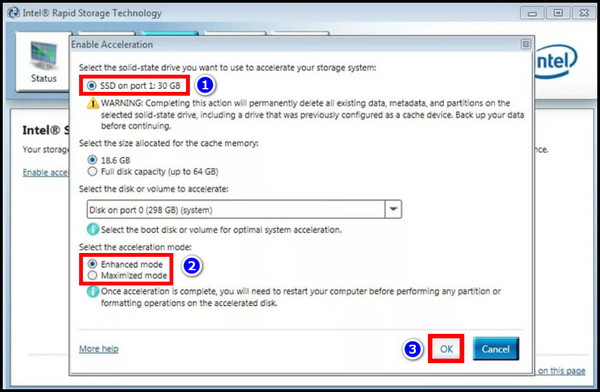
- Next, select the SSD and allocate the size as a cache.
- Then, select Enhanced or Maximised mode.
- Finally, Select the Ok button.
Now, restart your computer. The app will load all your frequently used files and apps on to the SSD. Once the caching is done, the applications will start to speed up.
Also, check out our separate post on how to access files on SSD.
Now, let’s go through the steps to set an SSD cache using Intel Optane.
Follow the steps to set up Intel Optane:
- Download Intel Optane Management and install it.
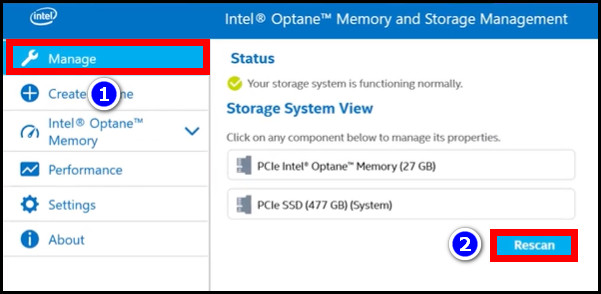
- Go to the Manage tab and press the Rescan button. This scans all the drives, including the Optane, internal SSD and HDDs.
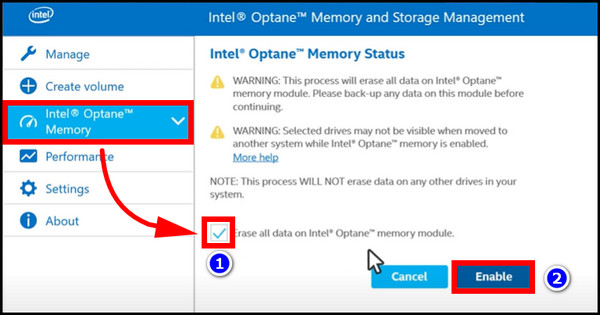
- Click on Intel Optane Memory, present on the left tab.
- Now press the Enable Intel Optane Memory button. Make sure the app correctly identifies the Optane drive from the list. You can also select from the dropdown list if not correctly identified.

- Next, check the tickbox and press the Enable button.
- When the configuration is done, press the Restart button.

You will not feel the snappiness of opening applications instantly. As you restart the computer and continue using different applications, they are copied to the SSD cache. That is when you will see the magic unfold, and the apps will start loading from the fast Optane drive.
Quickly check out our epic guide on how to move games HDD to SSD.
For AMD Systems
The StoreMI app is not available for every AMD processor. It only works on the Ryzen platform with a handful of pre-selected motherboard chipsets. If you are on older architecture, let’s say Bulldozer, the official app will not support it.
Let’s look at the minimum requirements to run AMD Store MI:
| Processor | AMD Ryzen 2000 and newer |
|---|---|
| Chipset | AMD X570, PRO 565, B550, A520, TRX 40 and WRX 80 |
| SSD Size | 32 GB and higher |
| Interface | AHCI |
For configuring StoreMi, you must set the SSD in AHCI mode from the BIOS. To do this, navigate to Integrated Peripherals > OnChip SATA Type > AHCI.
Follow the steps to set up the SSD cache on AMD:
- Download AMD StoreMi and install it.
- Click on Create Bootable StoreMI.
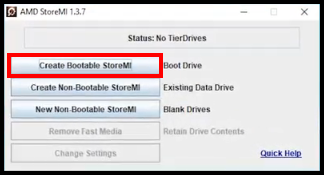
- Select the SSD from the list and select Transform.
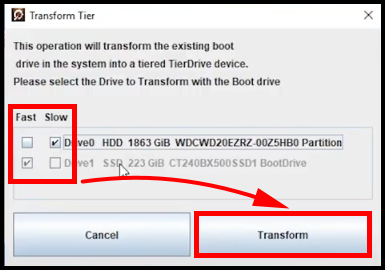
- Click on Create.
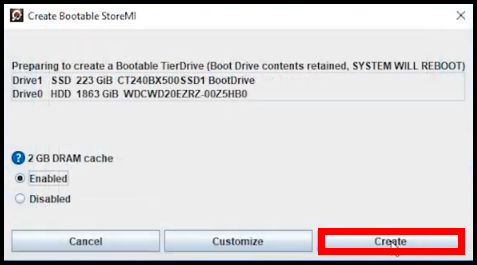
Restart your computer to see the changes taking place.
Performance Benefits With SSD Caching
So, do we finally get an improved performance on our system using an SSD cache? This section will shed light on this.
I have used an AMD Ryzen setup to test the SSD caching. The results will be very similar to an Intel system, so I have not focused on that part.
As on the test bench, I have used a Ryzen 5 2600x processor with an AMD X470 motherboard. Two sticks of 8 RAM on a dual-channel configuration are also present. For the GPU, we have an RTX 2060 on board. And we have Samsung 860 EVO SSD along with a WD 2 TB drive on the storage front.
On to some benchmarks, then.
I have CS: GO, GTA5, and PUBG to test out the loading times of the games.
First up is Counter Strike Global Offensive.
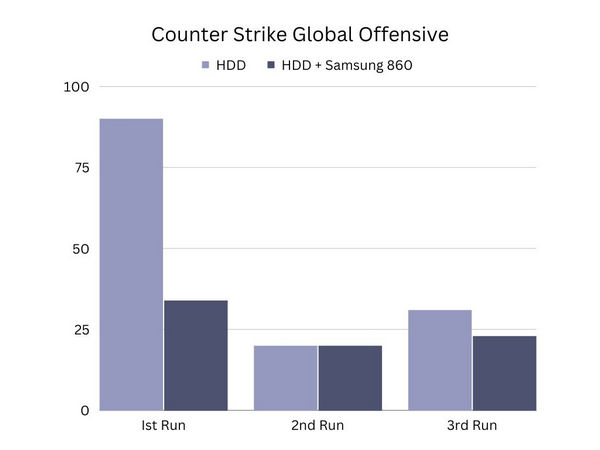
With the HDD, the loading time decreases dramatically with the second boot. As for the SSD cache, the loading times decrease right on the first run, with time decreasing with even further loads.
Next on the list is PUBG.
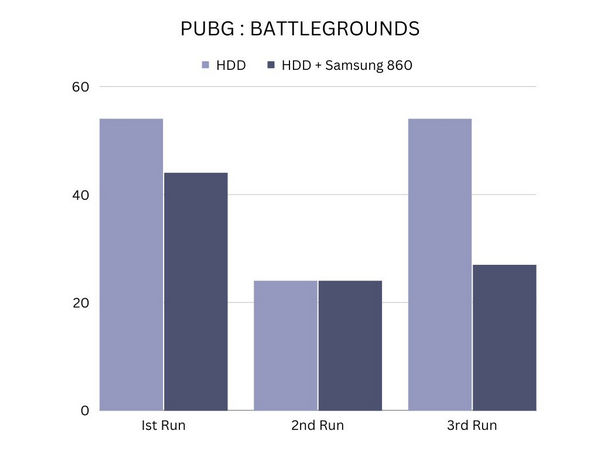
With PUBG, loading it for the first time takes longer with both the HDD and the SSD cache. However, during subsequent runs, loading times are decreased with SSD caching while the HDD takes a hit. And we see improved performance when loading the game after restarting the computer.
The last on the game list is GTA 5.

GTA 5 benefits after subsequent loads for both the HDD and SSD caching, but the gains are smaller than before. This also has to do with the game being an enormous 120 GB in size.
As an open-world game, the various sections of the map would load, resulting in the cache file being replaced by newer files. So, you are not really benefitting unless you use a huge SSD purely for caching.
Now onto some application benchmarks.
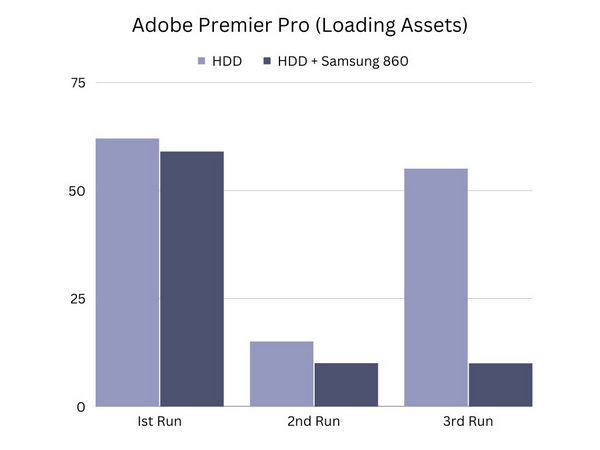
With Premier Pro, we do see a massive increase in loading times on subsequent reboots. The SSD caching really seems to be working here.
So what conclusions can we really draw from the results?
The performance gains are substantial for applications that you use often. And if the applications are smaller, you get fewer loading times, as we saw with GTA 5. The SSD cache really shines when the app learns your usage patterns and copies that data on the SSD.
Now, should you use an SSD cache? Not really, at this point.
These days, SSDs have come down in price to such a level that you can even buy a drive that can parallel an HDD in terms of capacity. And that will always be faster than an SSD cache.
For older systems, even a cheaper 120 GB SSD can provide a nice speed boost. So SSD caching, while useful, is not recommended at this point ‒ unless you get an Optane drive for dirt cheap prices.
Follow our easy step-by-step guide to use an internal SSD for external Storage.
Final Words
In this article, I tried to explain how you can set up an SSD cache irrespective of the processor you use. You can try this out if you have spare flash storage lying around.
So, what are your thoughts on SSD caching? Do let us know in the comments.
Until next time it’s goodbye.