So you finally got an SSD and booted Windows to it. But after restarting the computer, the OS fails to load. You get an error showing Windows cannot load from the device. So what has really gone wrong?
Misconfigurations in BIOS can lead to this, which you can easily fix by going through the solutions mentioned in this article.
Without further ado, let’s start.
How to Fix When Unable to Boot From an External SSD
Before fixing the boot issue, let’s take a moment to revisit why the issue prevails in the first place.
When you connect an SSD to a computer, that is primarily through the SATA port or the M.2 slot. As these devices are directly connected, the BIOS should recognize them immediately and boot from them if configured that way.
For USB drives, the BIOS first recognizes the USB 2.0 ports first. That way, if an external SSD or HDD is connected to a USB 3.0 port, it will bypass that. And hence any operating systems loaded into it will fail to start.
Also, the boot priority order can prevent booting from a USB SSD. If the USB device is not set to the highest priority, it will not load up Windows.
So, how can you fix these issues? It’s quite simple, actually.
Just go through the solutions below one by one in the same order and implement them on your computer.
Check our latest post on can SSD cause blue screen?
Put SSD in the Highest Boot Priority
Typically the BIOS gives the internal drives the most priority. Additional devices such as external USB SSD, flash drives or memory cards are given lower precedence in the boot order.
Since you need the SSD to boot, change its position and bring it right to the top. Boot priority is typically found in Boot Settings.
Here are the steps to put the external SSD in the highest boot priority:
- Enter the BIOS by pressing the predefined key. This is the DEL key for most computers. Additionally, the boot key can be F2, F8, F10 or F12. Check your manufacturer’s website for this information.
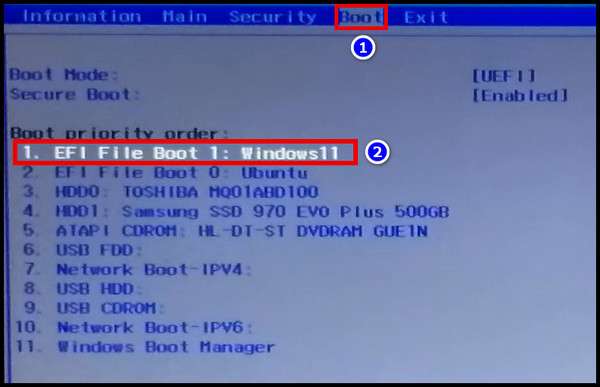
- Now Navigate to Boot > Boot Option Priority.
- On Boot Device #1, select your external SSD.
- Press F10 to save changes and reboot.
The computer will restart and now look if the SSD boots up. If not, move on to the next step.
Are you stuck entering the BIOS? This article goes in-depth to show you how to enter BIOS or UEFI in Windows 11.
Disable USB Legacy Devices
USB Legacy Support is there to recognize the mouse/keyboard devices in the initial boot phase. However, this also has a downside in the fact that the BIOS sometimes unrecognizes external drives.
As a remedy, you can disable USB Legacy Devices from the BIOS. Look out for Legacy Support and disable it. When you are done, press the F10 key and save the changes.
Also, change the Internal USB 3.0 controller from Enabled to Auto. This makes sure the USB 3.0 ports remain active and your BIOS detects any connected devices.
Disable Fastboot
Fastboot was first used with Windows 8 to bring quick boot-up in computers. This disables any USB drives connected as well as the optical and network drives. And as you can see, this feature does not play nice when you try to boot from an external drive.
Hence, disable it, and this should make the BIOS recognize the USB drives. You can disable Fastboot inside Windows and from the BIOS as well.
Follow the steps to disable Fastboot in Windows 10/11:
- Open the Control Panel by searching in the Start Menu.
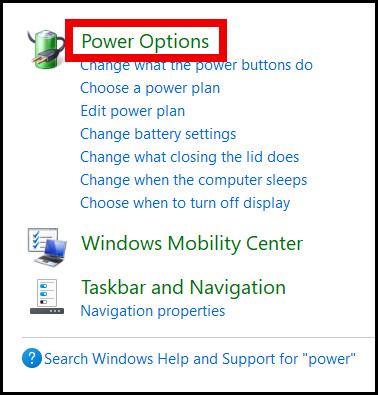
- Search Power Options and click to open it.
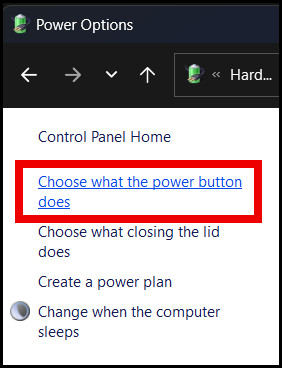
- Click on Choose what the power button does.
- Press Change settings that are currently unavailable.
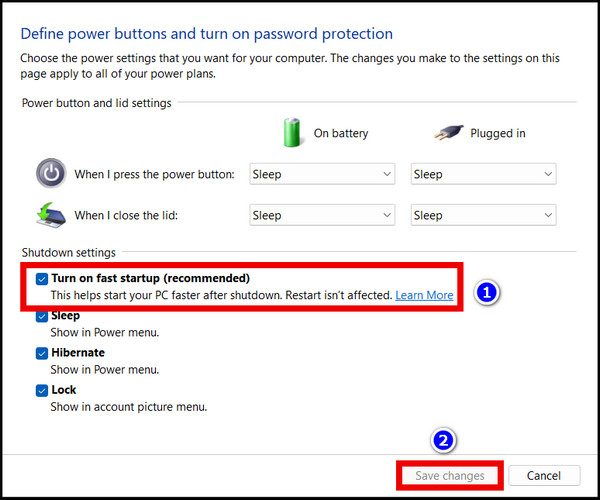
- Uncheck the box next to Turn on fast startup.
- Press the Save changes button.
Now Fastboot will be turned off for your computer.
The BIOS also contains options to turn off Fastboot. In that case, you have to find this as the options in BIOS change from one manufacturer to another.
This is the Fastboot settings inside an ASUS motherboard, which happens to power my rig.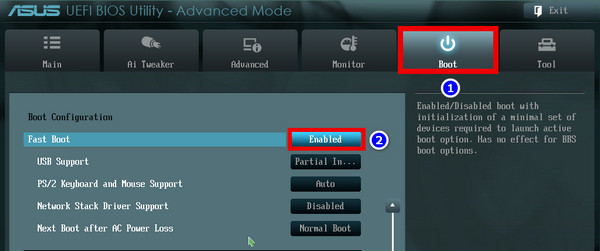
Don’t have Secure Boot or TPM? Don’t let these hold you back from embracing Windows 11. Learn how to fix secure boot errors to update to Windows 11.
Enable Secure Boot
It is a security measure taken by manufacturers so that unsigned code is not able to run on Windows. If secure boot is turned on, you cannot run softwares such as trainers.
It is advised to enable secure boot so that the overall security of the computer increases.
These are the steps to enable secure boot from BIOS:
- Press DEL to enter the BIOS. Alternatively, F2, F8, F10 or F12 can be used to access BIOS.
- Go to the Boot tab by navigating using the keyboard.
- Under Secure Boot, select Enabled.
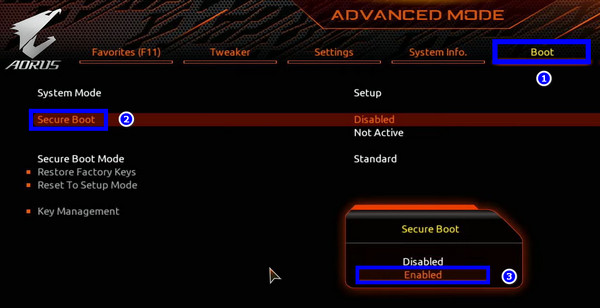
- Press F10 to save changes.
Your computer will start only with a verified code the next time you power it on. If you do not find the settings, consult your motherboard manufacturer’s manual. The settings for every motherboard differ from one manufacturer to the other.
Windows 11 requires you to have Secure Boot turned on. And you did exactly that. But what to do when Windows 11 fails to recognize it?
Repair Windows Boot Configuration Data (BCD)
If the SSD does not have any boot code on it, the BIOS will fail to recognize that it contains an operating system. The boot code is responsible for making sure the BIOS knows which files to load after the computer POSTs successfully.
It is a good practice to repair the BCD if you cannot load Windows in the first place. But to do that, first boot into the internal drive that contains a working Windows. Then enter the recovery mode to start fixing the boot code.
These are the steps to boot into the recovery menu in Windows 10:
- Shut down the computer by holding the Shift key.
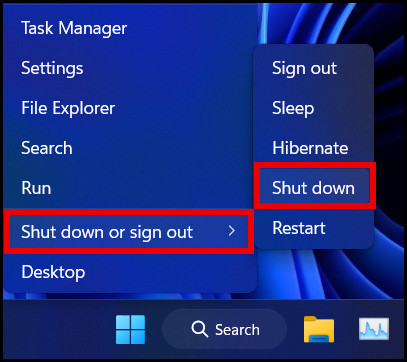
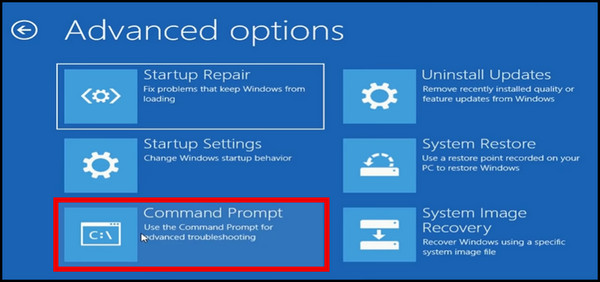
- Press Troubleshoot when the computer boots into recovery.
- Now navigate to Advanced Options > Command Prompt.
Next, identify the type of partition table present in the external SSD. It can be either MBR or GPT.
Here are the steps to identify the partition table type using the command prompt:
- Press Windows Key + R.
- Type cmd and press Ok.
- Write Diskpart and press the enter key.
- Next Type in List Disk.
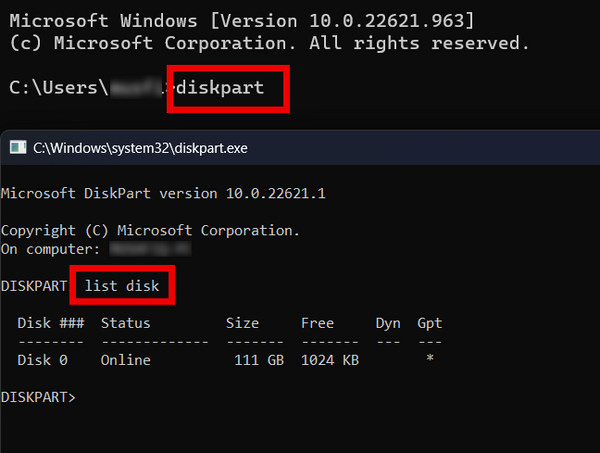
Now, if the disk type is GPT, it will show up in the output. For MBR disks, the GPT column will be empty.
So we know our disk type. Now, let’s enter the commands to repair the boot configuration files and press the enter key in each case. And we will use the command prompt too in this step.
Follow the steps to repair BCD in Windows:
- Enter bootrec.exe
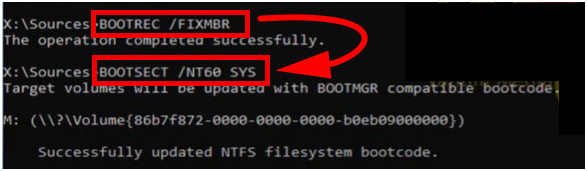
- Next, type in bootrec.exe/fixmbr.
- After that, type in bootsect /NT60 SYS.
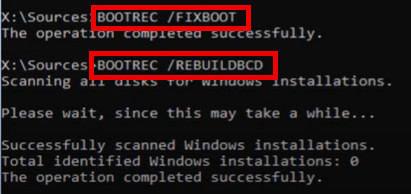
- When this finishes, write bootrec.exe/fixboot.
- Now, type bootrec.exe/rebuildbcd.
- Finally, enter bcdboot X:Windows, where X is the location of the external drive.

Wait for all processes to complete. Press the Y key when the system asks to add the drive to the boot list. To check if Windows identified your boot device successfully, type in bcdedit and look for the external drive in the list.
Here is my external drive showing up after Windows identifies it correctly.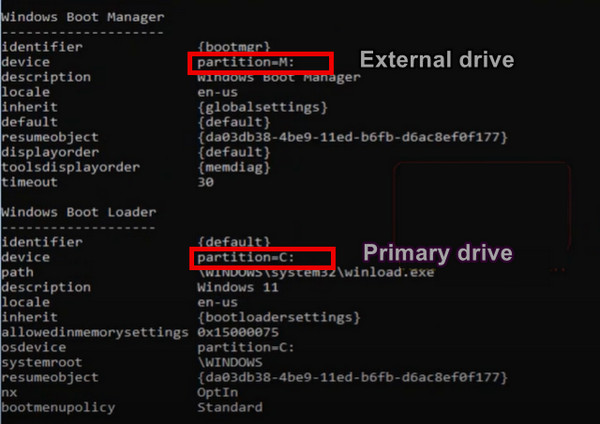
Related contents you should read about use old SSD on a new computer.
Frequently Asked Questions
Why won’t my computer boot from the SSD?
If the SSD is not set at the highest boot priority, it will not boot. To change this, enter the BIOS and go to Boot > Boot Priority > Ist Boot Device > SSD.
Can we boot from an external SSD?
Yes, both Windows and macOS support booting from an external USB device.
Why won’t my BIOS recognize my SSD?
If the SSD is not correctly formatted, the operating system will fail to recognize it. Additionally, it needs to be correctly connected for the BIOS to detect it.
Conclusion
That’s it. Now you can boot from the external SSD and enjoy the fast speeds.
The best part is, you don’t even have to open your computer. Just plug and play the drive.
I hope this guide worked for you. Do let us know in the comments if you face any issues.
Until next time, it’s goodbye.