With the introduction of Windows 11, Microsoft merged the stand-alone Snip & Sketch tool with the Snipping Tool to simplify the user experience.
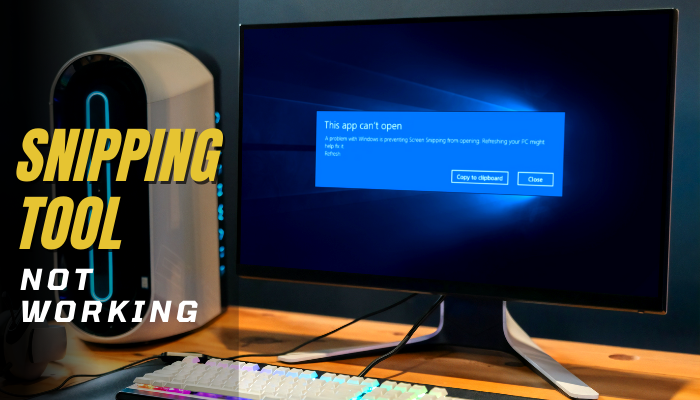
But ever since, things have gone a bit rough, and users worldwide reported experiencing issues like Snipping Tool not working, app can’t open, Snipping Tool stopped working unexpectedly, shortcut not working, etcetera.
In this article, I’ll explore such issues in great detail and provide every possible method to get them fixed once and for all.
Let’s get in on the act, shall we?
Why Is My Snipping Tool Not Working?
Snipping Tool is not working as a result of temporary bugs and glitches, corrupted system files, obsolete graphics card drivers, outdated windows, or incorrect digital certification date. As the snipping tool is a built-in Windows program, issues rooted particularly with this program are scarce.
Such integrated applications are affected heavily by problematic system files. Thus, you experience app crashing, shortcut keys not responding, no screenshot saved after execution, a specific in-app tool such as the eraser not working, or even the program does not launch at all!
In all fairness, possible reasons turn out to be myriad, but once identified, it mostly takes a few minutes to fix. This is what I’m going to explore in the following section.
How to Fix Windows 10/11 Snipping Tool Not Working
Before you make an effort to track down the underlying issues with the Snipping Tool and get them fixed, remember that it can either be a quick trip or an extended one. So have your patience and execute them sequentially.
1. Restart Snipping Tool
The easiest and most obvious method to fix the snipping tool not working problem is to relaunch the app on Windows 11 or 10. Quit any unresponsive app from the Windows Task Manager and open it again. It repairs the program by removing any temporary glitches.
Follow the steps below to restart or relaunch the snipping tool on Windows 11/10:
- Hold down Ctrl + Shift + Esc on your keyboard to launch Task Manager.
- Find the Snipping Tool under the Processes tab and right-click on it.
- Choose End task to quit the app.
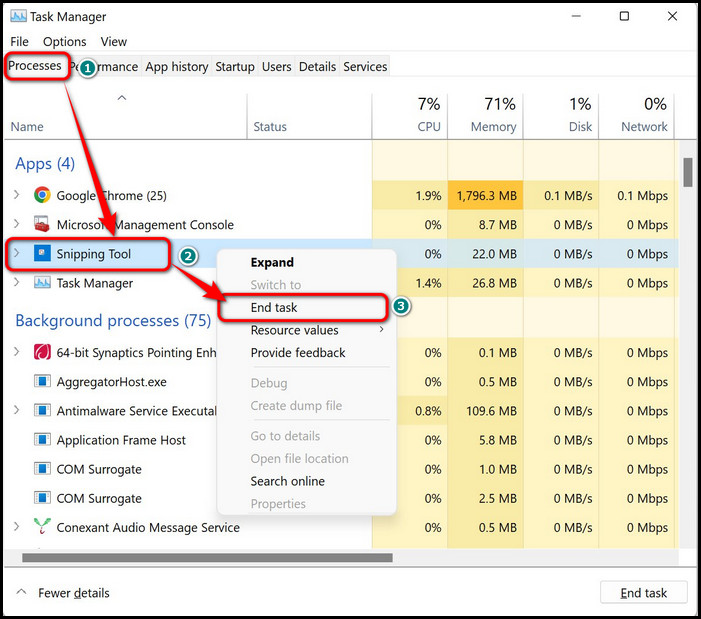
Now, close the Task Manager window and launch the snipping tool again. It should work flawlessly right away.
2. Reboot Windows 11
Rebooting your PC is another extremely easy way to fix snipping tool issues related to bugs and glitches. It may sound cliché, but it indeed makes a difference to a certain degree.
So, why waste another moment? Go ahead and restart your Windows 11 or 10 PC and verify if the snipping tool is in full swing.
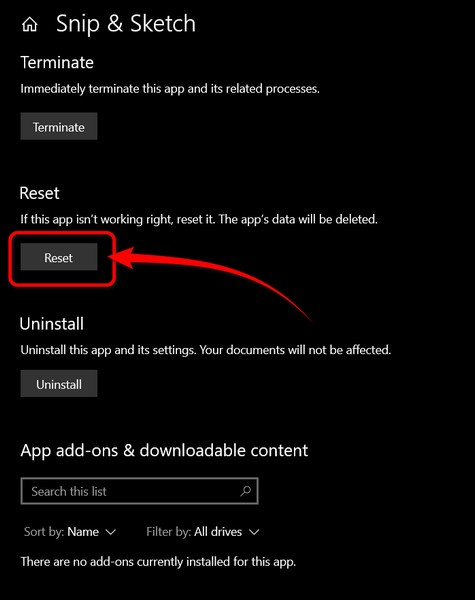
3. Reset & Repair Snipping Tool
If restarting the Snipping Tool brings forth no fruitful outcome, try repairing or resetting the app. This method is applicable to Windows 11 and 10 as well.
Below you’ll find the exact process to reset and repair the snipping tool:
Windows 11
- Press Windows + S key to open the Windows Search bar.
- Search for Snipping Tool.
- Right-click on the app and select App Settings.
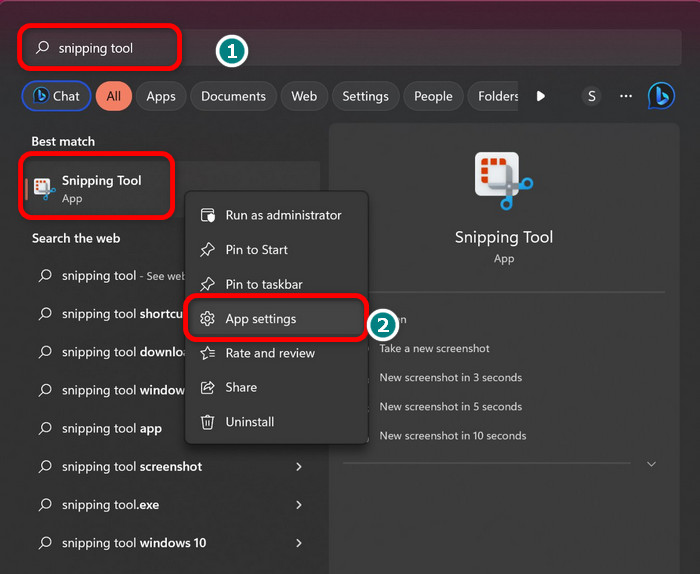
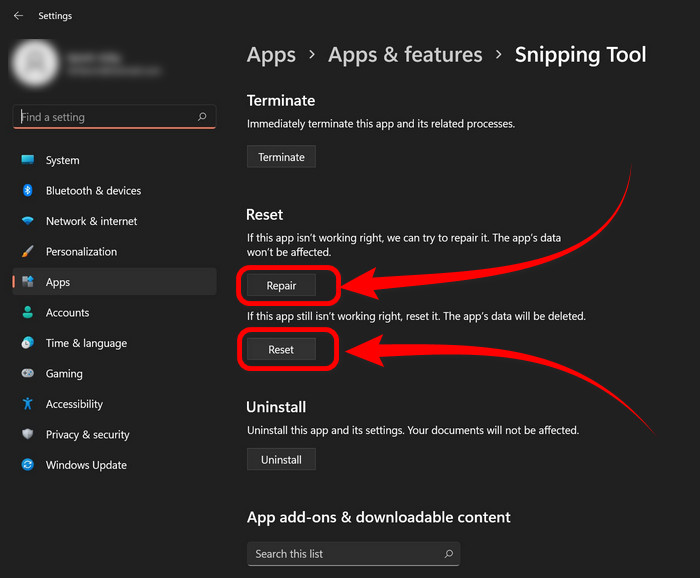
- Click on Reset or Repair to execute them accordingly.
Windows 10
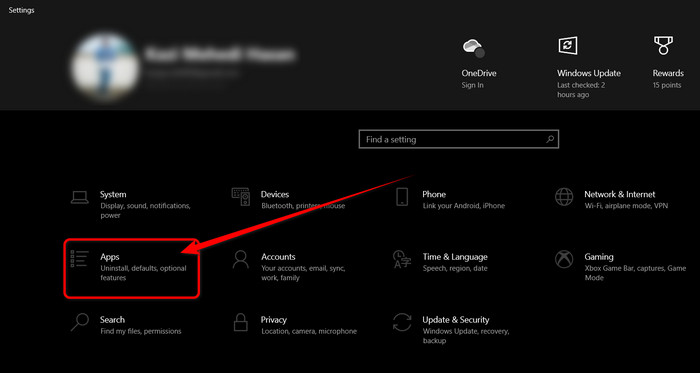
- Press Windows + I together on your keyboard to open Settings.
- Access Apps.
- Type snip in the search box below the Apps & features heading. Snipping Tool or Snip & Sketch app will appear in the list depending on Windows 10 version.
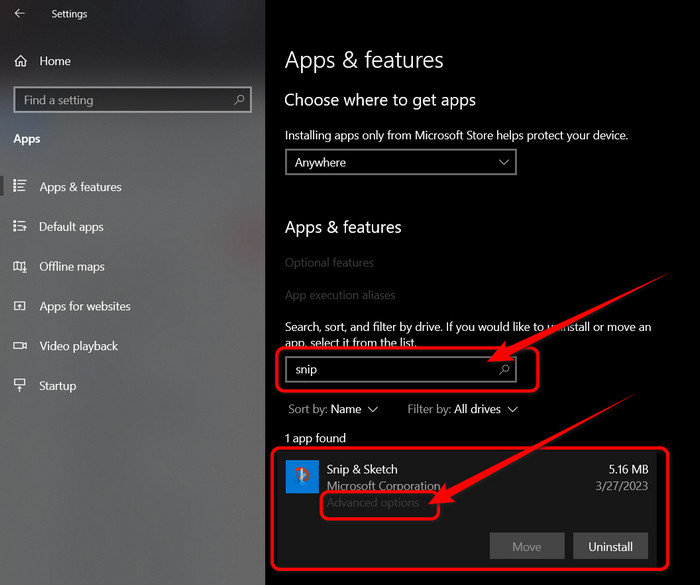
- Click on the search result to expand and choose Advanced options.
- Scroll down and execute Reset or Repair.
Once the repair process is executed, go ahead and launch the app to check whether the issue is fixed.
Check our recommended 4 quickest ways to take screenshots on Windows 11.
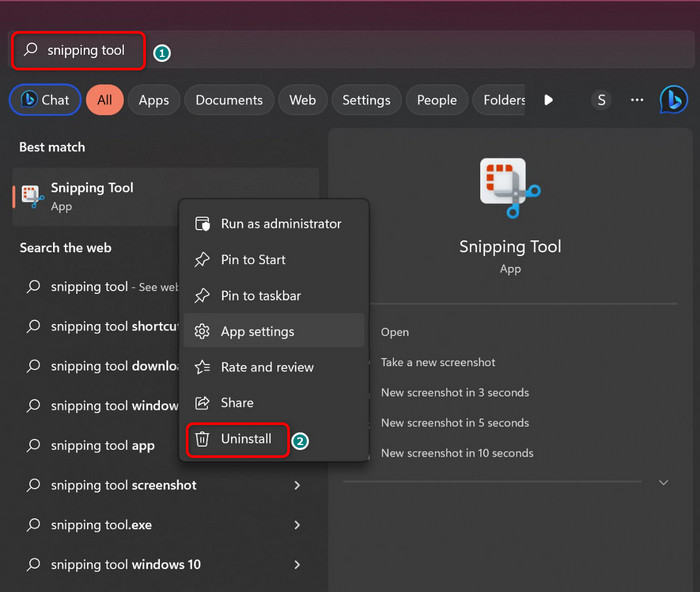
4. Uninstall & Reinstall Snipping Tool
Reinstallation of a program is highly effective if it randomly stops responding. On Windows 11, this method is particularly beneficial for solving any issues related to the snipping tool.
The following procedure is a demonstration of how you can uninstall and reinstall the snipping tool:
- Hold down Win + S keys to open the search bar.
- Search for Snipping Tool.
- Right-click on it and choose Uninstall.
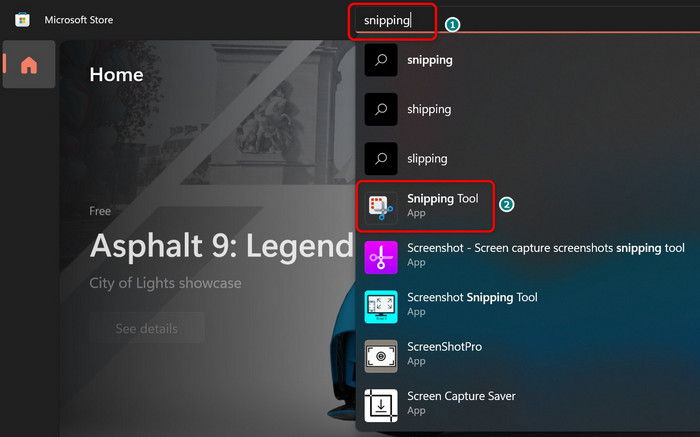
- Fire up Microsoft Store.
- Search Snipping Tool and click on the matched search result.
- Select Get to begin the installation process.
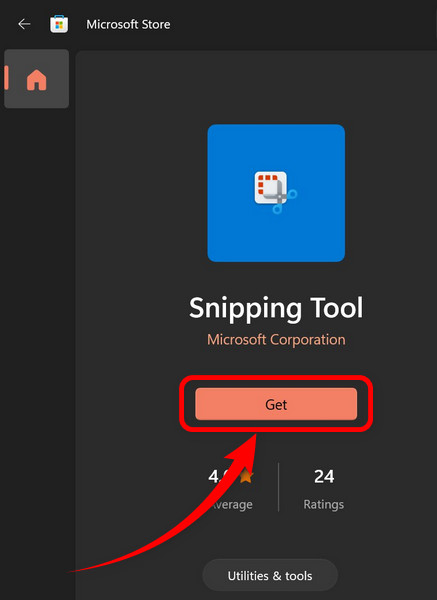
When the installation is complete, open the snipping tool and start taking snaps. If it still does not work or crashes, refer to the next method.
5. Allow Snipping Tool to Run in the Background
Sometimes, the lack of background activity by the snipping tool program forces it to break down and behave oddly when the app window is not active in the foreground. Thus, allowing this app in the background helps to sort out the not working problem.
Here’s how to allow the snipping tool to run in the background:
Windows 11
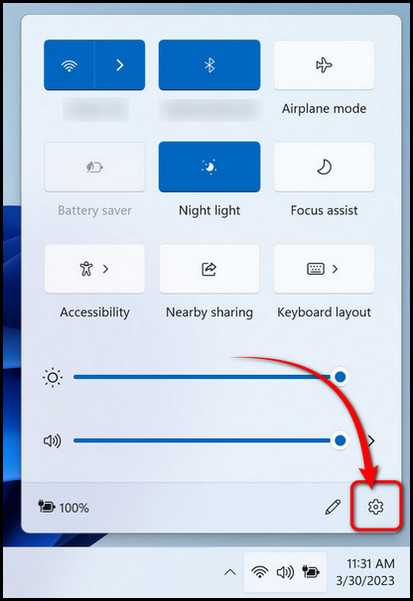
- Navigate to the bottom right corner of the taskbar.
- Click on the sound icon. The quick menu window will pop up.
- Select the settings icon from the bottom right.
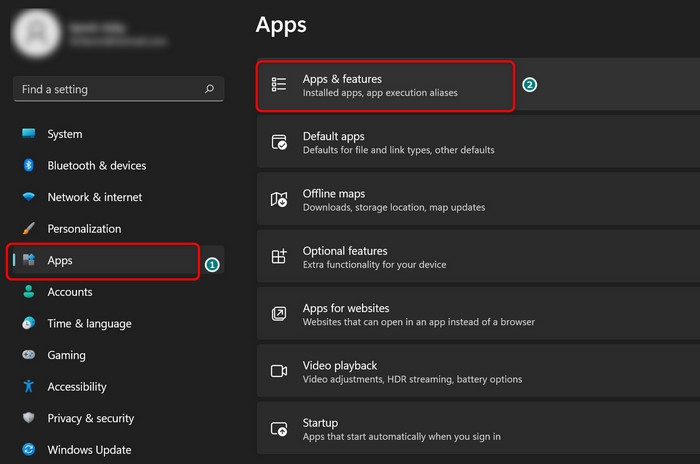
- Choose Apps from the left pane.
- Select Apps & features.
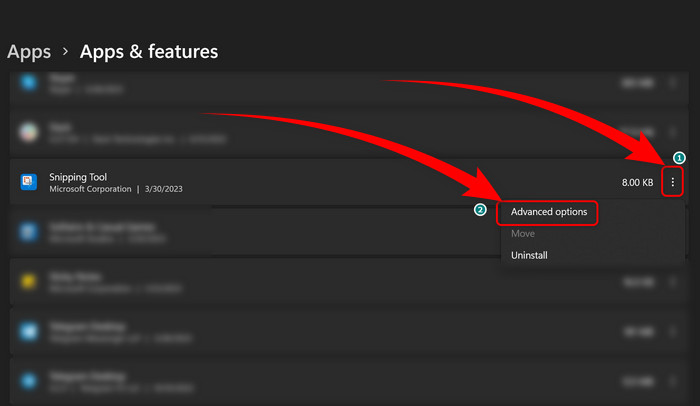
- Scroll down to find Snipping Tool.
- Hit the three-dot icon.
- Choose Advanced options.
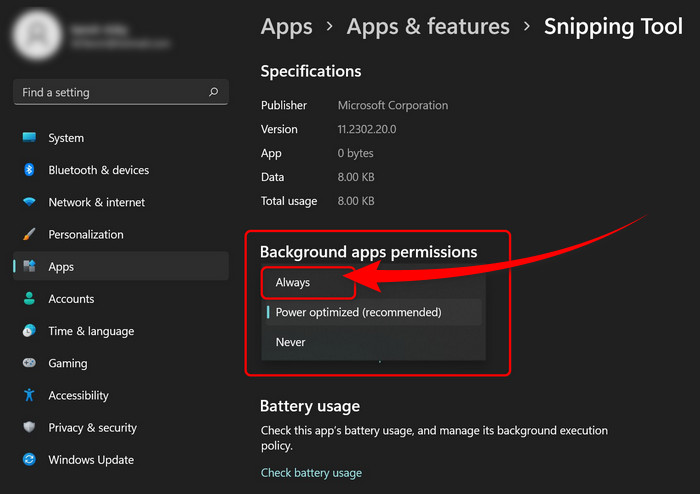
- Click on Background apps permissions and select Always.
Windows 10
- Click on Windows + I together on your keyboard.
- Select Privacy.
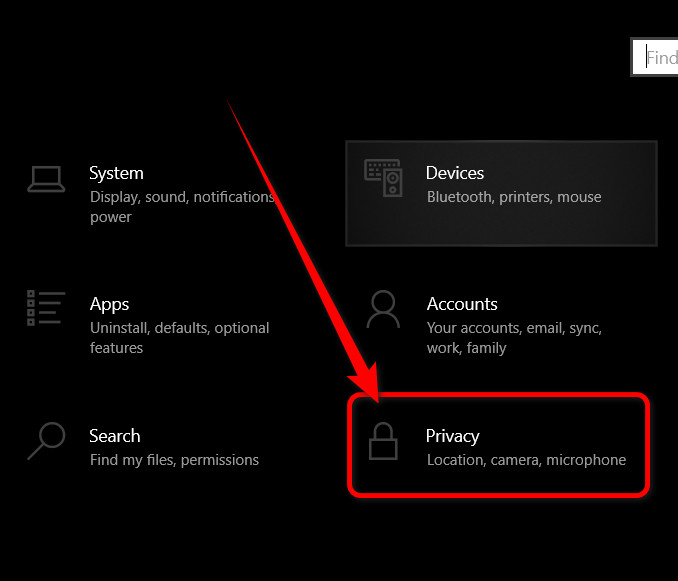
- Scroll down and click on Background apps under App permissions from the left pane.

- Toggle on Snip & Sketch from the app list.
After activating the background activity, the snipping tool should function properly on your Windows machine.
6. Enable Print Screen Hotkey
The default shortcut key for the snipping tool may not work on occasion due to other apps’ interference. So you can use the built-in option on Windows to use the PrtScr, PrtSc, or Print Screen to use it as the snipping tool hotkey.
Follow the steps below to enable the snipping tool print screen hotkey on Windows 11/10:
- Click on the Start button with the Windows logo from the left bottom corner of the taskbar.
- Select Settings. A new window will appear.
- Navigate to Accessibility > Keyboard. For Windows 10 Ease of Access > Keyboard.
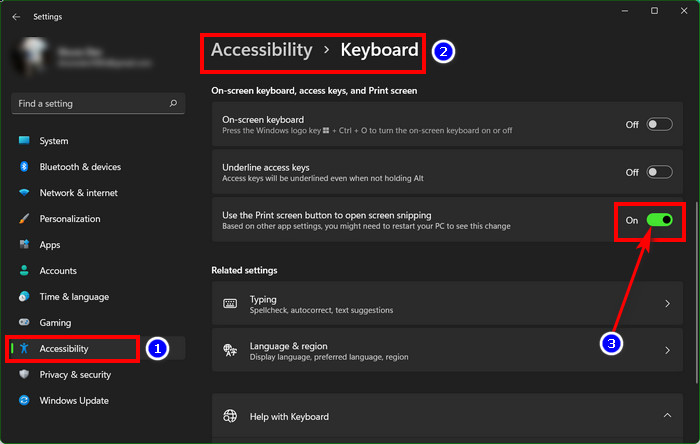
- Scroll down and toggle on Print Screen Shortcut.
- Restart your computer to let changes take effect.
After the reboot, press the print screen button on your keyboard, and it will activate the snipping tool immediately. You can also exploit more snipping tool shortcuts. If it does not work, however, the problem is rooted deep within. So, try the next fix.
7. Enable Snipping Tool from Registry Editor
Windows Registry Editor is a powerful workaround to fix the snipping tool, especially when the app simply does not launch at all. Enable the app from the regedit console, therefore.
Below is the complete process of enabling the snipping tool from the registry editor:
- Press Win + R to launch the Windows Run dialog box.
- Write regedit and hit Enter on your keyboard to open the registry editor.
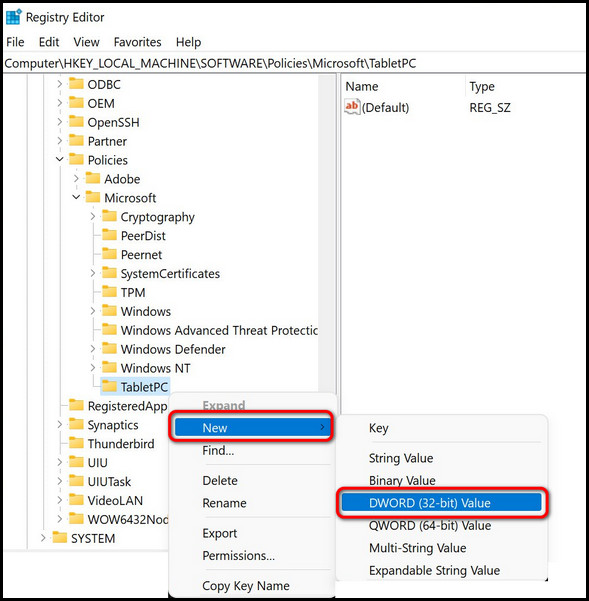
- Navigate to Computer\HKEY_LOCAL_MACHINE\SOFTWARE\Policies\Microsoft
- Do right-click on the Microsoft folder and create a new Key. Name it, TabletPC.
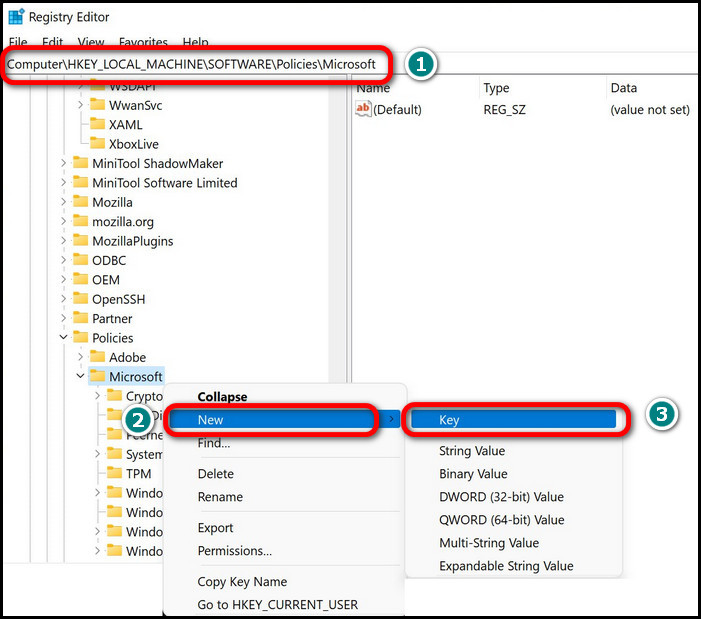
- Right-click on the TabletPC you just created and produce a new 32-bit DWORD value.
- Name it DisableSnippingTool.
- Double-click on the new DWORD and set 0 as the new value. Make sure the Base is set to Hexadecimal.
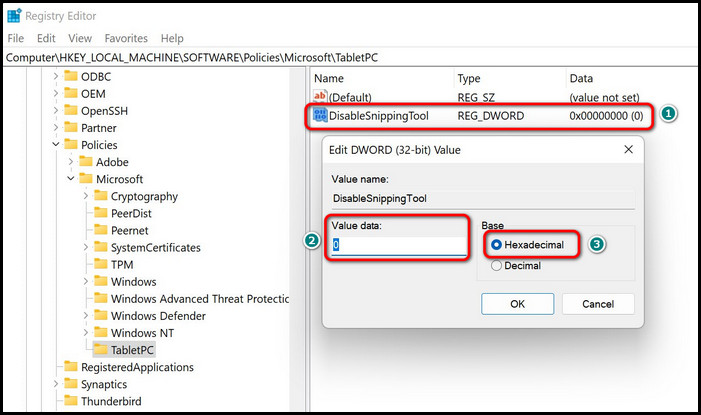
Click OK and exit the registry editor. Restart your PC to let the change take effect. From the next boot, the snipping tool not working issue should disappear.
8. Disable Focus Assist
Windows focus assist is a brilliant feature to isolate the workspace from unnecessary interruptions such as notifications. But it comes with a caveat of not letting the snipping tool fire up. That being the case, modify and disable the Focus Assist to resolve this issue.
Following are the sequential steps to prevent focus assist from conflicting snipping tool launch:
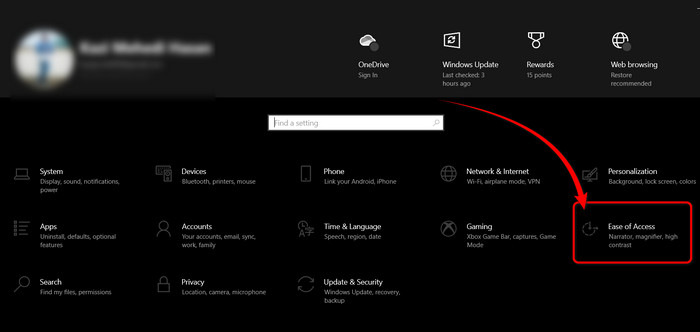
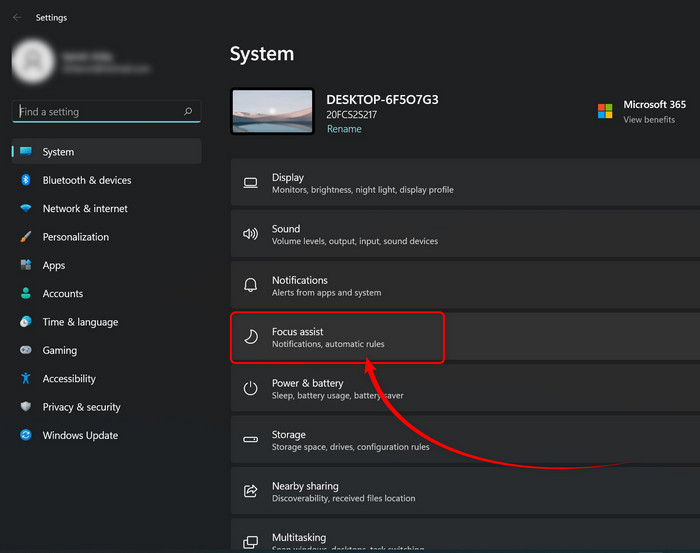
- Hit Win + I on your keyboard to open Windows Settings.
- Go to System.
- Select Focus Assist from the right pane.
- Choose Priority only and click on Customize your priority list.
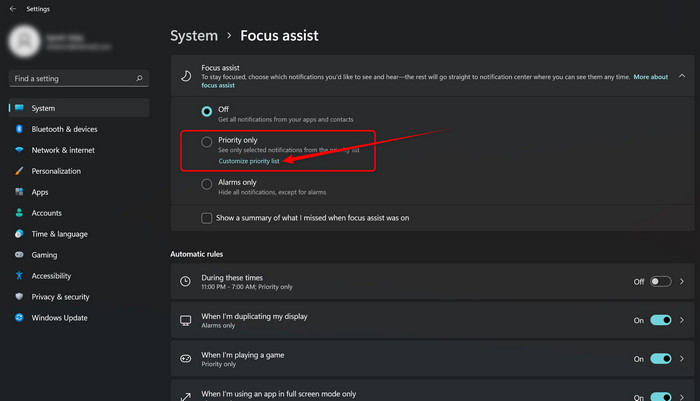
- Click on the Add an app button under the Apps list.
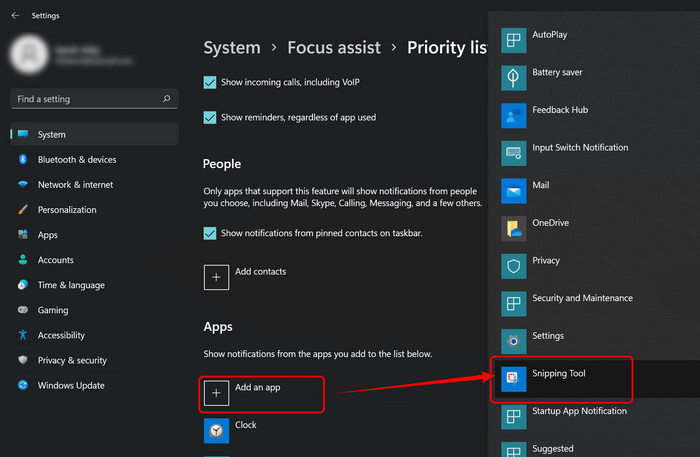
- Pick Snipping Tool from the newly appeared app list.
Try to launch the snipping tool app, and it should not cause any problems like freezing or crashing.
9. Disable Automatic Time Tentatively
There’s one unanticipated cause for a broken Snipping Tool functionality on Windows 11. It’s the incorrect time on your machine associated with the app’s digital certification. After turning over every stone, I figured if you set the date manually to October 31, 2021, the snipping tool start working again.
So, you need to disable automatic date and time then put the manual date. Know that, it’s a temporary measure. Once the snipping tool starts working, you can go back and switch to automatic date and time.
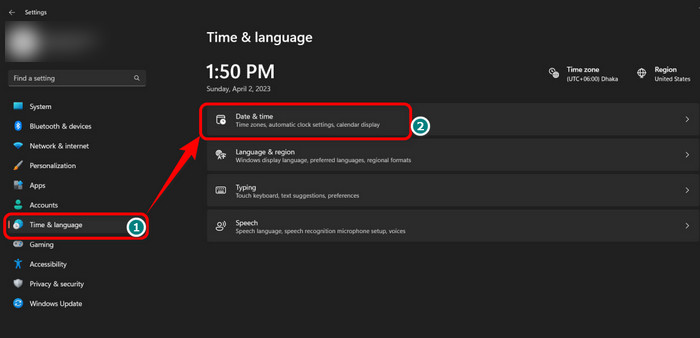
Here’s how you can set date manually on Windows 11/10:
- Access Settings by pressing Win + I together.
- Navigate to Time & Language > Date & Time.
- Toggle off, Set time automatically.
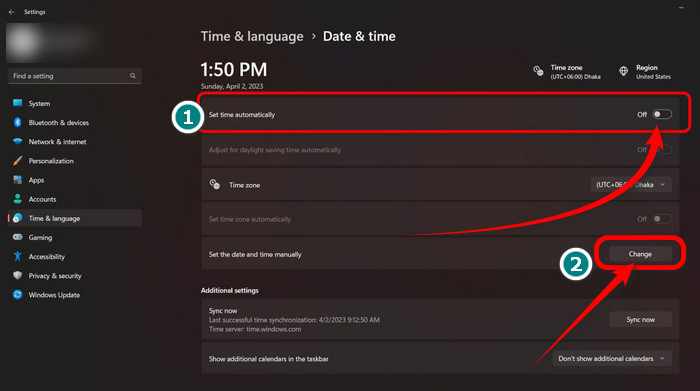
- Click on Change from the Set the date and time manually menu.
- Set the date value to October 31, 2021.
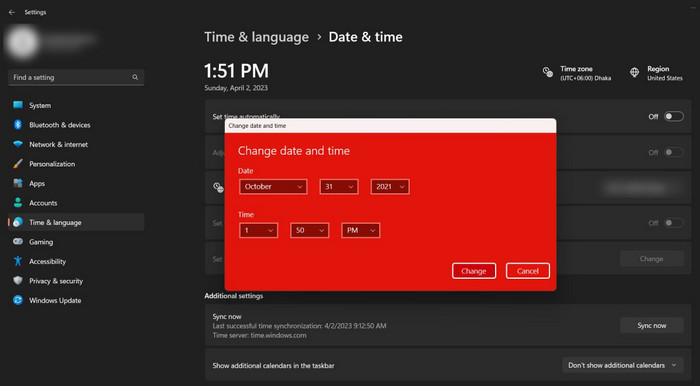
Now, go back and launch the snipping tool and see if it functions without a problem. When you feel the issue is solved, turn on the automatic date, and that’s it.
10. Update Windows
Missing patches for Windows 11, such as KB5008295 or outdated version Windows 11/10, can lead to a not working snipping tool. With the help of Windows Update, you can troubleshoot this concern.
Here’s how you can update Windows 11/10:
- Go to Settings by pressing Win + I together on your keyboard.
- Select Windows Update.
- Click on Check for updates.
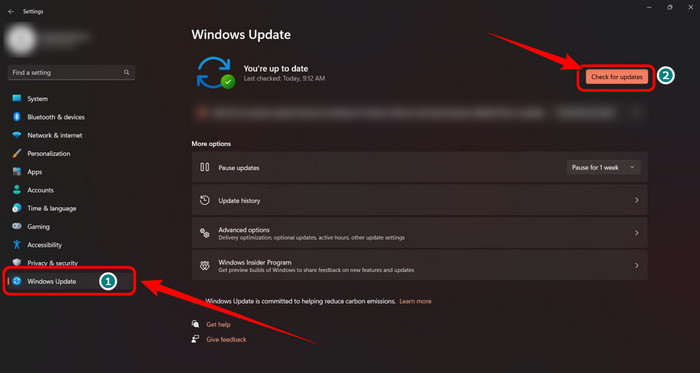
Wait for a few moments to search and install the latest patches and updates. During installation, your computer will restart multiple times, so don’t panic.
After finishing the update process, try to launch the snipping tool and validate if it is functional again.
For further persistent difficulty, move on to the next fix.
11. Run sfc/scannow Command
In a pool of possible reasons, damaged or corrupted system files might be the front-runner for an unresponsive Snipping Tool, which explains why updating the Windows didn’t help.
As luck would have it, System File Checker (SFC) fixes such file integrity issues.
I’ve put down the exact steps below to run the sfc scan on your computer:
- Click on the Windows Search bar and type command prompt.
- Right-click on the search result and select Run as administrator.
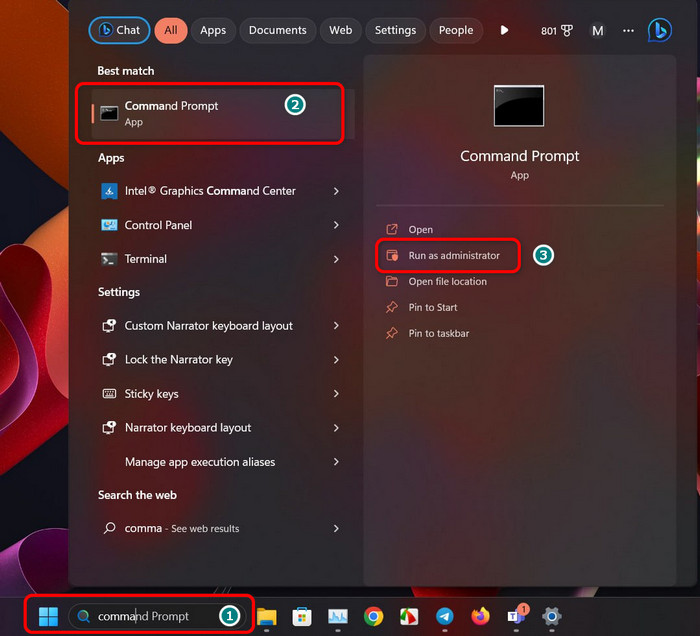
- Type sfc /scannow and hit Enter. Wait until this command completes the execution.
- Type and execute this command line: snippingtool.exe
As soon as this operation finishes, start the Snipping Tool app.
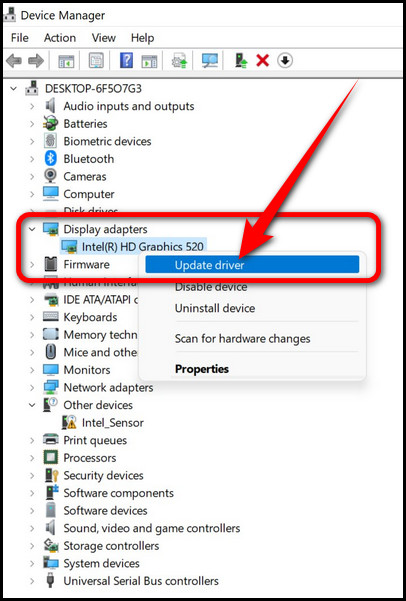
12. Update Graphics Driver
It might take you by surprise, but an out-of-date graphics driver can display the Snipping Tool not working error. A possible rationale being the GPU can not interpret the imagery instructions properly. As a result, the only getaway from this issue is to update your computer’s graphics driver.
Let me show you the process to update the graphics or video card driver below:
- Right-click on the Start menu button.
- Choose Device Manager. A new window will appear.
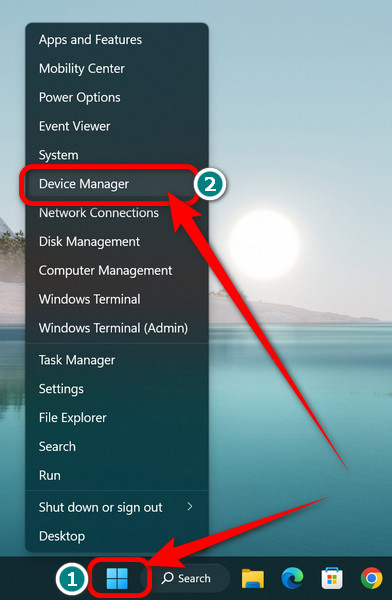
- Expand Display adapters.
- Right-click on the dGPU or iGPU and select Update driver.
- Choose Search automatically for drivers from the next floating window.
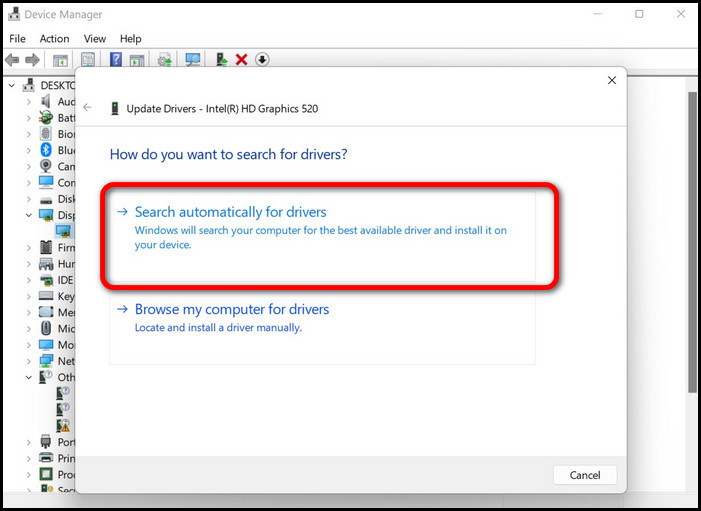
Windows will look for the latest driver online and install it spontaneously. Once done, restart your computer.
13. Install a Fresh Copy of Windows
In the event that you have explored every possible alley to fix the snipping tool not working problem, yet no luck! There’s no workaround except for a clean Windows install. A fresh copy of the OS will erase this issue regardless.
Just grab a USB stick and make it bootable or a Windows installation media. Restart your computer with the USB stick connected and press the Boot key to access it. Once you are on the installation screen, follow the instructions accordingly.
Note: Before you attempt Windows installation, back up your data, such as documents and downloads, on the C: drive. In the process, these files will be lost.
With every step followed correctly, Windows installation will be completed without a hassle.
FAQs
Are Snipping Tool and Snip & Sketch the same?
No, Snipping Tool and Snip & Sketch are two different apps on Windows 10. Although they share similar functionality, they have differences as well in keyboard shortcuts and snip customization. On Windows 11, however, there’s no Snip & Sketch program.
How Do I Get the Snipping Tool to work?
To get the Snipping Tool to work, you can either use a keyboard shortcut or open the app manually from the app list. Press Win + Shift + S to launch Snipping Tool quickly.
How Do I Unfreeze Snipping Tool?
Press Ctrl + Shift + Esc and open the Task Manager > Go through the process and right-click on Snipping Tool > Select End Task to unfreeze the snipping tool.
Ending Remarks
Whether the Snipping Tool is not saving on Windows 11 or the screen is greyed out, you should carefully try out the fixes I’ve explained in this guide. If you can execute them correctly, it should fix any issues with the program.
That’s all for today; for lingering issues and queries, comment down below. Peace!