Want to copy some audio and video content from a DVD? Is it for personal use or general use? Whichever the reason, can’t find a quicker solution to do so?
Last July, it was one of my cousin’s weddings. As I got the DVDs that contained videos of us from childhood, everyone asked me to assemble them. I was at a loss thinking about how to compact them. After researching for 5 hours, I finally decided to rip with VLC.
Read till the end to know more about ripping your DVDs with VLC.
So, why should you rip your DVD with VLC?
Convinced?
Go through every heading, subheading to the very end of this article to get your work successfully done.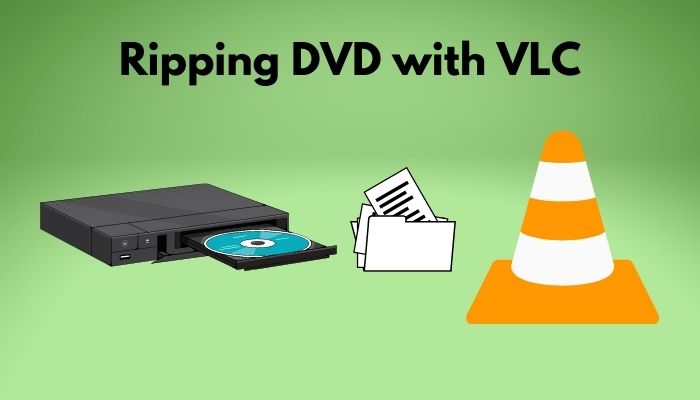
How to Rip a DVD with VLC
We have a lot of questions, misconceptions regarding ripping DVDs with VLC. After reading this article, almost all of them will wash away. How much time VLC takes to rip a DVD is one of them.
So, how long does it take to rip a DVD with VLC?
It takes around 10 to 40 minutes to rip a DVD with VLC. But this is not true every time. It depends on your computer configuration, DVD capacity, DVD-ROM reading speed, and so on. So, no one is sure how long it takes to rip a DVD with VLC.
Are you a Windows user? Or a Mac user?
If your answer is Windows, read along. But if the answer is Mac, skip this portion and go to the next heading.
Follow the steps and rip your DVD with VLC in Windows.
But wait a minute.
Have you installed the VLC media player on your PC yet?
Here’s a complete guide on how to fix VLC Youtube is not Working.
If not, do that first, and then follow the instructions:
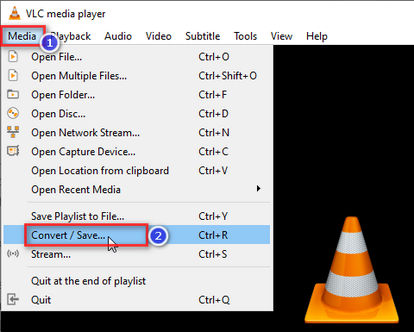
- Open VLC and insert your DVD that you want to rip. If your default media player is VLC, inserting the disc will open VLC automatically. Otherwise, if another media player is opened, close it, and open VLC. In the top left corner, you will find Media.
- Click Media and then Convert/Save. This will command a tab to pop up. You can also press Ctrl+R instead of clicking Convert.
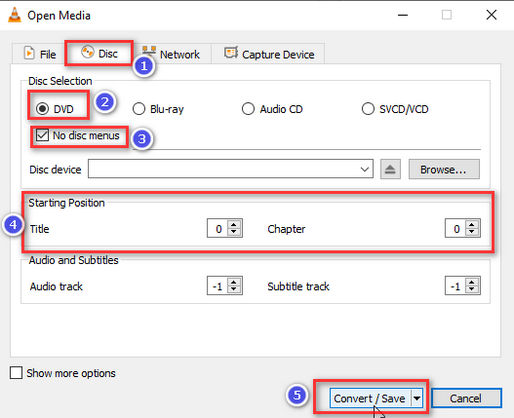
- Click the Disc tab. Thus VLC will look at your disk drives as to whether there is a disk or not.
- Select your DVD.
- Check the No disc menus box. Clicking the box will help prevent possible issues.
- Select the Title and Chapter you want to copy under the Starting Position.
- Click Convert/Save. It’ll help you convert your file by default size and quality.
- Click Browse. Choose your file destination and give it a name.
- Ensure the file extension, and click Save.
- Click Start. VLC will start the conversion. You will see an estimated time counting.
The moment it’s done, you can find it in your destination folder. Check how the outcome is.
How to Rip a DVD with VLC in Mac
VLC for Mac can rip a DVD without charging you any cost. So, being a Mac user, don’t get upset that you can’t enjoy free apps at all.
If you haven’t downloaded VLC yet, download it. As you won’t find it in the App Store, go to your web browser and get it from anywhere by searching for VLC for Mac.
However, follow the below-mentioned instructions to rip a DVD in your Mac using VLC:
- Insert your DVD into Mac’s DVD player and open the VLC Media Player app.
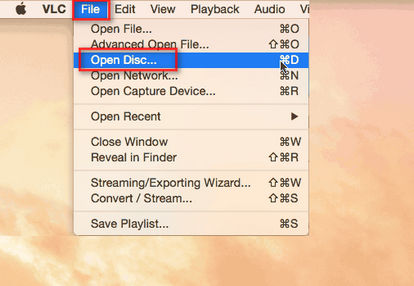
- Go to File and click Open Disk.
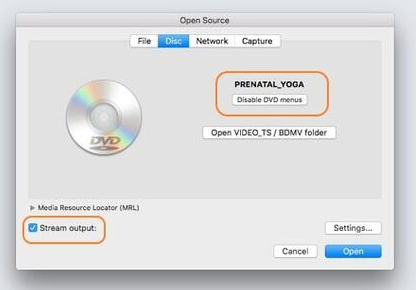
- A window containing your disk information will pop up. Click the box that tells you to Disable DVD menus.
- Check the Stream output box and click Settings. This will take you to a new window.
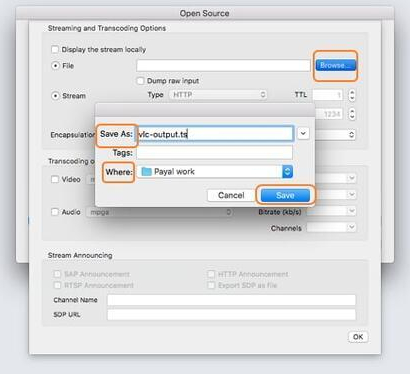
- Check File and then click Browse to select the ripped file location.
- Selecting your preferred destination, press Save.
- Open the Encapsulation Method and choose MPEG 4.
- Choose your preferred Video and Audio quality. Then click OK to save all the settings. This will take you back to the Open Source tab.
- Click Open to start the conversion.
Follow this exact process to complete ripping DVD with VLC on your Mac.
Fact: In the US, DVD ripping is almost always illegal.
Check out the easiest way to install VLC and make it Default on Windows 11.
Can VLC rip DVD to MP4 or MP3?
If anyone has this particular question or if it is one of yours, nothing to ashamed of. We learn things gradually, and no one has all the knowledge regarding everything.
However, the answer is definitely yes. VLC can rip DVD to mp4 or mp3 files.
Windows and Mac both run a different OS, so there are definite steps for Windows and Mac to perform this task correctly.
If you are a Windows user, follow this:
- Follow 1-6 from How to Rip a DVD with VLC in Windows.
- Click the reverse triangle icon right after Convert / Save. It prompts a drop-down menu.
- Click Convert. This will let you choose your required output file, and there will be a lot of options. So, if you want to get an mp4, choose from the Video If it’s an mp3, click Audio + MP3.
- Then follow 8, 9, 10 from How to Rip a DVD with VLC in Windows again.
Note: People also get confused when finding the “Play” option instead of the “Convert / Save” option.
If you are a Mac user, you should:
- Follow 1-7 from the above “How to Rip a DVD with VLC in Mac” portion.
- Check the Video box if you want it to be an mp4 version. You can choose different mp4 options by checking the arrows.
- Check the Audio box and choose your preferred audio file by checking the arrows if you want an mp3 file. Also, uncheck the Video
- Double click OK.
Thus VLC can rip your DVD to mp3 or mp4, whichever file you want, very quickly. But I don’t usually suggest converting to an mp3 file using VLC. But I recommend VLC if people want to get it done without less time and spending money.
Also, check out our separate post on fix VLC is unable to open MRL file Error.
VLC rip DVD with subtitles
If you want to add subtitles to your video, say, this is a movie; you can use hardcore subtitles with VLC after performing all the processes.
Why Hardcore?
Because it’ll let your video play with subtitles on any of the other players later, so to hardcore subtitles with a VLC media player, you have to:
- Download your preferred subtitle with the correct file extension from online.
- Open the video in VLC.
- Go to the Media and select Stream.
- Click + Add to add the video and check the Use a subtitle file
- Click Browse. It will open a tab. Go to your destination, where the subtitle file lies.
- Click the file and then Open.
- Tap on the Stream, and after that, Next.
- Click Add and Browse. Now you’ve to select where your subtitles will be saved.
- Go to your preferred destination and make this file a video as an mp4 one. To do that, delete .srt, and the rest of it’s right-handed portion. Make it as a .mp4 as your ripping video is also a .mp4.
- Save the file. It’ll take you back to the File Click Next.
- Check the Activate Transcoding Select MP4 from the drop-down menu of Profile.
- Click the Setting icon and then go to the Subtitles
- Check the two boxes you find there and click Save.
- Click Next and then Stream.
So, this is a proven process that’s how you can hardcore your subtitle, which will allow you to watch a subtitled movie after ripping off a DVD by the VLC media player.
Apart from this, I have an exact answer if you have questions on how to rip copy-protected DVDs using VLC.
So, how can I rip a copy-protected DVD with VLC?
You can’t rip a copy-protected DVD with VLC. You can rip only your homemade videos using VLC. If you have to make an urgent ripping your DVDs for assignment, scientific project and so on, you should consider buying “VideoProc Converter,” “WinX DVD Ripper.”
Conclusion
As VLC is one of the most used media players around the World, and it is available for everyone, enjoy your homemade video ripping using VLC.
I hope this article helped you just the way you wanted it to be. Comment below if I couldn’t clear any procedure to you.