Microsoft Excel is a fantastic software provided by Microsoft, the makers of the Windows operating system. It is the most popular software for spreadsheets and is used by countless people worldwide.
Excel has been with us since the early days of Windows, meaning a very long time. Although Microsft Excel has evolved with every new version, it is not perfect.
It has an amazing UI but still, some people face difficulties in using it. As it is a spreadsheet software, there are cells where you can put values. You can lock and unlock these cells and this is what many people do not know how to do. I also did not know how to do this in the past.

Can you lock or unlock protected cells in Excel?
If you do not know how to lock/unlock cells, look no further as I have given the best methods to do that in Excel. Read the full post to know more details.
How to lock and unlock cells in Excel easily
Locking and unlocking cells is one of the most helpful and straightforward things that can be done in Microsoft Excel. There is no need to worry if you do not know how to do it. I have written the different methods in great detail.
Here are the different methods to lock and unlock cells in Excel:
1. Lock or Unlock cells in Excel normally
This method is the simplest one in this post. It has the steps that you would normally follow to lock or unlock cells in Excel. If you want to do it, then please follow the steps given below.
Here are the steps to lock/unlock cells in Excel:
- Open Excel.
- Select your desired cells.
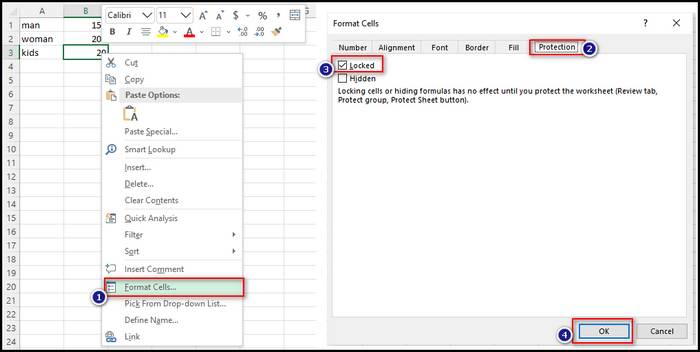
- Navigate to the Cells area and select Format.
- Select Format Cells.
- Click on the Protection Tab.
- Uncheck the box beside the Locked option to lock the cells and do the opposite to unlock the cells.
If this method is not what you are looking for, check the other methods given below in this post.
Pro tip: speed up your Computer’s speed by reducing CPU stressing apps.
2. Lock or Unlock protected cells in Excel
You can put special privileges for some sheets in Excel. You need to change some settings for editing those cells. The same goes for when you want to lick/unlock those cells. If you want to know how to lock/unlock protected cells, follow the steps given below.
Here are the steps to lock protected cells in Excel:
- Open Excel.
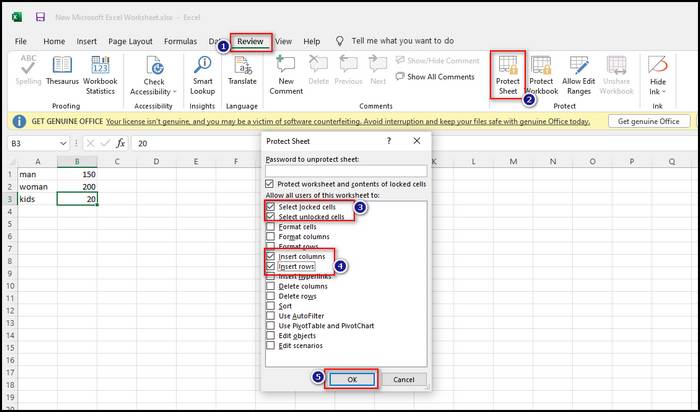
- Click on Protect sheet under the Review tab.
- Type in a password.
- Check the Select locked cells option.
- Check the select unlocked cells option.
- Check the Insert columns option.
- Check the Insert rows option.
- Click on OK.
Here are the steps to unlock protected cells in Excel:
- Open Excel.
- Click on Unprotect sheet under the Review tab.
- Type in the password.
- Turn on the Select locked cells option.
- Turn on the Select unlocked cells option.
- Check the Insert columns option.
- Check the Insert rows option.
- Click on OK.
If this method is not what you are looking for, check the other methods given below in this post.
Check out the easiest way to Copy Values Without Formulas on Excel.
3. Unprotect Excel sheet without password
After protecting an Excel sheet, you will also have to unprotect it later on. You can give a password to protect the sheet correctly. If, by any chance you forgot your password, there is no reason to worry.
Note that this method is applicable for Excel 2012 and lower. The process is similar to protecting a sheet, just follow the steps given below.
Also, check out our separate post on Enable Equation Editor In Microsoft Word.
Here are the steps to unprotect Excel sheets without a password:
- Open the Excel document.
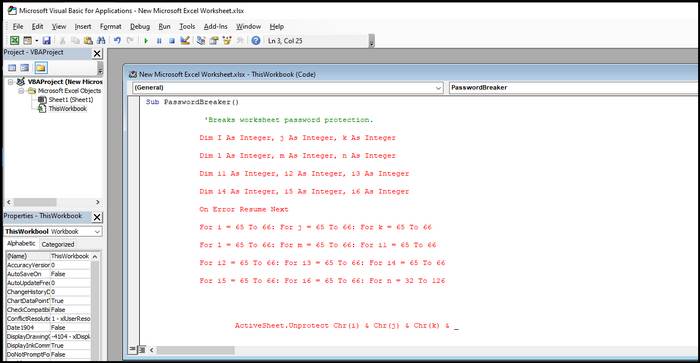
- Press Alt+F11 on your keyboard. You will see a Visual Basic Editor.
- Right-click on the workbook name that you can find on the left pane.
- Click on Insert.
- Select Module.
- Copy the code given below and paste it into the window that appears.
‘Breaks worksheet password protection. Dim I As Integer, j As Integer, k As Integer Dim l As Integer, m As Integer, n As Integer Dim i1 As Integer, i2 As Integer, i3 As Integer Dim i4 As Integer, i5 As Integer, i6 As Integer On Error Resume Next For i = 65 To 66: For j = 65 To 66: For k = 65 To 66 For l = 65 To 66: For m = 65 To 66: For i1 = 65 To 66 For i2 = 65 To 66: For i3 = 65 To 66: For i4 = 65 To 66 For i5 = 65 To 66: For i6 = 65 To 66: For n = 32 To 126 ActiveSheet.Unprotect Chr(i) & Chr(j) & Chr(k) & _ Chr(l) & Chr(m) & Chr(i1) & Chr(i2) & Chr(i3) & _ Chr(i4) & Chr(i5) & Chr(i6) & Chr(n) If ActiveSheet.ProtectContents = False Then MsgBox “Password is ” & Chr(i) & Chr(j) & _ Chr(k) & Chr(l) & Chr(m) & Chr(i1) & Chr(i2) & _ Chr(i3) & Chr(i4) & Chr(i5) & Chr(i6) & Chr(n) Exit Sub End If Next: Next: Next: Next: Next: Next Next: Next: Next: Next: Next: Next End Sub
- Press the F5 button on your keyboard.
- Click the Run button and wait for a couple of minutes.
- Wait till you see a report about a cracked password.
- Click on OK.
If this method is not what you are looking for, check the other methods given below in this post.
How to Unhide Rows or Columns in Excel
You will need to hide or unhide rows when working with spreadsheets in Excel eventually. It is essential to know how to do that.
That is why I have written the steps on how you can hide or unhide rows in Excel.
Here are the steps to Unhide or hide rows or columns in Excel:
- Select the columns and rows you want to modify.
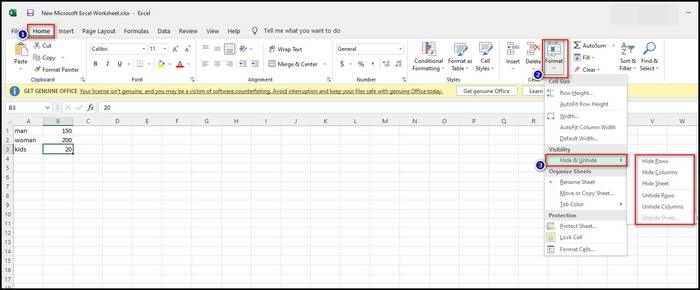
- Go to the Home tab.
- In the Cells area, click on Format.
- Click on Hide and Unhide.
- Click on Hide or Unhide rows or columns, depending on what you want to do. The selected columns and rows will be hidden or unhidden.
If this method is not what you are looking for, check the other methods given below in this post.
How to protect or unprotect cells in Excel
You can protect and unprotect cells in Excel. This feature is good for giving special privileges to whoever you want.
Here are the steps to lock protected cells in Excel:
- Open Excel.
- Click on Protect Sheet or Unprotect sheet under the Review tab.
- Type in a password. It is best you have a strong password.
- Check the box beside the Select locked cells option.
- Check the box beside the select unlocked cells option.
- Check the box beside the Insert columns option.
- Check the box beside the Insert rows option.
- Click on OK.
FAQ
Why don’t my arrow keys work in Excel?
This happens because the scroll lock feature is enabled on your device. Press the Scroll lock button on your keyboard to fix this problem.
Where is my Scroll Lock key?
The Scroll lock key is above the arrow keys on your keyboard.
How do I lock cells in sheets?
Select the cells you want to lock and press the F4 key to put a $ sign. Press f4 again to lock or unlock the cells.
Conclusion
As Excel is the most popular software or app for spreadsheets, it is good to know some basic functionalities of Excel. I hope I was successful in teaching you guys or girls on how to lock and unlock cells in Excel as it is a very important function. I wish you luck in your spreadsheet creations on Excel.


Thank you for those effort like this so helpful for those begginers like me..keepit up godbless
Hello jake, thank you so much that you liked our post. Follow our Excel, Word, and Outlook posts for more expertise.