PS5 console comes with only 825 GB SSD storage space. Well, that might sound enough for average gamers but for heavy gamers like you and me, it’s not enough.
However, PS5 resolves that problem by keeping an M.2 SSD expansion slot to ramp up the storage. Therefore, if you’re desperate to expand your PS5 storage and looking for a proper guide, this article is for you. Read along!
Why Should You Buy a Second SSD for Your PS5?
You must buy a second SSD for your PS5 console if you want more storage to download, copy, and launch PS4 & PS5 games. Additionally, you can install multiple media apps in that extended drive. Adding an extra NVMe SSD can increase the console’s storage.
As we all know, PS5 comes with only 825 GB of storage capacity, whereas system files take 157.8 GB, and you can only install games in the rest 667.2 GB. So, if you want to play more games simultaneously without uninstalling one or multiple, install an SSD without wasting any time.
Here are the reasons why you should buy and install an SSD to your PS5:
- Expand the game library.
- Don’t need to delete a game to install another game if internal storage is full.
- Install games that need bigger space.
- Transfer PS4 games to your PS5.
- Hassle-free M.2 SSD installing process.
- M.2 Gen4 NVMe storage is the fastest and improves gameplay.
- Move games from console storage to SSD storage.
How to Add an M.2 SSD to a PS5 Console
First, open the side panel to install an M.2 SSD storage to your PS5 console. Then unscrew the M.2 slot cover and remove the cover. Remove the M.2 screw and spacer and put it in the exact M.2 size hole. Then install the M.2 SSD securely and put back the cover. After that, attach the PS5 console side panel. And it’s done!
Then turn on the console, and the installed SSD should be detected automatically. Now, let’s show you the in-depth of the proper installation process and vice versa.
Here is the in-depth installation guide to add an M.2 SSD to a PS5 console:
1. Select the Perfect M.2 SSD
Choosing the right M.2 SSD for upgrading the SSD storage for your PS5 console is the first thing you must do. However, PS5 M.2 expansion slot does support the PCI-express Gen4x4 interface. And that M.2 NVMe SSD must be a socket 3 (Key M).
Apart from these, there are other requirements for selecting the perfect M.2 SSD for your PS5 console.
- Storage capacity: 250Gb – 4TB.
- Interface Type: PCI-e Gen4x4 M.2 NVMe SSD.
- Supported M.2 Sizes: 2230, 2242, 2260, 2280, 22110.
- M.2 Overall Size (Including heat dissipation mechanism):
Width: max 25mm, Length: 30/40/60/80/110mm, Thickness: max 11.25mm
- Sequential Read Speed: 5,500MB/s or higher.
- Socket Type: Socket 3 with Key M.
2. Open the Side Panel
After selecting the right M.2 NVMe, it’s time to open up the console and then install the SSD to upgrade its storage. But you must need certain things before you start removing the side panel.
- Phillips or crosshead screwdriver.
- Soft cloth to put the console.
- Room with proper lightning.
- Anit-static wristband.
Once you grab all these things, it’s time to open the PS5 console’s side panel. Here’s how to do that:
- Turn off the PS5 and unplug all the cables from it.
- Wait a bit for the PS5 to cool down.
- Place the PS5 console over a table on a soft cloth.
- Ensure the PS logo is facing down and the ports are facing toward you.
- Use your right hand to grip the edge of the bottom right corner and your left hand to grip the edge of the top left corner of the white cover.
- Gently lift the cover-up with your right hand and use your left thumb to slide the cover off.
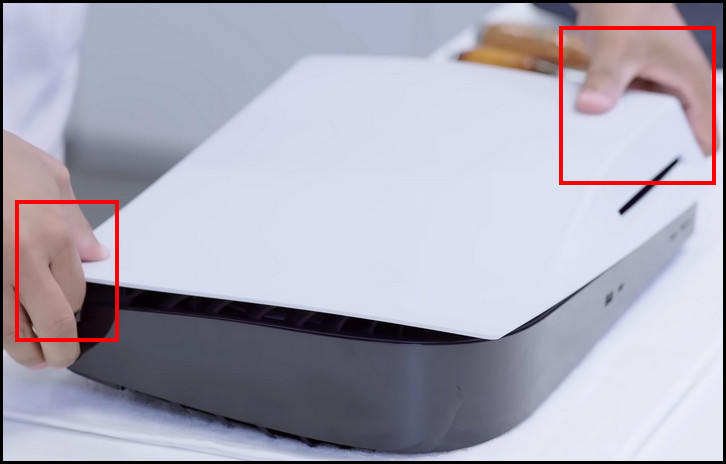
Bravo! You’ve opened the PS5’s side panel without any damage.
3. Remove the M.2 Slot Cover & M.2 Screw
Once the cover is removed, you’ll see the white rectangular-shaped cover. Now, gently remove the screw that is holding the cover. Keep the screw safe at the side. Now, you’ll see a small screw with a washer sitting on the far-right hole. Remove the screw and the washer. 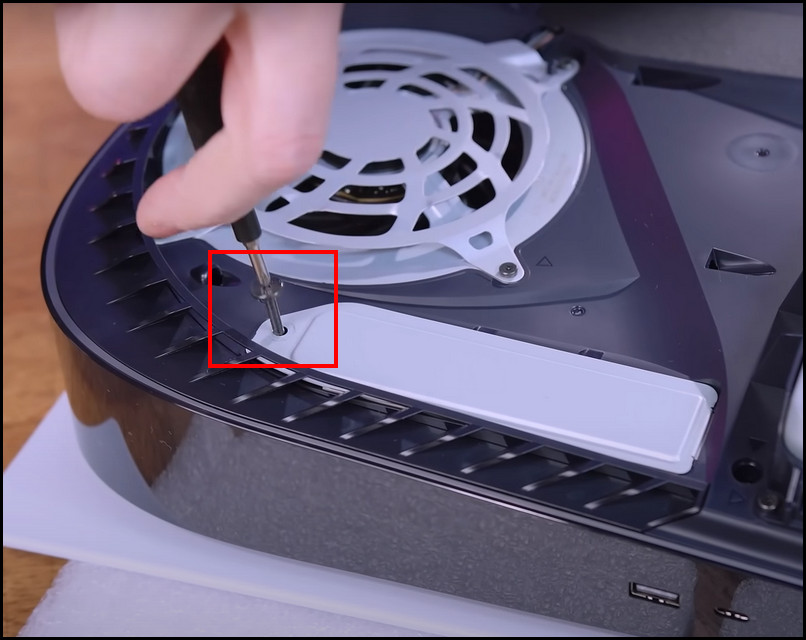
4. Place the Washer in the Correct M.2 Size Indicated Hole
There will be five holes indicated with the different M.2 sizes. So, check the exact length of the SSD and put the washer on the exact hole. For example, if your M.2 SSD size is 2280, put the washer in the hole marked 80. 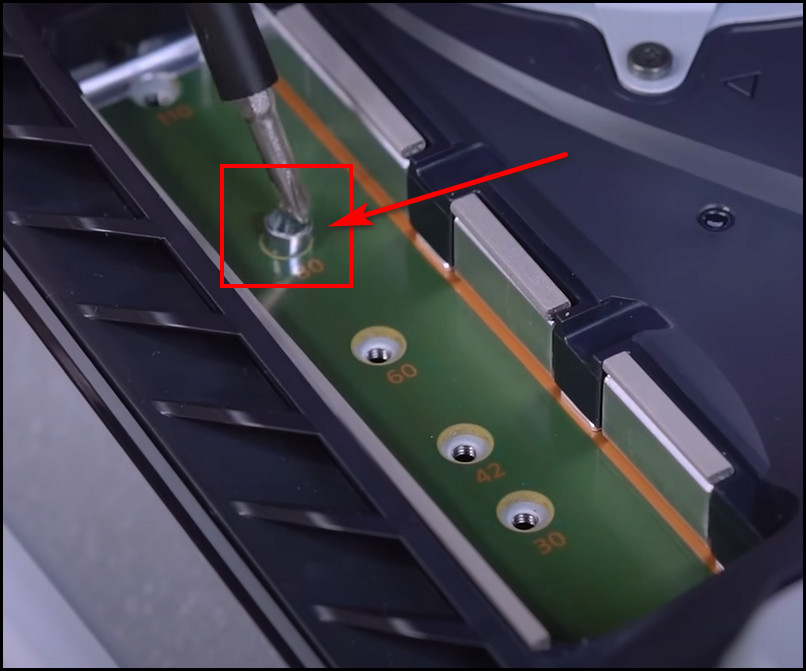
5. Install Heatsink on the M.2 SSD
When you’re trying to install an additional M.2 SSD to your PS5 console to load more games on it, remember to install a heatsink on the NVMe storage. It’s because PS5 requires proper heat dissipation from the storage devices for the best in-game experience.
Plus, Gen4 SSDs get too hot while it’s under load. So, you can install a single-sided heatsink with one thermal pad or a double-sided heatsink with two thermal pads to handle faster heat dissipation from the SSD.
However, many Gen4 M.2 SSD does come with a heatsink. So, you don’t need to install the heatsink if you buy one of those.
6. Securely Install the M.2 NVMe
Now, it’s time to install the M.2 SSD into the PCIe slot. So, hold the edge of the M.2 SSD and align the notch with the connector. Now gently push the M.2 diagonally upward and insert all the way in. 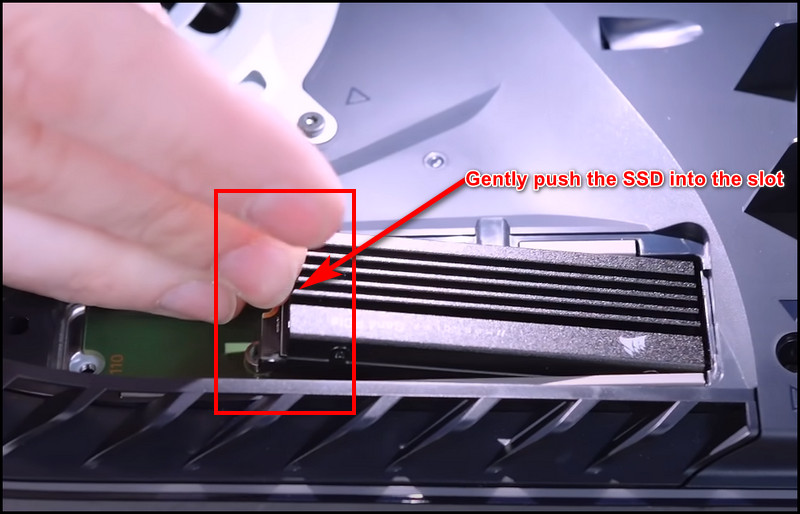
The M.2 SSD should rest flush on the spacer without obstructing the cooling structure. Ensure you installed the SSD properly in the expansion slot; otherwise, it might damage the slot or the SSD.
Now firmly push down the SSD on the washer and fasten it with the screw. And remember to check that the cooling structure should not obstruct the screw. 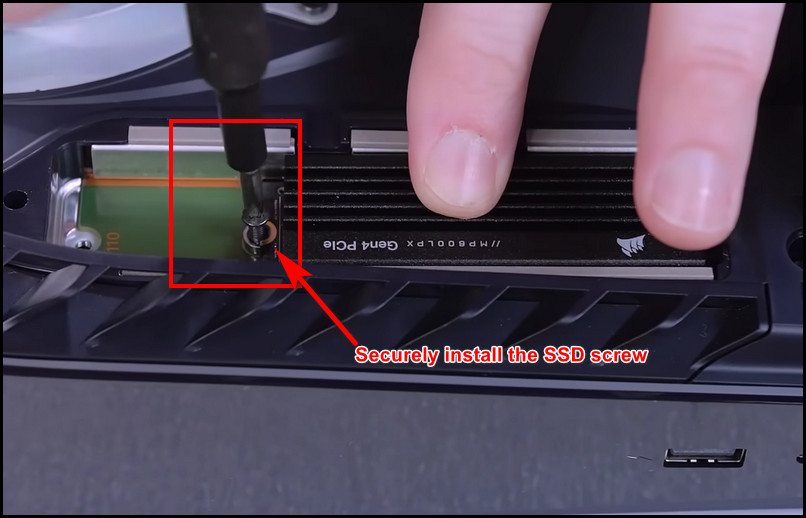
7. Install the M.2 Cover and Console’s Side Panel
Attach the removed white cover after securely installing the SSD and fasten it with the screw. If the heatsink size exceeds the limit, you won’t be able to attach the cover properly. So, ensure the SSD heatsink meets the required size before buying the SSD or heatsink. 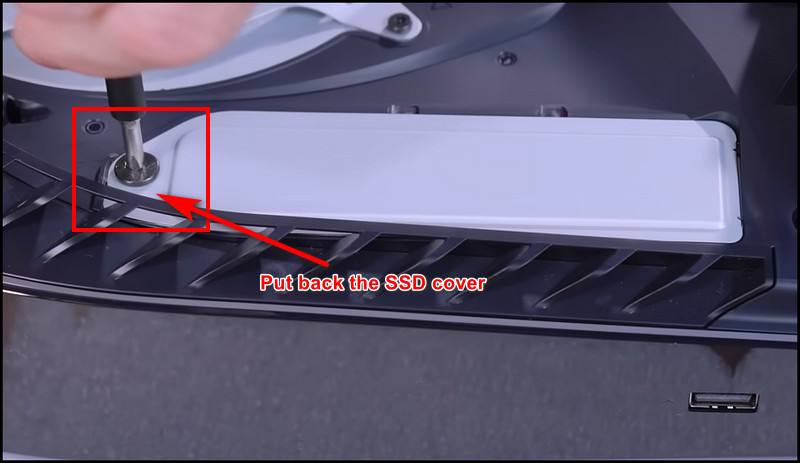
Now it’s time to put back the side panel. So take the panel and place it slightly away, about 3 to 4 inches from the top edge. Then gently slide it into the place until you hear a clicking sound. Once you hear it, it has been securely attached. 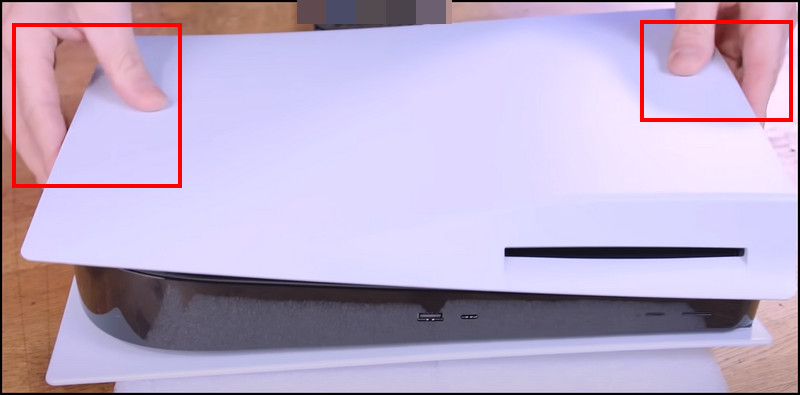
8. Plug in All the Cables and Turn it On
Now, place the PS5 console where you set it and plug in all the cables, power cord, and base. Connect with your TV or monitor via the HDMI cable and turn it on.
The console should boot immediately after hitting the power button. Now it should detect the installed SSD, and you’ll be asked to format it. Choose the Format M.2 SSD option and wait a few minutes till the formatting is complete.
That’s it. Now you don’t have to worry about the console storage or whether it is full! You can install any game directly on this expanded drive and play without worrying.
How to Install Games & Apps on M.2 SSD on PS5 Console
You can change the default installation location in PS5 after upgrading the storage with an M.2 SSD. To change the install location from the Console to M.2 SSD, go to Settings > Storage > Installation Location. And choose M.2 SSD Storage for PS5 Games and Apps.
Here are the steps to install games & apps on the M.2 SSD Storage on the PS5 console:
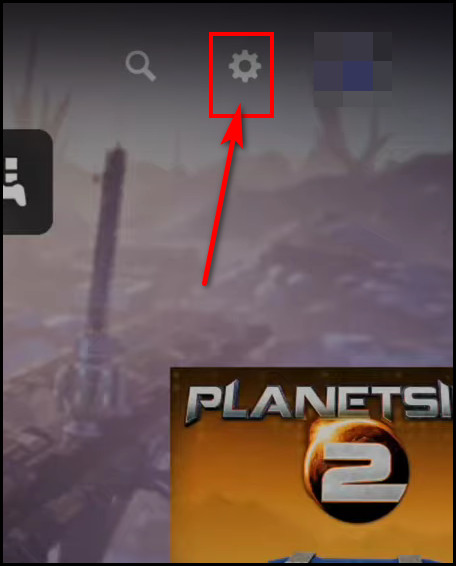
- Press and hold down the PS button on the console to bring the Home screen.
- Select the cog icon or Settings.
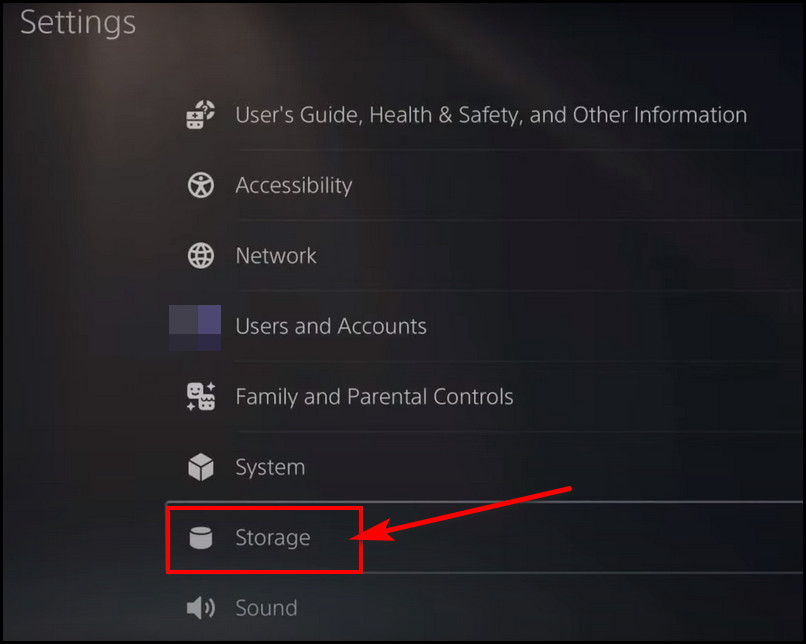
- Go to Storage > Installation Location > PS5 Games and Apps.
- Choose M.2 SSD Storage option.
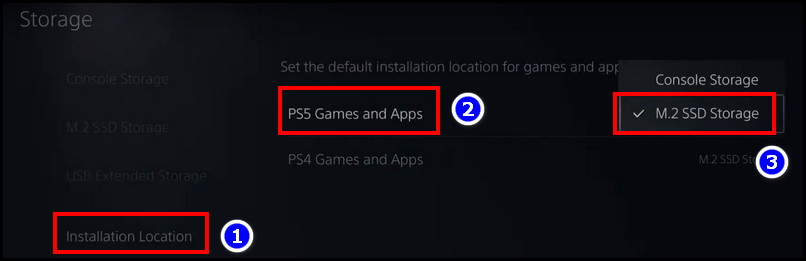
From now, when you download new PS5 games, it will automatically get installed into the expanded M.2 SSD storage.
Move PS5 Games from the Console Storage to M.2 Storage
To free up some console storage by moving installed games to the M.2 SSD, go to Settings > Storage > Console Storage > Games and Apps. Select the game that you want to move and press the X button. Choose the Select Items to Move. Select one or more games and select Move. 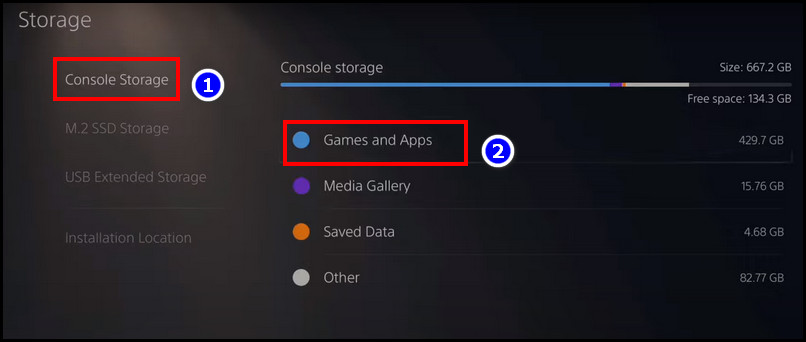
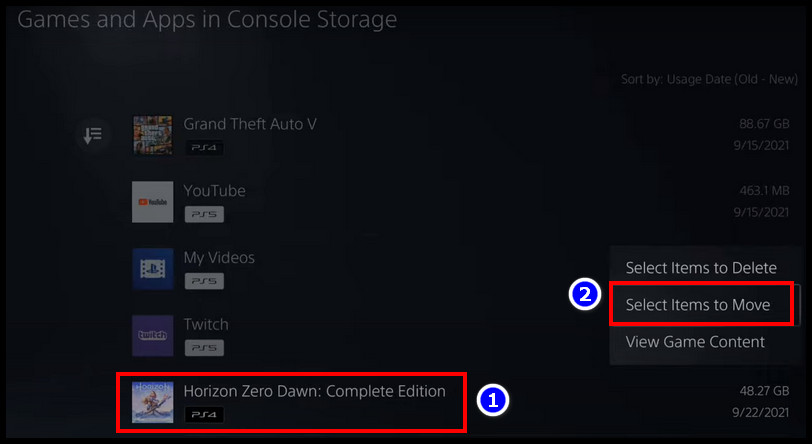
After that, select the OK button from the confirmation prompt. 
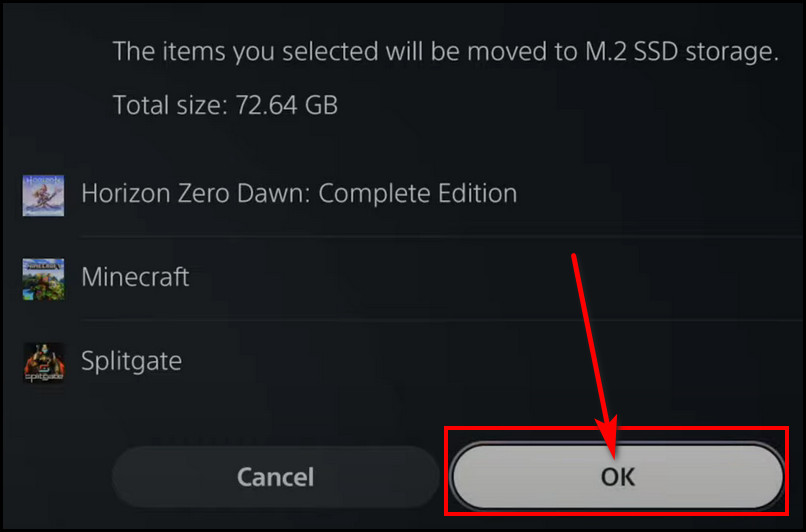
That’s it! Similarly, you can also move games from internal storage to M.2 SSD storage in your PS5 console.
FAQs
Can I put any SSD in the PS5 console?
You can’t put any SSD in the PS5 console. The M.2 SSD interface should support PCI-e Gen4x4 NVMe with an M key. Plus, that NVMe SSD must be the socket 3 type. Also, the SSD must contain a heatsink, or you must install a heatsink on it separately.
What is the maximum SSD storage capacity for PS5?
You can expand your PS5 console storage by installing an M.2 NVMe. But there is a capacity limitation for that, and you can install a minimum storage capacity of 250GB or a maximum capacity of 4TB on your PS5 console.
Is the PS5 storage upgradable?
PS5 console comes with only 825 GB of console storage. But this new console allows you to increase the storage by installing an M.2 SSD. After installing the SSD, you can use its space as the default game installation location or move installed games from the console storage to it.
Final Words
PS5 rocks the gamers with its immersive gaming experience. However, the internal storage failed to seduce the heavy gamers.
That’s why PS5 surprised everyone by putting an expansion SSD slot where you can install the fastest Gen4 SSD up to 4 TB. In this article, I have covered in-depth steps to mount the SSD to expand the storage securely.
I bet you can install it without a problem if you follow my steps correctly. Also, comment below for further assistance. Enjoy gaming!