Numerous user accounts are beneficial for family and work usability. And Microsoft allows the user to change the Administrator account by assigning another user account as an admin.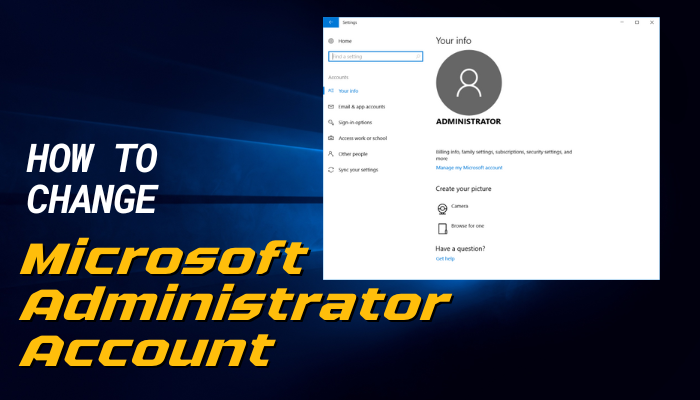
However, if you’re desperately seeking a way to change your Windows admin account, this guide is all you need. Read along and change the account type.
How to Change Microsoft Administrator Account on Windows 10/11
You can change the Windows PC’s admin account using the Settings app. Just launch Windows Settings by pressing the Windows key + I. Navigate to Accounts > Family & other users. Click on the account and select the Change Account type button. Choose Administrator and then click OK.
However, you can also change the Microsoft account type from the Control Panel. But the Settings app becomes more convenient, and its user-friendly UI greatly helps the user to navigate all the settings.
Furthermore, I’ll show you both ways to change the administrator account on Windows 10 & 11.
Here are the methods to change the admin account on Windows 10/11:
1. Change Windows Admin Account in Settings
Windows settings app becomes more straightforward and user-friendly in Windows 10 & 11. And if you have multiple user accounts added on Windows, you can make anyone an admin account. Let’s see how to change the admin account from Settings on Windows 10 & 11.
On Windows 11
Windows 11 Settings app is more refreshed, and its UI looks more straightforward than Windows 10’s. You can change the Windows Microsoft admin account from Windows 11 Settings app within a minute.
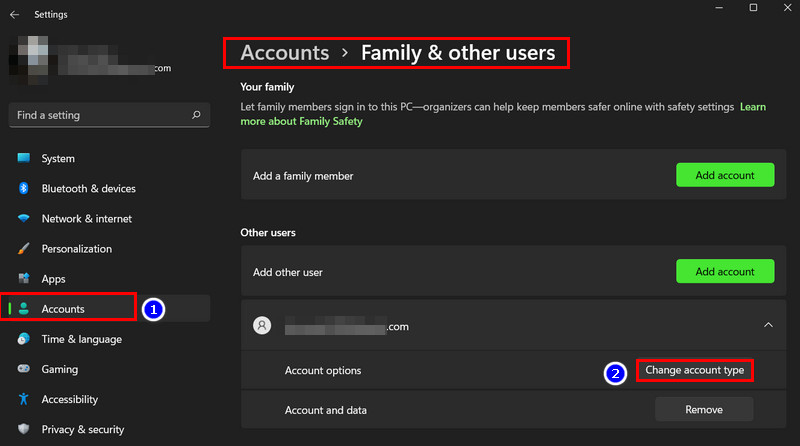
- Press Windows key + X and select Settings. Or press the Windows key + I to launch it directly.
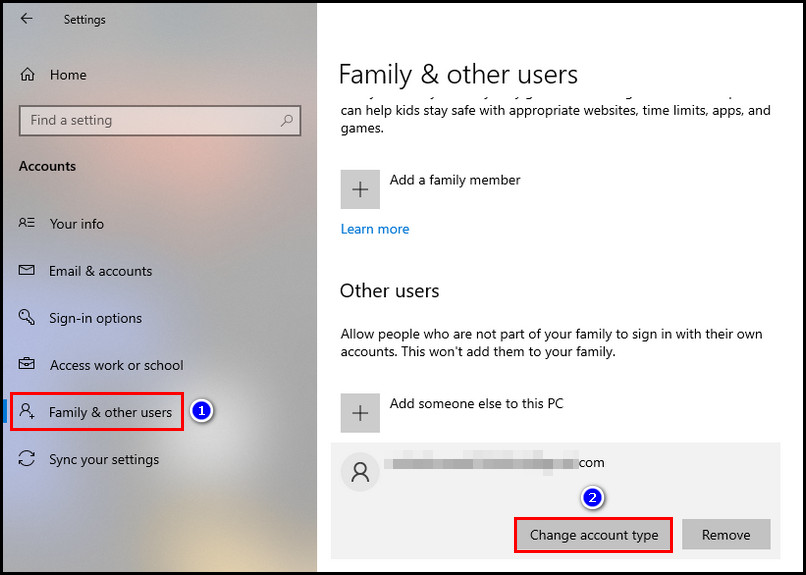
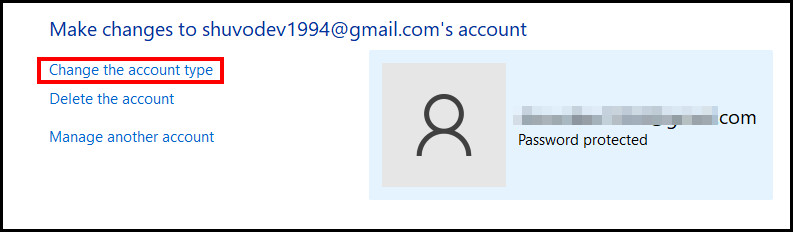
- Select Accounts > Family & other users.
- Look for the Other users section and click on the user account you want to assign as an admin.
- Select the Change account type button.
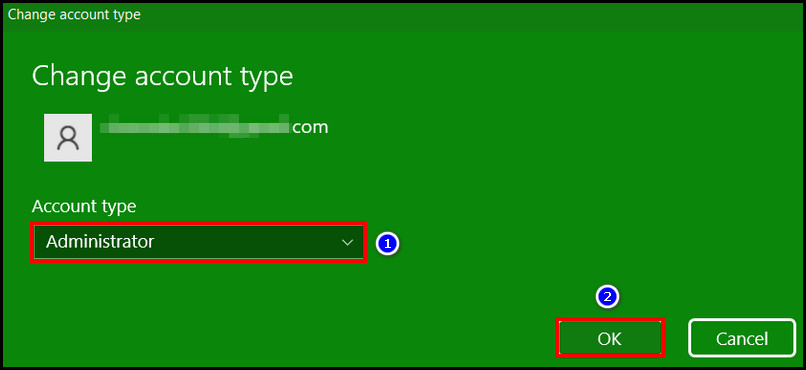
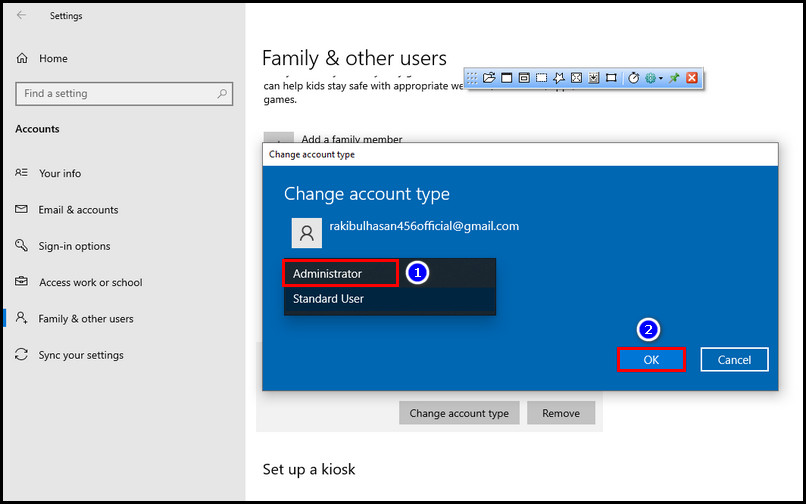
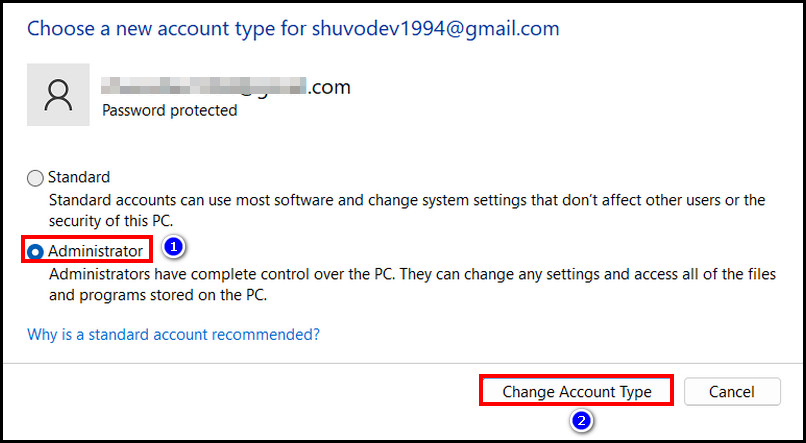
- Click the Account type’s drop-down button, and choose Administrator.
- Select the OK button.
Now the user account will transform into an Admin account from a standard user.
Apart from changing the Microsoft admin account, you can also create multiple guest accounts in Windows 11. You can modify the guest accounts and only give limited access to your PC so that other people can’t access your personal files or modify settings.
On Windows 10
Changing the Microsoft admin account from Windows 10 Settings app is quite similar to doing it from Windows 11.
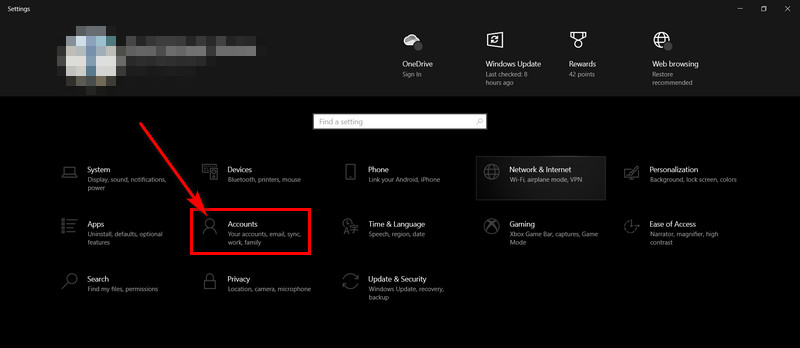
- Launch Windows Settings app by pressing Windows logo key + I.
- Select Accounts from the setting menu.
- Click on the Family & other users option from the left pane.
- Go to the Other users section and click on the account you want to add as an admin.
- Select the Change account type button.
- Choose Administrator and click OK.
However, following the above steps, you can also change the Administrator account type to Standard user. But instead of Administrator, choose Standard user account type.
Speaking of changing the admin account, you can use multiple Microsoft accounts on one PC. And the method is pretty simple.
2. Change Windows Admin Account from Control Panel
Windows Control Panel is the old way to modify Windows settings. From Windows 7 to Windows 11, it is still in the OS. You can change your Microsoft admin account from the Control Panel as you do in the Settings app. Let’s see how to do that.
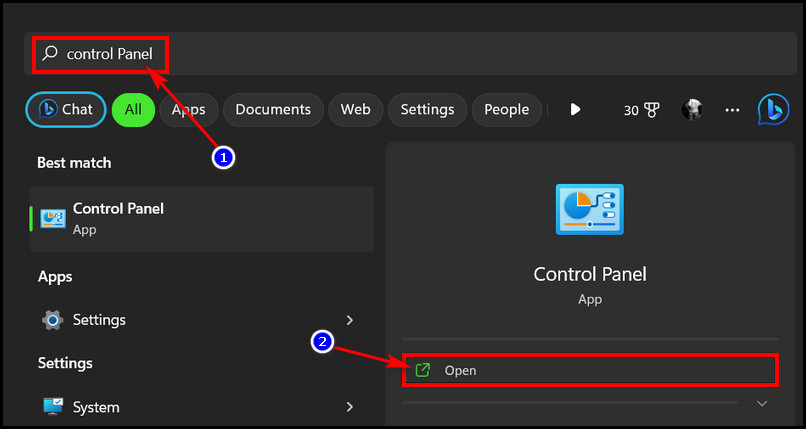
- Go to Windows search from the Taskbar.
- Search control panel in the search bar.
- Launch it from the search result.
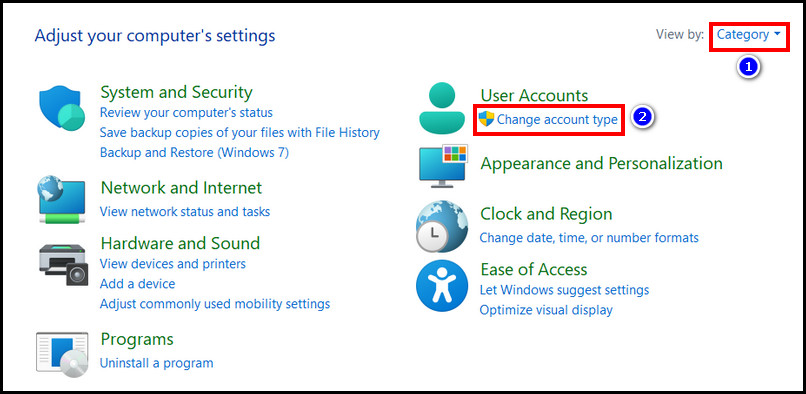
- Ensure the View by is set to Category.
- Click on the Change account type option under the User Accounts section.
- Select the account that you want to assign an admin to.
- Click on the Change the account type option.
- Select the Administrator radio button to select it.
- Click on the Change Account Type button.
That’s it. You have successfully changed the Microsoft Administrator account from the Control Panel.
3. Modify Windows Admin Account from Advanced User Accounts Control Panel
You can modify a Windows user account and change the account type to Admin from the advanced user accounts control panel. Let me show you how to do that quickly with the proper steps.
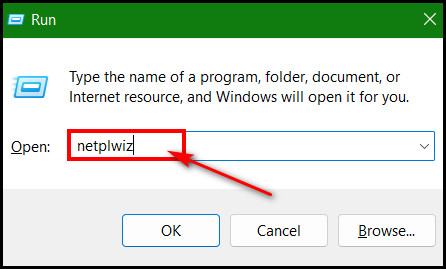
- Press the Windows logo key + R to launch the Run dialog box.
- Type in netplwiz in the command box and hit Enter.
- Double-click on the account that you want to assign as an admin.
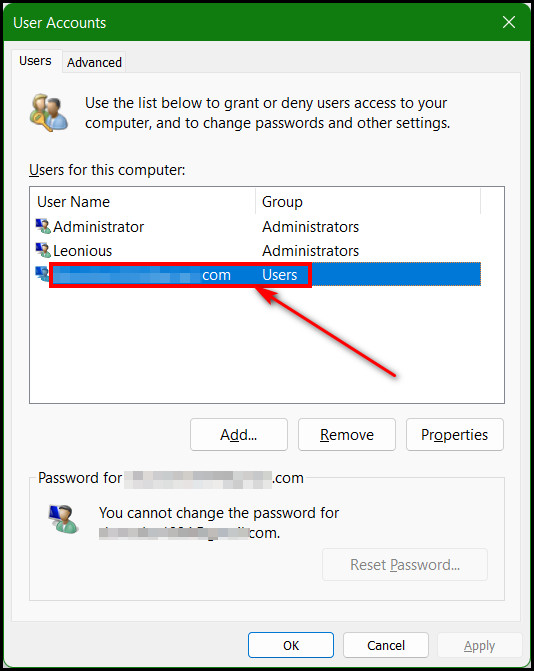
- Select the Group membership tab.
- Choose the Administrator option.
- Hit Apply > OK after that to save the changes.
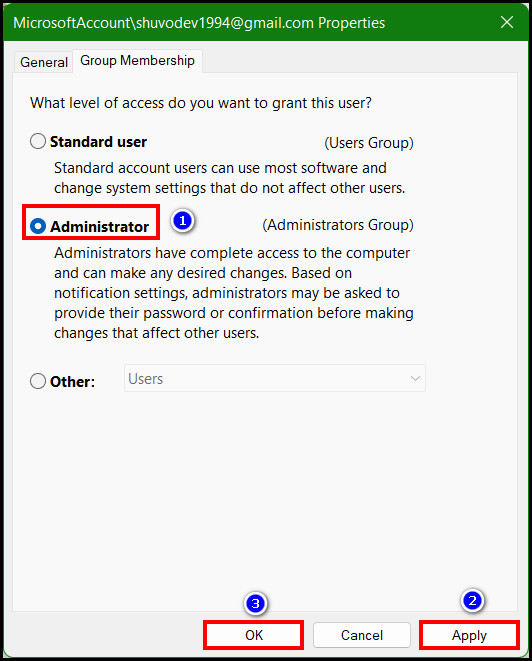
Now, you will see that the account has been changed to an admin account from the user account. Similarly, you can transform the admin account into a standard one by following the same procedures.
How to Change Microsoft Administrator Account Name
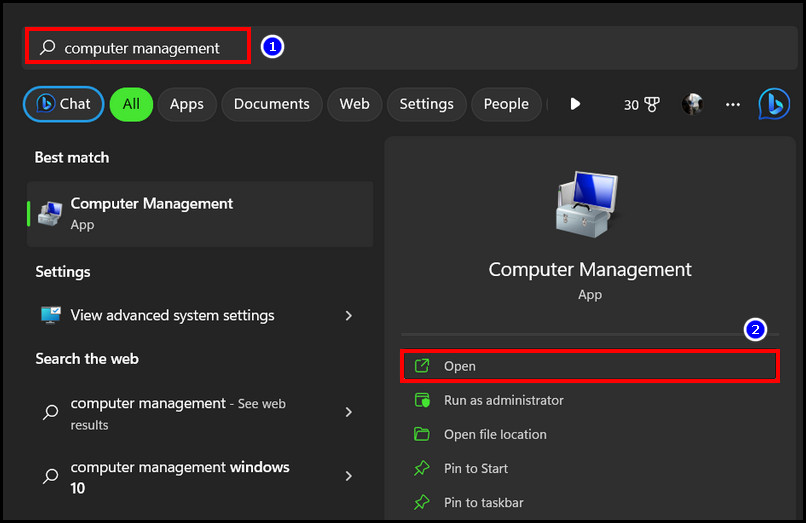
You can also change the Microsoft admin account name. To change the admin account name, launch the Computer Management app. Go to Local Users and Groups and open Users folder. Right-click on the Administrator account under the name field and select Rename option.
Windows admin account renaming procedure is short and simple. So, if you don’t like the admin account titled “Administrator,” you can rename it as you wish by applying the following steps.
- Press Windows key + S and search for computer management.
- Launch the app from the search result.
- Click on the Local Users and Groups from the left pane.
- Open Users folder by double clicking on it.
- Right-click on the Administrator account.
- Select Rename from the context menu.
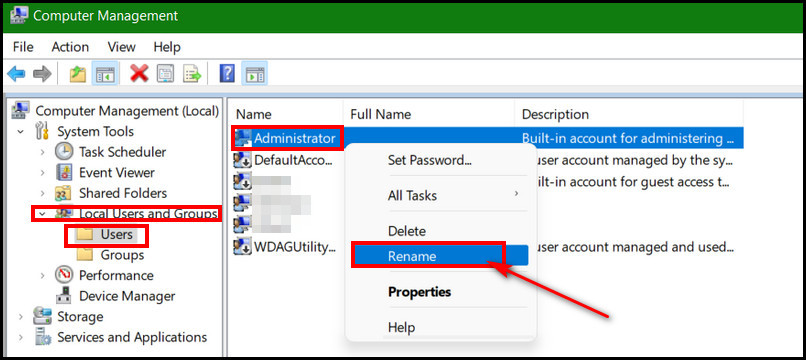
- Enter the account name as you wish, and hit Enter.
The admin account will get renamed to the given name at that instance.
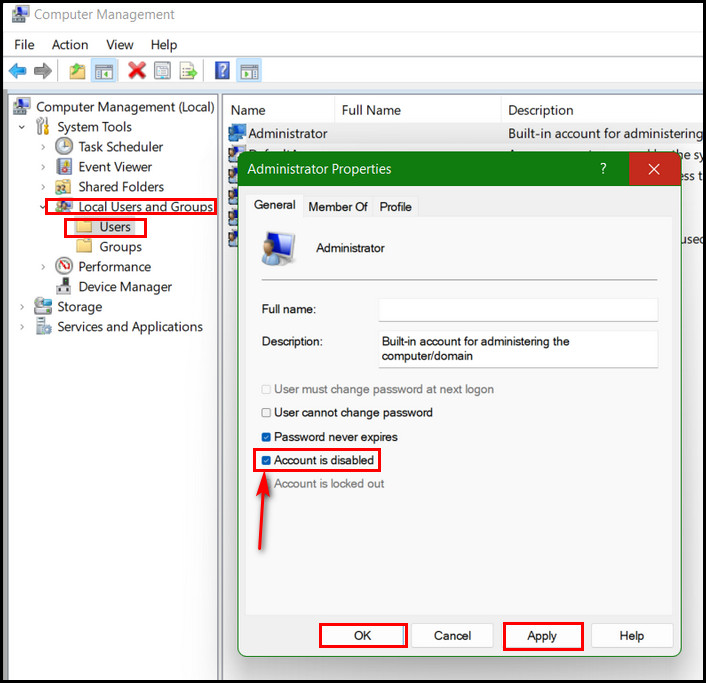
How to Disable Microsoft Administrator Account
To disable a Microsoft admin account, go to Compute Management app. Navigate to Local Users and Groups > Users. Double-click on the Administrator account and select the General tab. Next, check the box for Account is disabled option. Then click Apply > OK to complete the disabling process.
Windows supports multiple admin accounts. However, Windows OS has a default admin account titled Administrator. So, if you have another admin account and want to disable the default one, you can do it. Let me show you how to disable an admin account by the following steps.
- Right-click on the Windows start icon.
- Launch Computer Management from the list of apps.
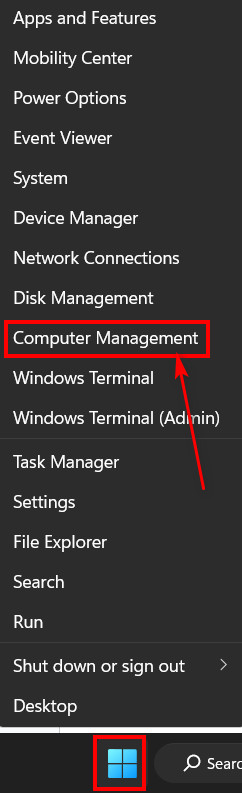
- Select Local Users and Groups > Users under the System Tools section.
- Double-click on the Administrator account.
- Select the General tab.
- Tick mark Account is disabled option.
- Select Apply > OK.
After disabling the default admin account, it will still exist in the system but won’t appear as an option when logging in.
Note: You can still get into the recover console after disabling the default admin account. So, in the future, you won’t get locked out due to deactivating the administrator account.
FAQs
How can I remove an admin from my Microsoft account?
To remove an admin account from Windows, Press Windows key + I to initiate the Settings app. Go to Accounts and then select Family & other users. Click on the admin account to be deleted, and select the Remove button. Finally, complete the process by clicking the Delete account and data button.
Can I change Administrator account in Windows?
You can change the admin account in Windows. Go to Settings > Accounts > Family & other users to do that. Click on the account under the Other users from the right pane. Select the Change account type button and choose the Administrator account type. Then click the OK button.
How to rename a Windows admin account?
Launch the Computer Management app to rename a Windows account from Administrator to anything you wish. Go to Local Users and Groups > Users. Right-click on the admin account name that you want to change. Select Rename option and enter the name you want. Hit Enter after that.
Final Words
Changing the Microsoft admin account is required when you want to assign another account with admin rights. Windows supports multiple admin accounts, changing any user account type.
In this article, I have shown several paths to changing the admin account and appointing another account with that role. Also, demonstrate the steps to renaming and disabling an admin account.
Please leave a comment if you need more help regarding Windows or Microsoft. Good luck!