Are you facing stuttering while playing a game or using a program? It hinders your smooth gameplay experience and makes you frustrated with constant stuttering.
When the issue occurs, it freezes the display of a specific program or affects the whole system. The problem is very irritating, and you may wonder if it’s only happening to you.
Well, it’s a very common issue, and users face this problem often. If you face the same stuttering issue in Windows 10, you are in the right place.
This article will explain the reasons and the ways to fix the stuttering issue in detail.
Without wasting any time, let’s start!
Why My Computer is Stuttering in Windows 10
The computer is stuttering in Windows 10 due to Windows update problems, wallpaper slideshow issues, extreme background process, and excessive temperature. Additionally, software issues, driver issues, and damaged files can create stuttering in your system.
Stuttering can be painful, and a lot of causes are responsible for this problem. You’ll get a broad knowledge about the reason from the passage below.
Here are the reasons behind stuttering on Windows 10:
Windows Update Problem
New Windows updates may contain bugs and issues. Installing them may create stuttering in your system. Also, any error while installing the updates can create a problem.
In most cases, outdated Windows updates create stuttering problems because they can’t cope well with the latest security updates and optimization.
Wallpaper Slideshow Issue
The wallpaper slideshow program takes a lot of space and resources. It takes time every time you come to the loading screen. If the feature is enabled, you may face stuttering in your system.
Also, check out our separate post on 12 Ways to Fix Microsoft Teams Keeps Freezing My Computer.
Extreme Background Process
Programs running in the background occupies your resource and slows your current process. Running many applications together can reduce the performance of your system, and you may face stuttering problems.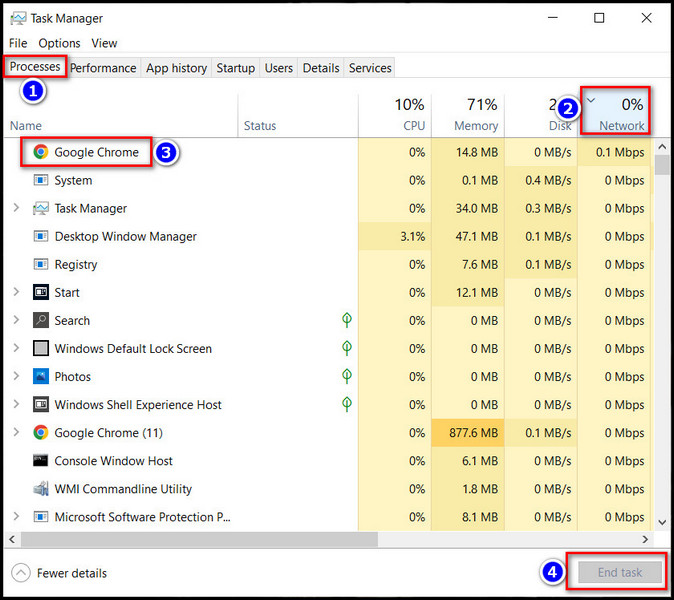
Excessive Temperature
Excessive temperature is not suitable for your computer. The heatsink and thermal paste is the most common reason for excessive temperature. Extreme heat reduces the performance of CPU and GPU and creates stuttering issues.
Software Issue
Some third-party apps can become problematic and occupy a lot of space and resources on your computer. Your system can prioritize the application over other applications and create a stutter.
Corrupted Files Problem
Due to malware or bugs, the essential system files can be corrupted or damaged. Some programs associated with the files can misbehave and show stuttering while you operate them.
I’ve seen many users find it difficult to fix the stuttering problem. You may find them critical if you don’t follow the appropriate solutions. The following passage will guide you to resolve the issue without difficulties.
You can check out the new post on Can Your Employer Ask for Your Computer Password.
How to Fix Computer Stuttering on Windows 10
The stuttering issue in Windows 10 can be solved by installing the latest Windows updates, disabling wallpaper slideshows, and stopping the background applications. Also, disabling the notification and action center and clearing the disk space can fix your issue.
There are additional solutions to fix the problem. The problems are very effortless, and you can quickly solve the issue by following the instructions below.
Here are the ways to fix stuttering in Windows 10:
1. Install New Windows Update
Old or outdated windows updates can be problematic. You’ll miss out on new features, security patches, various fixes, and optimization necessary for your computer to maintain stability.
Also, old Windows versions can create issues with stuttering. Install new Windows updates to solve the stuttering issues.
Here are the procedures to install new Windows updates:
- Go to Start.
- Search Check for updates on the search bar.
- Press the Check for updates button or install the downloaded version from the Windows Update section.
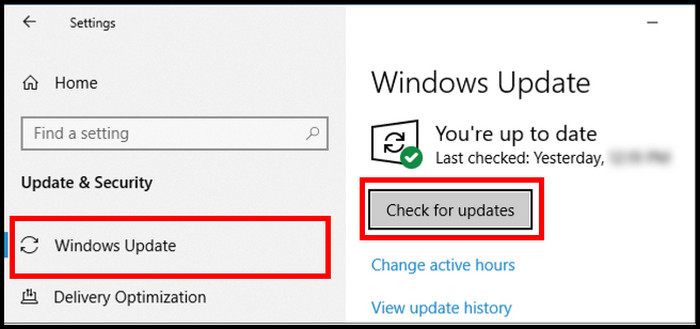
- Complete the update process.
Once the new update is installed, check if the stuttering issue in your Windows 10 is still happening.
Check out my new post on how to Adjust Computer Energy Consumption.
2. Rollback to Previous Windows Update
Although updating to the new version works as a charm most of the time. But, new updates may contain bugs that can create stuttering issues. If you face the problem after giving a recent Windows update, try rolling back to the previous version.
Here is the way to rollback to a previous Windows update:
- Click on the Windows search option.
- Search and open Check for updates.
- Press on the View update history.
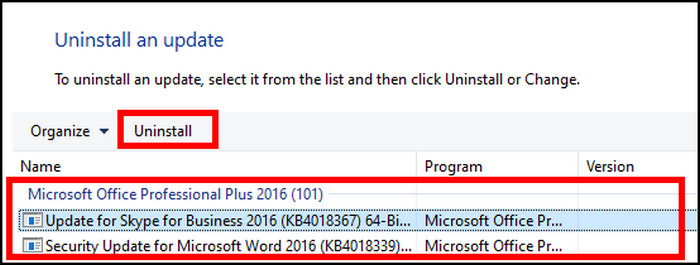
- Click on the Uninstall updates option from the top.
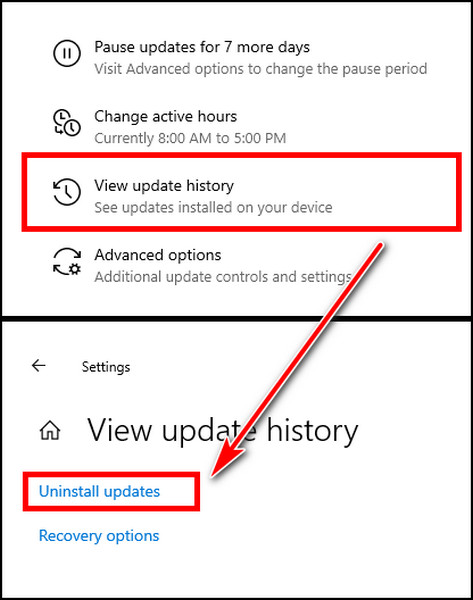
- Choose the problematic updates and click on Uninstall.
3. Disable Wallpaper Slideshow
The wallpaper slideshow is a wonderful feature that gives your home screen a new appearance. But, it’s a resource-hungry feature that occupies a lot of space in your system and creates a loading screen stuttering.
If you’re facing any loading screen stuttering problems, it’s better to turn the feature off. Here’s how to do it properly.
Here are the steps to disable the wallpaper slideshow:
- Right-click anywhere on the desktop.
- Click on Personalize.
- Go to Background.
- Press on the drop-down menu named Slideshow.
- Choose Picture or Solid color options.
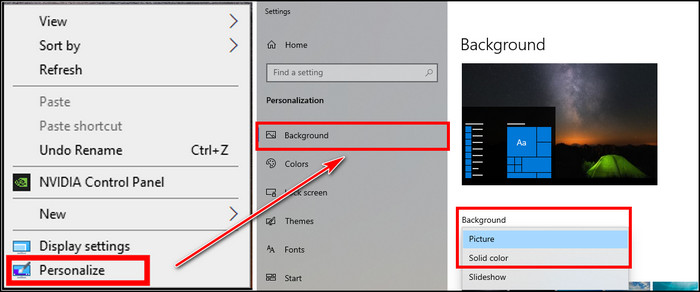
Choosing the Picture or Solid color option will disable the Windows wallpaper slideshow. It should fix the issue with your loading screen stuttering in Windows 10.
4. Close Background Programs
Despite your powerful computer, it’ll lag, or you will face stuttering issues if you run many programs in the background. You need to close the unnecessary application from the Task Manager. Allow me to guide you with the background program closing procedures.
Here is the process to close background programs:
- Open Task Manager.
- Select the background application that occupies a lot of resources.
- Press on the End Task button.

Closing the unnecessary background application should solve the Windows 10 stuttering issue.
5. Disable Notification and Action Center
Notification and Action Center shows all the system notifications of your computer. Several users have mentioned that disabling notification and action center have resolved their issues with the Windows 10 stuttering. Consider following the instructions to disable the option.
Here are the procedures to disable the notification and action center:
- Press Win + R together to open the Run dialog box.
- Paste msc and press the Enter button.
- Navigate to User Configuration > Administrative Templates > Start Menu and Taskbar.
- Look for Remove Notifications and Action Center from the right pane.
- Double-click on the option.
- Choose the Enabled radio button.
- Click on Apply and then OK.
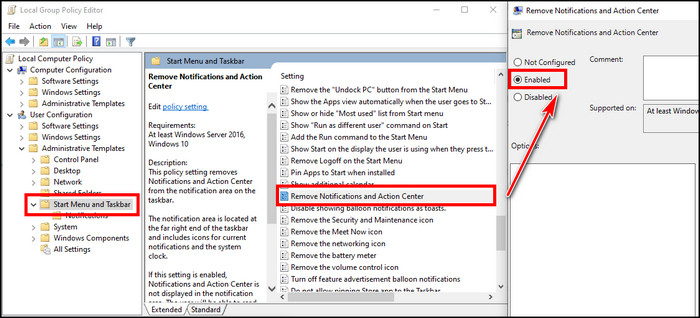
- Restart your computer and see if your problem is solved.
6. Free Up Disk Space
A program needs some space from your hard drive. If the disk space is almost full, especially the C: drive, the program may not run properly, and you can face stuttering issues.
Also, your system gathers temporary files and caches over time. They reduce the stability and increase the program executing time. Clear the unnecessary temporary files and cache to resolve the stuttering problem.
Here are the steps to free up disk space:
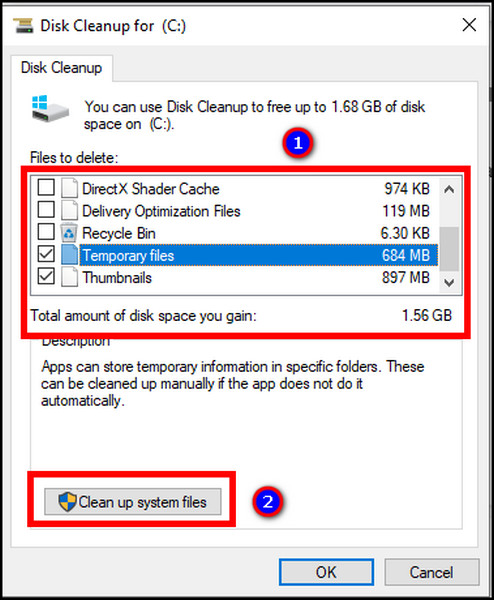
- Search Disk Cleanup from the Windows search box.
- Select the drive.
- Choose the temporary files, thumbnails, and other unnecessary files you want to delete.
- Click on the Clean up system files.
7. Check CPU & GPU Temperature
The CPU and GPU are the powerhouses of a computer. They don’t work properly if they get too heated. Excessive heating reduces the performance; as a result, users may face severe stuttering issues.
Monitor your CPU and GPU temperature and ensure they are running well. If you see abnormal temperatures, the reason can be the heatsink or thermal paste isn’t working correctly. Change the thermal paste and heatsink or go to a computer expert to resolve the problem.
8. Update Graphics Card Driver
Users face stuttering issues when the program and your display aren’t syncing correctly. The latest driver updates help with the syncing issue and smooth the experience. However, you can face problems using an outdated driver.
Here are the steps to update the graphics card driver:
- Search Device Manager from the Windows search menu.
- Go to Display adapters.
- Right-click on the display adapters.
- Press on the Update driver.
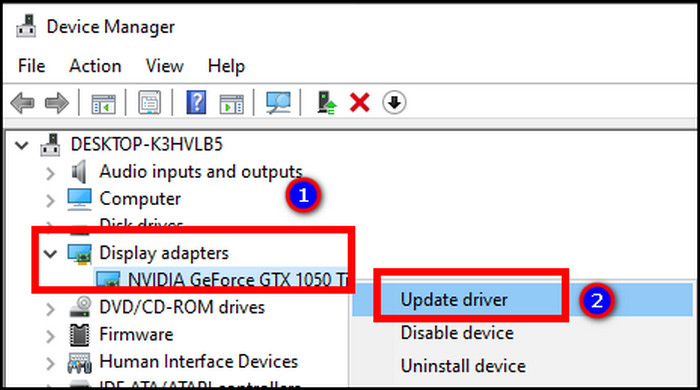
- Click on Browse my computer for drivers.
- Select Microsoft Basic Display Adapter.
After updating the display adapter, restart your computer to see if the issue has been solved.
9. Update IDE ATA/ATAPI controllers driver
IDE ATA/ATAPI or Integrated Drive Electronics is a convenient interface for IBM congenial hard drives and CD or DVD drives. Users have stated that updating the driver worked as a fix for them.
Here is the process of updating the IDE ATA/ATAPI controllers driver:
- Go to Device Manager.
- Expand IDE ATA/ATAPI controllers.
- Right-click on Standard SATA AHCI Controller.
- Press on the Update driver.
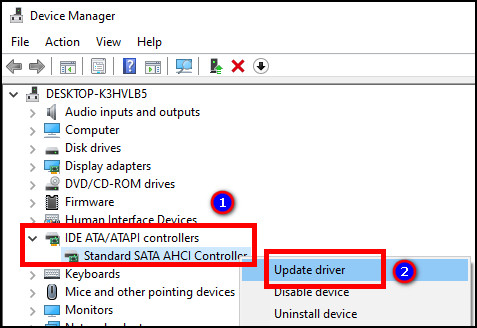
- Choose Search automatically for drivers.
- Complete the updating process.
10. Search for Software Issue
A problematic software can create stuttering on your Windows 10. Search for the problematic software from Task Manager and follow the instructions below to take necessary action.
Here are the steps to search the problematic software from Task Manager:
- Open Task Manager.
- Look at the Process tab for the apps using a lot of resources.
- Select the problematic application and press the End Task button.
If the problem still appears, continue reading the article for more solutions.
11. Resolve Power Management Problem
Setting an incorrect power plan can lead to a stuttering problem. A power-hungry program may require more power than provided and become incompatible with your current power plan. Restoring the power plan can fix the issue quickly.
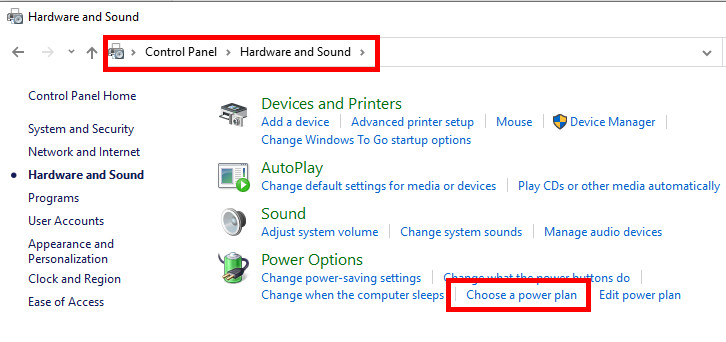
Here are the procedures to restore the power plan:
- Open Control Panel.
- Click on the Hardware and Sound.
- Select Choose a power plan from the Power Options.
- Click on the Change plan settings.
- Press on Restore default settings for this plan.
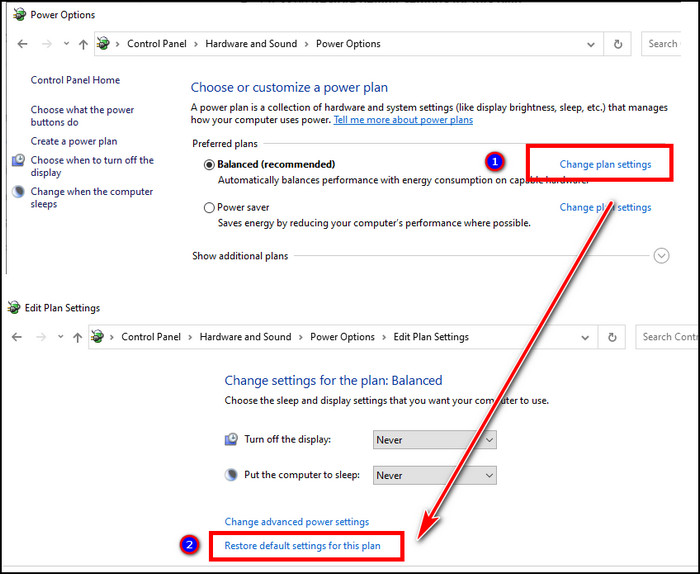
- Restart your computer.
12. Run Windows Troubleshooter
Windows troubleshooter helps you to find a problem in your system. Run the troubleshooter to identify the problem that is causing the stuttering issue. Follow the instructions carefully to run the troubleshooter.
Here is the process of running Windows troubleshooter:
- Open the Control Panel.
- Search Troubleshooting from the search box at the top right.
- Click on View all from the Troubleshooting options.
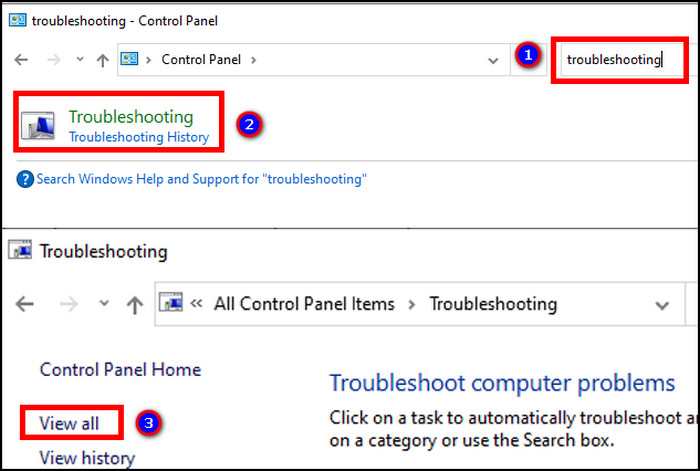
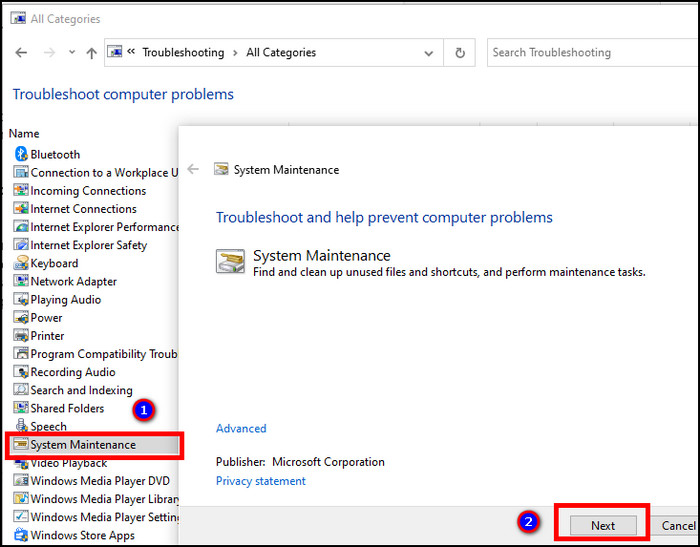
- Find System Maintenance from the list.
- Click on it and run the troubleshooting process.
13. Disable CD/DVD Drive
Most modern computers don’t use the CD/DVD drive anymore. Sometimes the CD/DVD drive keeps loading and creates stuttering issues. If you have a CD/DVD drive, you need to disable the CD/DVD drive to resolve this problem.
Here are the steps to disable CD/DVD drive:
- Go to Device Manager.
- Expand CD/DVD ROM drives.
- Right-click on the drive and go to Properties.
- Navigate to the Driver tab.
- Click on the Disable Device button.
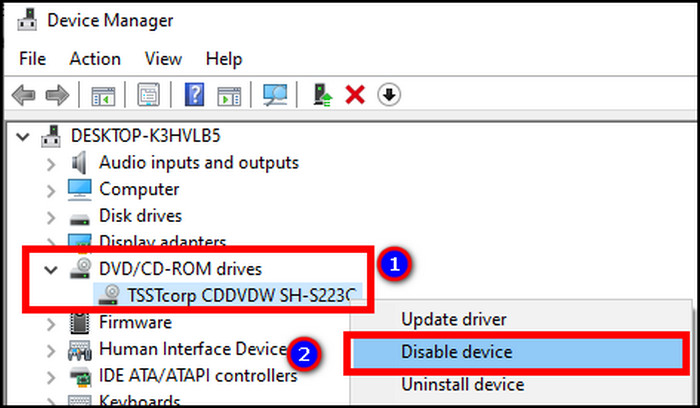
- Select Yes and then press OK to save the changes.
14. Scan System Files for Corruptions
If the above solutions didn’t work for you, there’s a high chance your system files got damaged or corrupted. You need to run the SFC or System File Checker to repair all the corrupted files.
Here is the way to scan system files:
- Press Win + R together.
- Paste sfc /scannow and click on OK.
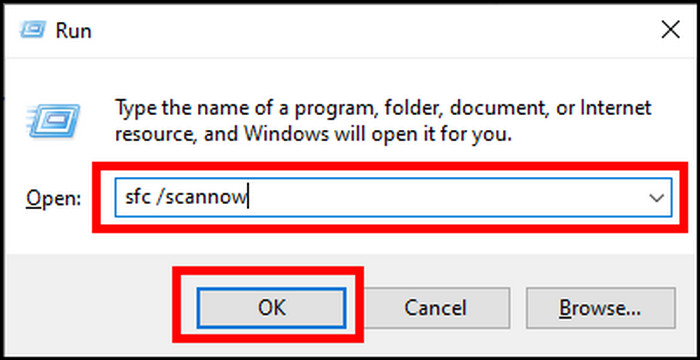
- Complete the scanning process.
Once the process is completed, reboot your computer and see if the issue is fixed for you.
15. Keep Programs Up to Date
Using outdated programs is common for stuttering in Windows 10. Old applications may be incompatible with your current system. Keeping them up to date is the best way to receive fluent and rich experience. If you have outdated programs, update them quickly.
Frequently Asked Questions
Why is my computer stuttering?
Your computer is stuttering because of outdated drivers, problematic hardware, application settings, internet speed, and temperature.
How to fix stuttering issues in Windows 10?
You can fix the stuttering issue in Windows 10 by installing new updates, disabling the wallpaper slider, updating drivers, resolving the power plans, and repairing the corrupted files.
Is stuttering caused by CPU or GPU?
Stuttering is generally caused by the CPU. But, GPUs can create stuttering when playing games.
Can motherboard cause stutter?
The motherboard doesn’t cause any stutter. But, it can create a stutter if the motherboard is physically damaged.
Conclusions
A smooth user experience is necessary for enjoying a game or software. But, a stuttering problem is enough to break your peaceful experience.
The issue is very annoying and leads to a bad user experience. If the problem continues for a long time, it can create rage and hamper your mental health.
In this article, I’ve provided the most effortless solutions to your problem and hope you’ve managed to resolve the issue.
Cheers!