A relationship may not complete you, but you can definitely complete the cells in Excel with AutoFill.
It can understand you, read your mind, and get along with you easily. But sometimes, it can give you pain, like your partner, by not doing as you desire.
But there’s nothing to get hurt because here, I’ll tell you the ways to fix the AutoFill and feel like it’s there for you.
So, let’s start.
How to Fix AutoFill Not Working in MS Excel
You need to turn on the fill handle tool to function the AutoFill feature in Excel. Additionally, selecting the automatic calculation mode, reapplying the AutoFill in sorted data, and unprotecting the spreadsheet will fix the AutoFill from not functioning.
The issues with AutoFill are very similar to fixing the Fill series from not functioning in Excel.
Also, there are additional ways to resolve the issue, and I’ve described them below.
Here are the procedures to fix the AutoFill not functioning issue in Microsoft Excel:
1. Enable the Fill Handle Tool
The fill handle tool helps the user autofill the selected cells with values or information. The option stays enabled by default in Microsoft Excel.
However, if you’ve disabled the fill handle tool before, you must turn on the option by following the steps below.
Read the following instructions to enable the fill handle tool in MS Excel:
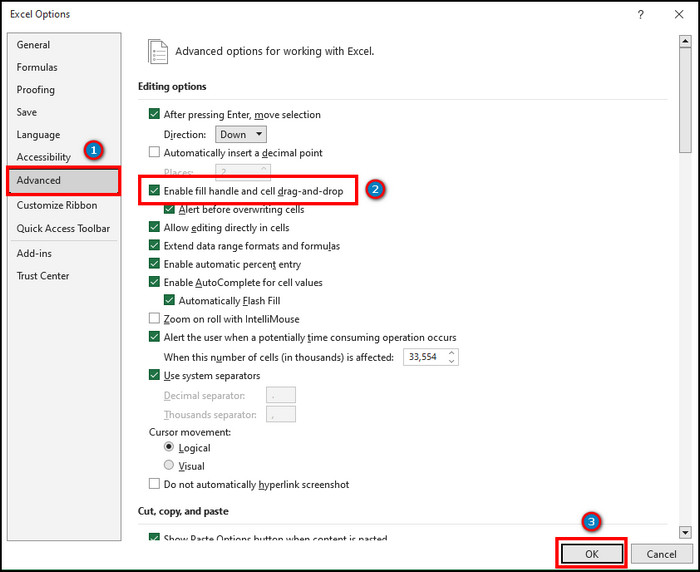
- Launch MS Excel and click on the File option.
- Press on Options and go to Advanced.
- Turn on the Enable fill handle and cell-drag-and-drop option.
- Click on OK to confirm the changes.
Once you’ve enabled the option, select the cell and check if the cursor is changing to fill handle tool icon.
Pull the fill handle tool and see the result. If it’s not providing an expected outcome, proceed to the next step to change the calculation mode.
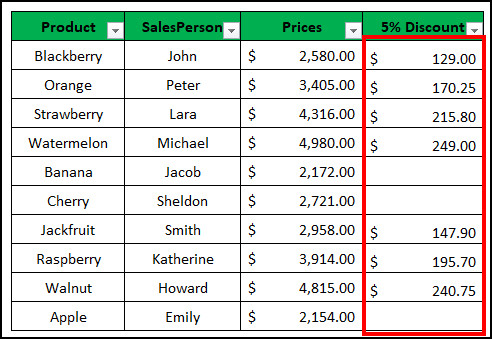
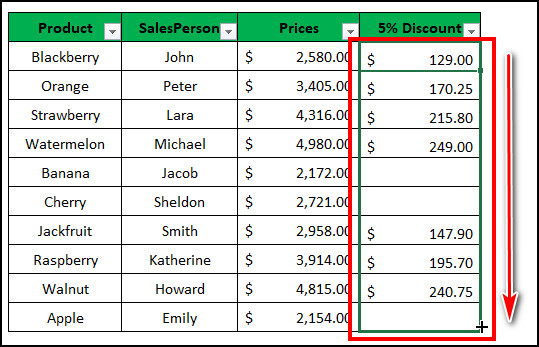
2. Choose Automatic Calculation Mode
Microsoft Excel uses auto and manual modes to calculate a formula. The manual method doesn’t provide an autofill feature and only gives results when you press the F9 button.
If AutoFill is copying cells instead of calculating the formula, change it to automatic using the instructions below.
Here’s how you can choose automatic calculation mode in MS Excel:
- Open the Excel application.
- Navigate to the Formulas from the ribbon.
- Press on the Calculations options.
- Select Automatic.
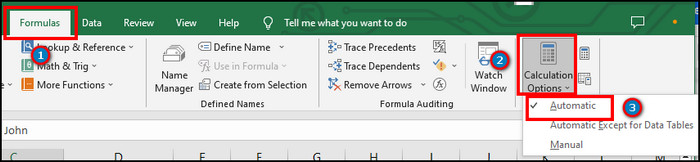
- Press on the cell and pull down the fill handle tool.
The AutoFill will instantly calculate your result and provide it to the selected cells. It can help to add the total row in an Excel table and calculate the outcome quickly.
3. Reapply AutoFill
The sort and filter options display the selected values in a data table. It hides the rest of the information and excludes them from the AutoFill function.
However, clearing the filter will leave a blank space, and the AutoFill will become incomplete.
You must reapply the AutoFill process to the selected cells to complete the series using the methods below.
Follow the procedures below to reapply the AutoFill function in Microsoft Excel:
- Click on the first cell with values.
- Pull down the fill handle tool.
The above process will reapply the fill handle tool and autofill the targeted cells.
4. Use the Fill Series
When you want to make a series of numbers, the AutoFill feature comes in handy. But after dragging the fill handle tool, it copies the selected cells instead of making a series.
Follow the procedures below to use the fill series to avoid repetition in your Excel sheet.
Here is the way to use fill series in Excel:
- Select the cell.
- Pull down the fill handle tool.
- Press on Auto Fill Options.
- Click on Fill Series.
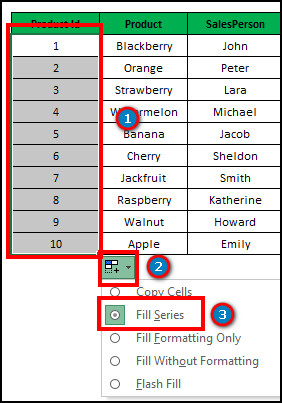
It will replace the previous repeated values and make a proper series of numbers.
5. Select Enough Information
If you have multiple values and need to make a series with the same difference, you must select enough information before using the fill handle tool.
Consider reading the process below to select sufficient information in Excel.
Read the following steps to select adequate information:
- Select the first two values.
- Drag the fill handle tool.
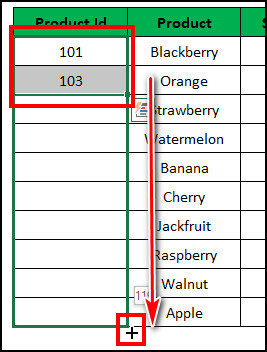
It will identify the pattern and return a result in the selected cells.
6. Unprotect Spreadsheet
A protected spreadsheet restricts the user from making any changes to the sheet.
If you’ve added password protection to your Excel sheet, you must remove it to use the AutoFill feature.
Follow the process below to remove the password protection from the Excel spreadsheet:
- Press on the Review tab from the ribbon.
- Click on Unprotect Sheet.
- Provide your information and press OK.
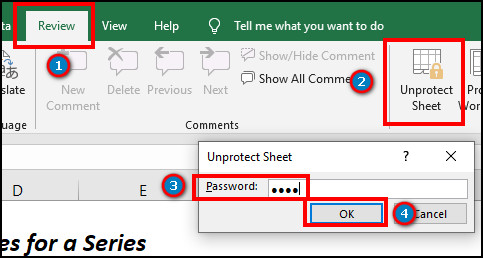
After unprotecting the sheet, you can apply the AutoFill process and move the rows and columns in Excel.
If you’re curious why the AutoFill isn’t functioning, continue reading the following passage to learn them in detail.
Why is the AutoFill Not Working on MS Excel?
The AutoFill feature isn’t functioning because the fill handle tool is turned off from the Excel settings. Also, you’ll face problems in working the AutoFill option if using manual calculation mode, sort & filter, password protection, and providing insufficient information.
The following passage will explain the causes and help you pinpoint your problem.
Read the following reason behind the AutoFill not functioning on MS Excel:
Disabled AutoFill
The common reason behind the fill handle not working is the disabled AutoFill feature.
Usually, the option stays turned on by default. But, if you’ve turned it off before, the AutoFill process won’t work in Microsoft Excel.
Using Manual Calculation Mode
The manual calculation mode in Excel doesn’t fill the selected series automatically. If you use the manual mode to calculate data, the AutoFill feature won’t work.
Using Sort & Filter
The sort and filter options hide the unselected information from the sheet. If you apply the AutoFill in the filtered data and later clear the filtering, the AutoFill won’t work on the whole series.
Inadequate Information
AutoFill needs multiple values to understand the pattern of a series. If you select a single cell and use the fill series option, it will copy and won’t work accurately.
Password Protected Sheet
Password protection limits unauthorized users from changing any data in a sheet. If you’ve enabled the protect sheet option, the AutoFill option won’t work.
I hope you’ve read the above reasons carefully and benefit while resolving the AutoFill feature.
Frequently Asked Questions
Why the AutoFill feature isn’t functioning in Microsoft Excel?
The AutoFill option isn’t functioning because it’s disabled from the settings.
How do I force AutoFill in Excel?
To force the AutoFill option in Excel, select the cell > Data > Flash Fill, or press Ctrl + E.
Wrapping Up
The AutoFill can ease your Excel experience by filling the cells quickly. But when the option fails to work, it can be troublesome.
This article has provided reasons and the necessary methods to resolve the functioning issue in Excel AutoFill.
If you’ve any queries, share them in the comment box below, and I’ll catch you at the next one.
Cheers!