Sometimes PC manufacturers limit the number of CPU cores an application can use. This can limit the maximum performance that a computer can provide you.
But this is not a fixed limitation. You can easily bypass it and get more performance from the same computer.
In this article, I will show you three ways how you can unpark your processor cores easily.
So, let’s start.
What is CPU Core Parking?
Core Parking is a feature that disables some processing cores on a CPU. The rest of the active cores are used whenever any instructions are executed. The disabled cores lay in a low-power state and are not used actively by the operating system.
This is mostly done to save energy. As lesser cores are used, less heat will be generated by the CPU. You will need smaller cooling solutions, and your fans will not spin hard to dissipate more heat. Thin and light laptops which focus on getting the longest battery life use this optimization.
But desktops do not need such power-saving measures, as they are plugged in all day long. If any cores are parked on a PC, all you are doing is losing performance, whether you are gaming or running productivity tasks.
So, how do you know if your processor has some cores parked?
The Resource Monitor program can show which cores are in hibernate state. These will appear as Parked as shown below.
But the good news is you can easily remove the CPU cores from the parking state. And the method shown in the next section will definitely work for both desktops and laptops.
In case you want a quick refresher on CPU cores and threads, go take a look at our separate article where we explain these.
How to Disable CPU Core Parking
To disable core parking, enable the High-Performance mode from the Power Options in Control Panel. You can also use any third-party software to do this or edit the values of registry entries using Registry Editor to achieve the same thing.
Do note that all the methods here will work for both Windows 10 and 11.
Here are the methods to disable parked cores in Windows:
1. Use the High-Performance Mode
The built-in power plans on Windows have predefined settings that allow you either run the computer in a low-power state or go all guns blazing.
When the High-Performance Mode is selected, all battery-saving optimizations are turned off. That means no more parked cores, and you get the full performance benefits.
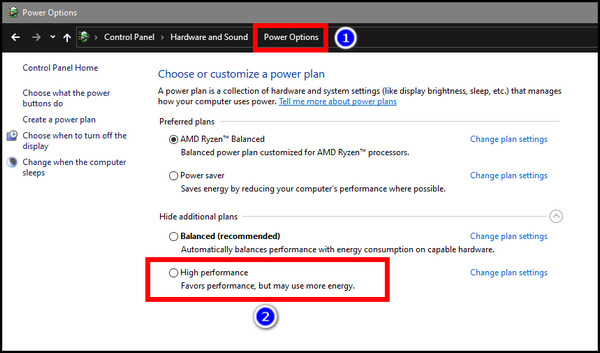
This is how you can set your computer to High Performance on Windows:
- Search Power from the Start Menu and open Choose a Power Plan. You will also find Power Options from the Control Panel and navigate from there.
- Select High Performance. Sometimes you need to expand Show additional plans, and then this shows up.
Now open Task Manager. You will see that all parked cores are now available to use.
Sometimes manufacturers deliberately lock up physical processing cores right from the BIOS. But you can unlock them easily. Check our separate guides for Windows 10 and Windows 11.
2. Use the Coderpack Core Unpark Utility
If you are not willing to fiddle with the Registry settings, the Core Unpack utility is for you. It has an easy-to-use UI, and by simply changing a slider, you can set the cores as unparked.
Let’s take a look at how.
Here are the steps to disable core CPU parking using the Core Unpark utility:
- Download Core Unpark and install it. You will need the .Net Framework version 4.5 or higher installed on your system. If you do not have that present visit the Microsoft website and install it.
- Open Core Unpark.
- Move the Core Parking Index slider all the way to Unparked. You can also click the Unpark All button.
- Press the Apply button when done.
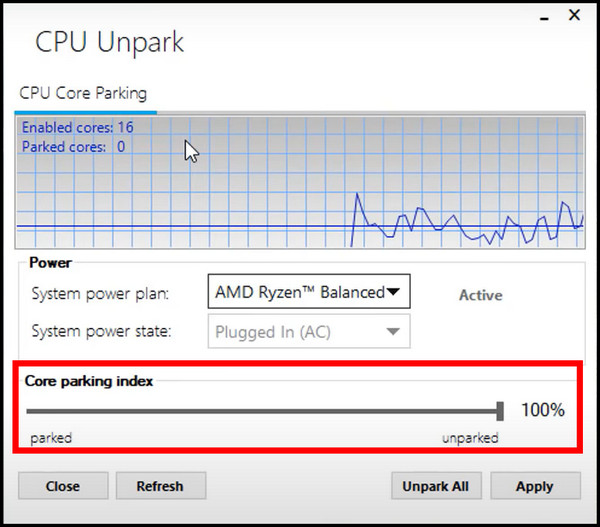
Now, reboot your computer. Now that all cores are unlocked go ahead and run a benchmark and see if this gives you a better performance.
3. Use Registry Editor
This method works for Windows 7,8,10, and 11. This allows all CPU cores to be available for utilization by an application. As you would have guessed, you are gaining performance by sacrificing power draw. So, keep that in mind if you are on a laptop.
Follow these steps to disable parked cores using Registry Editor:
- Press Win + R, type regedit, and press Enter.
- Expand the sections in the left pane and navigate to
HKEY_LOCAL_MACHINE\SYSTEM\CurrentControlSet\Control\Power\PowerSettings\54533251-82be-4824-96c1-47b60b740d00\0cc5b647-c1df-4637-891a-dec35c318583 - Find the ValueMax, right-click on it, and select Edit.
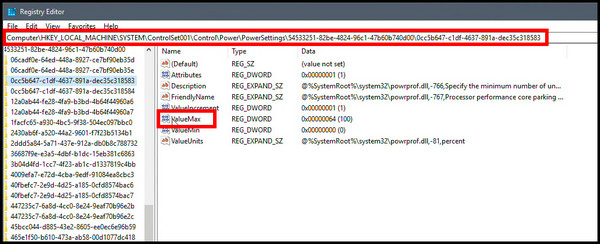
- Set the DWORD value to 0.
- Close the Registry Editor.
Now, if you open the Resource Manager, you won’t see any cores marked as parked.
Using a 6-core processor is common among PCs today. But do more cores give you better performance? Read our separate article, where we explore this scenario.
Frequently Asked Questions
Should I disable core parking?
Yes, you can disable core parking. This will make all the CPU cores available, and you will see an uplift in performance. An easy way to disable core parking is by selecting High Performance from your computer’s Power Plan.
Does disabling core parking improve performance?
Yes, if you disable core parking, this frees the parked cores from a sleep state. Then they can run the applications, and your overall system performance will improve.
Final Words
Disabling Core Parking is totally safe and ensures that your computer is ready to jet off when you need that extra power. Just ensure you are okay with loud fan noises.
For additional queries, feel free to comment below.
Goodbyes for now.