Adobe has integrated a new product service called Adobe Genuine Software Integrity Service to ensure its product legitimacy and prevent software piracy.
But you may receive an error message which shows The Adobe Software you are using is not genuine though you are using paid software license copies.

Don’t worry. You are not alone. Many users reported the same issue.
Even I have been in a similar situation as you, and I have been able to get out of this issue with proper tests and research. So, if you are looking for an ultimate solution to solve your Adobe service error issue on Windows 11, you are in the right place then.
Don’t skip any part as I will explain the process step by step.
So, let’s get started without further delay.
What is Adobe Genuine Software Integrity Service
If you want to learn about it in more detail, we have a detailed post explaining Adobe Genuine Software Integrity Service.
But many Adobe software users reported that they face an error message which shows The Adobe Software you are using is not genuine even though they have original or legitimate applications license on their computers.
In the following section, I will describe various the problem by disabling the Adobe Service.
How to Disable Adobe Genuine Software Integrity Service on Windows 11
Sometimes, the Adobe Service shows the error message on legitimate Adobe software users that is so frustrating and annoying for legit users.
However, you can ignore the error pop-up message or disable it permanently on your computer. There are many ways you can disable the service if you receive the error message.
Here are the methods to disable the Adobe Genuine Software Integrity Service on Windows 11:
1. Use Windows Services App
You can stop the Adobe Service on Windows 11 quickly by using Windows Services app.
Follow the steps below to stop the Adobe Genuine Software Integrity Service using Windows Services app:
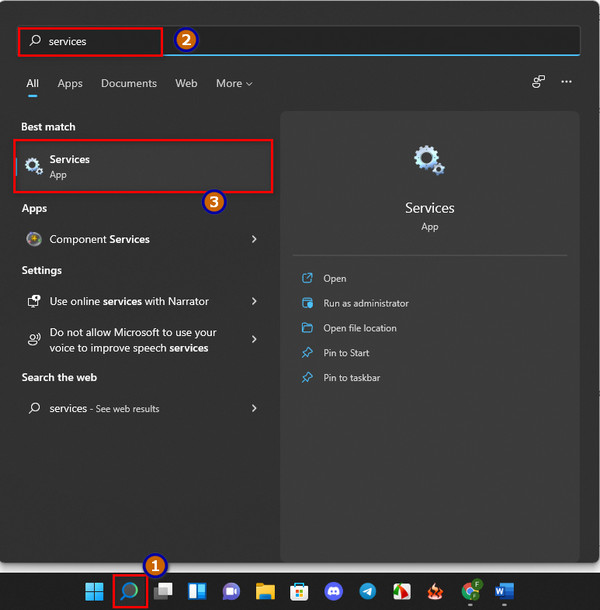
- Press Win+S keys on your keyboard to open the Windows Search panel, type services, and click on the search result or hit the Enter key to open the Windows Services.
- Find the Adobe Genuine Software Integrity Service.
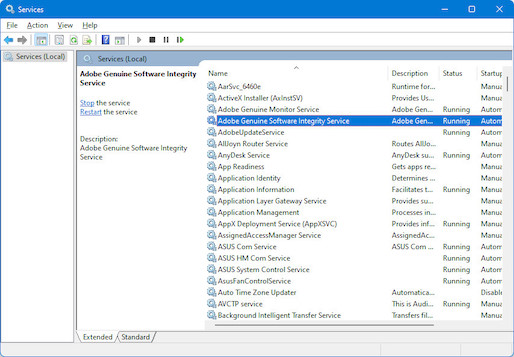
- Select the Adobe Genuine Software Integrity Service and hit the Enter key on your keyboard or double-click on it to open the Properties.
- Click on the Startup type drop-down menu.
- Select the Disabled option.
- Click on the Apply button to save the changes.

- Click on the OK button to exit the Properties window.
- Restart your computer.
Check to see whether your problem is solved. If not, try the next solution.
What is Windows Service?
Windows Services are programs that startup with the computer and continue in the background until it is shut down. NT services is another name for Windows Services, and it is a part of the Microsoft Windows operating system that allows you to create and manage long-running processes.
2. Use Task Manager
Another effective method to stop the Adobe Service on Windows 11 is using Task Manager.
To stop the issue permanently, you need to remove the AdobeGCIClient folder which contains the Adobe service.
Follow these steps to stop the Adobe ntegrity Service using the Task Manager:
- Press Ctrl+Shift+Esc keys on your keyboard to open the Windows Task Manager.
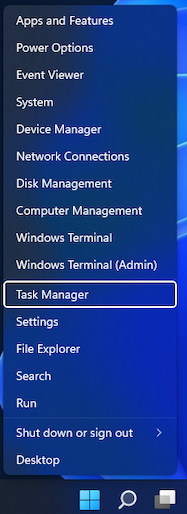
- Click on the More details button to extend the Task Manager if your task manager window is not expanded already.
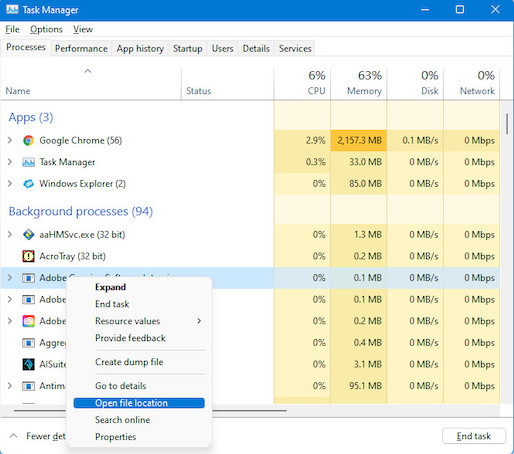
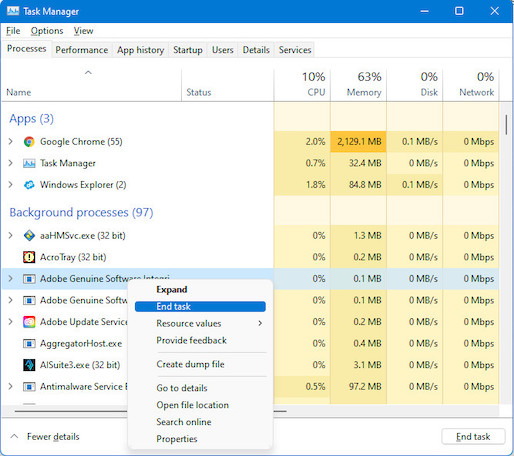
- Find and select the Adobe Genuine Software Integrity Service under the Processes.
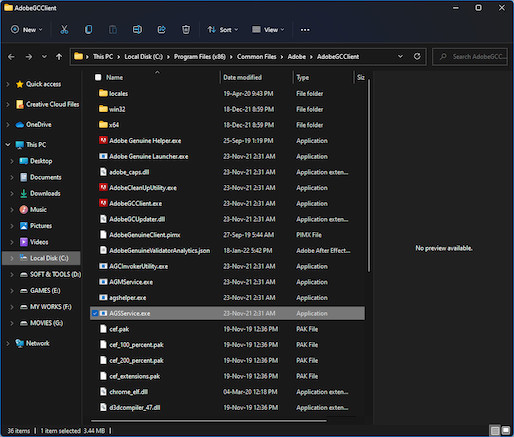
- Right-click on it and select the Open file location option to open the AdobeGCIClient.
- Minimize the AdobeGCIClient folder window after opening it and return to the Task Manager window.
- Right-click on Adobe Genuine Software Integrity Service and click on the End task button to stop the service.
- Return to the minimized AdobeGCIClient folder and delete the AdobeGCIClient folder.
- Restart your computer.
This should fix the problem since you have essentially deleted the Adobe service from your system.
3. Use Command Prompt
Executing a command using the Command Prompt is another effective way to stop the Adobe Genuine Software Integrity Service.
Follow these steps to stop the Adobe Integrity Service using the Command Prompt:
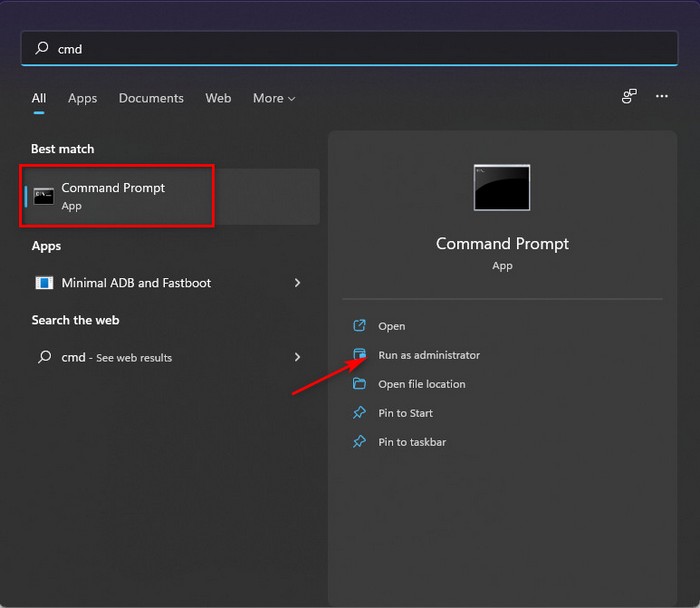
- Press Win+S on your keyboard to open the Windows Search bar and type cmd.
- Click on the Run as administrator to open the Command Prompt as an admin privilege.
- Enter the following command and press Enter: sc delete AGSService
- Go to the following path to delete the AdobeAdobeGCClient folder using File Explorer: C drive > Program Files(x86) > CommonFiles > Adobe.
- Restart your computer.
This will disable the Adobe service and you’ll get rid of the error message.
How to Stop Adobe Genuine Software Integrity Service on Mac
Are you using Adobe applications on Mac OS and facing the same problem?
Don’t worry. You can also stop the Adobe Integrity Service on your Mac device to solve the pop-up error issue.
Follow the steps below to stop the Adobe Genuine Software Integrity Service on your Mac OS:
- Click the Finder app at the bottom left side of the screen to open the Finder
- Select the Go option at the top of the menu panel.
- Choose Go to Folder option from the menu options.
- You won’t discover the Library folder in the current version, so click Go and type ~/library to get to it.
- Navigate to Application Support > Adobe > AdobeGCCClient
- Select and Delete the AdobeGCIClient folder.
Final Thoughts
Adobe Genuine Software Integrity Service is designed to determine pirated adobe software users and prevent them from using the application.
However, the Adobe Genuine Software Integrity Service occasionally displays an error message on legitimate Adobe software customers, which is highly unpleasant and annoying.
Here, I demonstrate some of the methods to stop the service.
I hope you found this post to be informative. If you found your solution, please let me know which method works for you.
You may also look at other posts if you’re interested in learning more about similar topics.


Dear Farhan Max. I did not find the folder in the specified path – AdobeGCCClient. Version Ventura 13.2.1
Please help me!
Thank you.
Hello andrey,
If you can’t find the “AdobeGCCClient” folder in the specified path for Ventura 13.2.1, check for hidden folders, verify alternative installation paths, consider reinstalling or repairing the Ventura software (Currently Sonomo v14.1.1), search for specific files, and consult official documentation or support for accurate information.
I have done all of this but the genuine service keeps reinstalling on Windows 11. Please help
Hello samuel, If the Adobe Genuine Integrity Service keeps reinstalling on Windows 11, you may need to take additional steps. First, ensure you’ve uninstalled any Adobe software and run the Adobe Creative Cloud Cleaner Tool. Then, navigate to the Task Scheduler and disable any tasks related to Adobe. Check your startup programs to prevent Adobe services from launching at boot. Lastly, search for and delete any remaining Adobe folders in Program Files and AppData. Restart your computer after these steps to prevent the service from reinstalling.