So your computer screen has gone black, and there is a line saying, “BIOS is updating LED firmware. Do not shut down or reset the system to prevent system bootup failure” or something similar. Now you are getting nervous, what to do?
I have been gaming on Asus motherboards and hardware for quite some time now, and I have faced the same issue and have seen some people talking about it. Luckily I have fixed the issue and helped some of my friends do so.
First of all, What is BIOS firmware update?
Black screen with BIOS is updating LED firmware issue is caused by various reasons, and the solution varies from user to user. So I will try discussing every possible way of solving your problem. Read till the end to try every possible solution if needed for your PC.
Check out my new post on SVM Mode In BIOS.
How to Fix BIOS Is Updating LED Firmware on ASUS Motherboard
There is no exact cause for this problem to show up, but one thing that is common for everyone is, it only happened to Asus motherboard users. If you keep your PC open in that state for about 42 minutes or so, then it usually starts and works just as fine. But that’s a hassle.
It can be caused by not successfully updating the BIOS, changing BIOS settings, adding an LED strip to your PC, or even it can happen out of nowhere. As the issue occurs from nuisance causes, it’s solves are also simple and a little odd.
Also, check out our separate post on will SSD reduce high disk usage.
Here are the methods to fix led firmware updates in BIOS:
1. Reset Your CMOS
Resetting the CMOS of the PC works for some users. Resetting the CMOS technically means resetting your BIOS settings to default. You can do this in three different ways.
You may ask:
How to remove the CMOS Battery correctly?
Also check our exclusive tutorial on can SSD Improve FPS.
Follow these steps to reset your CMOS by disconnecting the battery:
- Shut down and unplug your computer from the mainboard.
- Open up your computer case and locate the circular battery on your motherboard.
- Remove the battery using a screwdriver or some similar object.
- Rest for about 5 minutes.
- Put the battery in its place again and close up your computer case.
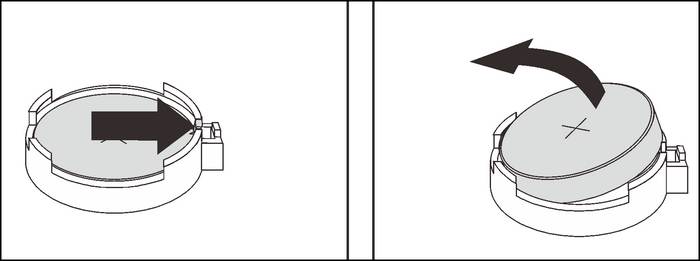
It will reset your CMOS settings to default.
Follow our guide to fixing GPU not Detected in BIOS.
Some motherboards have a dedicated CMOS reset button, and the button can be on your main motherboard or at the back of your motherboard. First of all, turn your computer off and find the CMOS reset button. Press and hold the button for 10 to 15 seconds. This will reset your CMOS to the default settings.
Have some time to spare? Check out our latest fix for BIOS Not Detecting USB.
3. Shorten the CMOS Jumper
In case if you do not have a CMOS reset button and removing the battery did not work for you too. Then you can short the CMOS jumper on your motherboard.
Follow these steps to short CMOS jumper:
- Turn off your computer and plug out all the cables connecting to your computer.
- Open your computer case and look for small two pins saying CLR_CMOS or something similar.
- Find a screwdriver tip or a metal nut or anything small conductive.
- Connect the two pins with the screwdriver to short them.
- Hold the screwdriver connected with the two pins for 10 to 15 seconds.
It will reset your CMOS, and you should be good to go.
4. Reinstall ASUS AURA
This problem happened with Asus users explicitly. Reinstalling the AURA software has shown results for some users.
Follow the steps to reinstall AURA:
- When booting up, do not go to BIOS. Instead, wait for the PC to turn on. It may take 42 to 45 minutes.
- Uninstall AURA from your computer.
- Download utility drivers for your motherboard also download AURA. You can find them on Asus’s official website.
- Reinstall AURA and setup as usual.
- Make sure to restart when prompted.
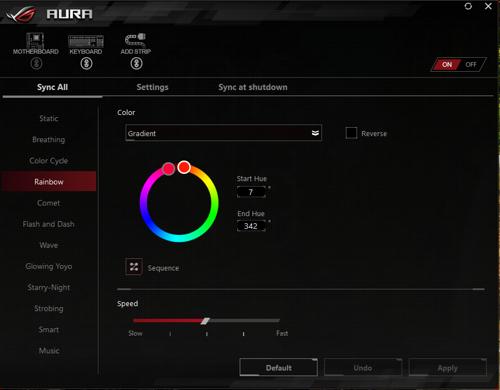
Reinstalling the software should fix the issue. If it doesn’t, then try out the next fix.
5. Disconnect Every Cable
This might sound odd, but giving your computer a day off might fix the problem. Yes, you are reading it right.
You can do the following:
- Turn off your computer, pull out all the cables, including keyboard and mouse cables, unplug the power supply and keep it that way for 8 to 10 hours. Just a simple workday off for the computer.
- If you just installed something new to your computer, such as an RGB LED strip or fan, then try removing it and booting your computer. Sometimes these small gadgets cause problems.
These should fix the ongoing issue on your computer, and if not, there is another fix here you may try out.
6. Update BIOS
If you google the issue, you will find that this problem only happened to the Asus users. So what you can do is look out at their website for the latest BIOS update for your motherboard, and updating your BIOS should fix the problem.
Here are some ways for updating BIOS:
Method 1. Through Windows Operating System
Before updating the BIOS, you need to check the motherboard serial number, and don’t forget to check the current BIOS version you are running. Check out which system type you are running on; is it 64 bit or 32 bit.
Then simply go to Asus’s official website and lookup for your motherboard number and BIOS update. If you find any updated BIOS version for your motherboard, download it. If it is software, you can run then open the application and follow the on-screen steps.
Note: Make sure you have a proper power connection, and no outage occurs during the BIOS update, or your motherboard may get damaged in the process.
Method 2. Updating Using An USB Flash Drive
If the downloaded file from the website is not software, you need to update the BIOS using a USB flash drive manually. In this case, all you need to do is have a bootable USB flash drive and software named Rufus.
Here are the steps to follow:
- Plugin the USB drive to your computer and use Rufus to format it in FAT32 and create a bootable disk of the BIOS update file in it.
- Restart the computer to run from the bootable device.
- Select the bootable drive to boot the system from it.
- A command prompt window will appear. Type C: and press Enter.
- Type dir to list the files on the flash drive.
- Now type the exact filename of the BIOS update executable file you copied, e.g., Q5WV1113.exe, and hit Enter. If you copied the zip folder files, type autoexec.bat and hit Enter.
- Follow the on-screen commands accordingly, and Do not turn off your computer during the update process. And your BIOS update should be done.
For most cases, following these methods should fix your issues.
Final Words
It is a manufacturing issue, so Asus will come up with an update to fix this issue, and newer motherboards should not have this problem. If you have trouble with any of the procedures mentioned above, feel free to let us know, and we will help you in any way we can.