Microsoft Word is the ultimate tool to fulfill your writing requirements. It offers almost every possible function for a better user experience, except the ability to add a new font directly to Word documents.
Word has a ton of pre-installed fonts to choose from. However, you may need to add a font to your Word file to make the document more visually satisfying and appealing.
Though Word doesn’t have any option to add a font to the Word font list, you can install any font on your device and use them on Microsoft Word.
In this guide, I will walk you through the steps to installing or removing a new font for Word and other MS Office applications.
Tag Along!
How to Add Fonts to Microsoft Word on Windows
Adding fonts to MS Word is very straightforward. There are several ways to install fonts. On Windows, you can directly install a font by right-clicking on it, or you can use your Windows settings.
There are two types of font files; one of them is TrueType (.ttf), and the other one is OpenType (.otf). You can download font files from numerous websites, including Google Fonts, DaFont, or FontSpace.
Many more websites also offer a vast list of font collections. Before downloading any font, ensure the site is trusted; otherwise, you can download a file that contains viruses and malware.
After downloading the fonts, unzip the font folder if the folder is zipped. Now follow the below instructions to install the fonts on your system directly.
Also, check out our separate post on how to Fix: Microsoft Word Table Of Contents Not Updating.
1. Install Fonts Using the Installer
Use the basic installer to install any font for word or other Office applications. Go through the subsequent instructions to successfully install a fond with the installer.
Here are the steps to install fonts using the installer:
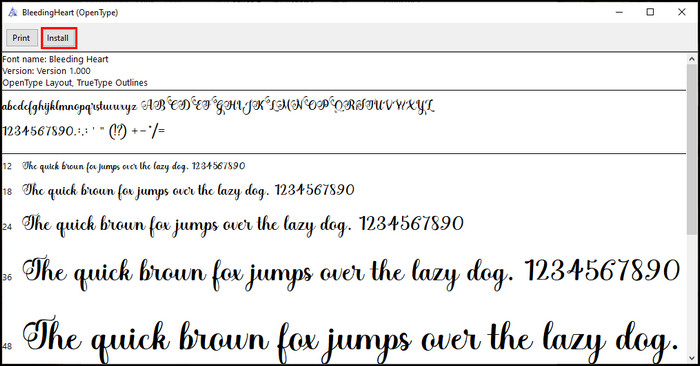
- Open the File Explorer by pressing the Windows + E keys.
- Go to the folder where you stored the font files.
- Double-click on the font file.
- Click on the Install button.
After successfully installing the font, you can now access the font on your MS Word application along with other Office apps. Install each font individually to access additional styles of a font family.
2. Install Fonts Using Settings
You can also use the Settings of Windows to install a font. The process is almost similar for Windows 10, 7, & 8. Follow the following methods to install fonts using Settings.
Here are the methods to install fonts using Settings:
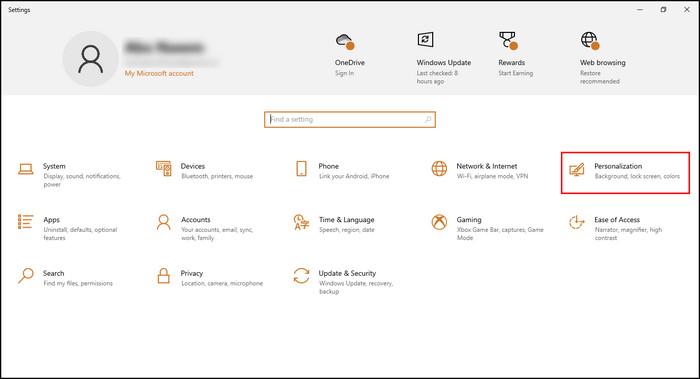
- Open Settings by pressing the Windows + I keys.
- Click on Personalization.
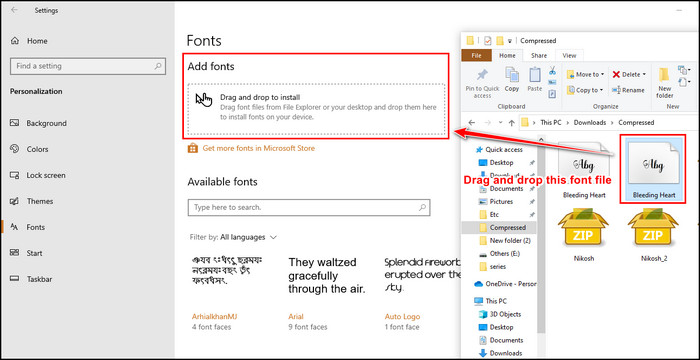
- Switch to the Fonts tab from the left pane.
- Select your fonts. Drag and drop them into the Add fonts box.
Following the above steps will install your fonts on your device, instantly available within any Office application, including MS Word.
You can also search for fonts in the Microsoft Store and install them directly on your computer from the Get more fonts in Microsoft Store option. 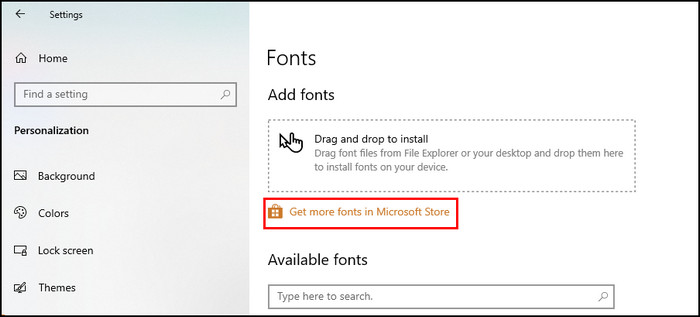
Also, check out our separate post on how to Unlock Selection in Word.
If you have multiple users on your computer, you can install fonts using the context menu to limit the access to who can use the specific font. The instructions below show you how to install fonts using the context menu.
Here are the ways to install fonts using the context menu:
- Launch the File Explorer.
- Navigate to the font folder.
- Right-click on the font file.
- Select Install to install the font only for your account. You can also select the Install for all users option to install the font for all user’s accounts.
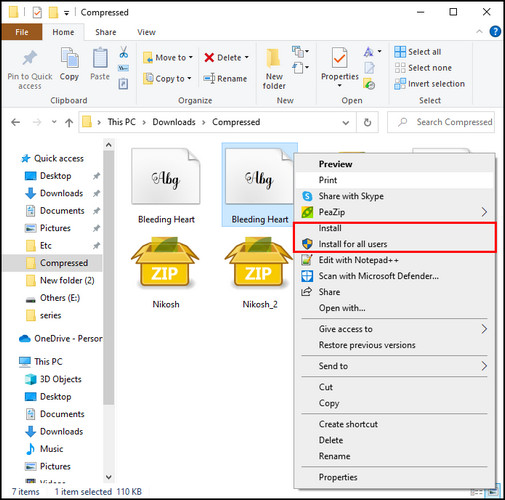
Installing the font with the context menu will immediately install your fonts on your computer. And the font can be used by every user if you choose the Install for all users option when installing the font.
After completing the installation, your font will be ready to use on MS Word and other Office applications. It is also possible to add fonts on your Mac devices. Keep reading the following to install fonts on your Mac successfully.
How to Install Fonts to MS Word on Mac
Installing fonts to Mac is super simple; download your desired fonts from any trusted site and unzip the file. After unzipping, place the file in a folder and follow the instructions below to install fonts on your Mac.
Here are the steps to install fonts to MS Word on Mac:
- Navigate to the folder where you stored the font files.
- Open the file by double-clicking on it.
- Wait for the Font Preview window to appear.
- Click Install Font from the bottom-right corner.
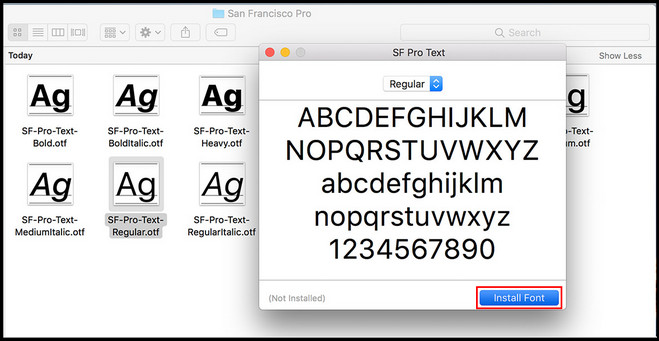
That will successfully install the font on your Mac device. It will be available on MS Word and other applications.
There are also some font manager applications for better managing your fonts on Mac. Font Book is one of them. In case you use Microsoft Word Online, you can easily add any fonts to MS Word. To learn more, keep reading.
Also, check out our separate post on how to Fix: Find and Replace Not Working On Microsoft Word.
How to Add Fonts to Word Online
You can use your device fonts for the Word online version. To use any font in the Word web version, first install the font on your device by following the previous methods.
Quick Note: When installing a new font on your device, ensure the Word Online is closed. If you install the font while Word Online is running, you may not be able to see the font on the Word font list.
The instructions below will help you use any font for Word Online. Just type the font’s name in the font name box to use the desired font.
Here are the steps to add fonts to Word Online:
- Install the font on your device while Word Online is closed.
- Launch Microsoft Word Online on your web browser.
- Select the Font tab from the top toolbar.
- Type the font name in the display box.
- Press the Enter button to apply the font for your current document.
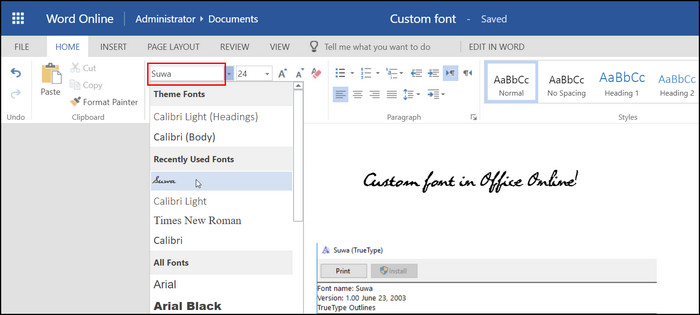
Following the above steps, you can quickly use any preferred font for your Word document or as a part of your Word file’s text.
How to Embed Fonts in a Microsoft Word Document
When you use a less popular font style for your word file and share it with someone, there is an excellent chance that they will not be able to see the font on their device if they don’t have the specific font installed.
To avoid this unwanted situation, you can embed the font with your word file, so the receiver can easily enjoy the doc with your favorite font. Follow the instructions below to embed a fond within the word file.
Here are the methods to embed a font within the Word file:
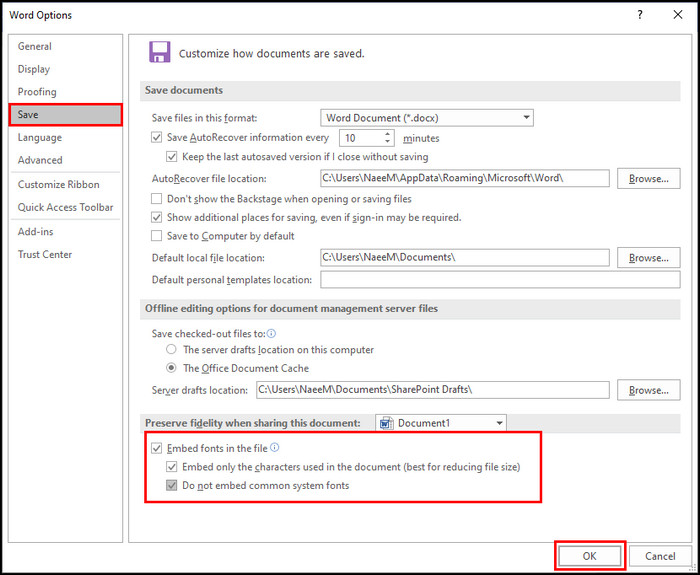
- Open the Word document.
- Navigate to File > Options.
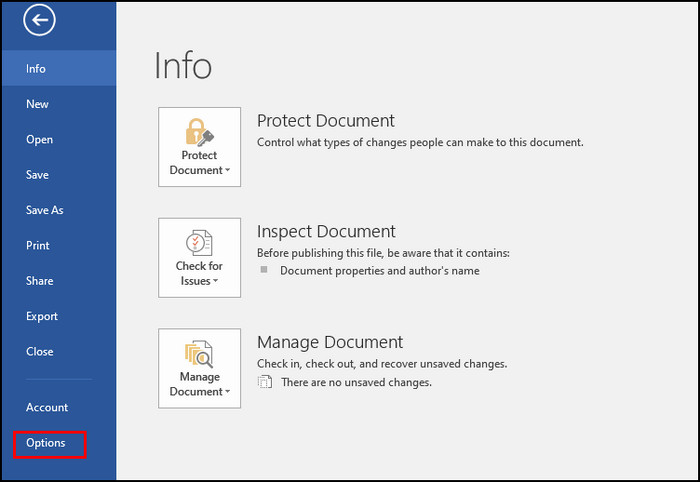
- Switch to the Save tab from the Word Options menu.
- Tick the checkbox next to Embed fonts in the file under Preserve fidelity when sharing this document: section.
- Check the checkbox next to Embed only the characters used in the document to reduce the file size.
- Keep the Do not embed common system fonts checked to reduce the file size further.
- Click OK to save the changes.
The above process will embed the essential font styles within the Word document, and anyone from any device can easily read the document with the embedded fonts.
Here’s a complete guide on how to Make a Resume in Word.
Frequently Asked Questions
How do I import a font into Word?
You can import a font into Word by installing the font on your device. Right-click on the font file you want to import and click Install. After the installation, launch Word and search by the font name and select it to use for your document.
How do I remove fonts from Word?
In Windows, navigate to Control Panel > Fonts. Search for the font name, then choose the font you want to remove. Select the Delete button and click Yes to successfully remove the font.
Why does the font change in Word?
When you use a font installed on your device, and then you open the same document with another device that doesn’t have the same font installed. The MS Word will automatically change the font for the missing one.
A Final Thought
Though you will find a considerable pre-installed font collection in Microsoft Word or other programs, you can efficiently add various fonts to enhance the quality and looks of your documents.
While adding a new font to your Word document, remember that the document with not be able to show the fonts appropriately on other devices that don’t have the same font installed. In that case, embed your fonts with the document.
In this article, I have covered all the possible ways to download, install and use any fonts in your Word document. Do you have any additional queries? Mention them in the below comment section.